1. Introduction
This manual provides detailed instructions for the installation, operation, and maintenance of your Yantinos NJ-AOXIONG AX-HB02 Electric Scooter Dashboard Meter. This meter is designed for electric scooters, supporting both 36V and 48V systems with a 6-pin connector. Please read this manual thoroughly before use to ensure proper function and safety.
2. Safety Information
- Always ensure the scooter's power is off before installing or removing the dashboard meter.
- Do not attempt to modify the meter's internal components. Unauthorized modifications can lead to damage and void the warranty.
- Keep the meter dry and away from extreme temperatures.
- If you encounter any issues, refer to the troubleshooting section or contact support.
3. Product Overview
The NJ-AOXIONG AX-HB02 dashboard meter provides essential information for your electric scooter. It features a clear display, control buttons, and a durable housing.
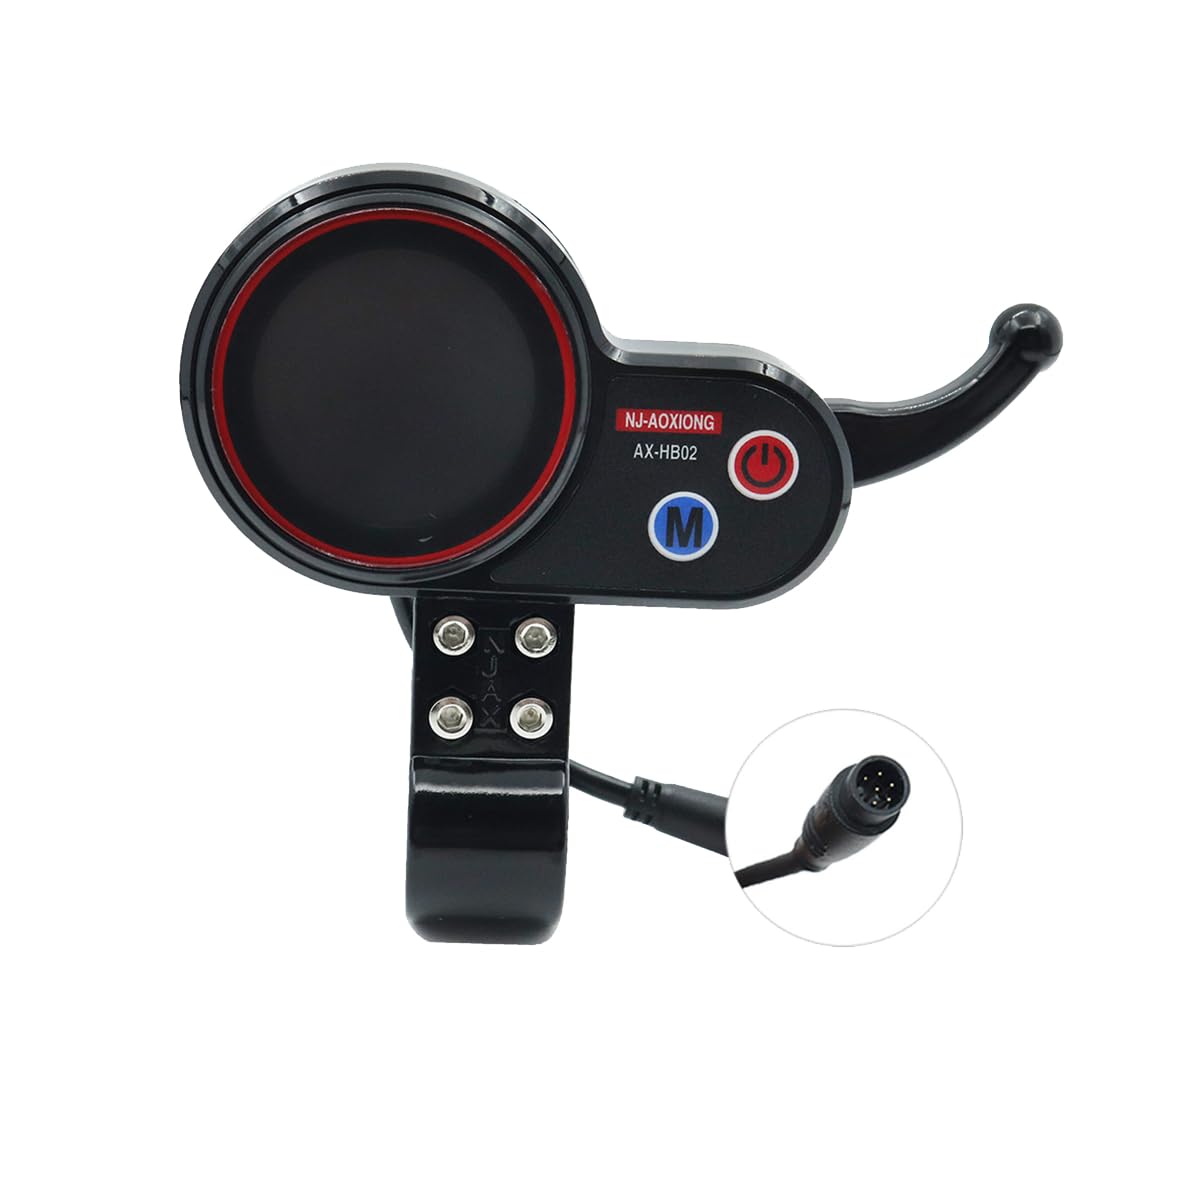
Figure 3.1: Front view of the AX-HB02 Dashboard Meter.
The meter is designed for easy integration with compatible electric scooters. It includes a 6-pin connector for secure and reliable electrical connection.

Figure 3.2: Detailed front view highlighting voltage and pin configuration.

Figure 3.3: Angled view of the meter, showing display and buttons.
4. Specifications
| Feature | Detail |
|---|---|
| Model | NJ-AOXIONG AX-HB02 |
| Voltage Compatibility | 36V / 48V (Adjustable) |
| Connector Type | 6-Pin |
| Material | Durable Material (Product description mentions plastic, specifications mention metal) |
| Color | Black |
| Manufacturer Part Number | YTS-B2CC63F934BB3F56102E4816CECAF9EA |
5. Setup and Installation
Follow these steps to properly install the dashboard meter on your electric scooter:
- Power Off: Ensure your electric scooter is completely powered off and the battery is disconnected before beginning installation.
- Mounting: Position the dashboard meter on the handlebar in a location that provides clear visibility and easy access to the controls. Use the integrated clamp to secure it firmly.
- Connect Wiring: Locate the corresponding 6-pin connector on your scooter's wiring harness. Carefully align and connect the meter's 6-pin cable to the scooter's harness. Ensure a snug and secure connection.
- Cable Management: Route the cable neatly along the scooter's frame, securing it with cable ties if necessary, to prevent interference with moving parts or accidental damage.
- Power On: Reconnect the scooter's battery and power on the scooter. The dashboard meter should illuminate and display information.

Figure 5.1: The dashboard meter ready for installation on a scooter.
6. Operating Instructions
Once installed, the AX-HB02 meter is straightforward to operate:
- Power Button: Press the power button (usually marked with a power symbol) to turn the meter on or off.
- Mode Button: Use the mode button (often marked with 'M') to cycle through different display modes, such as speed, battery level, trip distance, and total mileage.
- Voltage Adjustment: The meter is compatible with both 36V and 48V systems. Refer to your scooter's specific controller settings or the meter's advanced settings (if available) to ensure the correct voltage is selected for accurate readings. This adjustment is typically done through a sequence of button presses or via a dedicated setting menu.
- Throttle Control: The integrated throttle lever allows for speed control. Gently press the lever to accelerate.

Figure 6.1: The dashboard meter in use while riding an electric scooter.
7. Maintenance
To ensure the longevity and optimal performance of your dashboard meter, follow these maintenance guidelines:
- Cleaning: Wipe the display and housing with a soft, damp cloth. Do not use abrasive cleaners or solvents, as these can damage the screen or plastic.
- Inspection: Periodically check the wiring and connectors for any signs of wear, fraying, or loose connections. Ensure the meter is securely mounted to the handlebar.
- Storage: When not in use for extended periods, store the scooter and meter in a dry, cool place, away from direct sunlight and extreme temperatures.
8. Troubleshooting
| Problem | Possible Cause | Solution |
|---|---|---|
| Meter does not power on. | No power from scooter; loose connection; faulty meter. | Check scooter battery and power supply. Ensure 6-pin connector is securely attached. If problem persists, contact support. |
| Incorrect speed/distance readings. | Incorrect voltage setting; sensor issue. | Verify the meter's voltage setting matches your scooter (36V or 48V). Check scooter's speed sensor connection. |
| Display is dim or flickering. | Low battery; loose connection; environmental factors. | Charge scooter battery. Check all connections. Ensure meter is not exposed to extreme temperatures. |
9. Warranty and Support
This product is manufactured by Generic. For warranty information or technical support, please refer to the retailer where the product was purchased. Keep your proof of purchase for any warranty claims.
For further assistance, you may contact the seller, Yantinos, through the platform where the purchase was made.