1. Introduction
This manual provides essential information for the safe and effective operation, setup, and maintenance of your INGCO ENCO ING-MMA1302 130 Amp Inverter IGBT Welding Machine. Please read this manual thoroughly before using the machine to ensure proper function and to prevent injury or damage. Keep this manual for future reference.
2. Safety Instructions
Welding operations involve significant risks. Always adhere to the following safety precautions to prevent electric shock, fire, burns, and other serious injuries.
- Personal Protective Equipment (PPE): Always wear a welding helmet with appropriate shade, flame-resistant clothing, welding gloves, and safety shoes.
- Ventilation: Ensure adequate ventilation to remove welding fumes, which can be hazardous to health. Work in a well-ventilated area or use fume extraction equipment.
- Electrical Safety: Never operate the welder in wet conditions. Ensure all cables are in good condition and properly connected. Do not touch live electrical parts.
- Fire Prevention: Keep flammable materials away from the welding area. Have a fire extinguisher readily available. Welding sparks can travel.
- Work Area: Keep the work area clean and free of clutter. Ensure stable footing.
- Eye Protection: Arc rays can cause severe eye damage. Never look at the welding arc without proper eye protection.
- Grounding: Always ensure the workpiece is properly grounded.
3. Package Contents
Upon unpacking, verify that all items are present and undamaged:
- INGCO ENCO ING-MMA1302 Welding Machine
- Electric Holder with Cable
- Ground Clamp with Cable
- Wire Brush
- Welding Helmet (basic)
- User Manual (this document)
4. Product Overview
Familiarize yourself with the components of your welding machine.

Figure 4.1: INGCO ENCO ING-MMA1302 Welding Machine with electrode holder, ground clamp, and wire brush.
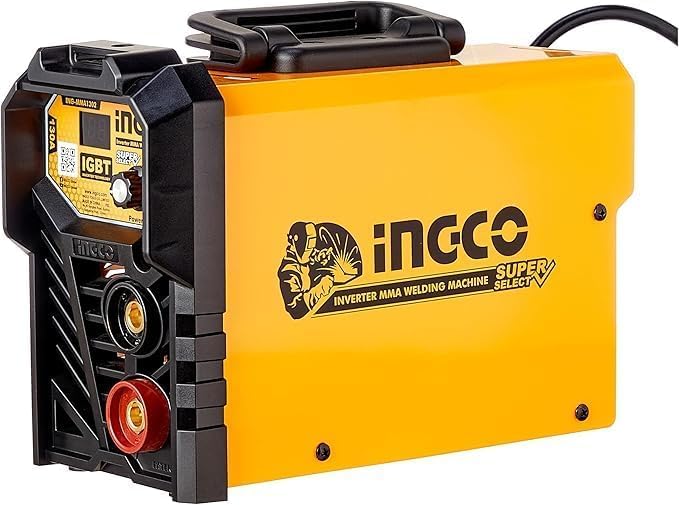
Figure 4.2: Front panel showing the current adjustment knob, LCD display, and cable connectors.
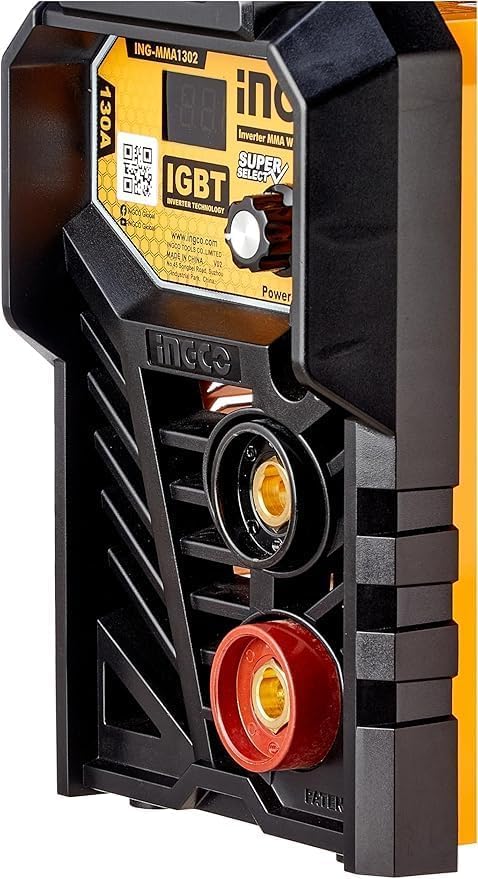
Figure 4.3: Detailed view of the front panel, highlighting the 130A rating, IGBT technology, and power indicator.
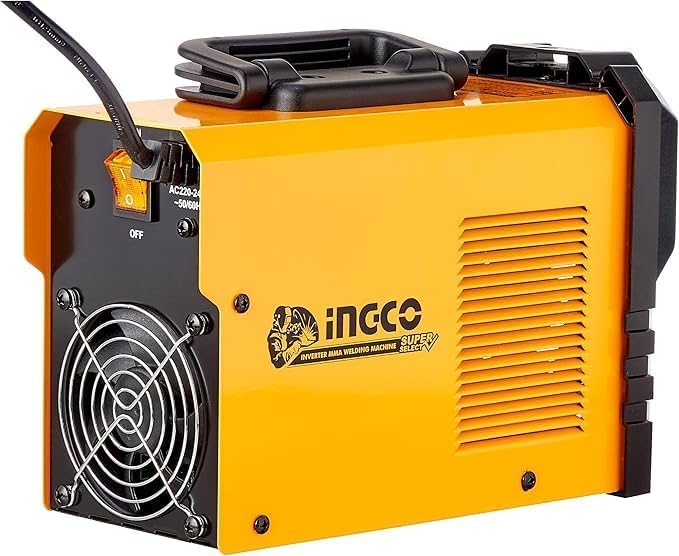
Figure 4.4: Rear panel showing the cooling fan, power switch, and power input cable.
Front Panel Features:
- LCD Display: Shows the welding current (Amps).
- Current Adjustment Knob: Used to set the desired welding current (15-130A).
- Positive (+) Connector: For connecting the electrode holder cable.
- Negative (-) Connector: For connecting the ground clamp cable.
- Power/Overheat Indicator: Lights up to indicate power on or an overheat condition.
Rear Panel Features:
- Power Switch: Turns the machine ON/OFF.
- Cooling Fan: Provides necessary cooling during operation.
- Power Input Cable: Connects the machine to the main power supply.
5. Setup
Follow these steps to prepare your welding machine for operation:
- Connect Ground Clamp: Insert the ground clamp cable connector into the negative (-) terminal on the front panel and twist to secure. Attach the ground clamp firmly to the workpiece or a clean, bare metal part of the welding table.
- Connect Electrode Holder: Insert the electrode holder cable connector into the positive (+) terminal on the front panel and twist to secure.
- Insert Electrode: Open the jaws of the electrode holder and securely insert the welding electrode. Ensure good electrical contact.
- Power Connection: Ensure the power switch on the rear panel is in the 'OFF' position. Plug the machine's power cable into a suitable 220-240V, 50/60Hz power outlet.
- Ventilation Check: Confirm that the welding area is well-ventilated.
6. Operating Instructions
Once setup is complete, you can begin welding.
- Power On: Flip the power switch on the rear panel to the 'ON' position. The LCD display on the front panel should illuminate.
- Adjust Current: Use the current adjustment knob to set the desired welding amperage. The recommended current depends on the electrode diameter and material thickness. Refer to electrode manufacturer guidelines. The machine operates within a 15-130A range.
- Arc Striking: With your welding helmet on, gently scratch or tap the electrode against the workpiece to strike an arc. Once the arc is established, maintain a consistent arc length.
- Welding: Move the electrode along the joint at a steady pace, maintaining the arc. Observe the weld pool and adjust your speed and angle as needed.
- Duty Cycle: The ING-MMA1302 has a duty cycle of 30% at 130A. This means it can weld continuously for 3 minutes out of every 10-minute period at maximum current. Exceeding the duty cycle will activate the thermal overload protection, and the machine will temporarily shut down to cool. Allow it to cool before resuming operation.
- Power Off: After welding, turn the power switch to 'OFF'. Disconnect the machine from the power outlet.
7. Maintenance
Regular maintenance ensures the longevity and safe operation of your welding machine.
- Cleaning: Periodically clean the cooling fan and ventilation openings to prevent dust buildup, which can hinder cooling. Use compressed air to blow out dust from inside the machine (ensure power is disconnected).
- Cable Inspection: Regularly inspect all cables (power, electrode holder, ground clamp) for cuts, fraying, or damaged insulation. Replace damaged cables immediately.
- Connector Check: Ensure all cable connectors are clean and securely fastened. Loose connections can cause overheating and poor performance.
- Storage: Store the welding machine in a clean, dry, and dust-free environment when not in use.
8. Troubleshooting
Refer to this section for common issues and their solutions.
| Problem | Possible Cause | Solution |
|---|---|---|
| Machine does not power on | No power from outlet; Power switch off; Internal fuse blown | Check power outlet; Ensure power switch is ON; Contact qualified service personnel for fuse replacement. |
| No welding arc or weak arc | Poor ground connection; Incorrect current setting; Damp electrode; Damaged cables | Ensure ground clamp is on clean metal; Adjust current; Use dry electrodes; Inspect and replace damaged cables. |
| Machine stops during welding (overheat protection) | Exceeded duty cycle; Insufficient ventilation; High ambient temperature | Allow machine to cool down; Ensure proper ventilation; Reduce welding time or current. |
| Excessive spatter | Current too high; Incorrect arc length; Damp electrode | Reduce current; Adjust arc length; Use dry electrodes. |
9. Specifications
| Model | ING-MMA1302 |
| Input Voltage | 220-240V |
| Frequency | 50/60Hz |
| Maximum External Current | 130A |
| Current Range | 15-130A |
| Duty Cycle | 130A at 30% |
| No-Load Voltage | 75V |
| Technology | IGBT Inverter |
| Display | LCD Display |
| Product Dimensions | 10 x 20 x 37 cm |
| Item Weight | 209 g |
| Power Source Type | Electrical |
| Country of Origin | China |
10. Warranty and Support
This INGCO ENCO ING-MMA1302 Welding Machine comes with a 6 Months Warranty Card. Please retain your proof of purchase for warranty claims.
For technical support, service, or warranty inquiries, please contact your retailer or the authorized service center. Refer to the warranty card for specific contact details.