1. Introduction
Thank you for choosing the DITOSH 2-in-1 Electric Moka Pot Espresso Maker with Milk Frother. This appliance is designed to provide a convenient way to prepare espresso and frothed milk for various coffee beverages. Please read this manual thoroughly before first use to ensure proper operation, maintenance, and safety.
2. Safety Instructions
- Read all instructions before using the appliance.
- Do not immerse the base unit, cord, or plug in water or other liquids.
- Close supervision is necessary when any appliance is used by or near children.
- Unplug from outlet when not in use and before cleaning. Allow to cool before putting on or taking off parts, and before cleaning the appliance.
- Do not operate any appliance with a damaged cord or plug, or after the appliance malfunctions or has been damaged in any manner.
- The use of accessory attachments not recommended by the appliance manufacturer may result in fire, electric shock, or injury to persons.
- Do not use outdoors.
- Do not let the cord hang over the edge of a table or counter, or touch hot surfaces.
- Do not place on or near a hot gas or electric burner, or in a heated oven.
- Always attach plug to appliance first, then plug cord into the wall outlet. To disconnect, turn any control to 'off', then remove plug from wall outlet.
- Do not use appliance for other than intended use.
- Exercise extreme caution when disposing of hot steam.
- The appliance is for household use only.
3. Product Overview and Components
The DITOSH 2-in-1 Electric Moka Pot combines an espresso maker and a milk frother on a single base for convenient beverage preparation.
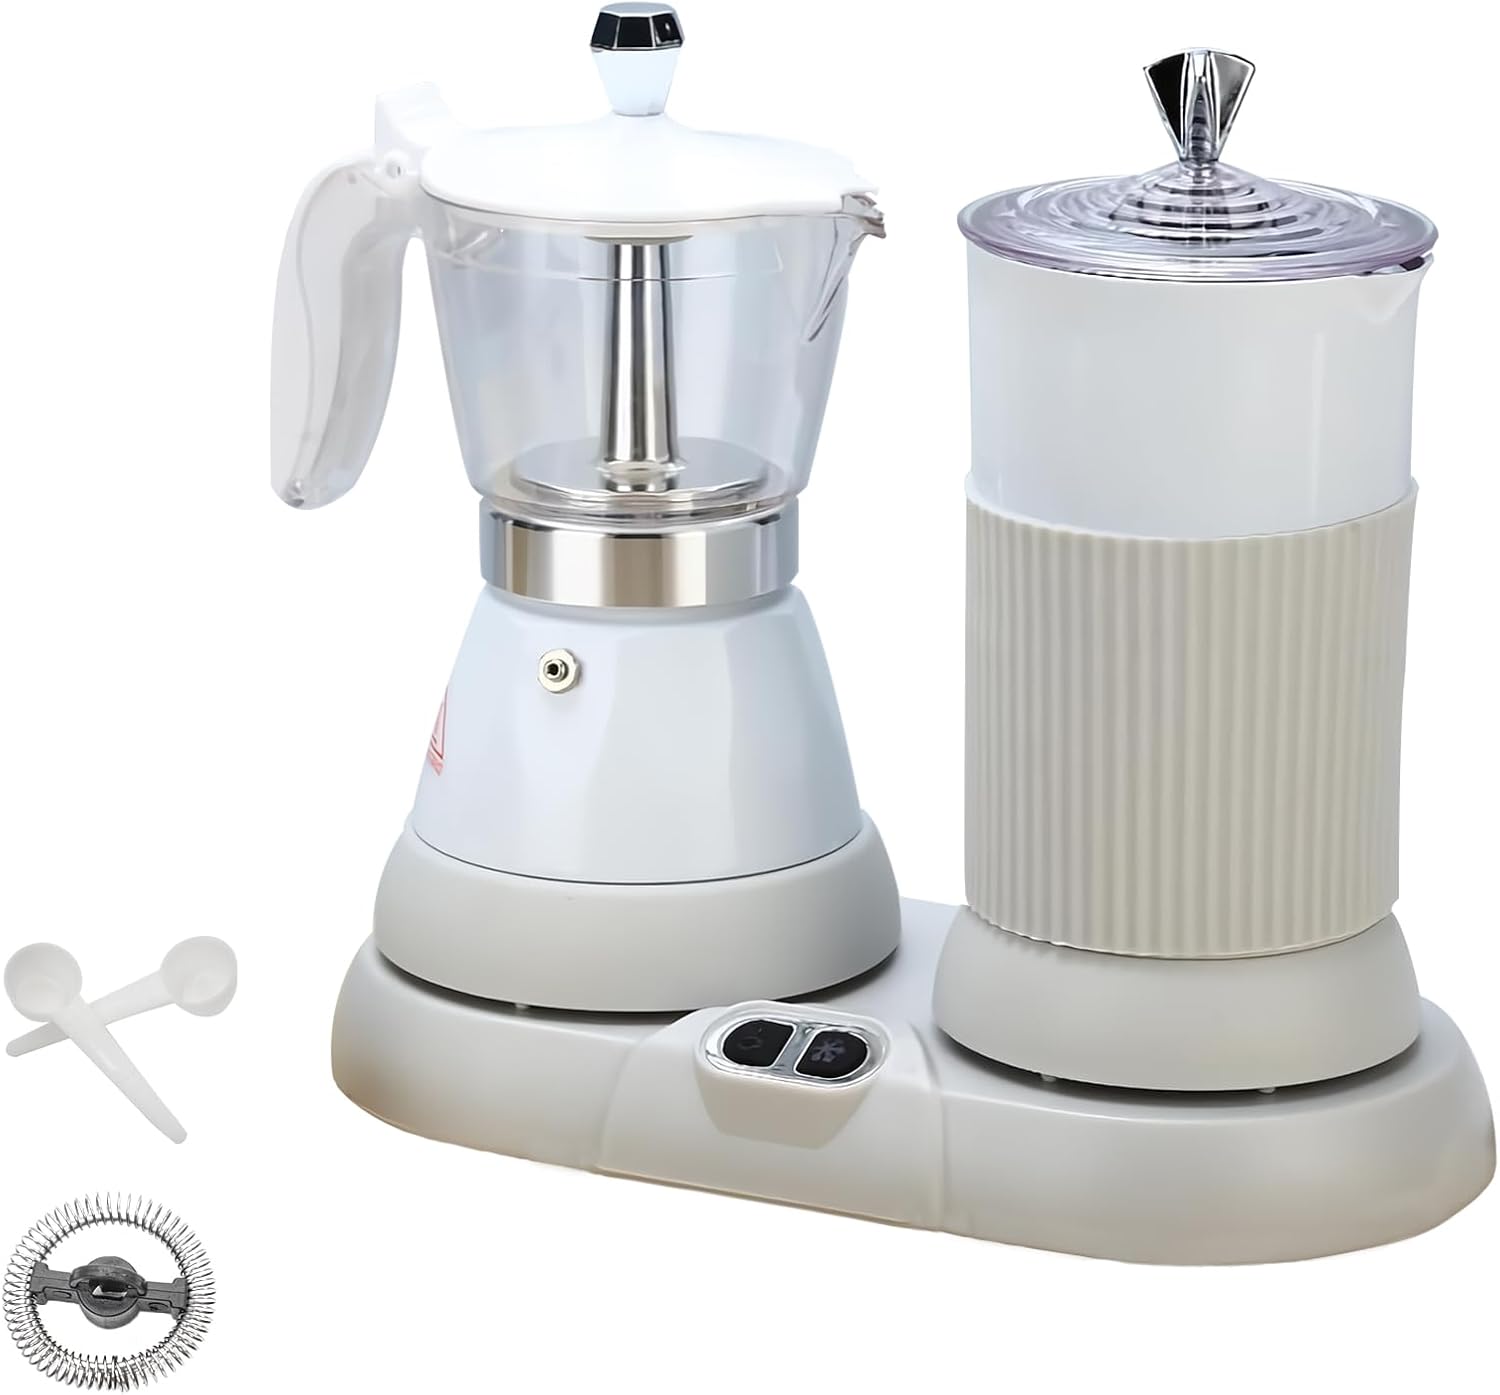
Figure 3.1: DITOSH 2-in-1 Electric Moka Pot Espresso Maker with Milk Frother. This image displays the complete appliance, featuring the moka pot on the left and the milk frother on the right, both mounted on a shared electric base. Included accessories like a whisk and spoons are also visible.
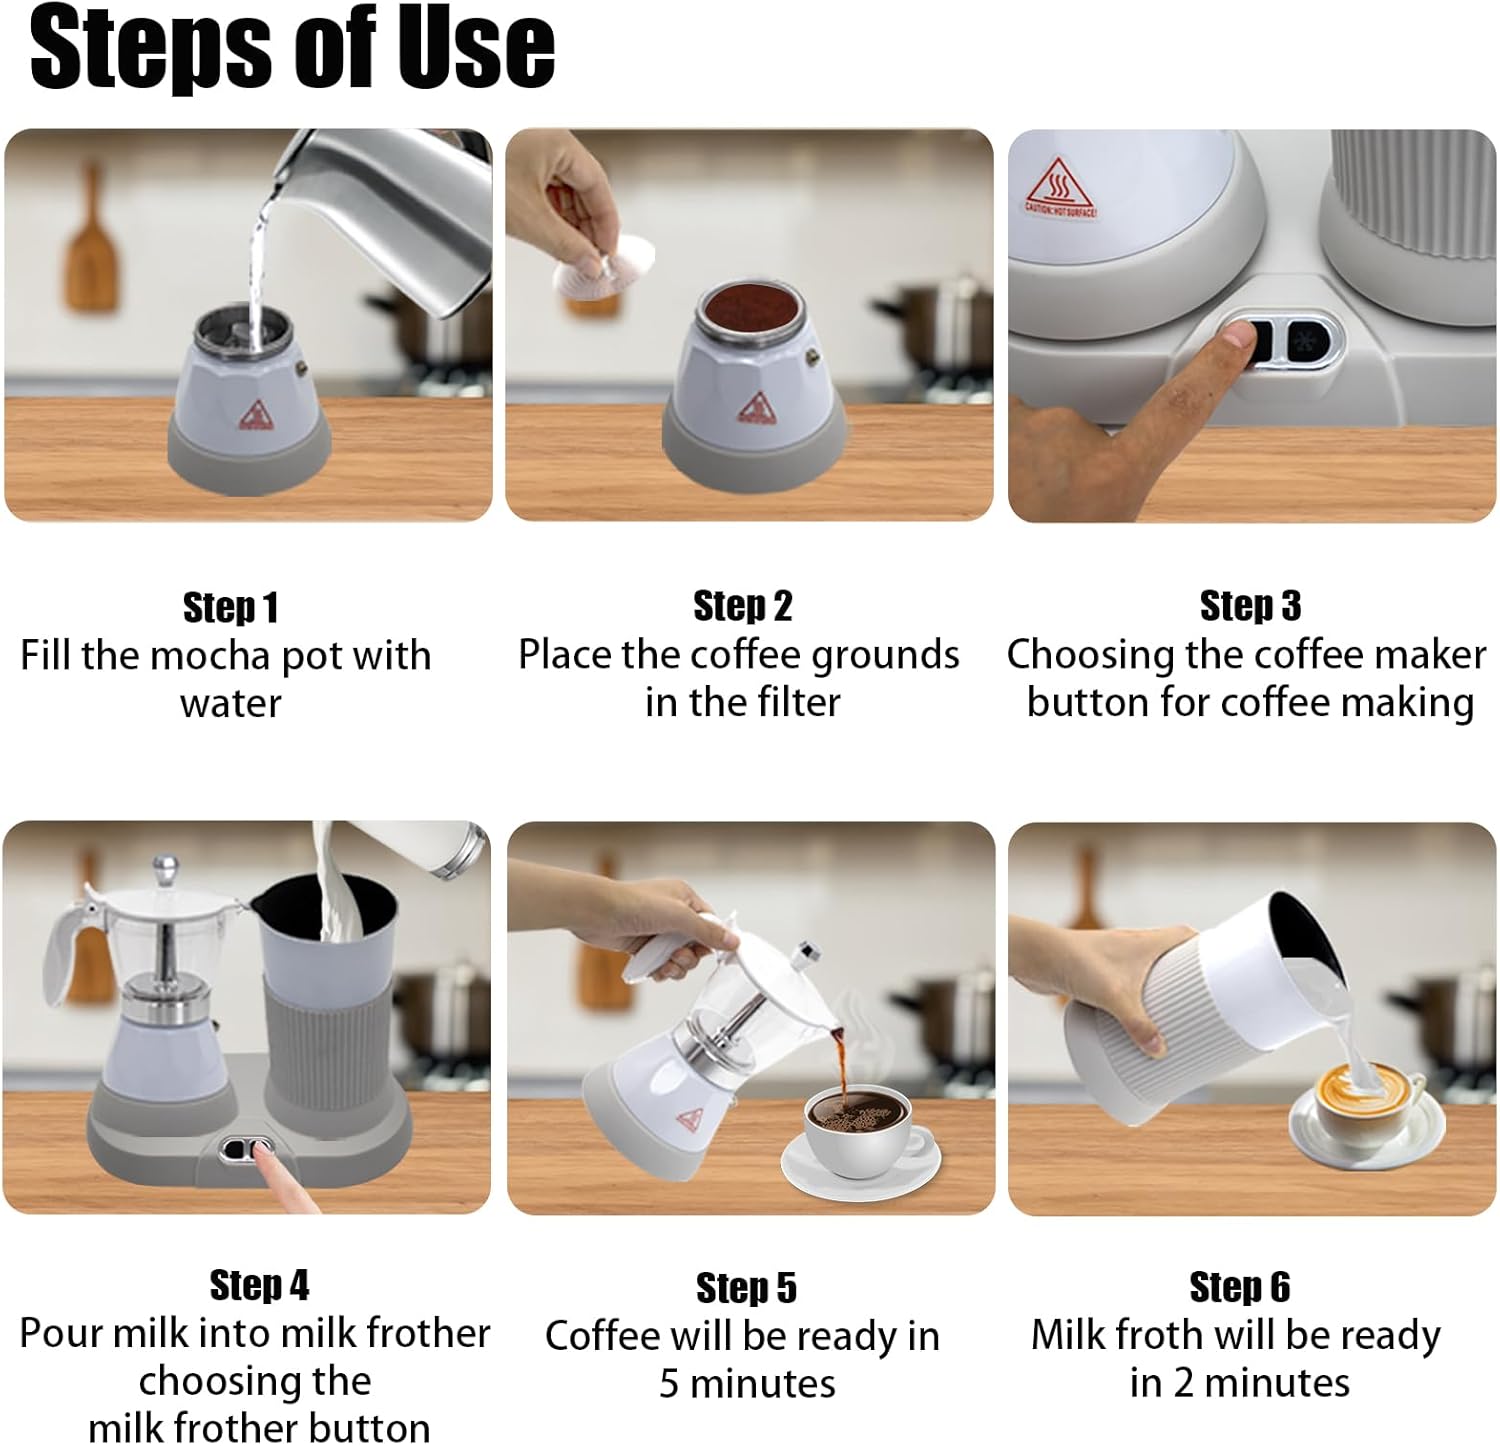
Figure 3.2: Packing List and Key Components. This image illustrates the items included in the package: one whisk, two spoons, and one instruction manual. It also highlights features of the main unit such as the transparent container for intuitive monitoring, the detachable base for easy cleaning, and the silicone material for anti-burning hands and good thermal insulation.
Components:
- Electric Base: Powers both the moka pot and milk frother. Features one-touch operation buttons.
- Moka Pot: For brewing espresso. Includes a transparent upper chamber, filter, and lower water reservoir.
- Milk Frother: For heating and frothing milk. Features a high-quality stainless steel mixing head and intelligent temperature control.
- Whisk: For milk frother.
- Spoons: Two included for convenience.

Figure 3.3: Product Dimensions. This image provides the overall dimensions of the appliance: approximately 26.5 cm (10.4 inches) in width, 14 cm (5.5 inches) in depth for the base, and 23.5 cm (9.26 inches) in height.
4. Setup
- Unpacking: Carefully remove all components from the packaging. Retain packaging for future storage or transport.
- Initial Cleaning: Before first use, wash the moka pot's upper chamber, filter, and lower reservoir, as well as the milk frother's jug and whisk, with warm soapy water. Rinse thoroughly and dry. Do not immerse the electric base in water.
- Placement: Place the electric base on a stable, flat, heat-resistant surface near a power outlet. Ensure there is adequate ventilation around the unit.
- Assembly: Ensure the moka pot and milk frother are correctly seated on their respective heating plates on the electric base.
5. Operating Instructions
5.1. Brewing Espresso with the Moka Pot
- Step 1: Fill with Water. Unscrew the moka pot and fill the lower reservoir with cold water up to the safety valve level. Do not overfill.

Figure 5.1: Filling the moka pot's lower chamber with water.
- Step 2: Add Coffee Grounds. Place the filter funnel into the lower reservoir. Fill the filter with finely ground coffee, leveling it gently without tamping.

Figure 5.2: Adding coffee grounds to the filter funnel.
- Step 3: Assemble and Brew. Screw the upper chamber firmly onto the lower reservoir. Place the assembled moka pot onto the electric base. Press the designated coffee maker button to start brewing. Coffee will be ready in approximately 5 minutes.

Figure 5.3: Pressing the coffee maker button to begin brewing.

Figure 5.4: Freshly brewed coffee in a cup, indicating completion.
5.2. Using the Milk Frother
The milk frother can create hot or cold milk froth for various beverages.

Figure 5.5: Milk being poured from the frother, demonstrating its capability to create fine froth for various drinks.
- Step 4: Pour Milk. Pour milk into the milk frother jug. Ensure the milk level is between the MIN and MAX indicators. For best results, whole milk is recommended, especially if refrigerated.

Figure 5.6: Pouring milk into the frother jug.
- Step 5: Start Frothing. Place the milk frother jug onto the electric base. Press the designated milk frother button. The intelligent temperature control system will heat and froth the milk to 50-60°C. Milk froth will be ready in approximately 2 minutes.

Figure 5.7: The milk frother in operation, showing the precise temperature control for optimal frothing.

Figure 5.8: Frothed milk being poured into a cup, ready for serving.
5.3. Multi-Functional Use
This appliance is versatile and can be used to prepare various coffee and milk-based drinks, including espresso, latte, cappuccino, macchiato, and hot chocolate.

Figure 5.9: Examples of beverages that can be prepared, including milk froth, latte, cappuccino, macchiato, and espresso.
6. Maintenance and Cleaning
Regular cleaning ensures optimal performance and longevity of your appliance.
- Always unplug the appliance and allow it to cool completely before cleaning.
- Moka Pot: Disassemble the moka pot. Wash the upper chamber, filter, and lower reservoir with warm soapy water. Rinse thoroughly and dry.
- Milk Frother: Wash the milk frother jug and whisk with warm soapy water. Rinse thoroughly and dry.
- Base Unit: Wipe the electric base with a damp cloth. Do not immerse the base in water.
- Important: Do not use a dishwasher, steel wire ball, or abrasive dishcloth to clean the coffee maker or frother to avoid damage to the body. Sponge cleaning is recommended.

Figure 6.1: A warning against using abrasive cleaning tools and a recommendation for using whole milk for frothing.

Figure 6.2: The detachable base design, highlighting its ease of cleaning and maintenance.
7. Troubleshooting
| Problem | Possible Cause | Solution |
|---|---|---|
| Coffee not brewing / Frother not working | Appliance not plugged in or power issue. | Ensure the appliance is properly plugged into a working power outlet. Check circuit breaker. |
| Coffee tastes weak or watery | Too much water, too little coffee, or coffee grounds too coarse. | Ensure water is filled only up to the safety valve. Use the recommended amount of finely ground coffee. |
| Coffee not coming out | Coffee grounds too fine or tamped too hard, blocking the filter. | Use slightly coarser grounds or do not tamp the coffee. Clean the filter thoroughly. |
| Milk not frothing properly | Insufficient milk, incorrect milk type, or frother whisk not installed correctly. | Ensure milk is between MIN/MAX lines. Use cold whole milk for best results. Check if the whisk is properly attached. |
| Appliance leaks | Moka pot not screwed on tightly or seals are worn. | Ensure the moka pot's upper and lower chambers are screwed together tightly. Inspect and replace seals if necessary. |
8. Specifications
| Feature | Specification |
|---|---|
| Brand | DITOSH |
| Model Name | 2in1 moka set |
| Color | White |
| Product Dimensions | 5.5"D x 10.4"W x 9.26"H |
| Special Feature | Milk Frother, Portable |
| Coffee Maker Type | Espresso Machine |
| Specific Uses For Product | Espresso |
| Recommended Uses For Product | Camping, Home Use, Traveling |
| Included Components | Filter, Milk Frother |
| Operation Mode | Fully Automatic |
| Number of Items | 1 |
| Coffee Input Type | Ground Coffee |
| Item Weight | 4.51 pounds |
9. Warranty and Support
For warranty information or product support, please contact DITOSH customer service through your purchase platform.
How to Contact Us:
- Login to your Amazon Account.
- Navigate to 'Your Orders'.
- Find the relevant Order ID for your purchase.
- Click 'Contact Seller'.
For more information about DITOSH products, visit the official DITOSH Store on Amazon.