1. Introduction
Thank you for choosing the Jindaaudio 8-Channel Bluetooth USB DJ Mixer (Model MSM8). This professional audio mixer is designed for a variety of applications, including live streaming, podcasting, recording, and live performances. It features 8 input channels, Bluetooth connectivity, USB audio interface, 48V phantom power for condenser microphones, and built-in FX (Reverb/Delay) for enhanced sound. This manual will guide you through the setup, operation, and maintenance of your new mixer.

Figure 1.1: The Jindaaudio MSM8 mixer shown in various application scenarios, including a bar show, live mixing setup, recording studio, and stage performance, highlighting its versatility.
2. Safety Information
Please read and understand all safety instructions before operating this device. Keep this manual for future reference.
- Power Source: Use only the specified power adapter. Ensure the voltage matches your local power supply.
- Water and Moisture: Do not expose this device to rain, moisture, or any liquids. Do not place objects filled with liquids on the device.
- Ventilation: Ensure adequate ventilation. Do not block ventilation openings.
- Heat: Do not place the device near heat sources such as radiators, heat registers, stoves, or other heat-producing appliances.
- Cleaning: Clean only with a dry cloth.
- Servicing: Do not attempt to service this product yourself. Refer all servicing to qualified service personnel.
- Phantom Power: When activating 48V phantom power, ensure all microphones requiring it are connected and that dynamic microphones or other non-phantom powered devices are disconnected to prevent damage.
3. Package Contents
Verify that all items are present in your package:
- Jindaaudio 8-Channel Bluetooth USB DJ Mixer (MSM8)
- Power Adapter
- User Manual
4. Product Overview
Familiarize yourself with the various controls and connections on your mixer. The image below illustrates the main components of the mixer's top and rear panels.

Figure 4.1: Comprehensive overview of the Jindaaudio MSM8 mixer. The top panel displays 8 input channels with microphone and line inputs, gain controls, channel signal switching, treble, medium, and bass tone controls, auxiliary knobs, effect insert adjustment, balance controls, channel volume faders, monitor switch, USB jack, LED display, USB control area, balance adjustment, level indicator, reverb knob, delay knob, and pan knob. The bottom part of the image shows the rear panel with the power switch, power input (AC 220V-240V 50/60Hz), and audio output connections (Speaker Output R, L, SUB Output SUB-2, SUB-1).
Key Controls and Connections:
- Microphone Input (XLR): Connect XLR microphones to channels 1-6.
- Line Input (TRS/RCA): Connect line-level devices to channels 1-8. Channels 7/8 are stereo line inputs.
- Gain Control Knob: Adjusts the input sensitivity for each channel to prevent clipping.
- Channel Signal Switching: Selects between microphone and line input for certain channels.
- EQ Knobs (Treble, Mid, Bass): Adjust the high, mid, and low frequencies for each channel to shape the tone.
- AUX Knob: Controls the send level from each channel to the auxiliary output for external effects or monitoring.
- FX Knob: Controls the send level from each channel to the internal effects processor (Reverb/Delay).
- Pan Knob: Adjusts the stereo position (left/right) of the channel signal in the main mix.
- Channel Volume Fader: Controls the output level of each individual channel in the main mix.
- Monitor Switch Button: Activates monitoring for specific channels.
- 48V Phantom Power Switch: Activates 48V phantom power for condenser microphones connected to XLR inputs.
- USB Control Area: Features a USB jack, LED display, and controls for USB playback, recording, and Bluetooth functions.
- Balance Adjustment: Controls the balance of the stereo output.
- Level Indicator: LED meters display the main output level.
- Reverb Knob: Adjusts the intensity or decay of the reverb effect.
- Delay Knob: Adjusts the time or feedback of the delay effect.
- Main Channel Volume Adjustment: Controls the overall output level of the main mix.
- Stereo SUB 1/2: Subgroup outputs for routing multiple channels to a single stereo pair.
- Power Switch: Turns the mixer on or off.
- Power Inlet: Connects the power adapter.
- Audio Output (Speaker Output R/L, SUB Output SUB-1/SUB-2): Connects to main speakers, subwoofers, or other audio devices.
5. Setup
Follow these steps to set up your Jindaaudio mixer:
- Power Connection:
Connect the provided power adapter to the mixer's power input and then to a suitable power outlet. Ensure the mixer's power switch is in the OFF position before connecting power.
- Connecting Microphones:
For condenser microphones, connect them to the XLR inputs. Activate the 48V phantom power switch only after connecting the microphones. For dynamic microphones, connect them to the XLR inputs; phantom power is not required and should remain off for these types of microphones.
- Connecting Line-Level Devices:
Connect instruments, media players, or other line-level audio sources to the 1/4" TRS or RCA line inputs on the respective channels.
- Connecting Output Devices:
Connect your main speakers or recording interface to the MAIN OUT (XLR) connectors. For monitoring, connect headphones to the headphone jack or monitor speakers to the MONITOR OUT.
- USB Connection (for PC/Mac):
Connect a USB cable from the mixer's USB port to your computer. The mixer will function as an audio interface, allowing you to play audio from your computer or record the mixer's main output.

Figure 5.1: Diagram illustrating various interface connections for the Jindaaudio MSM8 mixer. This includes connections for guitars, electronic musical instruments, recorders, phones/PCs, speakers/amplifiers, condenser microphones, dynamic microphones, headsets, monitor speakers, and USB/computer connections.
6. Operating Instructions
6.1 Basic Operation
- Power On: After all connections are made, switch the mixer's power button to the ON position.
- Adjusting Input Levels:
For each active channel, speak into the microphone or play your instrument. Adjust the GAIN knob until the PEAK LED flashes only occasionally. Then, use the channel's volume fader to set the desired level.
- Equalization (EQ):
Use the TREBLE, MID, and BASS knobs to shape the tone of each channel. Turn clockwise to boost frequencies and counter-clockwise to cut them.
- Main Output Level:
Adjust the MAIN fader to control the overall output volume. Monitor the LEVEL INDICATOR to ensure the signal does not consistently peak into the red.
6.2 Bluetooth Connectivity
The mixer features built-in Bluetooth for wireless audio streaming from compatible devices.

Figure 6.1: Image showing the Jindaaudio MSM8 mixer with a Bluetooth icon, indicating its built-in wireless streaming receiver compatibility with smartphones, tablets, and other modern devices.
- Activate Bluetooth: Press the MODE button in the USB control area until "Bluetooth" or a similar indicator appears on the LED display. The Bluetooth indicator light will flash, indicating it's in pairing mode.
- Pairing: On your smartphone, tablet, or other Bluetooth device, search for available Bluetooth devices and select "MSM8" (or similar name). Once paired, the indicator light will become solid.
- Audio Playback: Play audio from your device. Control the volume using your device's volume controls and the mixer's dedicated Bluetooth channel volume knob.
6.3 USB Playback and Recording
The mixer supports USB playback from a USB drive and can also function as a USB audio interface for computers.

Figure 6.2: Close-up of the Jindaaudio MSM8 mixer's USB control area, showing a USB drive inserted. This highlights the mixer's capability to support USB playback with lossless sound quality.
- USB Drive Playback:
Insert a USB flash drive containing audio files (MP3, WAV, etc.) into the USB port. Use the controls in the USB control area (Play/Pause, Next/Previous, Mode) to navigate and play tracks. Adjust the USB channel volume knob.
- USB Audio Interface (PC/Mac):
When connected to a computer via USB, the mixer will be recognized as an audio input/output device. You can play audio from your computer through the mixer or record the mixer's main output into your digital audio workstation (DAW) software.
6.4 Using Built-in FX (Reverb/Delay)
The mixer includes built-in digital effects to enhance your sound.
- Applying Effects:
For each channel, use the FX knob to send a portion of that channel's signal to the effects processor.
- Adjusting Effects:
Use the dedicated REVERB and DELAY knobs in the master effects section to control the parameters of the chosen effect. The overall effect return level can also be adjusted.
7. Maintenance
- Cleaning: Disconnect power before cleaning. Use a soft, dry cloth to wipe the surface of the mixer. Do not use liquid cleaners or aerosols.
- Storage: When not in use for extended periods, store the mixer in a dry, dust-free environment.
- Handling: Avoid dropping or subjecting the mixer to strong impacts.
8. Troubleshooting
| Problem | Possible Cause | Solution |
|---|---|---|
| No sound output |
|
|
| Distorted sound |
|
|
| Bluetooth not connecting |
|
|
| Phantom power not working |
|
|
9. Specifications
| Feature | Detail |
|---|---|
| Model Number | MSM8 |
| Number of Channels | 8 |
| Connectivity Technology | USB, Bluetooth |
| Power Source | Corded Electric |
| Output Type | XLR |
| Audio Input | USB, Microphone (XLR), Instrument (RCA or 1/4") |
| Phantom Power | 48V |
| Package Dimensions | 44 x 44 x 16 cm |
| Item Weight | 4 kg |
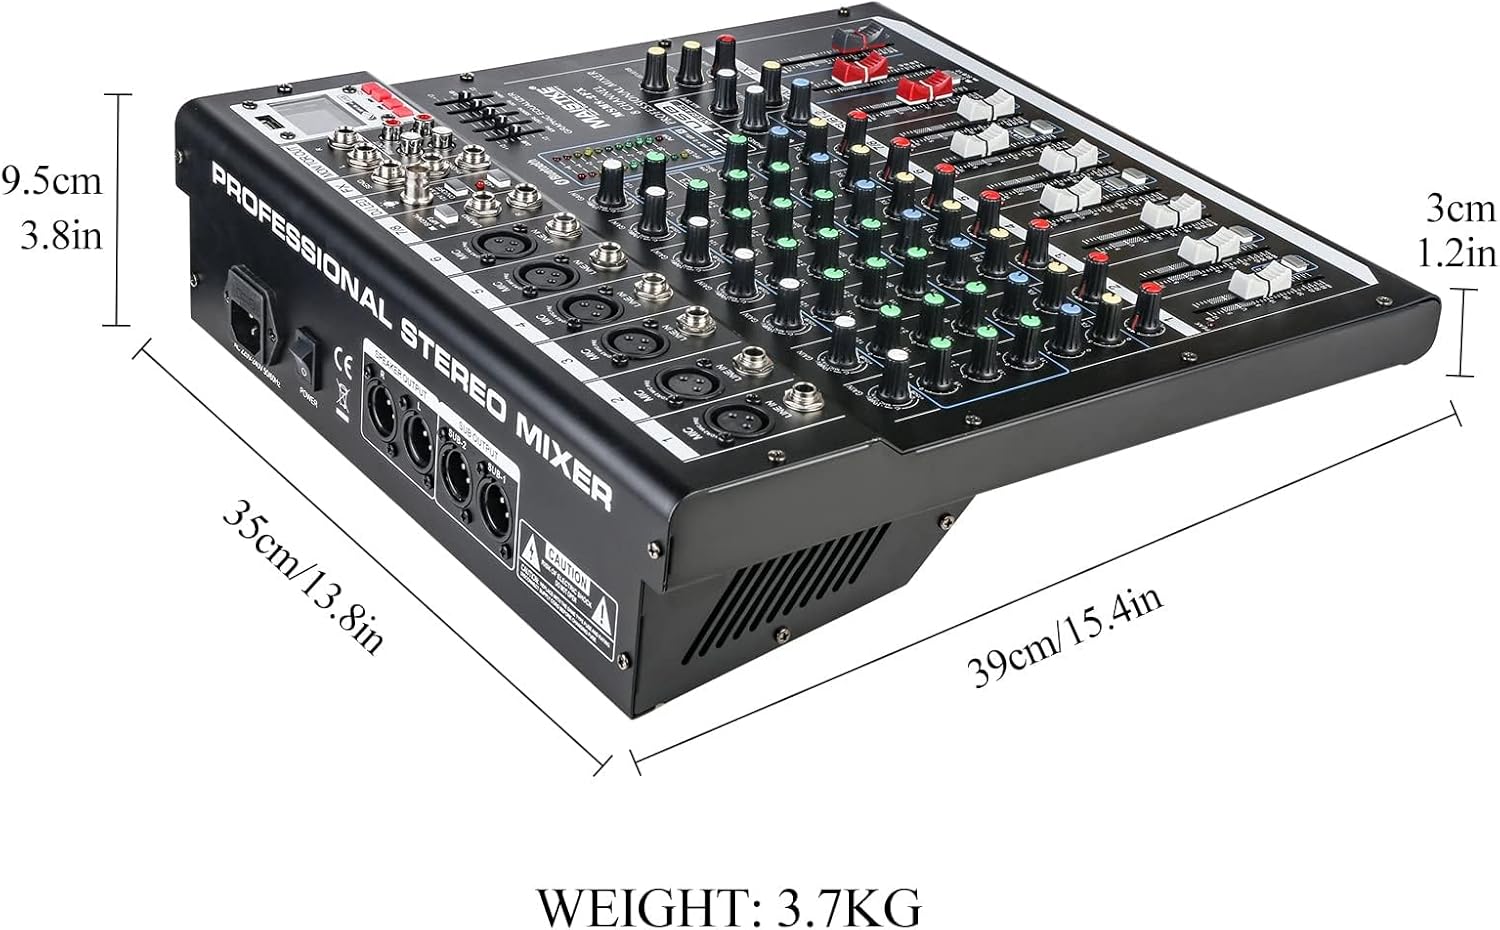
Figure 9.1: Dimensions of the Jindaaudio MSM8 mixer, showing measurements of 35cm (13.8in) length, 39cm (15.4in) width, and 9.5cm (3.8in) height, with a weight of 3.7kg.
10. Warranty and Support
For warranty information and technical support, please refer to the contact details provided with your purchase or visit the official Jindaaudio website. Keep your proof of purchase for any warranty claims.