Oabduz CHL-100W
Oabduz 100W Fiber Laser Marking Machine User Manual
Model: CHL-100W
Brand: Oabduz
1. Introduction
This user manual provides essential information for the safe and efficient operation of your Oabduz CHL-100W 100W Fiber Laser Marking Machine. Please read this manual thoroughly before operating the machine to ensure proper usage, prevent damage, and maximize the lifespan of your equipment.
The Oabduz CHL-100W is a high-precision fiber laser marking machine designed for engraving and marking various metal materials, including jewelry, and other compatible surfaces. It features a powerful 100W JPT MOPA M7 laser source, a high-quality SINO-SG 7110 galvo head, and user-friendly software compatibility.
2. Safety Information
WARNING: This is a Class 4 Laser Product. Direct exposure to the laser beam can cause severe eye and skin damage. Always follow safety precautions.
- Eye Protection: Always wear the provided laser safety goggles (OD6+) when the machine is in operation. Ensure anyone in the vicinity also wears appropriate eye protection.
- Skin Protection: Avoid direct exposure of skin to the laser beam.
- Ventilation: Ensure adequate ventilation in the work area to dissipate fumes and particles generated during marking.
- Flammable Materials: Do not operate the machine near flammable liquids, gases, or materials.
- Emergency Stop: Familiarize yourself with the location and operation of the emergency stop button.
- Power Supply: Connect the machine to a properly grounded power outlet with the correct voltage.
- Authorized Personnel: Only trained and authorized personnel should operate and maintain this equipment.
- FDA Accession Number: This product has FDA Accession Number: 2411184-000.

Figure 2.1: Overview of the Oabduz 100W Fiber Laser Marking Machine and included components. Always ensure proper setup and safety gear are used.
3. Product Overview
The Oabduz CHL-100W is engineered for precision and durability, featuring advanced components for superior marking performance.
3.1 Key Components
- JPT 100W MOPA M7 Laser Source: Provides high-quality laser output with an expected lifespan of over 100,000 hours. Capable of color marking on stainless steel.
- SINO-SG 7110 Galvo Head: A high-quality scanning system that ensures precise and fast marking. Features a double red dot for accurate focusing.
- BJJCZ Control Board: Ensures stable motion control and fast laser operation.
- 300x300MM Lens: Provides a large working area for various applications.

Figure 3.1: SINO-GALVO SG 7110 Head. This galvo head provides outstanding accuracy and fast, stable marking of flat surfaces at speeds up to 5000mm/s, with a positioning speed up to 8000mm/s.

Figure 3.2: BJJCZ Control Board. This board ensures stable motion control and correspondingly fast laser operation, contributing to the machine's precision and efficiency.

Figure 3.3: JPT MOPA Laser Source. This 100W MOPA M7 laser source is known for its high quality and long lifespan, supporting advanced applications like color marking on stainless steel.
3.2 Software Compatibility
The machine comes bundled with EzCad Lite software, compatible with 32-bit and 64-bit editions of Windows 7, 8, and 10. Additionally, while the EzCad Lite-based device primarily supports Windows, it is compatible with LightBurn software, which supports both Windows and macOS systems.

Figure 3.4: Software Compatibility. The machine supports EzCad Lite for Windows and is compatible with LightBurn, extending support to macOS and Linux for certain functionalities.
Supported file formats include, but are not limited to: PLT, DXF, AI, DST, SVG, GBR, NC, JPC, BOTBMP, JPG, JPEG, GIF, TGA, PNG, TIF, TIFF, Code39, EAN, PDF417, DATAMATRIX, QR codes, and more.
3.3 Applications
This fiber laser marking machine is suitable for a wide range of applications on various metal materials. Its capabilities include:
- Color marking on stainless steel (with 30/60/100W settings)
- Laser rust removal
- Surface treatment
- Thin plate cutting
- Carving and drilling
- Peel anode and coating
- Flight marking

Figure 3.5: Diverse Applications. The machine is suitable for marking on silver, metal hardware, stainless steel, aluminum, copper, ferrous metals, and creating intricate designs on various items like jewelry and coins.
4. Package Contents
Upon receiving your Oabduz 100W Fiber Laser Marking Machine, please verify that all the following items are included in the package:
- JPT 100W Marking Machine Unit
- EzCad Lite Software (on U Disk)
- D80 Rotary Axis (Optional, if purchased)
- Laser Safety Goggles
- Data Cable
- Power Cord
- Foot Switch
- Wrench & Position Strip
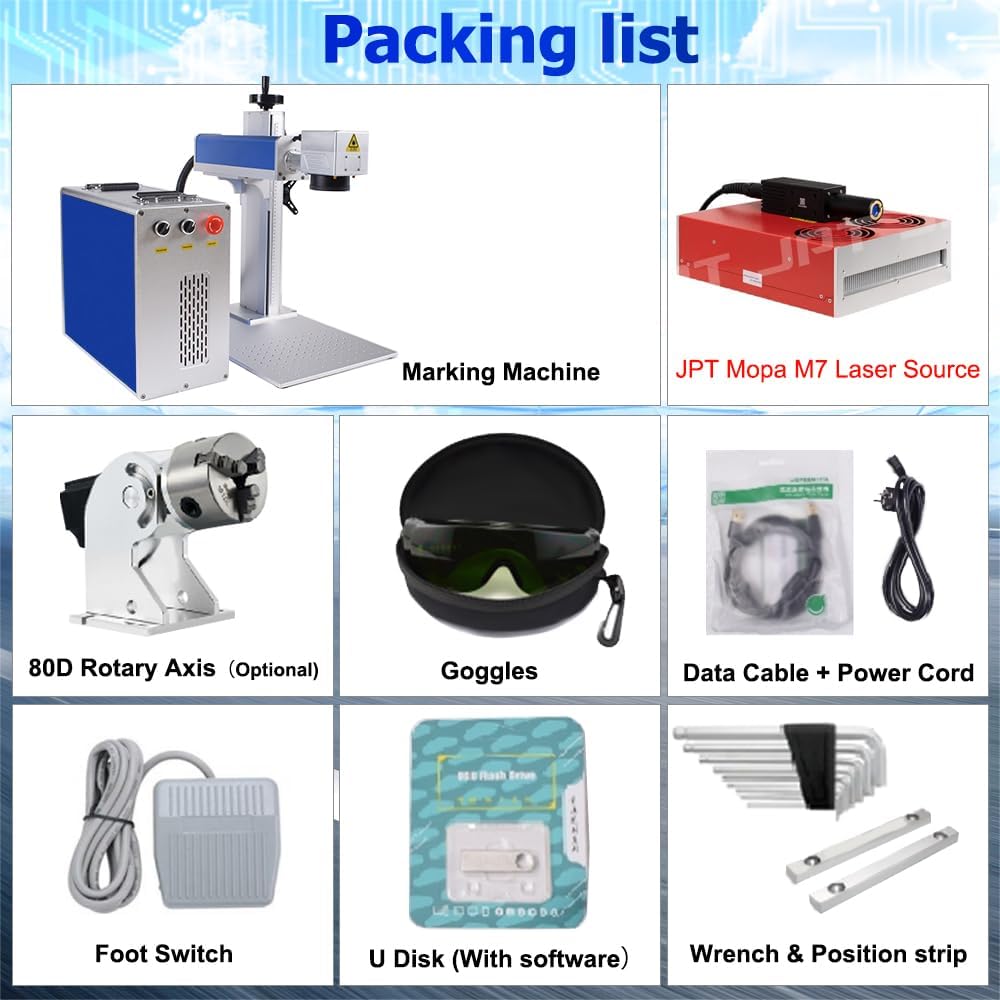
Figure 4.1: Packing List. This image illustrates the main components included with the Oabduz 100W Fiber Laser Marking Machine, such as the marking machine, laser source, rotary axis (optional), goggles, cables, foot switch, and software U disk.
5. Setup
Follow these steps to set up your laser marking machine:
- Unpacking: Carefully remove all components from the packaging. Retain the original packaging for future transport or storage.
- Placement: Place the machine on a stable, level surface in a well-ventilated area, away from direct sunlight and excessive dust. Ensure sufficient space around the machine for operation and maintenance.
- Component Connection:
- Connect the laser source to the main machine unit using the provided cables.
- Connect the galvo head to the main unit.
- If using the D80 Rotary Axis, connect it to the designated port on the machine.
- Connect the foot switch to its port.
- Power Connection: Connect the power cord to the machine and then to a grounded electrical outlet. Ensure the power switch on the machine is in the OFF position before plugging it in.
- Software Installation:
- Insert the U Disk containing the EzCad Lite software into your computer.
- Follow the on-screen instructions to install the software and necessary drivers.
- If using LightBurn, follow its installation guide and ensure proper communication with the laser machine.
- Initial Power On: Once all connections are secure and software is installed, turn on the main power switch of the machine.
6. Operating Instructions
This section outlines the basic steps for operating your laser marking machine.
6.1 Preparing for Marking
- Safety First: Always wear your laser safety goggles before starting any operation.
- Material Placement: Place the material to be marked on the work platform. Ensure it is stable and flat.
- Focusing: Use the double red dot system to achieve optimal focus. Adjust the Z-axis (height) until the two red dots converge into a single point on the material surface.
- Software Launch: Open EzCad Lite or LightBurn software on your computer.
6.2 Creating and Loading Designs
- Design Creation: Use the software's tools to create your desired text, graphics, or barcodes.
- Importing Designs: Import existing designs in supported formats (e.g., DXF, AI, JPG, PNG).
- Parameter Settings: Adjust laser parameters such as power, speed, frequency, and fill patterns according to the material and desired marking effect. Refer to the software's user guide for detailed parameter explanations.
6.3 Marking Process
- Preview (Red Light): Use the red light preview function in the software to verify the marking area and position on your material. Adjust as needed.
- Start Marking: Once satisfied with the preview, initiate the marking process through the software or by pressing the foot switch.
- Monitoring: Monitor the marking process. In case of any issues, immediately press the emergency stop button.
- Completion: After marking is complete, wait for the laser to stop completely before removing the marked item.
6.4 Using the Rotary Axis (Optional)
If you have the D80 Rotary Axis, follow these general steps for marking cylindrical objects:
- Installation: Securely attach the rotary axis to the machine's work platform and connect its cable.
- Object Mounting: Mount the cylindrical object firmly in the chuck of the rotary axis.
- Software Configuration: In the software, enable and configure the rotary axis settings (e.g., diameter, circumference).
- Focus and Mark: Perform focusing and marking as described above, ensuring the design is correctly mapped to the cylindrical surface.
7. Maintenance
Regular maintenance ensures the longevity and optimal performance of your laser marking machine.
- Cleaning the Lens: Periodically clean the F-theta lens with a specialized lens cleaning solution and lint-free wipes. Avoid touching the lens surface with bare hands.
- Cleaning the Work Area: Keep the work platform and surrounding area clean from dust and debris. Use a vacuum cleaner or compressed air.
- Checking Connections: Regularly inspect all electrical and data cable connections to ensure they are secure and free from damage.
- Ventilation System: Ensure the machine's ventilation fans are clear of obstructions and functioning properly to prevent overheating.
- Software Updates: Keep your EzCad Lite or LightBurn software updated to the latest version for improved performance and features.
- Storage: When not in use for extended periods, cover the machine to protect it from dust. Store in a dry, temperature-controlled environment.
8. Troubleshooting
This section addresses common issues you might encounter. For problems not listed here, please contact customer support.
| Problem | Possible Cause | Solution |
|---|---|---|
| Machine does not power on. | Power cord not connected; power switch off; faulty power outlet. | Check power cord connection; ensure power switch is ON; try a different outlet. |
| Laser not firing. | Emergency stop engaged; software not connected; laser source error; focus issue. | Disengage emergency stop; ensure software connection; check laser source indicator lights; re-focus the laser. |
| Poor marking quality / inconsistent results. | Incorrect focus; wrong laser parameters for material; dirty lens; material not flat. | Re-focus the laser; adjust power/speed/frequency settings; clean the F-theta lens; ensure material is flat and stable. |
| Software not detecting machine. | USB cable disconnected; driver not installed or corrupted; machine not powered on. | Check USB connection; reinstall software drivers; ensure machine is powered on. |
9. Specifications
| Feature | Detail |
|---|---|
| Model Number | CHL-100W |
| Laser Source | JPT 100W MOPA M7 Fiber Laser |
| Output Power | 100,000mW (100W) |
| Laser Class | Class 4 |
| Galvo Head | SINO-SG 7110 with double red dot focus |
| Lens | 300x300MM |
| Control Board | BJJCZ |
| Software Compatibility | EzCad Lite (Windows 7/8/10), LightBurn (Windows/macOS/Linux) |
| Product Dimensions | 30.31 x 18.9 x 22.44 inches |
| Manufacturer | Oabduz |
| FDA Accession Number | 2411184-000 |
10. Warranty and Support
For warranty information, technical support, or service inquiries, please contact the seller or manufacturer directly. Keep your purchase receipt and model number (CHL-100W) readily available when contacting support.
Manufacturer: Oabduz
Seller: ACHI-Official (as per Amazon listing)
For the most up-to-date support contact information, please refer to your purchase documentation or the official Oabduz website.
Ask a question about this manual
Ask about setup, troubleshooting, compatibility, parts, safety, or missing instructions. Manuals+ will review the question and use this page’s manual context to help answer it.