1. Safety Information
Please read and understand all instructions before beginning installation. Failure to follow these instructions may result in electric shock, fire, or other hazards that could cause property damage or personal injury.
- Electrical Safety: Always turn off power at the circuit breaker or fuse box before installing, servicing, or cleaning the fixture. Ensure proper grounding.
- Qualified Electrician: If you are unsure about the installation process, consult a qualified electrician.
- Wiring: Ensure all electrical connections are made in accordance with local codes, ordinances, and the National Electric Code (NEC).
- Fixture Integrity: Do not install any fixture with damaged components. Inspect the fixture carefully before installation.
- Outdoor Use: This product is designed for outdoor use only. Ensure all connections are waterproofed as required for outdoor installations.
- Heat: The light fixture may become hot during operation. Allow it to cool before handling.
2. Product Overview
The LUTEC 80W 9000LM Hardwired LED Flood Light is a high-performance outdoor lighting solution designed for security and general illumination. It features four adjustable heads, providing extensive and uniform light coverage.

Image: The LUTEC 80W 9000LM Hardwired LED Flood Light with its four adjustable heads.
Key Features:
- High Brightness: 80W power output delivering 9000 lumens of 5000K daylight.
- Adjustable Heads: Four flexible light heads allow for a customizable coverage area with a maximum illumination angle of 300°.
- Wide Coverage: Provides uniform and extensive illumination covering up to 2,370 sq. ft.
- Energy Efficient: Offers significant energy savings compared to traditional halogen bulbs.
- Switch Controlled: Designed for simple on/off operation via a standard wall switch. Note: This fixture does not include solar power, motion sensor, or dusk-to-dawn functionality.
- Durable & Waterproof: IP65 rated for protection against dust and water, suitable for various weather conditions including rain and snow. Constructed with a sturdy aluminum body for heat dissipation.

Image: Illustration of the IP65 waterproof rating, showing the light enduring water splashes.
Package Contents:
Verify that all components are present before beginning installation.
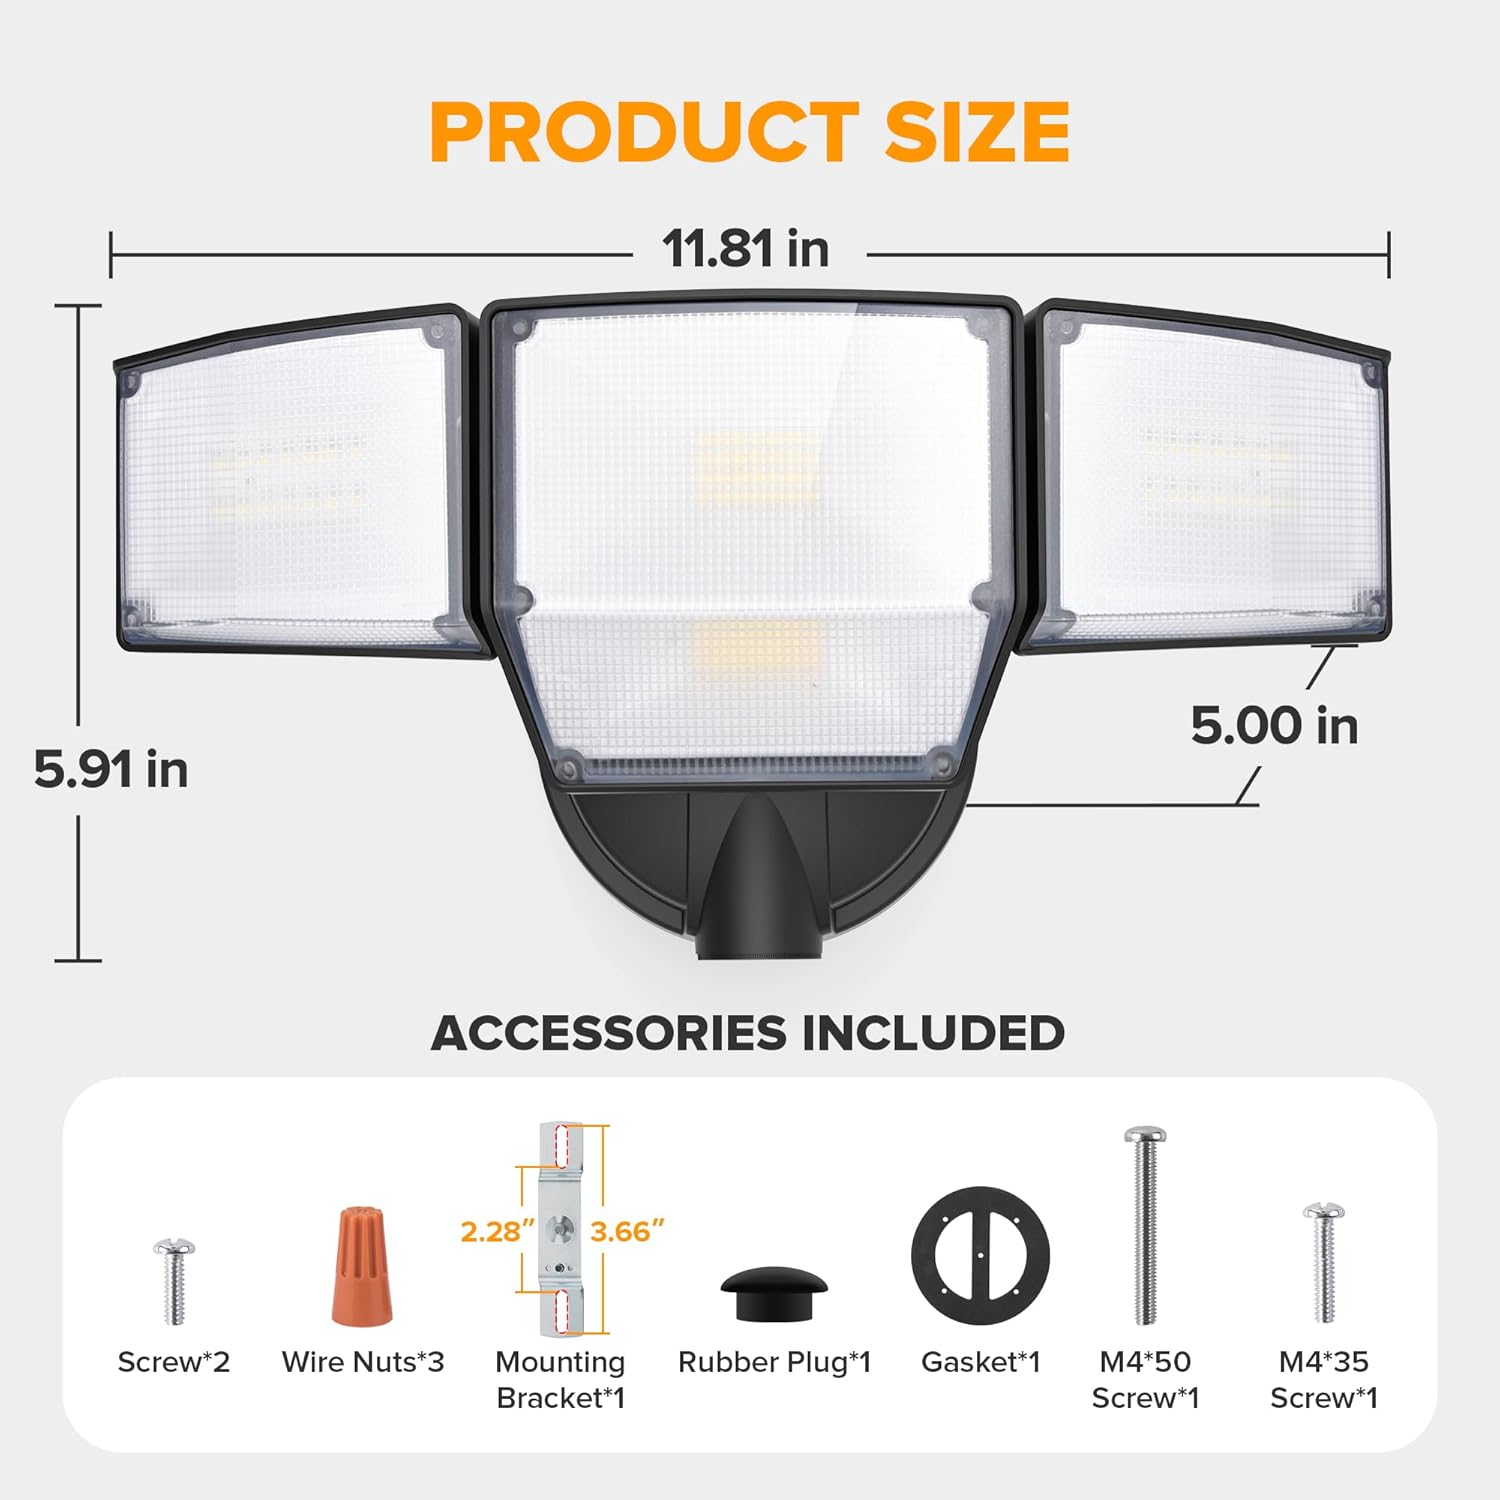
Image: Diagram showing product dimensions and included accessories.
- LED Flood Light Fixture (1)
- Mounting Bracket (1)
- Wire Nuts (3)
- Screws (M4*35, M4*50) (2)
- Rubber Plug (1)
- Gasket (1)
3. Installation and Setup
This flood light is designed for hardwired installation to a standard electrical junction box (not included). Ensure power is OFF before starting.
Tools Required (Not Included):
- Screwdriver (Phillips head recommended)
- Wire Strippers
- Pliers
- Electrical Tape
- Caulking Gun and Weatherproof Sealant (for sealing gaps)
Installation Steps:
- Turn Off Power: Locate the circuit breaker controlling the outdoor lighting circuit and switch it to the OFF position. Verify power is off using a voltage tester.
- Prepare Junction Box: If replacing an existing fixture, remove it. Ensure the junction box is clean and free of debris.
- Attach Mounting Bracket (Step 1): Secure the provided mounting bracket to the junction box using the appropriate screws. Ensure it is firmly attached.
- Wire Connections (Step 2):
- Connect the black wire from the fixture to the black (live) wire from the junction box.
- Connect the white wire from the fixture to the white (neutral) wire from the junction box.
- Connect the green/ground wire from the fixture to the ground wire from the junction box.
- Mount Fixture (Step 3): Align the flood light fixture with the mounting bracket and secure it with the remaining screws. Ensure the gasket is properly seated between the fixture and the mounting surface to maintain weather resistance.
- Seal Gaps: For enhanced waterproofing, apply weatherproof sealant around the base of the fixture where it meets the mounting surface, especially if installing on soffits or uneven walls.
- Adjust Light Heads: Loosen the adjustment screws on each light head, position them to your desired angle (up to 300° total beam angle), and then tighten the screws securely.
- Restore Power: Turn the power back ON at the circuit breaker.

Image: Exploded view illustrating the three main steps for hardwired installation.
Mounting Options:

Image: Visual comparison of soffit-mounted and wall-mounted installations.
- Wall Mounted: The fixture can be mounted directly onto a vertical wall surface.
- Soffit Mounted: The fixture can also be mounted underneath a soffit or eaves.
4. Operating Instructions
The LUTEC 80W 9000LM Flood Light is controlled by a standard wall switch.

Image: Illustration showing a wall switch controlling the flood light.
- To turn the light ON, flip the connected wall switch to the ON position.
- To turn the light OFF, flip the connected wall switch to the OFF position.
Important Note: This model does not feature integrated motion sensing, solar power, or dusk-to-dawn capabilities. Operation is solely via the connected wall switch.
5. Maintenance
Regular maintenance helps ensure optimal performance and longevity of your flood light.
- Cleaning: Periodically clean the fixture with a soft, damp cloth. Do not use abrasive cleaners or solvents, as these can damage the finish or electrical components. Ensure power is off before cleaning.
- Inspection: Annually inspect the fixture for any signs of damage, loose wiring, or wear. Check the integrity of the sealant around the base.
- Bulb Replacement: This fixture uses integrated LED lamp beads and does not require bulb replacement. If the LEDs fail, the entire fixture may need to be replaced.
6. Troubleshooting
If your flood light is not functioning correctly, refer to the following common issues and solutions:
| Problem | Possible Cause | Solution |
|---|---|---|
| Light does not turn on. | No power to the fixture. Loose wiring connection. Faulty wall switch. | Check the circuit breaker and ensure it is ON. Verify all wire connections are secure (ensure power is OFF first). Test the wall switch or consult an electrician. |
| Light flickers or dims. | Loose wiring connection. Voltage fluctuations. | Check all wire connections for tightness (ensure power is OFF first). Consult an electrician to check household voltage. |
| Water inside the fixture. | Improper sealing during installation. Damaged gasket. | Ensure the gasket is properly seated. Apply weatherproof sealant around the fixture base. If damage is present, contact customer support. |
If you encounter issues not listed here or if the problem persists after attempting the solutions, please contact LUTEC customer support.
7. Specifications
Detailed technical specifications for the LUTEC 80W 9000LM Flood Light.
| Specification | Value |
|---|---|
| Brand | LUTEC |
| Model Number | 7632814012 |
| Power Source | AC |
| Wattage | 80W |
| Brightness | 9000 Lumens |
| Light Color | 5000K Daylight (Cool White) |
| Number of Light Sources | 4 |
| Beam Angle | Adjustable up to 300° |
| Illumination Range | Up to 2,370 sq. ft. |
| Water Resistance Level | IP65 Waterproof |
| Material | Aluminum + PC |
| Color | Black |
| Product Dimensions | 6.5"L x 8.66"W x 6.69"H |
| Item Weight | 2.16 pounds |
| Installation Type | Surface Mount |
| Switch Type | Toggle (External Wall Switch) |
| Indoor/Outdoor Usage | Outdoor |
8. Warranty and Support
LUTEC is committed to providing high-quality products and customer satisfaction.
- Customer Service: For any issues, questions, or assistance, please contact LUTEC customer service. We provide 7*24 hour after-sales support.
- Warranty Information: Please refer to your purchase documentation or the official LUTEC website for specific warranty terms and conditions.