Introduction
This user manual provides detailed instructions for the DUMBORC X10F 10CH 2.4GHZ Receiver. Designed for RC cars, boats, and tank models, this receiver offers reliable performance with a wide voltage range and essential safety features. Please read this manual thoroughly before operation to ensure proper setup and safe use.
Key Features
- 10 Channels: Supports up to 10 channels for comprehensive control.
- Wide Voltage Range: Operates within 4.8-10V, supporting high voltage servos.
- Voltage Receiver Support: Equipped to support the vehicle's battery voltage (optional).
- Safety Functions: Includes brakes and fail-safe protection for enhanced operational safety.
- Coach Interface: Features a coach interface for training modules (wireless trainer module sold separately).
- Modulation Mode: GFSK modulation for stable signal transmission.
- Spreading Mode: FHSS 67 channel pseudo-random frequency hopping for interference resistance.
Product Overview

Figure 1: Front view of the DUMBORC X10F 10CH Receiver, showing the channel ports and branding.

Figure 2: The X10F receiver positioned in front of compatible DDF-350 and X10P-350 transmitters, illustrating its intended use with these remote controls.
Specifications
| Parameter | Value |
|---|---|
| Brand | DUMBORC |
| Model | X10F |
| Channels | 10CH |
| Receiver Voltage Range | 4.8-10V |
| Operating Current | 30mA |
| Modulation Mode | GFSK |
| Spreading Mode | FHSS 67 channel pseudo-random frequency hopping |
| Product Size (L*W*H) | 40mm x 35mm x 13mm |
| Gyro Function | No |
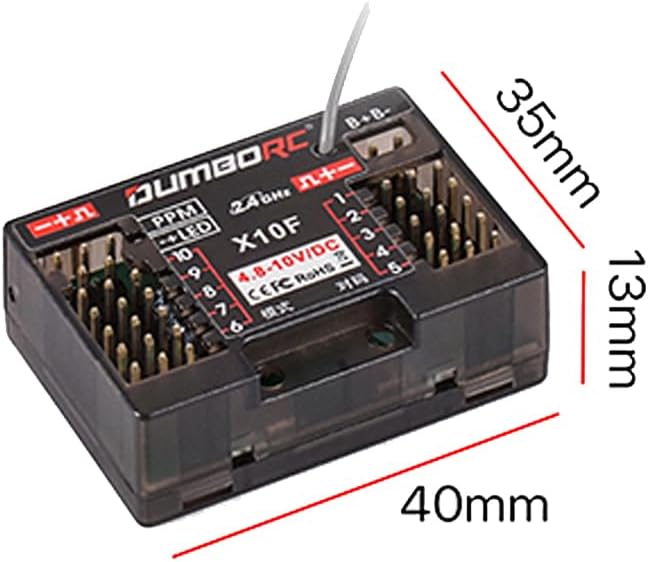
Figure 3: Detailed dimensions of the X10F receiver, showing its length (40mm), width (35mm), and height (13mm).
Setup and Binding
Before operating your RC model, the X10F receiver must be properly connected and bound to your DUMBORC transmitter (e.g., DDF-350, X10P-350).
Connection Diagram

Figure 4: Illustration of the X10F receiver's key definitions, detailing functions for the left and right buttons, including gyro direction, on/off, EPA, runaway protection, channel indicator control, and PPM mode.
- Connect Power: Connect the receiver to a power source within the 4.8-10V range. Ensure correct polarity.
- Connect Servos/ESC: Plug your servos and Electronic Speed Controller (ESC) into the corresponding channels on the receiver. Refer to Figure 4 for channel layout.
- Binding Procedure:
- Turn on your transmitter and ensure it is in binding mode (refer to your transmitter's manual).
- Power on the receiver. The LED indicator on the receiver should flash, indicating it's ready for binding.
- Once bound, the LED on the receiver will turn solid, indicating a successful connection.
- Fail-Safe Setup: After successful binding, set up the fail-safe positions for your model. This ensures that if signal is lost, the model will return to a predetermined safe state (e.g., throttle to neutral, steering straight). Consult your transmitter manual for specific fail-safe setting instructions.
Operating Instructions
Once the receiver is successfully bound and installed in your model, you can begin operation.
Basic Operation
- Always turn on your transmitter first, then power on your model.
- Before each use, perform a range check to ensure proper signal reception.
- Familiarize yourself with the controls on your transmitter and how they correspond to the model's movements.
Receiver Button Functions (Refer to Figure 4)
The X10F receiver features buttons for advanced settings:
- Left Key Definition:
- Press 1: Switch gyro direction (Note: X10F does not have built-in gyro, this function might be for compatible external modules or future versions).
- Short press 3: Turn the gyroscope on/off (See note above).
- Hold down to set EPA (End Point Adjustment).
- Right Key Definition:
- Press and hold for 3 seconds: Initiate binding process or other specific functions.
- Press 1: Set runaway protection (Fail-safe).
- Press 2: Control any channel indicator.
- Press 3: Enable PPM mode.
Note: While the image indicates gyro functions, the product description explicitly states "No gyro function" for the X10F. These button definitions might apply to other DUMBORC receivers or external gyro modules.
Maintenance
- Cleaning: Keep the receiver clean and free from dust, dirt, and moisture. Use a soft, dry cloth for cleaning. Avoid using solvents or harsh chemicals.
- Storage: Store the receiver in a cool, dry place when not in use. Avoid extreme temperatures.
- Connections: Periodically check all wire connections to ensure they are secure and free from damage. Loose connections can lead to intermittent signal loss.
- Antenna: Ensure the receiver antenna is not cut, kinked, or damaged. A damaged antenna can significantly reduce range and signal quality.
Troubleshooting
| Problem | Possible Cause | Solution |
|---|---|---|
| Receiver LED not lighting up. | No power or incorrect polarity. | Check power source connection and voltage. Ensure correct positive/negative connection. |
| Receiver LED flashing, but not binding. | Transmitter not in binding mode or too far away. | Ensure transmitter is in binding mode. Bring transmitter closer to receiver. Repeat binding steps. |
| Loss of control/intermittent signal. | Interference, damaged antenna, low battery, or loose connections. | Avoid operating near strong interference sources. Check antenna for damage. Ensure model battery is charged. Verify all connections are secure. |
| Servos not responding. | Incorrect servo connection, damaged servo, or receiver not powered. | Check servo connections to receiver channels. Test servos with another receiver/tester. Ensure receiver has power. |
Warranty and Support
Please note that this product is stated to have no warranty. If you encounter any product-related issues, please contact the seller, Lubosi, directly through the platform where you purchased the item. Be prepared to provide product pictures or videos to assist with troubleshooting and resolution.
For further assistance or inquiries, please refer to the contact information provided by your retailer or the manufacturer's official channels if available.