Important Safety Information
Always read and understand all instructions before assembling and using the stroller. Failure to follow these instructions could result in serious injury or death.
- Always use the 5-point harness to secure your child in the stroller.
- Ensure all locking mechanisms are engaged before placing a child in the stroller or before use.
- Never leave your child unattended in the stroller.
- Do not overload the storage basket or attach items to the handle that could cause the stroller to become unstable.
- The maximum weight recommendation for this stroller is 50 pounds (22.7 kg).
- This stroller is suitable for children aged 0-36 months.
- Avoid placing hot liquids or heavy objects in the cup holder.
- Keep children clear of moving parts during adjustment.
Package Contents
Verify that all components are present before beginning assembly:
- Stroller Frame
- Seat/Bassinet Unit
- Canopy
- Front Wheels (2)
- Rear Wheels (2)
- Removable Foot Cover
- Diaper Bag
- Soft Cushion
- Mosquito Net
Setup and Assembly
Follow these steps to assemble your Kinder King 2-in-1 Convertible Baby Stroller:
1. Unfolding the Stroller Frame
Carefully remove the stroller frame from its packaging. Release any transport locks and unfold the frame until it clicks into place, indicating it is fully open.
2. Attaching the Wheels
Attach the front and rear wheels to the stroller frame. Ensure each wheel clicks securely into its designated slot. Pull on each wheel to confirm it is firmly attached.

Figure 1: The Kinder King 2-in-1 Convertible Baby Stroller in black, showcasing its various components including the frame, seat, canopy, and accessories like the diaper bag. Insets show the stroller configured as an infant carriage and a toddler pushchair.
3. Attaching the Seat/Bassinet Unit
Align the seat/bassinet unit with the connectors on the stroller frame. Push down firmly until you hear a click, indicating a secure attachment. Ensure the unit is facing the desired direction (forward or backward).
Video 1: This video demonstrates the step-by-step assembly of the Kinder King 2-in-1 Convertible Baby Stroller, including attaching the wheels, seat unit, and canopy. It also shows the conversion between bassinet and seat modes.
4. Installing the Canopy and Accessories
Attach the canopy to the seat unit. Secure the removable foot cover, soft cushion, and mosquito net as needed. The diaper bag can be hung on the handle or stored in the basket.
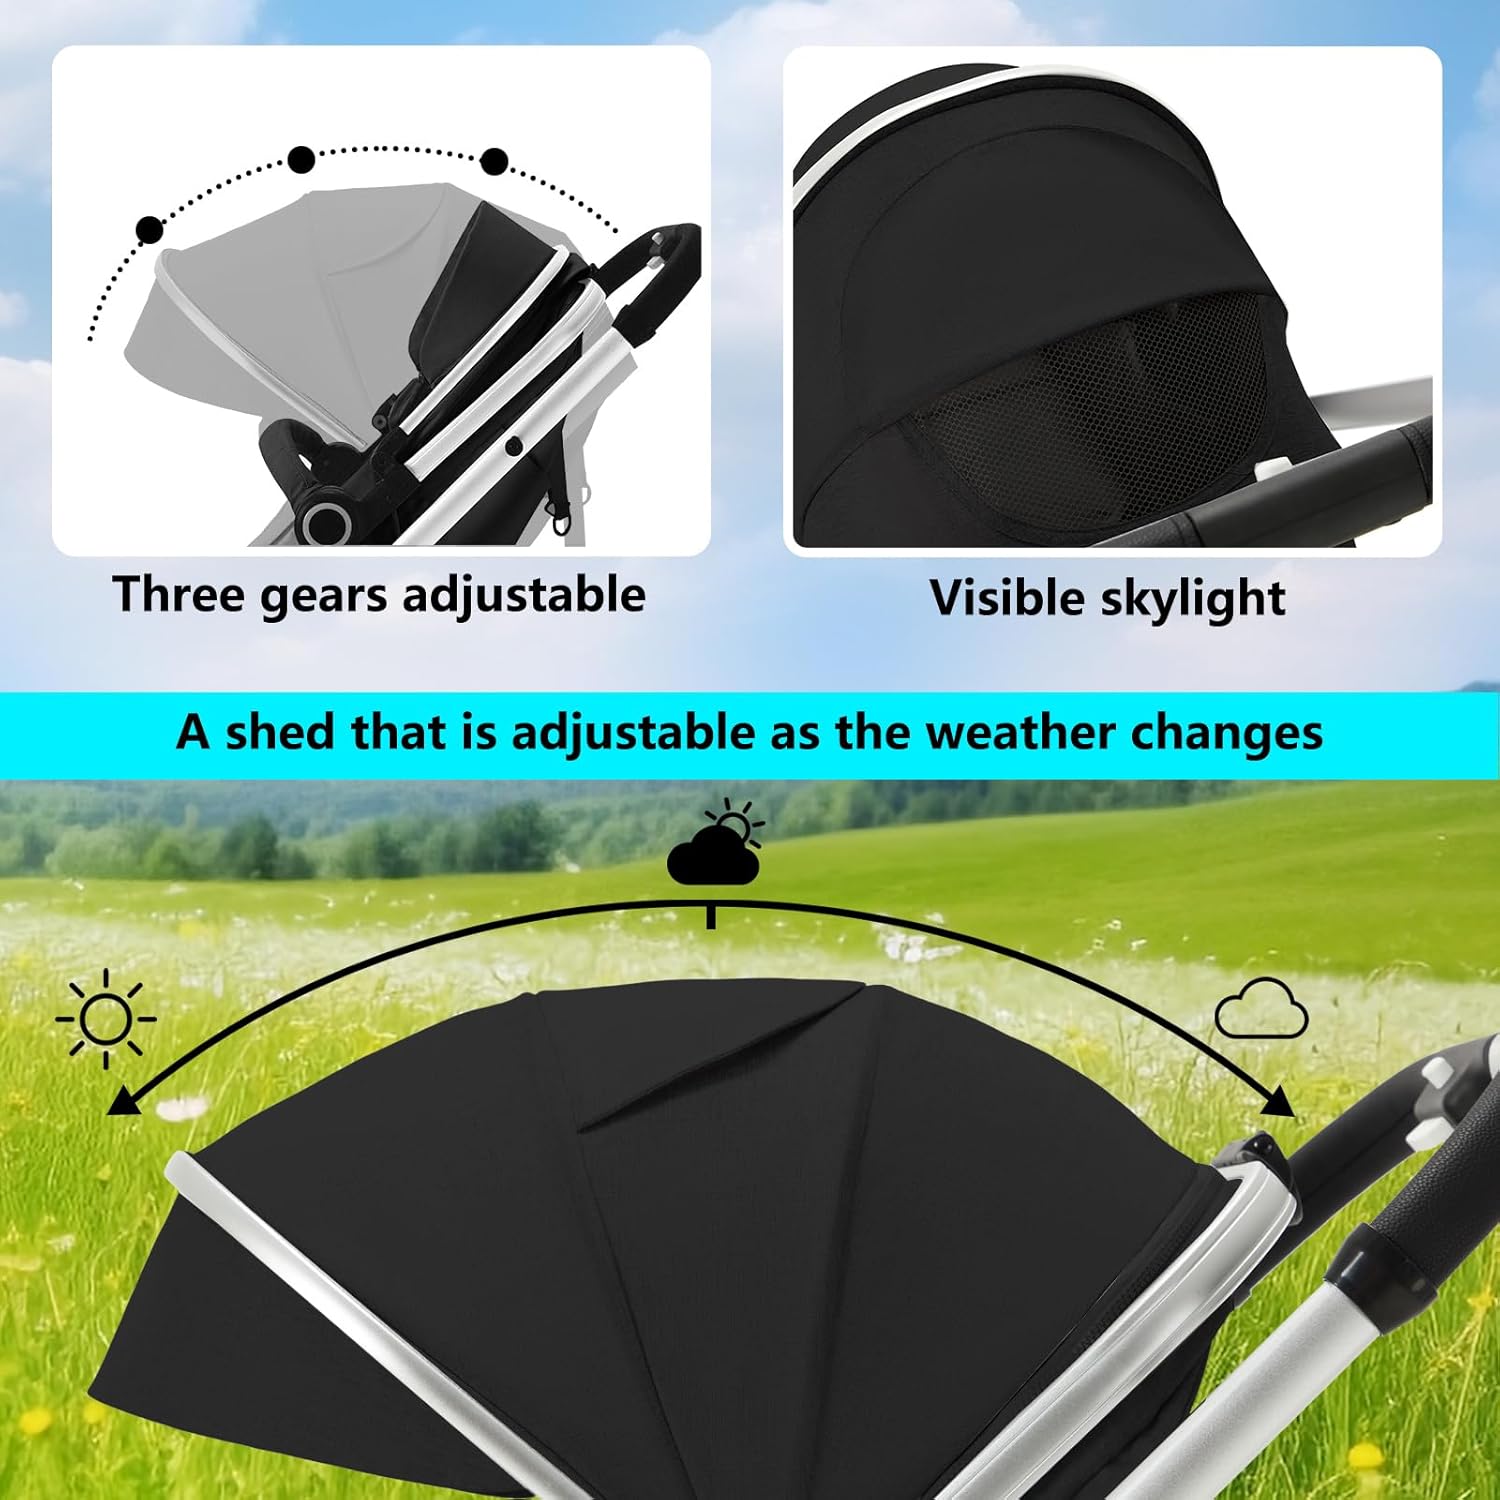
Figure 2: This image illustrates the three-position adjustable canopy, designed to protect the child from sun and rain. A visible mesh skylight is also shown for ventilation and observation.
Operating Instructions
1. Reversible Mode
The seat unit can be reversed to allow your child to face you or face forward. To change the direction, disengage the seat unit from the frame using the side release buttons, rotate the unit, and reattach it securely.

Figure 3: This image demonstrates the two-way push feature, allowing the baby to face outwards to observe the surroundings or face the parent for interaction and bonding.
2. Seat Position Adjustment
The stroller offers three seat positions: 100° sitting mode, 145° rest mode, and 180° bassinet mode. The angle of the backrest and footrest can be adjusted independently. Locate the adjustment levers on the side or back of the seat unit and follow the instructions to recline or sit up the seat.
Video 2: This video provides a detailed guide on how to adjust the seat positions (sitting, rest, bassinet mode) and the angle of the backrest and feet for optimal child comfort.

Figure 4: Three distinct seat positions are shown: 100° sitting mode, 145° rest mode, and 180° bassinet mode, highlighting the stroller's versatility for different age groups and activities.
3. Folding and Portability
To fold the stroller, ensure the seat is in the forward-facing position and fully upright. Locate the folding mechanism on the handle or frame (often a button or lever) and follow the two-step process to collapse the stroller into a compact size. Secure the folding latch if available.

Figure 5: A visual guide demonstrating the two-step folding process of the stroller, showing its compact size for easy storage and transport in a car trunk.
4. Brake System
The stroller is equipped with a rear wheel brake system. To engage the brake, press down on the brake pedal located near the rear wheels with one foot. To release, lift the pedal. Always engage the brake when the stroller is stationary.

Figure 6: This image highlights multiple functional features of the stroller, including the 5-point harness, one-button folding mechanism, comfortable PU leather handle, and the convenient one-foot brake system.
5. Front Wheel Lock and Suspension
The front wheels can swivel 360 degrees for maneuverability or be locked into a straight position for stability on uneven terrain. The stroller also features a spring suspension system for a smoother ride.

Figure 7: This image details the spring suspension system and wheel design, emphasizing shock absorption and suitability for various terrains like gravel, blind tracks, and speed bumps.
Maintenance and Care
Proper maintenance ensures the longevity and safe operation of your stroller:
1. Cleaning the Fabric
When cleaning the cloth on the stroller, brush the stain directly with a brush or other suitable cleaning equipment. For deeper cleaning, refer to the fabric care tags.
2. Cleaning Other Parts
For cleaning other parts of the stroller, such as the frame and plastic components, please use household soap or a neutral detergent with a damp cloth. Avoid abrasive cleaners.
3. Wheel Maintenance
Regularly check the wheels for debris, such as dirt or hair, and remove them to ensure smooth rotation. Periodically inspect the wheel axles and lubricate if necessary to prevent squeaking or stiffness.
4. Storage
Store the stroller in a dry, cool place away from direct sunlight when not in use. Ensure it is clean and dry before storing to prevent mold or mildew.
Troubleshooting
If you encounter any issues with your stroller, refer to the following common solutions:
1. Stroller Not Folding Correctly
- Ensure all locking mechanisms are disengaged before attempting to fold.
- Verify that the seat is in the correct position (usually forward-facing and upright) for folding.
- Refer to the 'Folding and Portability' section and Video 1 for the correct procedure.
2. Wheels Not Rotating Smoothly
- Check for any debris (e.g., dirt, hair, small objects) lodged in the wheels or axles and remove them.
- Ensure all wheels are securely attached to the frame.
- Apply a small amount of silicone-based lubricant to the wheel axles if they are stiff or squeaky.
3. Seat Adjustment Issues
- Make sure the adjustment levers are fully engaged or disengaged as required for the desired position.
- Ensure no fabric or other obstructions are preventing the seat from moving freely.
- Refer to Video 2 for a visual guide on seat adjustment.
4. Stroller Feels Unstable
- Confirm that the stroller frame is fully unfolded and locked into place.
- Ensure all wheels are properly attached and secured.
- Check that the weight in the storage basket does not exceed the recommended limit and is evenly distributed.
Specifications
| Brand | Kinder King |
| Model Number | FLL1165BK |
| Color | Black |
| Material (Fabric) | Linen |
| Frame Material | Aluminum |
| Tire Material | Rubber |
| Age Range | 0-36 months |
| Item Weight | 21 Pounds (9.5 kg) |
| Maximum Weight Recommendation | 50 Pounds (22.7 kg) |
| Item Dimensions (L x W x H) | 29.5" x 14.6" x 40.8" (74.9 cm x 37.1 cm x 103.6 cm) |
| Folded Size | 41.3" x 23.6" x 8.2" (104.9 cm x 59.9 cm x 20.8 cm) |
| Harness Type | 5 Point |
| Stroller Type | Modular Stroller |
| Number of Wheels | 4 |
| Has Stroller Brake System | Yes |
| Is Car Seat Compatible | No |
| Included Components | Removable foot cover, Diaper bag, Soft cushion, Mosquito net |
Warranty and Support
For warranty information, customer service, or to purchase replacement parts, please contact Kinder King directly. You can typically find their contact details on their official website or through the retailer where you purchased the product.
- Refer to the product packaging or included documentation for specific warranty terms and conditions.
- Keep your proof of purchase for warranty claims.