1. Introduction
This instruction manual provides essential information for the assembly, operation, and maintenance of your new Glass Greenhouse (Model 3082336). Designed to create an optimal environment for plant growth, this greenhouse offers protection from cold and extreme weather conditions, while promoting effective plant development by storing moisture.
Constructed from durable aluminum and steel, this greenhouse is UV-resistant and heat-insulated, ensuring longevity and stability. Please read this manual thoroughly before beginning assembly or use to ensure safe and correct installation and operation.

Figure 1.1: Overview of the Glass Greenhouse (Model 3082336).
2. Safety Information
Your safety and the safety of others are paramount. Always follow these basic safety precautions when assembling, operating, or maintaining the greenhouse:
- Read All Instructions: Before assembly, carefully read and understand all instructions provided in this manual.
- Wear Protective Gear: Always wear appropriate personal protective equipment (PPE), including gloves and safety glasses, during assembly to protect against sharp edges and potential glass breakage.
- Two-Person Assembly: Assembly of this greenhouse requires at least two people due to the size and weight of components.
- Site Selection: Choose a level, stable, and well-drained site for installation. Ensure the location is clear of overhead obstructions (e.g., power lines, tree branches).
- Anchoring: Securely anchor the greenhouse to the ground using appropriate methods to prevent wind damage. Failure to do so can result in serious injury or property damage.
- Glass Handling: Glass panels are fragile. Handle them with extreme care. Do not apply excessive force or impact. Immediately replace any cracked or broken panels.
- Ventilation: Ensure adequate ventilation, especially during hot weather, to prevent overheating inside the greenhouse.
- Children and Pets: Keep children and pets away from the assembly area. Do not allow them to play unsupervised inside or around the greenhouse.
- Tools: Use only the recommended tools and ensure they are in good working condition.
3. Package Contents
Before beginning assembly, verify that all parts listed below are present and undamaged. If any parts are missing or damaged, do not proceed with assembly. Contact customer support immediately.
- Aluminum Frame Profiles (various lengths and shapes)
- Steel Base Frame Components
- Glass Panels (for walls and roof)
- Door Assembly Components
- Roof Vent Assembly Components
- Hardware Kit (bolts, nuts, washers, clips, seals, etc.)
- Instruction Manual (this document)
Note: Small components may be packaged together. Refer to the detailed parts list in the separate assembly guide (if provided) for exact quantities and identification.
4. Setup and Assembly
Assembly of the greenhouse requires careful attention to detail. Follow the steps sequentially. It is highly recommended to have at least two people for assembly.
4.1 Site Preparation
- Choose a Level Location: Select a flat, level, and well-drained area that receives adequate sunlight for your plants.
- Clear the Area: Remove any debris, rocks, or vegetation from the chosen site.
- Foundation (Optional but Recommended): For added stability and longevity, consider installing a concrete slab or a treated timber foundation. Ensure the foundation is perfectly level and square.
4.2 Base Frame Assembly
- Unpack all steel base frame components.
- Assemble the base frame according to the diagrams in the separate assembly guide, ensuring all corners are square and connections are secure.
- Position the assembled base frame on your prepared site.
- Securely anchor the base frame to the ground or foundation using appropriate anchors (not included, unless specified).

Figure 4.1: Assembled greenhouse frame before panel installation.
4.3 Main Frame Assembly
- Begin by attaching the vertical aluminum profiles to the base frame.
- Connect the horizontal roof and wall profiles, gradually building the main structure.
- Ensure all bolts are tightened securely but do not overtighten until all frame sections are aligned.

Figure 4.2: Side view illustrating the frame structure.
4.4 Glass Panel Installation
- Carefully insert the glass panels into the designated frame channels.
- Use the provided clips and sealing strips to secure the panels and ensure a weather-tight seal.
- Start with the side panels, then proceed to the roof panels.
- Exercise extreme caution when handling glass.
4.5 Door and Vent Installation
- Assemble the door frame and attach the glass panels for the door.
- Install the door into the main frame, ensuring it opens and closes smoothly.
- Assemble and install the roof vent mechanism. Ensure it operates freely for ventilation.

Figure 4.3: Front view showing the sliding door in an open position.
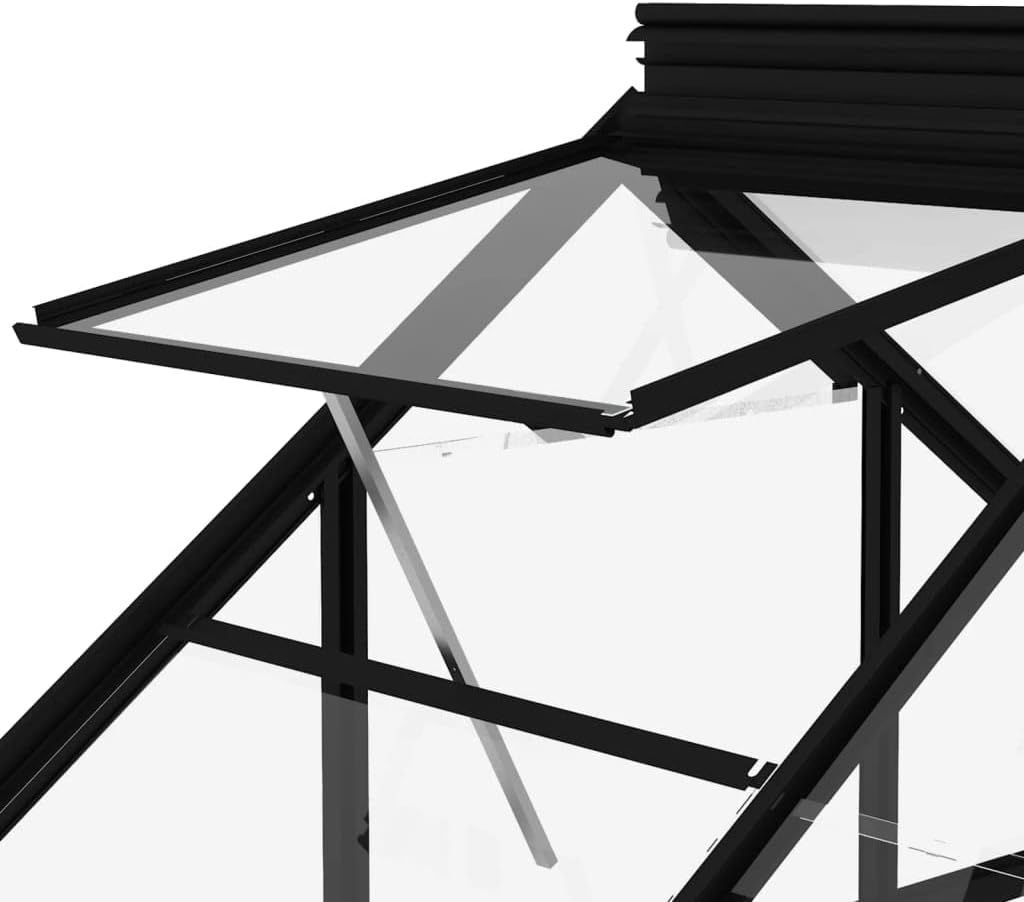
Figure 4.4: Detail of the roof vent for air circulation.
5. Operating Instructions
Once assembled, your greenhouse is ready for use. Proper operation ensures optimal growing conditions for your plants.
5.1 Ventilation
- Temperature Control: Use the roof vent and sliding door to regulate the internal temperature. Open them on warm days to prevent overheating and close them during cooler periods or at night to retain heat.
- Air Circulation: Good ventilation prevents fungal diseases and promotes healthy plant growth. Ensure regular air exchange.
5.2 Watering
- The enclosed environment of a greenhouse reduces water evaporation, so adjust your watering schedule accordingly.
- Monitor soil moisture levels regularly.
5.3 Humidity Management
- The greenhouse helps maintain higher humidity levels. If humidity becomes excessive, increase ventilation.

Figure 5.1: Greenhouse in use, providing a protected environment for plants.
6. Maintenance
Regular maintenance will extend the life of your greenhouse and ensure its continued performance.
- Cleaning: Periodically clean the glass panels with mild soap and water to maximize light transmission. Avoid abrasive cleaners that could scratch the glass or damage the frame finish.
- Frame Inspection: Annually inspect the aluminum and steel frame for any signs of corrosion, loose bolts, or damage. Tighten any loose fasteners.
- Seals and Gaskets: Check the condition of all rubber seals and gaskets around the glass panels and door. Replace any that are cracked or deteriorated to maintain insulation and weatherproofing.
- Door and Vent Operation: Lubricate hinges and sliding mechanisms of the door and roof vent as needed to ensure smooth operation.
- Winter Preparation: In areas with heavy snowfall, consider clearing snow from the roof to prevent excessive weight buildup. Ensure the greenhouse is well-sealed to retain heat.
7. Troubleshooting
| Problem | Possible Cause | Solution |
|---|---|---|
| Excessive condensation inside | Insufficient ventilation; high humidity | Increase ventilation by opening door and roof vent. Ensure proper air circulation. |
| Greenhouse feels too hot | Inadequate ventilation; direct strong sunlight | Open door and roof vent fully. Consider shade cloth during peak summer. |
| Door or vent sticks/does not slide smoothly | Dirt in tracks; misaligned frame; lack of lubrication | Clean tracks. Check frame for squareness and adjust if necessary. Apply silicone lubricant to tracks. |
| Water leaks | Damaged or improperly installed seals/gaskets; loose panels | Inspect and replace damaged seals. Ensure all glass panels are properly seated and secured with clips. |
8. Specifications
| Feature | Detail |
|---|---|
| Product Dimensions (L x W x H) | 155 x 395.5 x 191 cm (approximately 61 x 155.7 x 75.2 inches) |
| Color | Anthracite Grey |
| Frame Material | Aluminum and Steel |
| Panel Material | Glass |
| UV Resistant | Yes |
| Heat Insulated | Yes |
| Model Number | 3082336 |
| Manufacturer | vidaXL |
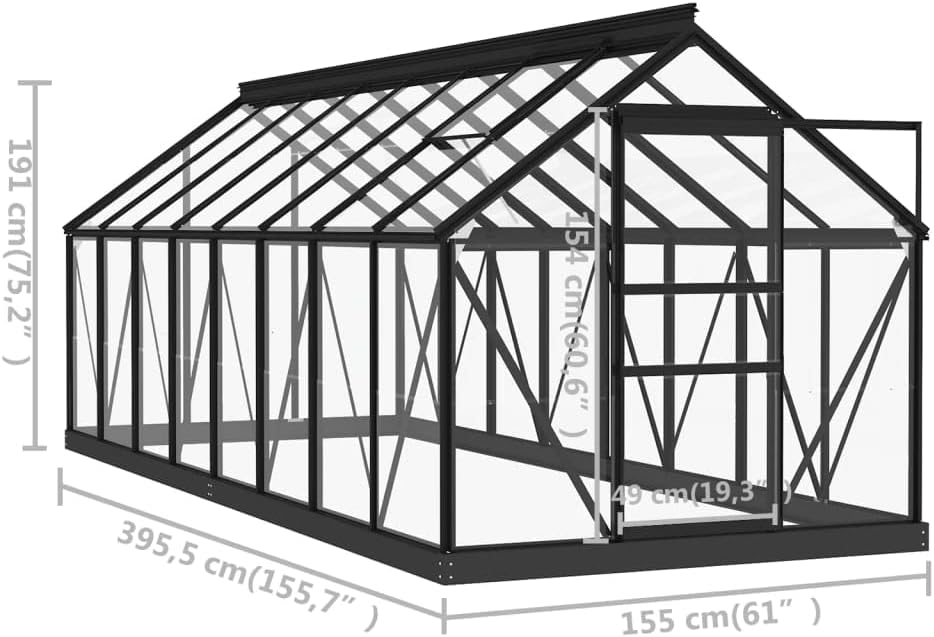
Figure 8.1: Detailed dimensions of the Glass Greenhouse.
9. Warranty and Support
For information regarding warranty coverage, terms, and conditions, please refer to the documentation provided at the time of purchase or contact the retailer or manufacturer directly. Keep your proof of purchase for any warranty claims.
For technical support, missing parts, or assembly assistance, please contact the manufacturer, vidaXL, or your point of purchase. Provide your model number (3082336) and purchase date when seeking support.