GLAoHZNJ GLAoHZNJ567
GLAoHZNJ PZ19 19mm Carburetor with Air Filter Instruction Manual
Model: GLAoHZNJ567
1. Introduction
This instruction manual provides essential information for the proper installation, operation, and maintenance of your GLAoHZNJ PZ19 19mm Carburetor with Air Filter. Please read this manual thoroughly before installation and use to ensure optimal performance and longevity of the product.
2. Product Overview
The GLAoHZNJ PZ19 19mm Carburetor is a high-quality replacement component designed to enhance engine performance. It features a durable zincaluminum alloy construction for reliability and is optimized for improved throttle response and smoother acceleration.

Figure 2.1: Side view of the GLAoHZNJ PZ19 19mm Carburetor, showing the main body and air intake.
3. Compatibility
This carburetor is designed for universal compatibility with a wide range of motorcycles and ATVs. It is suitable for the following models:
- C90
- C100
- C110
- DY100
- ATV Quads
- 4 Wheelers
- Dirt Bikes
- Motorbikes (Electric start models)
4. Package Contents
Verify that all items listed below are present in your package:
- 1 x PZ19 19mm Carburetor
- 1 x Air Filter (integrated or separate, as pictured)

Figure 4.1: View of the carburetor showing the fuel inlet and choke mechanism.
5. Setup and Installation
Installation of the carburetor is designed to be user-friendly. However, if you are unfamiliar with engine components, professional installation is recommended. Always ensure the engine is cool and the fuel supply is turned off before beginning installation.
- Preparation: Disconnect the battery (if applicable) and ensure the vehicle is stable.
- Remove Old Carburetor: Carefully disconnect the fuel line, throttle cable, and any vacuum lines from the old carburetor. Remove mounting bolts and detach the old carburetor.
- Inspect Manifold: Clean the intake manifold surface and ensure it is free of debris. Replace gaskets if necessary.
- Install New Carburetor: Position the new GLAoHZNJ PZ19 carburetor onto the intake manifold. Secure it with the mounting bolts, ensuring a snug fit without overtightening.
- Connect Lines: Reconnect the fuel line, throttle cable, and any vacuum lines to their respective ports on the new carburetor. Ensure all connections are secure and free of leaks.
- Install Air Filter: Attach the included air filter to the carburetor's air intake. Ensure it is properly seated to prevent unfiltered air from entering the engine.
- Final Checks: Double-check all connections. Turn on the fuel supply and check for any leaks.
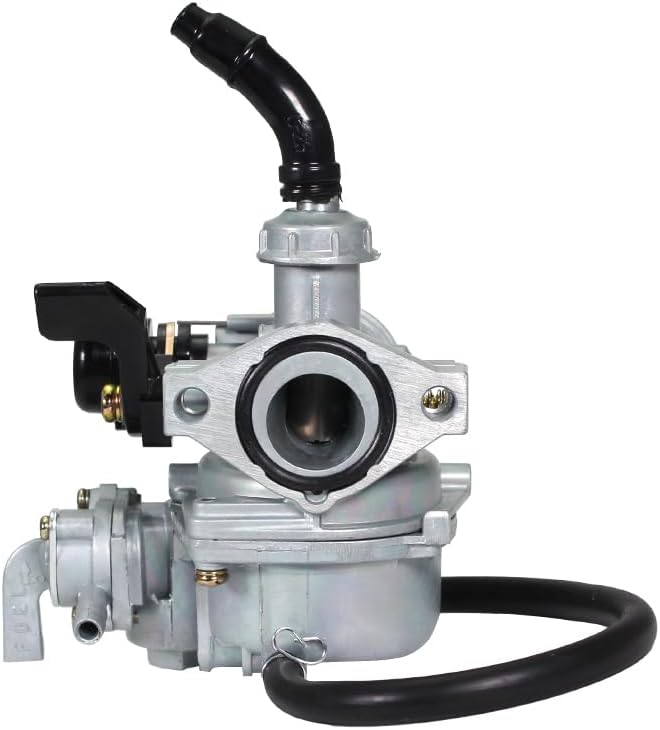
Figure 5.1: Front view of the carburetor, highlighting the air intake opening where the air filter connects.
6. Operating Instructions
After installation, follow these steps to start and operate your vehicle:
- Fuel Supply: Ensure the fuel petcock is in the "ON" or "RUN" position.
- Choke Operation: For cold starts, engage the choke lever (typically by pulling it out or flipping it up). Once the engine starts and warms up, gradually disengage the choke.
- Starting the Engine: Start the engine as per your vehicle's manufacturer instructions (e.g., electric start button or kick start).
- Idle Adjustment: Once the engine is warm, adjust the idle screw (if necessary) to achieve a stable idle speed according to your vehicle's specifications.
- Throttle Response: Test the throttle response gently. The engine should accelerate smoothly without hesitation.
7. Maintenance
Regular maintenance ensures the longevity and optimal performance of your carburetor.
- Air Filter Cleaning/Replacement: Periodically inspect the air filter. Clean or replace it as needed, especially in dusty conditions, to ensure clean airflow and prevent carburetor clogging.
- Fuel System Inspection: Regularly check fuel lines for cracks or leaks. Ensure the fuel filter (if present) is clean.
- Carburetor Cleaning: If performance issues arise, the carburetor may need cleaning. This typically involves disassembling the carburetor, cleaning jets and passages with carburetor cleaner, and replacing gaskets. This task is recommended for experienced individuals or professionals.
- Idle and Mixture Adjustment: Over time, minor adjustments to the idle speed and air-fuel mixture screws may be required for optimal engine performance. Refer to your vehicle's service manual for specific adjustment procedures.
8. Troubleshooting
This section addresses common issues you might encounter.
| Problem | Possible Cause | Solution |
|---|---|---|
| Engine not starting | No fuel, clogged fuel line, incorrect choke setting, fouled spark plug. | Check fuel level and petcock. Inspect fuel line for blockages. Adjust choke. Check/replace spark plug. |
| Rough idle or stalling | Incorrect idle adjustment, dirty carburetor jets, air leak in intake. | Adjust idle screw. Clean carburetor. Check intake manifold for leaks. |
| Poor acceleration or loss of power | Clogged air filter, restricted fuel flow, incorrect air-fuel mixture. | Clean/replace air filter. Check fuel filter and lines. Adjust mixture screw (if applicable). |
| Fuel leaks | Loose fuel line connections, damaged float bowl gasket, faulty float valve. | Tighten connections. Inspect and replace gaskets. Inspect float valve. |
For issues not listed here, or if troubleshooting steps do not resolve the problem, consult a qualified mechanic.
9. Specifications
Detailed specifications for the GLAoHZNJ PZ19 19mm Carburetor:
- Model: GLAoHZNJ567
- Carburetor Diameter: 19mm (PZ19)
- Material: Zincaluminum alloy
- Item Weight: 1.76 ounces
- Package Dimensions: 1.18 x 0.79 x 0.39 inches
- Manufacturer Part Number: GLAoHZNJ567
- ASIN: B0D97CTNV2
- Date First Available: July 11, 2024
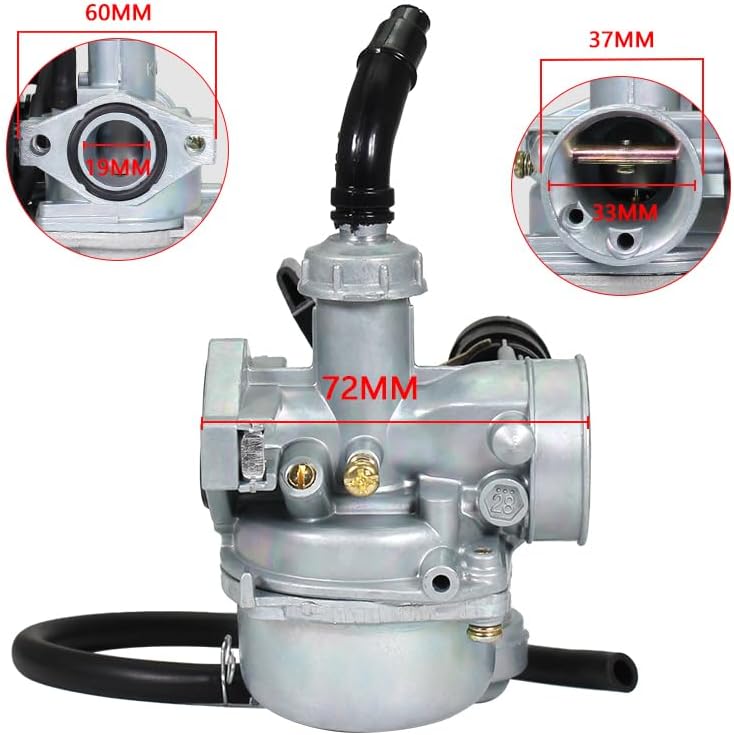
Figure 9.1: Carburetor dimensions, showing key measurements for reference.
10. Warranty and Support
Information regarding specific warranty terms is not provided in the product details. For warranty claims or technical support, please contact the seller or manufacturer directly through the platform where the product was purchased.
Manufacturer: GLAoHZNJ
Ask a question about this manual
Ask about setup, troubleshooting, compatibility, parts, safety, or missing instructions. Manuals+ will review the question and use this page’s manual context to help answer it.