
BREVELTION YT-300
BREVELTION 110V 30-300ml Automatic Quantitative Filling Machine User Manual
Model: YT-300 | Brand: BREVELTION
1. Important Safety Instructions
To ensure safe operation and prevent damage to the machine, please read and adhere to the following precautions:
- Power and Air Supply: Ensure the power supply (110V) and air source meet the machine's requirements. Maintain stable air pressure during continuous operation.
- Before Maintenance: Always turn off the air source and power supply before disassembling, cleaning, or repairing the machine.
- Water Exposure: Never wash the entire machine directly with water. This poses a risk of electric shock and damage to electrical components.
- Electrical Safety: Even after turning off the power switch, some circuits may retain voltage. Always unplug the power cord when performing maintenance on the control circuit.
- Hot Surfaces: Do not approach the vertical and horizontal sealing areas when the machine is operating to prevent burns.
- Moving Parts: Keep hands clear of the central axis of the cylinder during operation to avoid pinching injuries.
- Initial Cleaning: Before using materials for filling, clean the machine with a suitable detergent, then rinse thoroughly with clean water to remove any manufacturing residues or oil stains.
2. Product Overview and Components
The BREVELTION YT-300 is an automatic quantitative filling machine designed for packaging various liquids and pastes. It integrates bag making, filling, sealing, cutting, and bag counting functions.

Figure 2.1: Overview of the BREVELTION YT-300 Automatic Quantitative Filling Machine.
2.1 Key Components

Figure 2.2: Labeled diagram of the machine's main components.
- Support Rod: Provides structural support for the film roll.
- Consumable Hanging Rod: Holds the roll of packaging film.
- Horizontal Mixing Hopper: Stores and mixes the product to be filled.
- Packaging Consumables: The film used for creating bags.
- Intelligent Control Panel: User interface for machine operation and settings.
- Power Switch: Controls the main power to the machine.
- Vertical Sealing: Mechanism for sealing the sides of the bag.
- Protective Cover: Shields internal components and moving parts.
- Wheel: Allows for easy movement of the machine.
- Filling Machine: The core unit responsible for dispensing the product.
- Stainless Steel Body: Durable and hygienic exterior casing.
- Packaging Molding Machine: Forms the bags from the film.
- Horizontal Sealing: Mechanism for sealing the top and bottom of the bag.
- Product Outlet: Where the filled and sealed bags exit the machine.
2.2 Dimensions

Figure 2.3: Overall machine dimensions.
- Height: 51.9 inches (132 cm)
- Width: 34.2 inches (87 cm)
- Depth: 19.68 inches (50 cm)

Figure 2.4: Dimensions of the horizontal mixing hopper.
- Hopper Length: 18.5 inches (47 cm)
- Hopper Width: 17.3 inches (44 cm)
- Hopper Depth: 12.4 inches (31.5 cm)
3. Technical Specifications
| Feature | Specification |
|---|---|
| Voltage | 110V |
| Power | 0.5KW |
| Machine Dimensions (L*W*H) | 87*50*132 CM (34.25*19.68*51.9 inches) |
| Filling Volume Range | 30ml - 300ml |
| Filling and Packaging Speed | 20-30 bags per minute |
| Material | Stainless Steel |
| Applicable Packaging Film Width | 9.4 inches (24 CM) |
| Required Air Compressor Exhaust | Not less than 0.1 m³/min |
| Required Air Compressor Pressure | 0.4-0.9 Mpa |
| Product Weight | 250 Pounds (approx. 113 kg) |
4. Setup Instructions
Follow these steps to set up your BREVELTION YT-300 filling machine:
- Unpacking and Placement:
Carefully unpack the machine. Due to its weight (250 lbs), ensure proper lifting techniques or equipment are used. Place the machine on a stable, level surface. The integrated wheels facilitate movement.

Figure 4.1: The machine is equipped with wheels for convenient relocation.
- Power Connection:
Connect the machine to a 110V power outlet. Ensure the power switch (refer to Figure 2.2) is in the OFF position before connecting.
- Air Compressor Connection:
This machine requires an external air compressor. Connect the air compressor to the machine's air inlet. Ensure the air compressor provides an exhaust of at least 0.1 m³/min and can maintain a pressure between 0.4-0.9 Mpa.

Figure 4.2: The barometer and air inlet. The air inlet connects to an external air compressor for operation.
- Install Packaging Film:
Mount the roll of packaging film onto the consumable hanging rod (refer to Figure 2.2). Thread the film through the machine, ensuring it passes correctly through the black wheels for proper function.

Figure 4.3: Packaging consumables must pass through the black wheels for proper operation. A protective cover is present to prevent accidental injury near the heating block.
- Initial Cleaning:
Before first use, clean the horizontal mixing hopper and filling system. Use a suitable detergent, then rinse thoroughly with clean water to remove any manufacturing residues or oil stains. The detachable clasp allows for easy cleaning of internal channels.
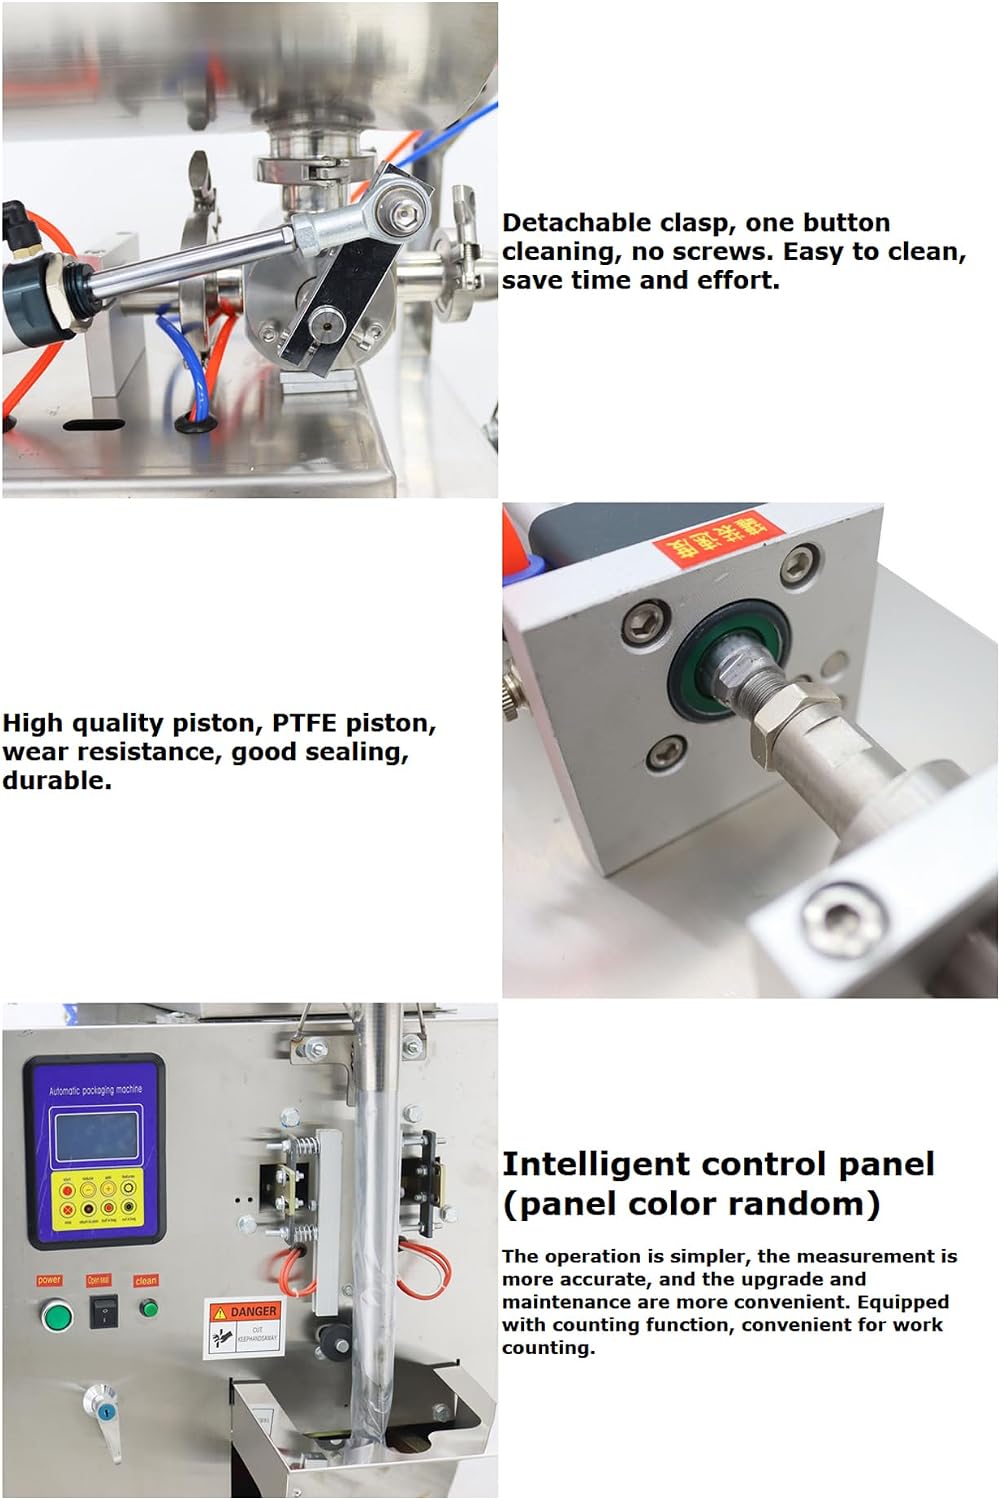
Figure 4.4: Detachable clasp for one-button cleaning, saving time and effort. The machine features a high-quality PTFE piston for durability and good sealing.
5. Operating Instructions
Operating the BREVELTION YT-300 involves filling the hopper, setting parameters, and initiating the filling process.
- Fill the Hopper:
Pour the product (sauces, pastes, oils, liquids with tiny particles) into the horizontal mixing hopper (refer to Figure 2.2). The hopper is made of stainless steel and includes a mixing mechanism to ensure product consistency.
Figure 5.1: Stainless steel hopper with horizontal mixing funnel, designed for hygiene and preventing corrosion. The mixing speed can be adjusted.
- Adjust Filling Volume:
The filling volume can be adjusted between 30ml and 300ml. Use the magnetic switch or the rocker handle to precisely set the desired filling amount. For initial setup, weigh the output to confirm the volume.

Figure 5.2: Magnetic switch for adjusting filling amount via hand wheel rotation. Figure 5.3: Hand handle for adjusting rocker filling precision. Figure 5.4: High-quality air cylinder allows adjustment of filling speed via inlet/outlet flow regulation.
- Set Packaging Parameters:
Use the intelligent control panel to set parameters such as bag length, sealing temperature, and counting. The microcomputer control system provides cursor positioning, automatic detection, and fault diagnosis.
Figure 5.5: The intelligent control panel offers simplified operation, accurate measurement, and convenient maintenance. It includes a counting function.
- Start Operation:
Once all settings are configured and safety checks are complete, turn on the power switch and press the START button on the control panel to begin the automatic bag making, filling, sealing, cutting, and counting process.
6. Maintenance
Regular maintenance ensures the longevity and optimal performance of your machine.
- Daily Cleaning:
After each use, especially when changing products, clean the hopper and filling system. The "One-click cleaning" function automatically cleans internal channels, making it suitable for switching between multiple materials.
Figure 6.1: The "One-click cleaning" function simplifies the cleaning process for internal channels.
For thorough cleaning, utilize the detachable clasp (refer to Figure 4.4) to access and clean components. Always turn off power and air supply before cleaning.
- Piston and Cylinder Inspection:
Periodically inspect the high-quality PTFE piston and cylinder (refer to Figure 4.4 and Figure 5.4) for wear or damage. Ensure good sealing and smooth operation.
- Sealing Mechanism Check:
Regularly inspect the vertical and horizontal sealing mechanisms for debris or wear. Ensure they are clean and functioning correctly to produce consistent seals.
- Air System Check:
Verify that the air compressor connection and barometer (refer to Figure 4.2) are secure and that the air pressure remains within the specified range (0.4-0.9 Mpa).
- General Inspection:
Check all bolts, screws, and connections for tightness. Ensure all protective covers are in place.
7. Troubleshooting
This section provides solutions to common issues you might encounter.
| Problem | Possible Cause | Solution |
|---|---|---|
| Machine does not power on. | No power supply; Power switch off; Blown fuse. | Check power cord connection; Ensure power switch is ON; Inspect and replace fuse if necessary. |
| Filling volume is inconsistent. | Incorrect volume setting; Air pressure fluctuation; Product consistency issues; Worn piston/seals. | Re-adjust filling volume using magnetic switch/rocker; Check air compressor for stable pressure; Ensure product is well-mixed; Inspect and replace piston/seals if worn. |
| Bags are not sealing properly. | Incorrect sealing temperature; Debris on sealing bars; Worn sealing elements; Film not threaded correctly. | Adjust sealing temperature on control panel; Clean sealing bars; Inspect and replace sealing elements; Verify film path through black wheels (refer to Figure 4.3). |
| Machine stops unexpectedly. | Air pressure drop; Power interruption; Safety sensor triggered; Material jam. | Check air compressor and connections; Verify power supply; Inspect for obstructions or safety sensor activation; Clear any material jams. |
| Control panel displays error. | System fault; Sensor error. | Refer to the error code displayed on the intelligent control panel (refer to Figure 5.5) for specific guidance. If unresolved, contact customer support. |
8. Warranty and Support
For warranty information, technical support, or service inquiries, please refer to your purchase documentation or contact BREVELTION customer service. Keep your purchase receipt and product serial number (Item Number: 160317) readily available when contacting support.
Customer Support: For assistance, please contact the seller "WALDEEP INC" or refer to the contact information provided at the time of purchase.
Ask a question about this manual
Ask about setup, troubleshooting, compatibility, parts, safety, or missing instructions. Manuals+ will review the question and use this page’s manual context to help answer it.