1. Introduction
Thank you for choosing the PULUZ Upgrade Video Light. This compact and versatile fill light is designed to enhance your photography and videography with adjustable brightness and color temperature. It features dual power options for flexible use in various shooting environments. Please read this manual carefully before use to ensure proper operation and maintenance.

Image 1.1: Front view of the PULUZ Upgrade Video Light, displaying its LED panel.
2. Package Contents
Verify that all items listed below are included in your package:
- PULUZ Upgrade Video Light x 1
- White Filter x 1
- Orange Filter x 1
- USB Type-C Charging Cable x 1

Image 2.1: All components included in the product package.
3. Product Overview
Familiarize yourself with the main components of your video light:
- LED Panel: Provides illumination.
- Power Switch: Turns the light on and off.
- Brightness Adjustment Knob: Controls light intensity.
- Cold Shoe Mount: For attaching to cameras or other accessories.
- 1/4" Screw Hole: For mounting on tripods, light stands, or rigs.
- Type-C Port: For external power supply.
- Battery Compartment: For AA batteries.

Image 3.1: Key mounting points on the video light, including cold shoe and 1/4" screw hole.
4. Setup
4.1 Power Supply
The video light supports two power modes:
- AA Batteries: Open the battery compartment cover and insert AA batteries (not included), ensuring correct polarity.
- USB Type-C: Connect the provided USB Type-C cable to the light's Type-C port and to a compatible USB power source (e.g., power bank, USB adapter).

Image 4.1: The video light can be powered by AA batteries or via a Type-C USB connection.
4.2 Mounting
Attach the video light to your equipment:
- Camera Hot Shoe/Cold Shoe: Slide the light's cold shoe mount into your camera's hot shoe or a cold shoe adapter on a rig. Tighten the locking wheel if available.
- Tripod/Light Stand: Use the 1/4" screw hole at the bottom to mount the light onto a tripod, light stand, or other compatible accessories.
4.3 Filter Installation
The light comes with a white and an orange filter to adjust color temperature:
- Gently snap the desired filter onto the front of the LED panel.
- The white filter provides a neutral, daylight-balanced light (6400K).
- The orange filter provides a warm, tungsten-balanced light (3200K).
5. Operation
5.1 Power On/Off
Locate the power switch on the side of the unit. Slide it to the 'ON' position to turn on the light, and to the 'OFF' position to turn it off.
5.2 Brightness Adjustment
Once powered on, use the dimmable adjustment knob on the side of the light to increase or decrease the brightness. Rotate clockwise to increase brightness and counter-clockwise to decrease it.

Image 5.1: The adjustment knob controls brightness, and filters change the color temperature between white and warm.
5.3 Color Temperature Adjustment
Change the color temperature by attaching either the white or orange filter to the front of the light. The white filter provides a cooler, natural light, while the orange filter provides a warmer tone.
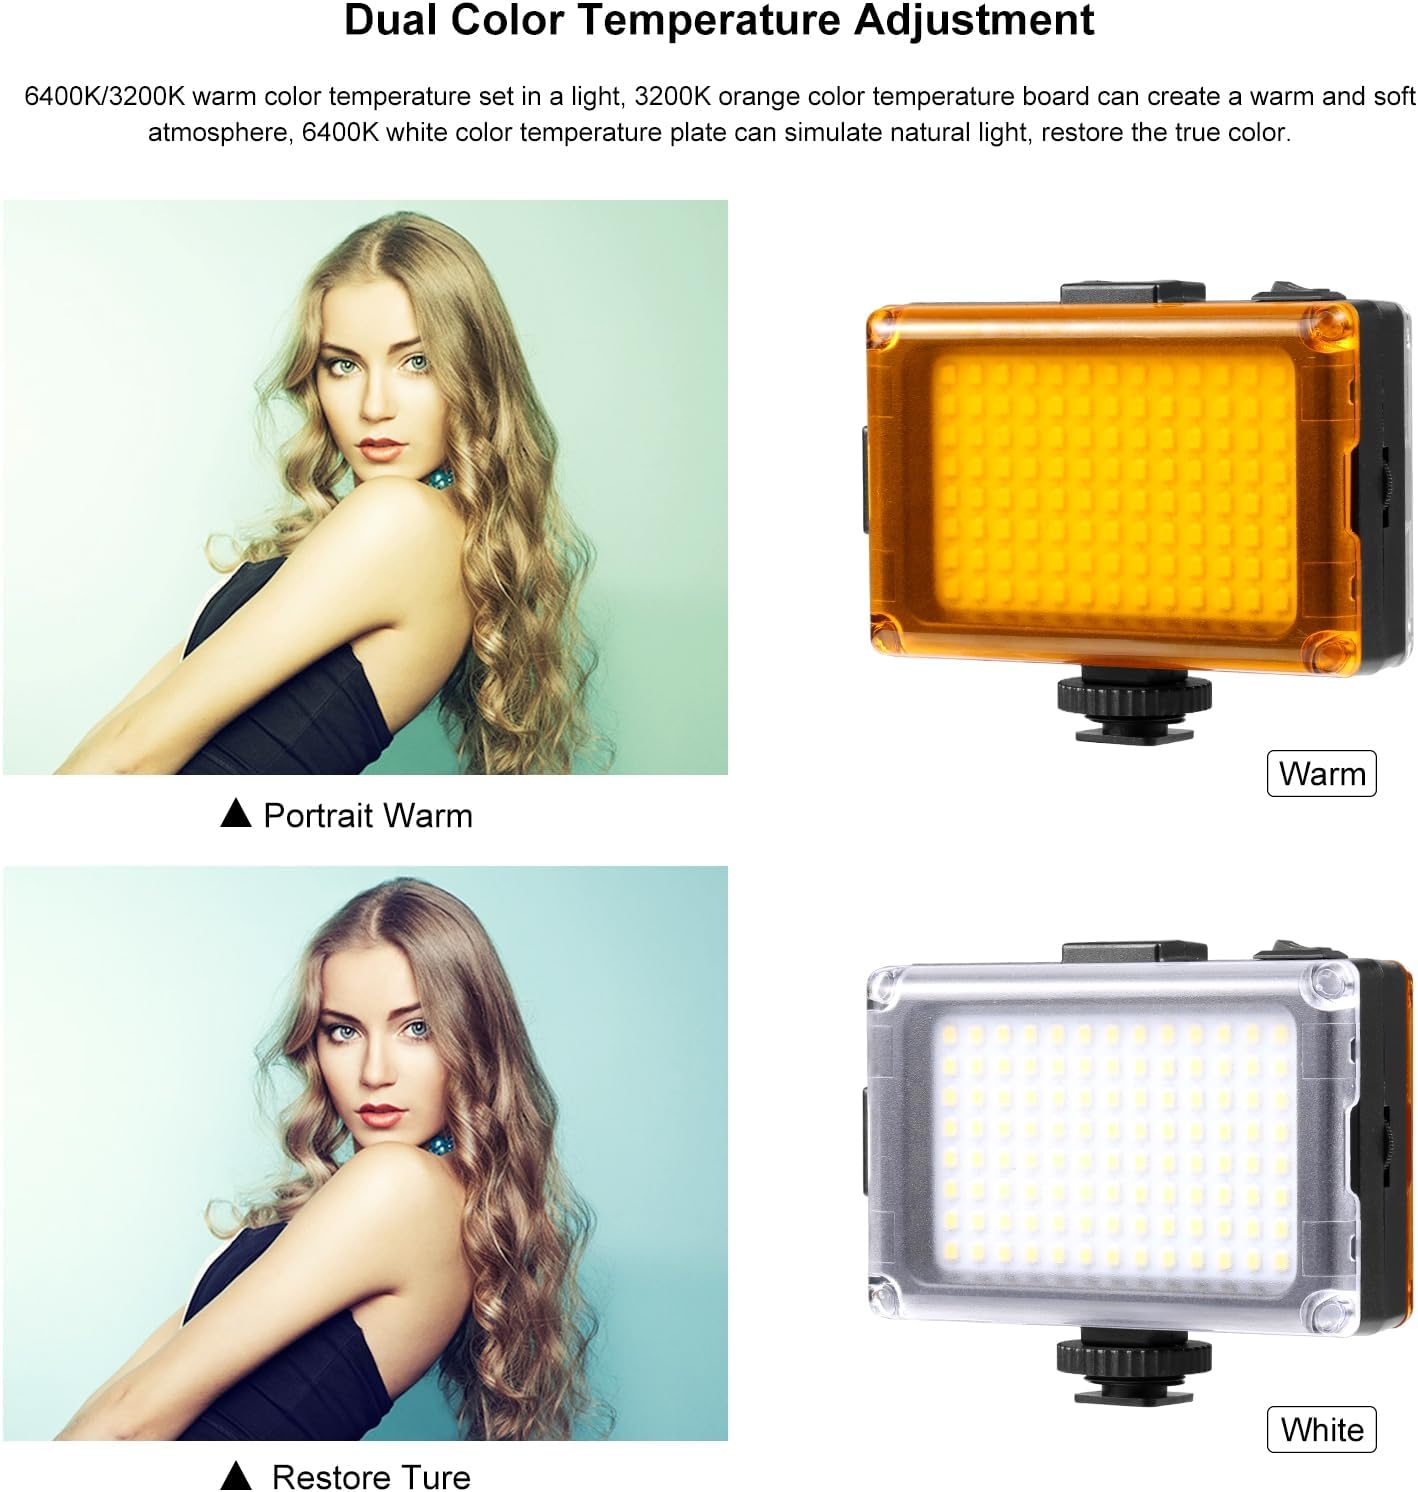
Image 5.2: The light can be adjusted for warm (3200K) or white (6400K) color temperatures using the included filters.
6. Maintenance
- Cleaning: Use a soft, dry cloth to clean the light's surface and LED panel. Avoid using harsh chemicals or abrasive materials.
- Storage: When not in use, store the light in a cool, dry place away from direct sunlight and moisture. If using AA batteries, remove them during extended storage to prevent leakage.
- Handling: Handle the light with care to avoid dropping or impacting it, which could damage internal components.
7. Troubleshooting
- Light does not turn on:
- Ensure the power switch is in the 'ON' position.
- If using AA batteries, check if they are inserted correctly and have sufficient charge. Replace if necessary.
- If using USB Type-C, ensure the cable is securely connected and the power source is active.
- Brightness is too low/high:
- Adjust the brightness knob to your desired level.
- Ensure the power source (batteries or USB) is providing adequate power.
- Inconsistent light output:
- Check for loose connections if using USB power.
- If using batteries, ensure they are making good contact and are not low on charge.
8. Specifications
| Brand | PULUZ |
| Model Number | Upgrade Video Light |
| Connectivity Technology | USB |
| Hardware Interface | USB 3.0 Type C |
| Flash Modes Description | Constant illumination, adjustable brightness, adjustable color temperature |
| Water Resistance Level | Not Water Resistant |
| Compatible Devices | DSLR cameras, Canon, Nikon, Sony, devices with Type-C port |
| Exposure Control Type | Manual (M) |
| Light Angle | 120 degrees |
| Color Temperature | 6400K (with white filter), 3200K (with orange filter) |
9. Warranty Information
This PULUZ Upgrade Video Light comes with a 1-month warranty from the date of purchase. This warranty covers manufacturing defects and malfunctions under normal use. It does not cover damage caused by misuse, accidents, unauthorized modifications, or improper storage.
Please retain your proof of purchase for warranty claims.
10. Customer Support
If you encounter any issues or have questions regarding your PULUZ Upgrade Video Light that are not addressed in this manual, please contact our customer support team. For the fastest service, please visit the official PULUZ website or refer to your purchase platform for contact details.
When contacting support, please provide your product model number and a detailed description of the issue.