EuroChef 9L Dual Zone Air Fryer
EuroChef 9L Dual Zone Air Fryer User Manual
Model: 9L Dual Zone Air Fryer | Brand: EuroChef
Introduction
Thank you for choosing the EuroChef 9L Dual Zone Air Fryer. This appliance is designed to provide a healthier way to cook your favorite meals, utilizing advanced 360° air-circulation technology for crispy results with significantly less fat. With its dual baskets and independent cooking zones, you can prepare two different dishes simultaneously or synchronize cooking for larger meals. This manual provides essential information for safe operation, maintenance, and troubleshooting to ensure optimal performance and longevity of your air fryer.
Important Safety Instructions
Please read all instructions carefully before using the appliance and retain them for future reference. Failure to follow these instructions may result in electric shock, fire, or serious injury.
- Always place the air fryer on a stable, level, and heat-resistant surface, away from walls or other appliances to allow adequate air circulation.
- Do not immerse the main unit, cord, or plug in water or any other liquid.
- Ensure the voltage indicated on the appliance corresponds to your local mains voltage before connecting.
- Unplug the appliance from the outlet when not in use and before cleaning. Allow it to cool completely before handling or storing.
- Do not operate any appliance with a damaged cord or plug, or after the appliance malfunctions or has been damaged in any manner.
- Keep children and pets away from the appliance during operation. Hot surfaces can cause burns.
- Do not block any ventilation openings.
- Do not overfill the baskets. Overfilling may prevent food from cooking evenly and could lead to overheating.
- Use caution when removing hot air fryer baskets or handling hot food. Always use oven mitts.
- The four rubber clips on the grill trays are designed to secure the tray within the basket and are heat-resistant for normal cooking operations. Ensure they are properly attached.
Product Overview
Familiarize yourself with the components of your EuroChef 9L Dual Zone Air Fryer.

Figure 1: Front view of the EuroChef 9L Dual Zone Air Fryer, showcasing its sleek black design, digital control panel, and two transparent cooking drawers.
Components:
- Main Unit: Houses the heating element and control panel.
- Control Panel: Intuitive LED display with touch controls for settings.
- Cooking Drawers (x2): Removable baskets for holding food.
- Non-Stick Grill Trays (x2): Inserted into the cooking drawers for optimal air circulation and easy cleaning.

Figure 2: Detailed view of the air fryer's touch control panel, highlighting the digital display for time and temperature settings, along with icons for various functions.
Setup
- Unpack: Carefully remove all packaging materials and promotional labels from the air fryer.
- Clean Before First Use: Wash the cooking drawers and grill trays with warm, soapy water. Rinse thoroughly and dry completely. Wipe the exterior of the main unit with a damp cloth.
- Placement: Place the air fryer on a flat, stable, heat-resistant surface. Ensure there is at least 15 cm (6 inches) of clear space around the back and sides of the unit for proper ventilation.
- Power Connection: Plug the power cord into a grounded electrical outlet. The appliance will beep, and the display will illuminate briefly.
Operating Instructions
Basic Operation:
- Power On: Press the power icon (⏻) to turn on the air fryer.
- Select Basket: Choose basket 1 or 2 by pressing the corresponding number on the control panel.
- Set Temperature and Time: Use the temperature (+/-) and time (+/-) buttons to adjust settings. The temperature range is 80-200°C, and the timer can be set up to 60 minutes.
- Start Cooking: Press the Start/Stop button (▶/■) to begin the cooking cycle.
Using Pre-set Functions:
The air fryer comes with 8 pre-set cooking functions for common dishes. To use a pre-set:
- Select the desired basket (1 or 2).
- Press the menu icon repeatedly to cycle through the 8 pre-set options until the desired icon is highlighted.
- The air fryer will automatically set the recommended time and temperature. You can adjust these manually if needed.
- Press Start/Stop to begin.
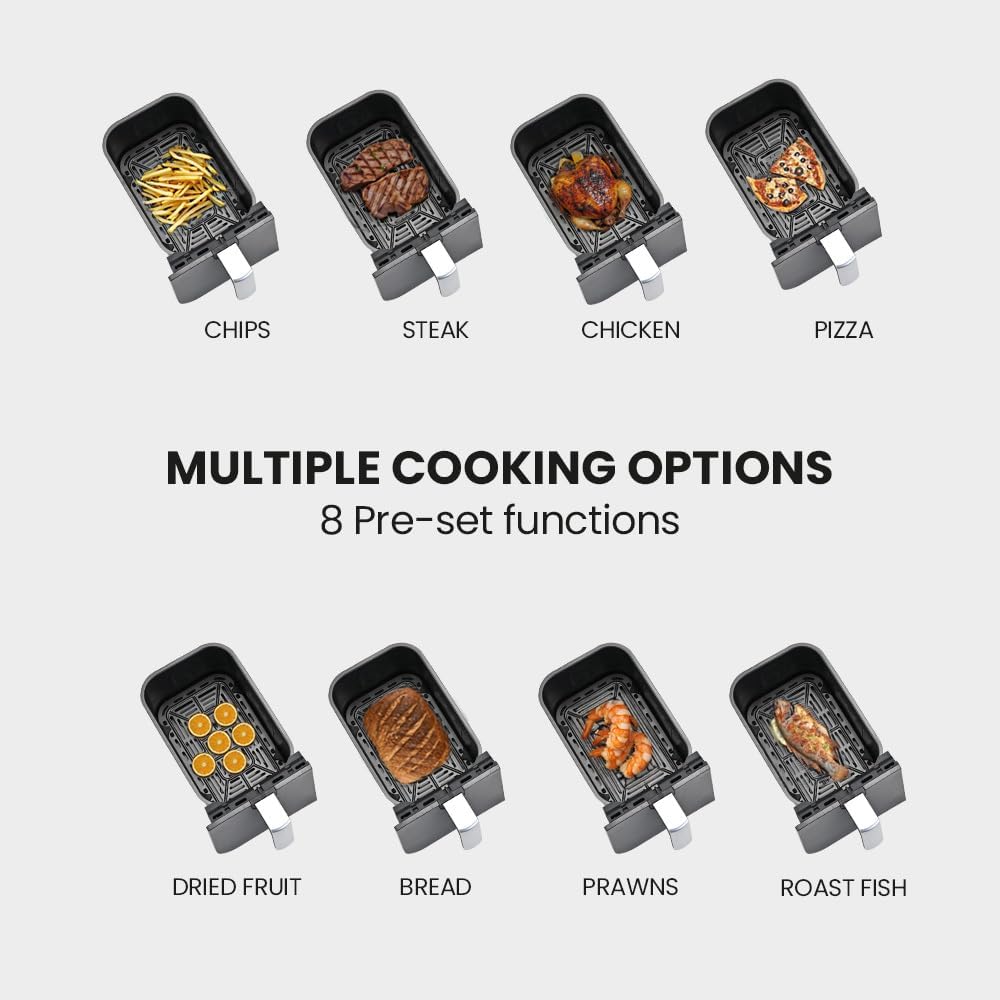
Figure 3: Visual representation of the 8 pre-set functions available on the EuroChef Air Fryer, illustrating the variety of dishes that can be prepared.
Available Pre-sets: Chips, Steak, Chicken, Pizza, Dried Fruit, Bread, Prawns, Roast Fish.
Dual Zone Cooking:
The EuroChef 9L Air Fryer features independent dual zone cooking, allowing for versatile meal preparation.
- Independent Cooking: Set different temperatures and times for each basket (Basket 1 and Basket 2) to cook two different foods simultaneously.
- SYNC Function: Use the SYNC button to ensure both baskets finish cooking at the same time, even if they have different cooking times and temperatures. The air fryer will automatically adjust the start time of the basket with the shorter cooking duration.
- DUAL COOK Function: Use the DUAL COOK button to apply the same cooking settings (time and temperature) to both baskets, ideal for cooking larger quantities of the same food.

Figure 4: Illustration of the independent dual zone cooking capability, demonstrating how different foods can be cooked simultaneously with distinct settings.
Shake Reminder:
For certain foods, the air fryer will prompt you with a "SHAKE" reminder during the cooking cycle. This indicates that the food in the basket should be shaken or flipped to ensure even cooking and crispiness. Simply pull out the basket, shake or flip the contents, and reinsert the basket to resume cooking.
Cooking Guide and Tips
- Preheating: For best results, preheat the air fryer for 3-5 minutes before adding food.
- Oil Usage: While air frying requires significantly less oil than deep frying (up to 80% less fat), a small amount of oil (1-2 teaspoons) can enhance crispiness for some foods.
- Do Not Overcrowd: Cook food in single layers or small batches to ensure even air circulation and crisping. Overcrowding can lead to uneven cooking.
- Shake or Flip: For foods like fries or chicken nuggets, shaking the basket or flipping the food halfway through cooking ensures all sides are evenly cooked and crispy.
- Monitoring: The lit viewing window allows you to monitor cooking progress without opening the baskets, helping to maintain consistent temperature.
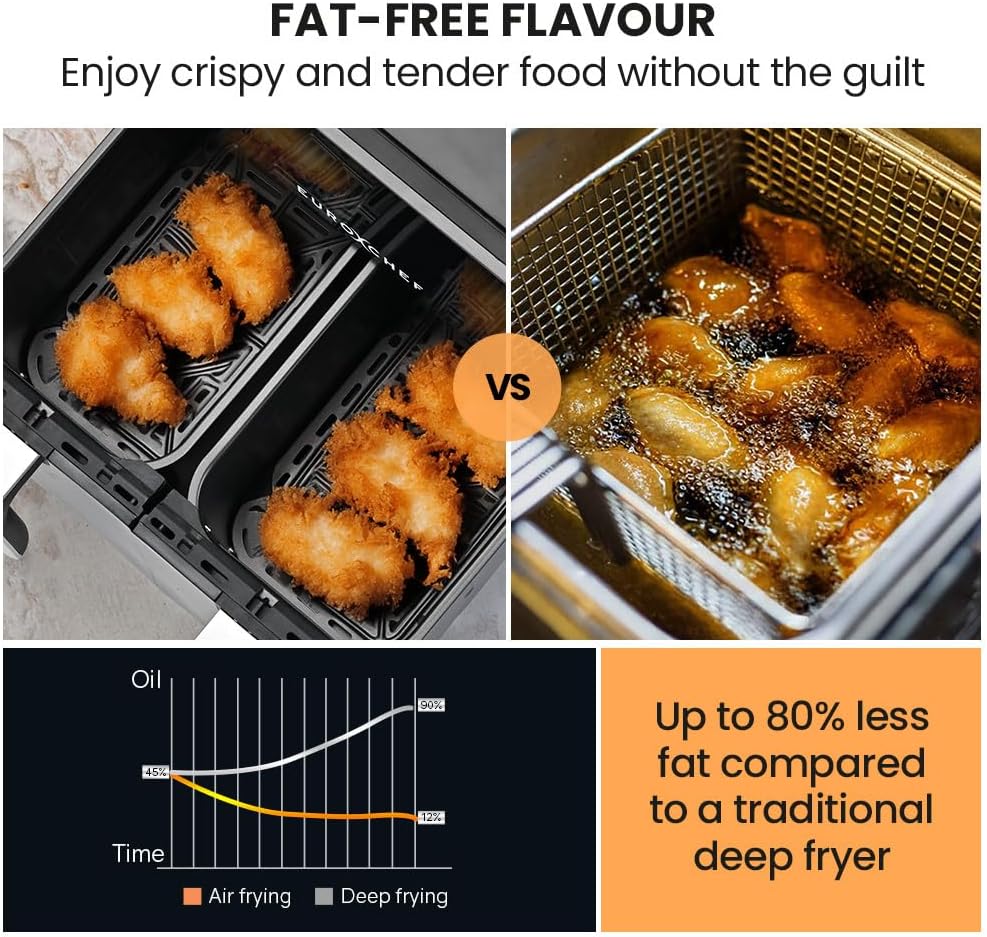
Figure 5: Visual comparison demonstrating the health benefits of air frying, showing significantly reduced fat content compared to traditional deep frying methods.
Cleaning and Maintenance
Regular cleaning will help maintain the performance and extend the life of your air fryer.
- Unplug and Cool Down: Always unplug the air fryer from the power outlet and allow it to cool completely before cleaning.
- Clean Baskets and Trays: The removable non-stick grill trays and cooking drawers are dishwasher-safe for convenient cleaning. Alternatively, wash them with warm, soapy water and a non-abrasive sponge. Rinse and dry thoroughly.
- Clean Interior: Wipe the interior of the air fryer with a damp cloth and mild detergent. Ensure no water enters the heating element area.
- Clean Exterior: Wipe the exterior of the appliance with a soft, damp cloth. Do not use abrasive cleaners or scouring pads.
- Storage: Ensure all parts are clean and dry before storing the air fryer in a cool, dry place.
Troubleshooting
| Problem | Possible Cause | Solution |
|---|---|---|
| Air fryer does not turn on. | Not plugged in; power outlet malfunction. | Ensure the power cord is securely plugged into a working electrical outlet. |
| Food is not cooked evenly. | Baskets are overcrowded; food not shaken/flipped. | Do not overcrowd baskets. Shake or flip food halfway through cooking. |
| Appliance overheats and shuts off. | Insufficient ventilation; baskets overfilled; prolonged use of both baskets simultaneously with high power demands. | Ensure adequate space around the unit for ventilation. Do not overfill baskets. If using both baskets for high-demand cooking, consider cooking in batches or reducing the load to prevent thermal overload. Allow the unit to cool down before restarting. |
| Smell transfer between compartments. | Inherent design characteristic. | Due to the shared air circulation system, some aroma transfer between compartments may occur. This is normal and does not affect food safety. |
Specifications
| Feature | Detail |
|---|---|
| Brand | EuroChef |
| Model | 9L Dual Zone Air Fryer |
| Power | 2400W |
| Capacity | 9 Litres (total) |
| Pre-set Functions | 8 |
| Timer | Up to 60 minutes |
| Temperature Range | 80-200°C |
| Input Voltage | 220-240V |
| Product Dimensions (W x L x H) | 40 x 40 x 31 cm |
| Product Weight | 7 kg |

Figure 6: Product dimensions of the EuroChef Air Fryer, illustrating its compact size for kitchen countertops.
Warranty and Support
Warranty information for your EuroChef 9L Dual Zone Air Fryer is typically provided with your purchase documentation or can be found on the manufacturer's official website. Please refer to these resources for details regarding warranty coverage, terms, and conditions.
For product support, technical assistance, or inquiries not covered in this manual, please contact EuroChef customer service. Contact details are usually available on the product packaging or the official EuroChef website. When contacting support, please have your product model and purchase details ready.
Ask a question about this manual
Ask about setup, troubleshooting, compatibility, parts, safety, or missing instructions. Manuals+ will review the question and use this page’s manual context to help answer it.