1. Introduction
This manual provides essential instructions for the safe and efficient operation, installation, and maintenance of your GarveeTech CW-5200 Industrial Water Chiller. The CW-5200 is designed to provide stable and precise temperature control for various industrial applications, particularly CO2 laser engraving and cutting machines up to 150W. Please read this manual thoroughly before operating the unit and retain it for future reference.

Figure 1: GarveeTech CW-5200 Industrial Water Chiller
The GarveeTech CW-5200 is a 6-liter industrial water chiller featuring a 0.9hp compressor and a flow rate of 2.6 gallons per minute. It is engineered for fast cooling, low noise operation, and precise temperature control, making it suitable for chilling two 60W, 70W, 80W, 90W, 100W, 120W, or 150W CO2 laser engraving machines.
2. Safety Information
Always observe the following safety precautions to prevent injury or damage to the equipment:
- Ensure the chiller is placed on a stable, level surface.
- Provide adequate ventilation around the unit to prevent overheating. Maintain at least 12 inches (30 cm) of clear space on all sides.
- Use only distilled or deionized water in the cooling system. Do not use tap water or corrosive liquids.
- Verify that the power supply matches the chiller's requirements (voltage, frequency).
- Do not operate the chiller without sufficient water in the reservoir.
- Disconnect power before performing any maintenance or troubleshooting.
- Keep children and unauthorized personnel away from the operating unit.
3. Product Overview and Components
Familiarize yourself with the main components of the CW-5200 chiller:

Figure 2: Front and Back Panel Layout
- Front Panel: Temperature Controller, Power Switch, Air Inlet & Filter.
- Rear Panel: Alarm Output Terminal, Cooling Water Outlet, Cooling Water Inlet, Water Injection Port, Power Socket & Spare Fuse, Air Outlet, Water Drain.
- Side Panels: Cooling Fan (visible on the right side in Figure 1).
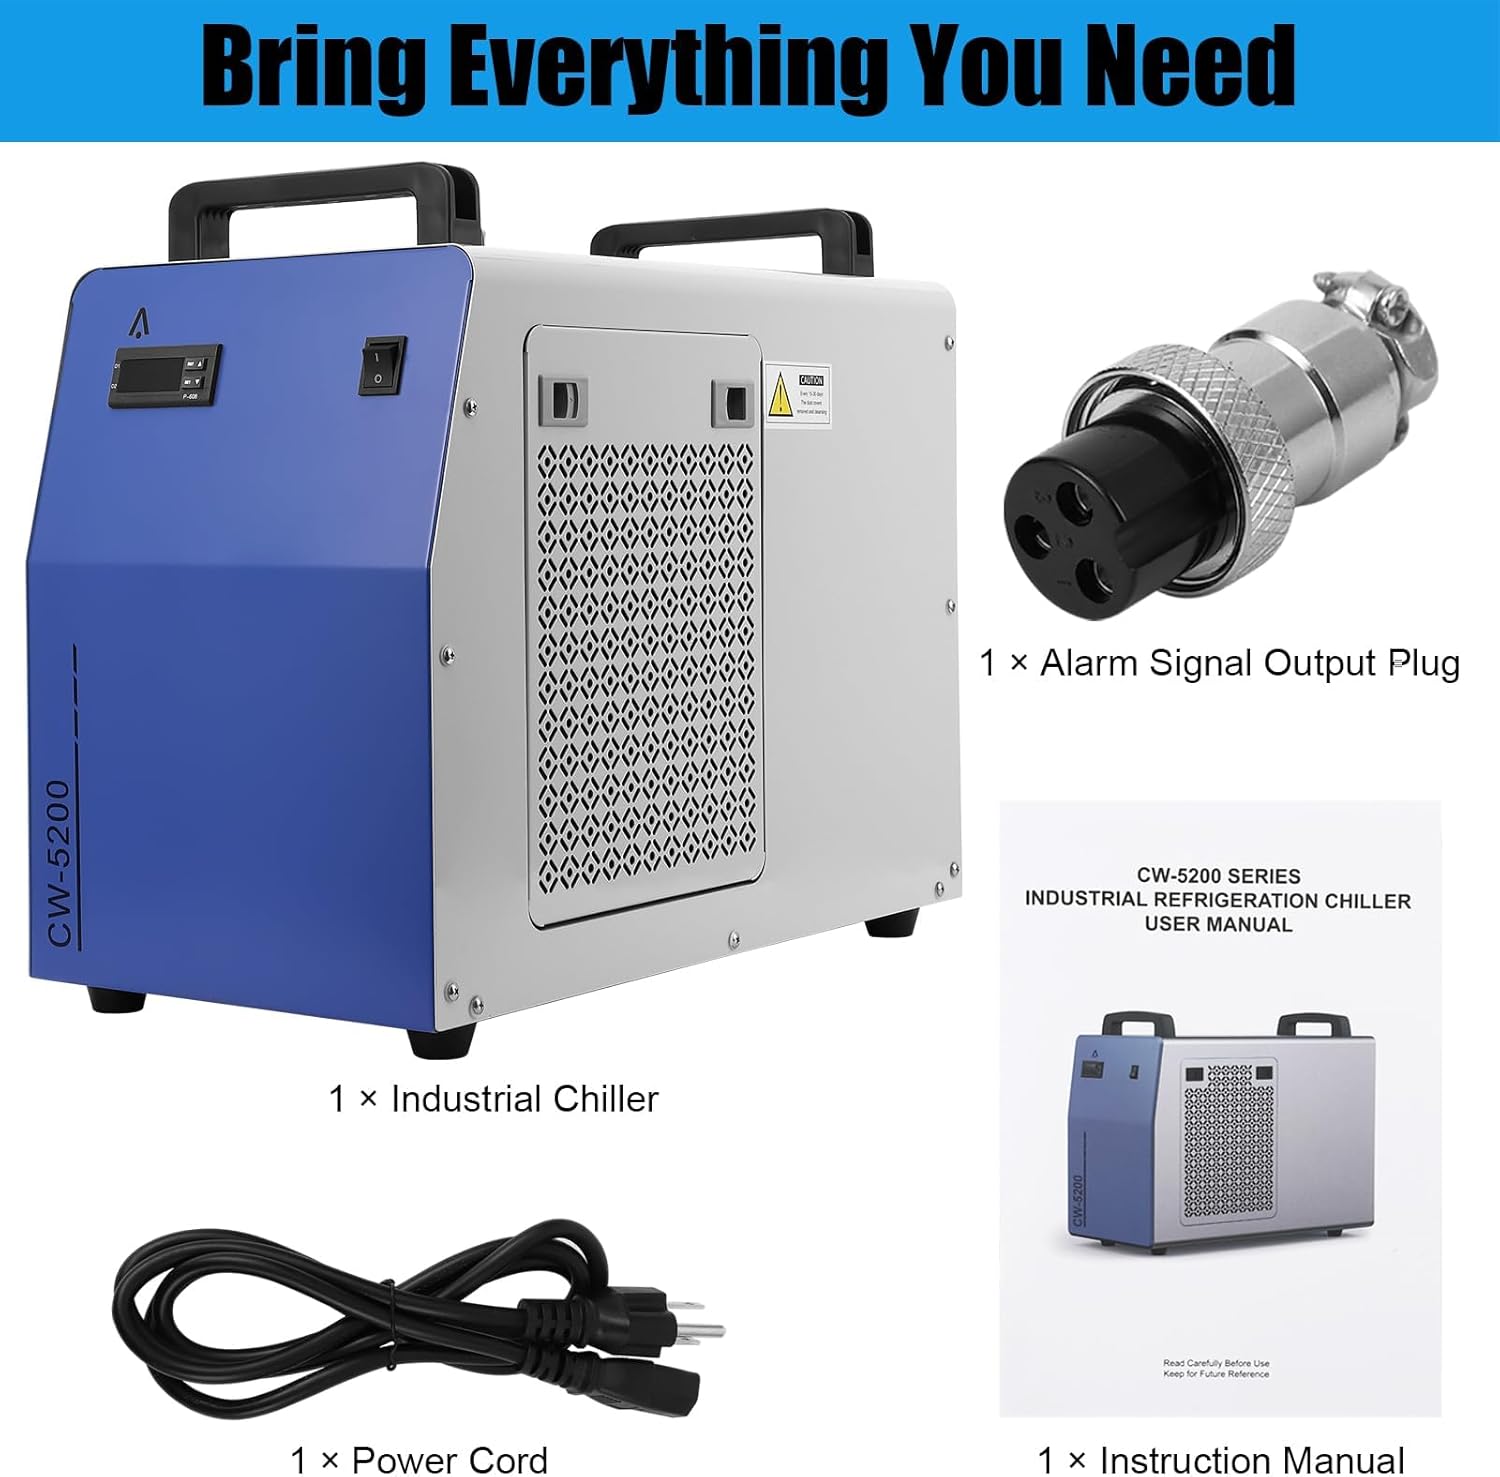
Figure 3: Detailed Product Features
The chiller is equipped with ergonomic plastic handles for portability and four swivel casters for easy movement within your workspace.
4. Setup Instructions
Follow these steps for initial setup:
4.1 Unpacking and Placement
- Carefully remove the chiller from its packaging. Inspect for any shipping damage.
- Place the chiller on a firm, level surface. Ensure there is at least 12 inches (30 cm) of clear space around all sides for proper airflow and heat dissipation.
4.2 Water Filling
- Locate the Water Injection Port on the rear panel (refer to Figure 2).
- Open the cap and slowly pour distilled or deionized water into the reservoir until the water level reaches the 'FULL' mark on the sight glass. The chiller has a 6-liter capacity.
- Close the cap securely.
4.3 Connecting to Equipment
- Connect the water outlet of your laser machine to the 'COOLING WATER INLET' of the chiller.
- Connect the water inlet of your laser machine to the 'COOLING WATER OUTLET' of the chiller. The CW-5200 model features a single set of inlet/outlet connections.
- Ensure all connections are secure and leak-free. The water inlet and outlet are constructed from brass for durability.
4.4 Power Connection
- Plug the power cord into the 'POWER SOCKET' on the rear panel.
- Connect the other end of the power cord to a grounded electrical outlet that meets the chiller's power requirements.

Figure 4: Package Contents
5. Operating Instructions
5.1 Initial Startup
- After completing the setup, turn on the power switch located on the front panel.
- The chiller will begin circulating water. Check for any leaks and ensure the water level remains above the 'NORMAL' mark. The water pump operates smoothly and quietly.
- The digital display on the temperature controller will show the current water temperature.
5.2 Temperature Control

Figure 5: Temperature Controller
The CW-5200 features an intelligent control mode for precise temperature monitoring and adjustment. The constant temperature mode ensures the water temperature remains within your specified range.
- Setting Temperature: Use the 'SET' button and arrow keys (up/down) on the controller (P-608) to adjust the desired water temperature. Refer to the detailed controller manual for specific programming steps.
- Monitoring: The digital display provides a clear, real-time readout of the water temperature.
5.3 Alarm System

Figure 6: Full Protection Features
The chiller is equipped with internal sensors, indicator lights, and built-in alarms for continuous system monitoring. These include:
- Water Flow Alarm: Alerts if water flow is interrupted.
- Water Level Alarm: Alerts if the water level drops below the minimum threshold.
- Ultra High/Low Temperature Alarm: Indicates temperatures outside the safe operating range.
- Compressor Protection: Includes time delay and overcurrent protection.
In the event of an alarm, the indicator lights will illuminate, and an audible alarm may sound. Address the issue promptly to prevent damage to the chiller or connected equipment.
6. Maintenance
Regular maintenance ensures optimal performance and extends the lifespan of your chiller.
6.1 Water Replacement
- Replace the water in the reservoir every 1-3 months, depending on usage and water quality.
- To drain, disconnect power, open the water drain plug on the rear panel, and allow all water to exit.
- Refill with fresh distilled or deionized water as per Section 4.2.
6.2 Cleaning
- Air Filter: The chiller features a removable and cleanable air filter. Periodically remove and clean the filter to ensure efficient heat exchange. Dust and debris can reduce cooling efficiency.
- Condenser: Use a soft brush or compressed air to clean the condenser fins, typically located behind the side grilles. Ensure the unit is powered off before cleaning.
- Exterior: Wipe the exterior surfaces with a soft, damp cloth. Do not use abrasive cleaners or solvents.
6.3 Connection Checks
- Periodically inspect all water hoses and electrical connections for wear, damage, or leaks. Tighten any loose connections.
7. Troubleshooting
This section addresses common issues you might encounter.
| Problem | Possible Cause | Solution |
|---|---|---|
| Chiller not powering on | No power supply; Blown fuse; Faulty power switch | Check power cord and outlet; Replace fuse (spare fuse located near power socket); Contact support. |
| No water flow / Low flow | Low water level; Kinked hose; Pump malfunction; Blockage | Refill water to 'FULL' level; Straighten hoses; Check for obstructions; Contact support if pump is faulty. |
| Insufficient cooling | Dirty air filter/condenser; Insufficient ventilation; Ambient temperature too high; Refrigerant leak | Clean air filter and condenser; Ensure adequate space around chiller; Operate in a cooler environment; Contact support for refrigerant issues. |
| Alarm activated | Water level low; Water flow interruption; Over-temperature; Sensor error | Check water level and refill; Inspect water lines for blockages; Verify ambient temperature; Refer to controller manual for specific error codes or contact support. |
| Digital display stuck / Celsius only | Controller settings; Firmware issue | Consult the specific temperature controller manual (P-608) for instructions on changing units or resetting. If issues persist, contact GarveeTech support. |
8. Specifications
Key technical specifications for the GarveeTech CW-5200 Industrial Water Chiller:
| Feature | Specification |
|---|---|
| Model | CW-5200 |
| Cooling Capacity | 5186 BTU/hour (approx. 1500W) |
| Compressor Power | 0.9 hp |
| Water Tank Capacity | 6 Liters |
| Water Flow Rate | 2.6 gallons per minute |
| Refrigerant | R410a (standard) |
| Product Dimensions (L x W x H) | 25.2 x 14.96 x 20.87 inches (64 x 38 x 53 cm) |
| Item Weight | 61.9 pounds (28.1 kg) |
| Material | Brass (water inlet/outlet) |

Figure 7: Product Dimensions
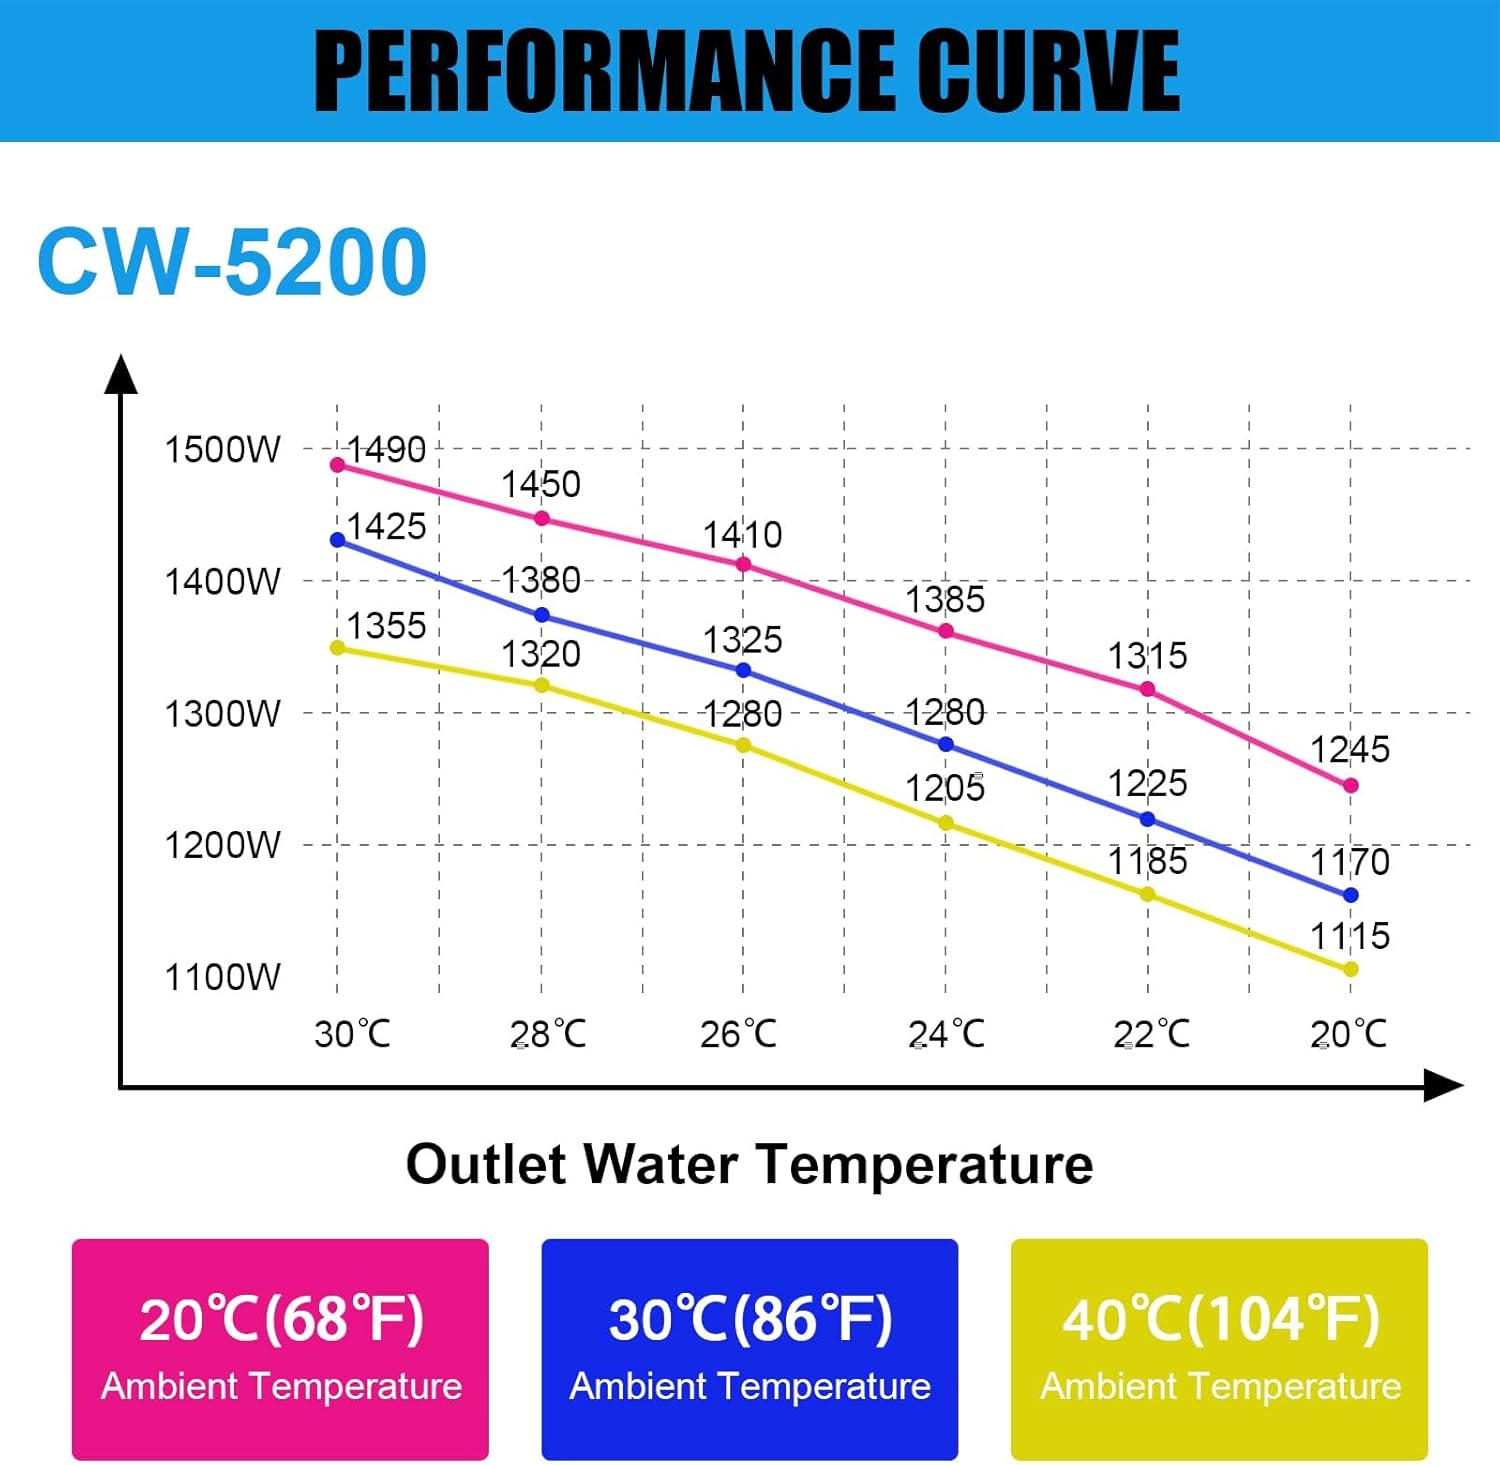
Figure 8: CW-5200 Performance Curve
Figure 8 illustrates the cooling performance of the CW-5200, showing the relationship between ambient temperature, outlet water temperature, and cooling capacity (in Watts).
9. Warranty and Support
GarveeTech products are manufactured to high-quality standards. For warranty information, please refer to the warranty card included with your product or visit the official GarveeTech website. For technical assistance, troubleshooting not covered in this manual, or spare parts, please contact GarveeTech customer support.
You can find more information and contact details on the GarveeTech Store.