Introduction
Thank you for choosing the HOMGX 6FT Toddler Recreational Trampoline with Swing. This manual provides essential information for the safe assembly, operation, maintenance, and troubleshooting of your new trampoline. Please read all instructions carefully before assembly and use to ensure the safety of all users and the longevity of the product.
This trampoline is designed for children aged three to eight years, offering both bouncing and swinging activities. It is suitable for both indoor and outdoor use.
Safety Guidelines
WARNING: Failure to follow these safety guidelines may result in serious injury.
- Adult Supervision Required: Always ensure an adult is present to supervise children using the trampoline and swing.
- Weight Limits: The maximum weight capacity for the trampoline is 220 lbs. The maximum weight capacity for the swing is 110 lbs. Do not exceed these limits.
- One User at a Time: Only one child should use the trampoline or swing at a time to prevent collisions.
- Clearance Area: Ensure adequate overhead and surrounding clearance. Maintain a minimum of 8 feet of overhead clearance and 6 feet of clearance around the trampoline.
- Proper Attire: Users should wear appropriate clothing, free of drawstrings, hooks, or loops that could get caught. Remove shoes, jewelry, and sharp objects before use.
- No Somersaults or Flips: Avoid somersaults or flips, as these can lead to serious head and neck injuries.
- Inspect Before Each Use: Before each use, check the trampoline for damaged, worn, or missing parts. Do not use if any components are compromised.
- Secure Enclosure: Always ensure the safety enclosure net is properly zipped and buckled before use.
- Stable Surface: Place the trampoline on a flat, level surface. Uneven surfaces can cause instability and increase the risk of tipping.
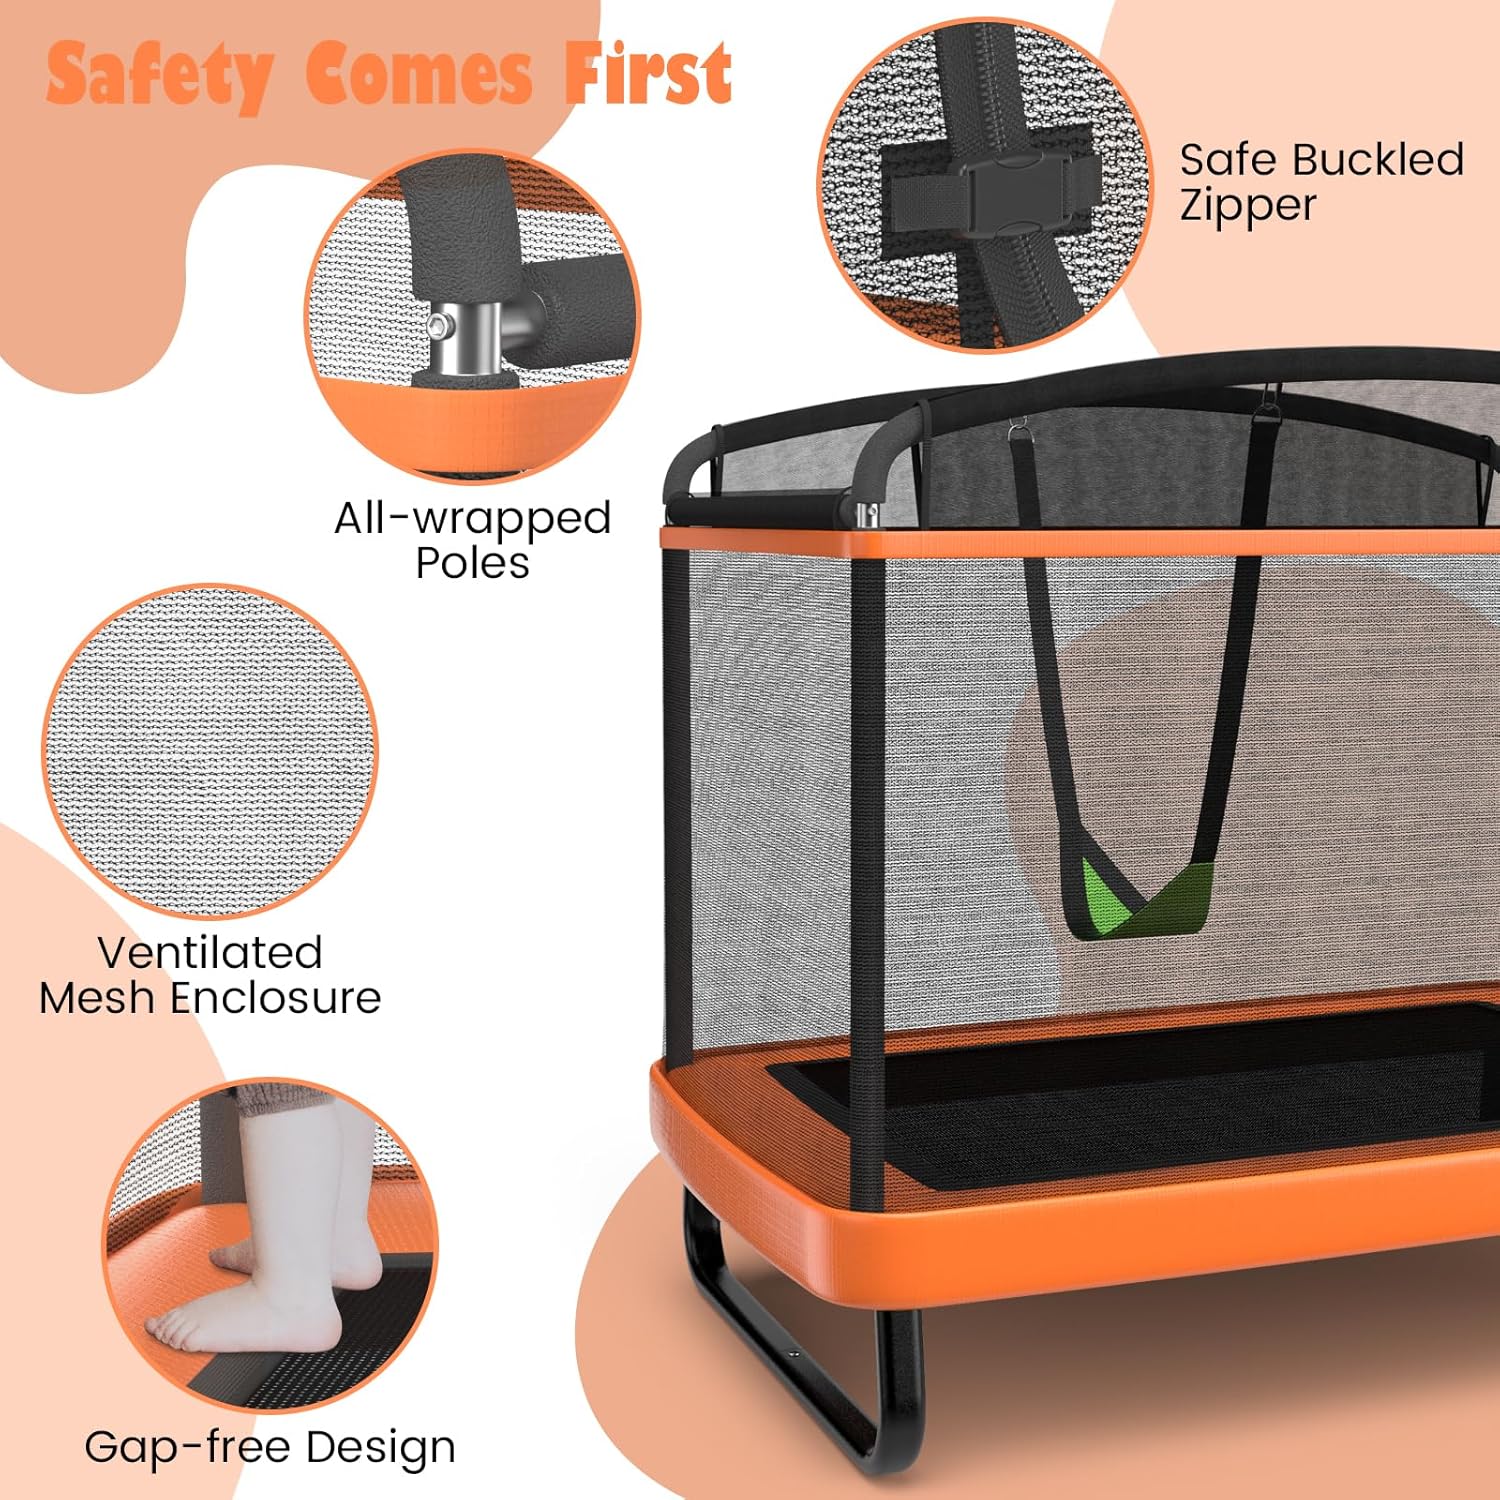
Image: Key safety features of the HOMGX trampoline, including the buckled zipper, padded poles, and gap-free design.

Image: Children safely enjoying the trampoline and swing, demonstrating proper use within the enclosure.
Package Contents
Please verify that all components are present before beginning assembly. If any parts are missing or damaged, contact customer support.
- Trampoline Frame Components (Galvanized Steel Tubes)
- Jumping Mat
- 40 x Springs
- Safety Enclosure Net
- Foam Padding for Poles
- 1 x Swing Attachment
- Hardware (bolts, nuts, washers)
- Spring Pull Tool (recommended for spring installation)
- Instruction Manual (this document)
Assembly Instructions
Assembly typically requires two adults. Please follow the steps below carefully. Tools required (not included): Wrench, Screwdriver.
- Unpack and Identify Parts: Lay out all components and verify against the parts list. Familiarize yourself with each piece.
- Assemble the Base Frame: Connect the U-shaped leg sections to the main rectangular frame tubes using the provided hardware. Ensure all connections are secure.
- Attach the Jumping Mat: Carefully attach the 40 galvanized springs to the jumping mat and the frame. Use the spring pull tool to stretch and hook the springs evenly around the frame. This step requires significant force.
- Install the Safety Enclosure Poles: Insert the padded poles into the designated slots on the frame. Secure them according to the instructions.
- Attach the Safety Enclosure Net: Drape the enclosure net over the poles and secure it to the jumping mat or frame as instructed, ensuring a gap-free design. Zip and buckle the entrance.
- Install the Swing Attachment: Attach the swing to the designated points on the enclosure poles or frame, ensuring it hangs freely and securely.
- Final Inspection: Double-check all bolts, nuts, and connections to ensure they are tight and secure. Verify the enclosure net is properly installed and the swing is stable.
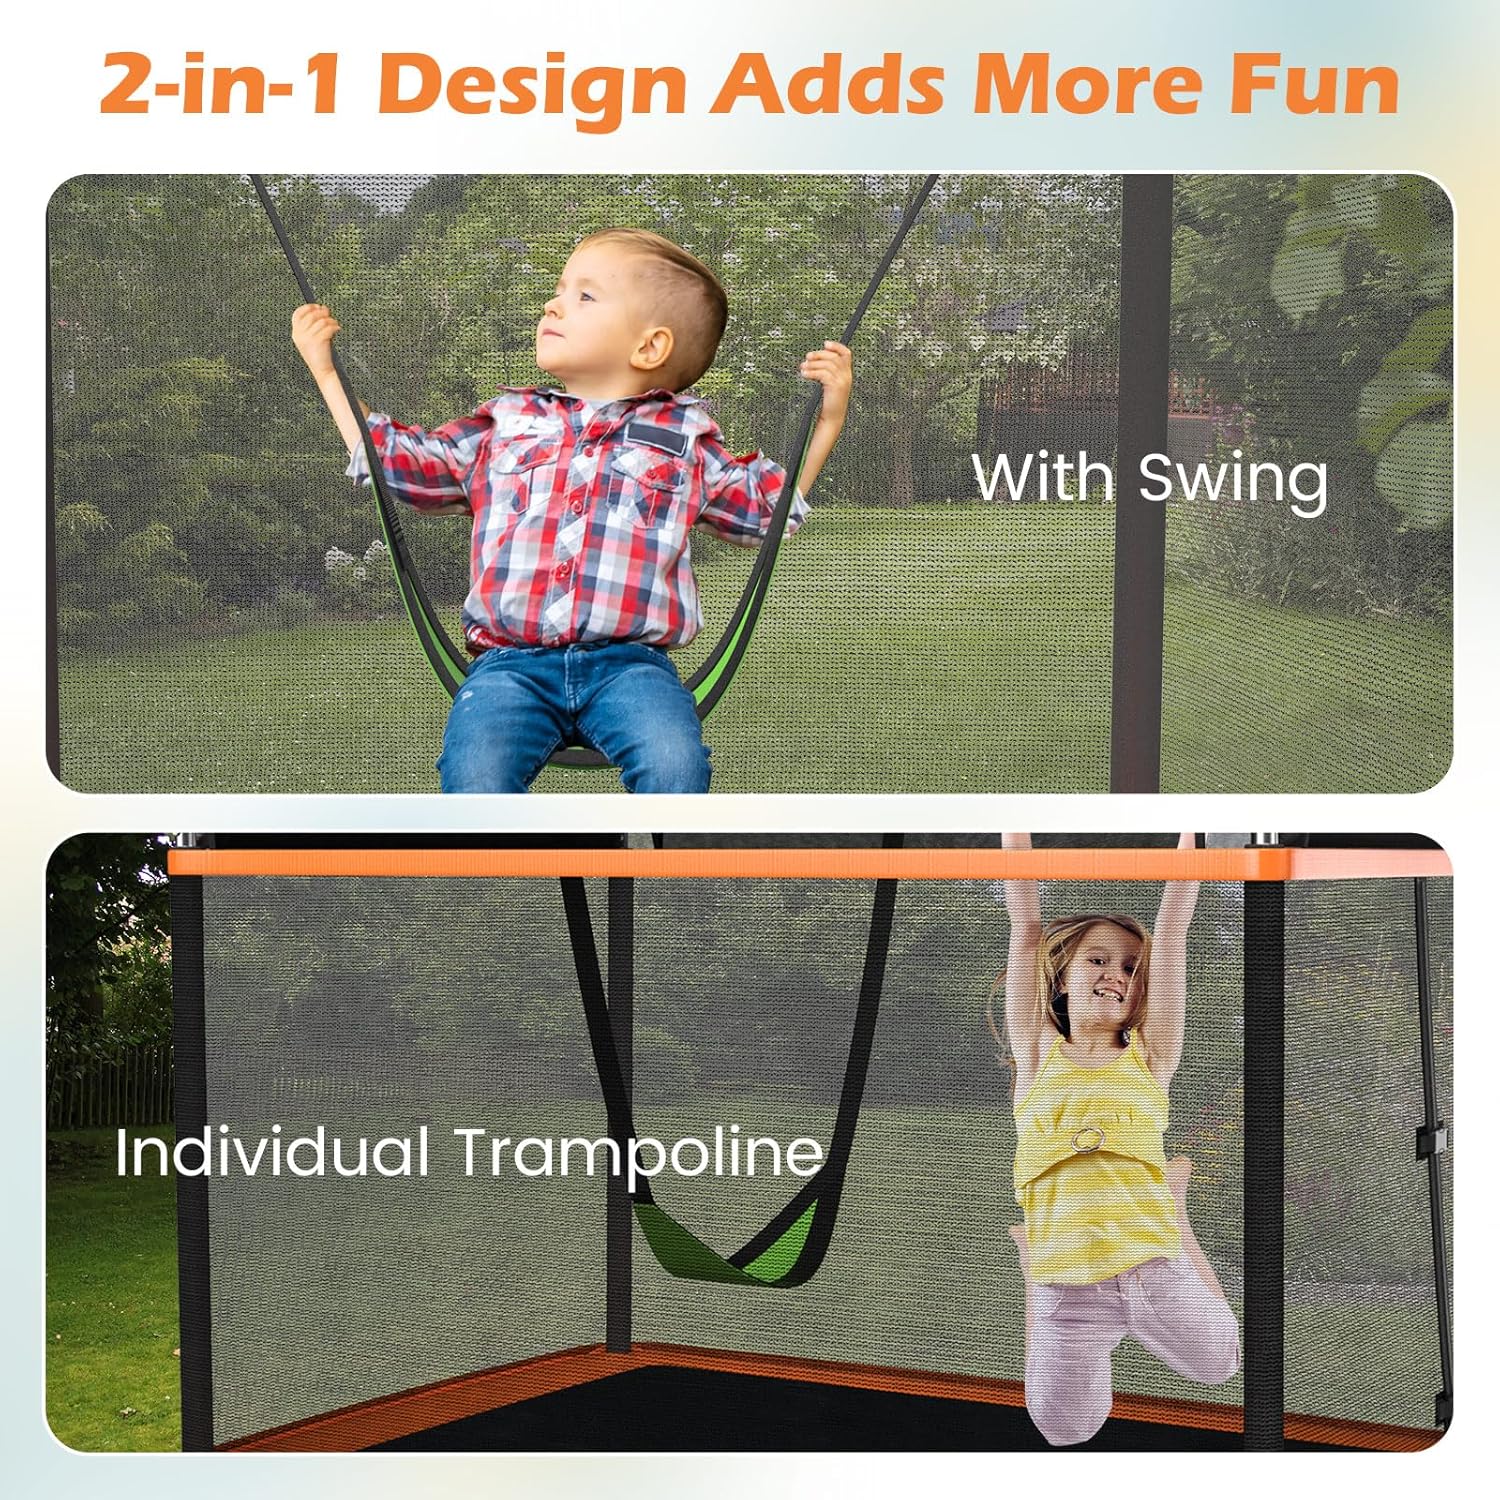
Image: The trampoline's dual functionality, featuring both a swing and a bouncing area, highlighting the versatility of the design.

Image: Details of the high-quality materials used in the trampoline's construction, including galvanized steel, springs, and thick metal tubing.
Operating Instructions
Once assembled and inspected, the trampoline is ready for use. Always adhere to the safety guidelines.
- Entering and Exiting: Use the zippered opening to enter and exit the trampoline. Do not attempt to climb over the enclosure net.
- Bouncing: Encourage children to bounce in the center of the mat. Avoid bouncing too high or attempting stunts.
- Using the Swing: Ensure the swing is securely attached. Children should sit properly on the swing and hold onto the ropes. Do not stand on the swing.
- Supervision: An adult must always supervise children during play.

Image: The non-slip foot pads on the trampoline's base, providing enhanced stability for both indoor and outdoor use.
Maintenance and Care
Regular maintenance will extend the life of your trampoline and ensure continued safety.
- Cleaning: Clean the jumping mat and enclosure net with a damp cloth and mild soap. Rinse thoroughly and allow to air dry. Do not use abrasive cleaners.
- Frame Inspection: Periodically check the frame for rust, cracks, or bends. Ensure all bolts and nuts remain tight.
- Spring Inspection: Check springs for stretching, damage, or rust. Replace any compromised springs immediately.
- Net and Padding Inspection: Inspect the safety enclosure net and foam padding for tears, holes, or deterioration. Replace as needed.
- Storage: If storing outdoors for extended periods, especially during harsh weather, consider covering the trampoline or disassembling it for indoor storage to protect components from the elements.
Troubleshooting
Here are solutions to common issues you might encounter:
- Difficulty during Assembly: If screws or parts are not clearly labeled, refer to the diagrams in the instruction manual. Ensure you are using the correct hardware for each step. If a spring tool is not included, a strong pair of pliers can sometimes be used, but caution is advised.
- Trampoline Feels Unstable: Ensure the trampoline is placed on a completely flat and level surface. Check that all frame connections and leg bolts are securely tightened.
- Reduced Bounce: Inspect all springs for damage or stretching. A worn jumping mat can also reduce bounce. Replace any faulty components.
- Enclosure Net Sagging: Check the tensioning straps or ropes that secure the net to the poles and frame. Adjust as necessary to ensure the net is taut.
Product Specifications
| Feature | Specification |
|---|---|
| Brand | HOMGX |
| Model Name | Toddler Trampoline |
| Color | Orange |
| Product Dimensions (LxWxH) | 75"L x 49"W x 63"H |
| Frame Size | 63 Inches |
| Item Weight | 66 Pounds |
| Maximum Trampoline Weight Recommendation | 220 Pounds |
| Maximum Swing Weight Recommendation | 110 Pounds |
| Number Of Springs | 40 |
| Material | Galvanized steel, PP, PVC, EPE, PE |
| Frame Material | Alloy Steel |
| Recommended Age | 3+ years old |

Image: Detailed dimensions and weight capacities for the HOMGX 6FT Toddler Trampoline with Swing.
Warranty and Support
This product comes with a standard manufacturer's warranty against defects in materials and workmanship. For specific warranty details, claims, or technical support, please refer to the warranty card included with your purchase or contact HOMGX customer service directly. Keep your proof of purchase for warranty purposes.
For further assistance, please visit the HOMGX official website or contact their customer support team.