LLAVETOR LS3135C
LLAVETOR Digital Torque Wrench User Manual
Model: LS3135C (5-99.5 ft-lbs / 6.8-135Nm)
1. Introduction
This manual provides detailed instructions for the proper use, setup, maintenance, and troubleshooting of your LLAVETOR Digital Torque Wrench, Model LS3135C. This precision instrument is designed for accurate torque measurement and application, featuring a digital display, multiple measurement modes, and audible/visual notifications.
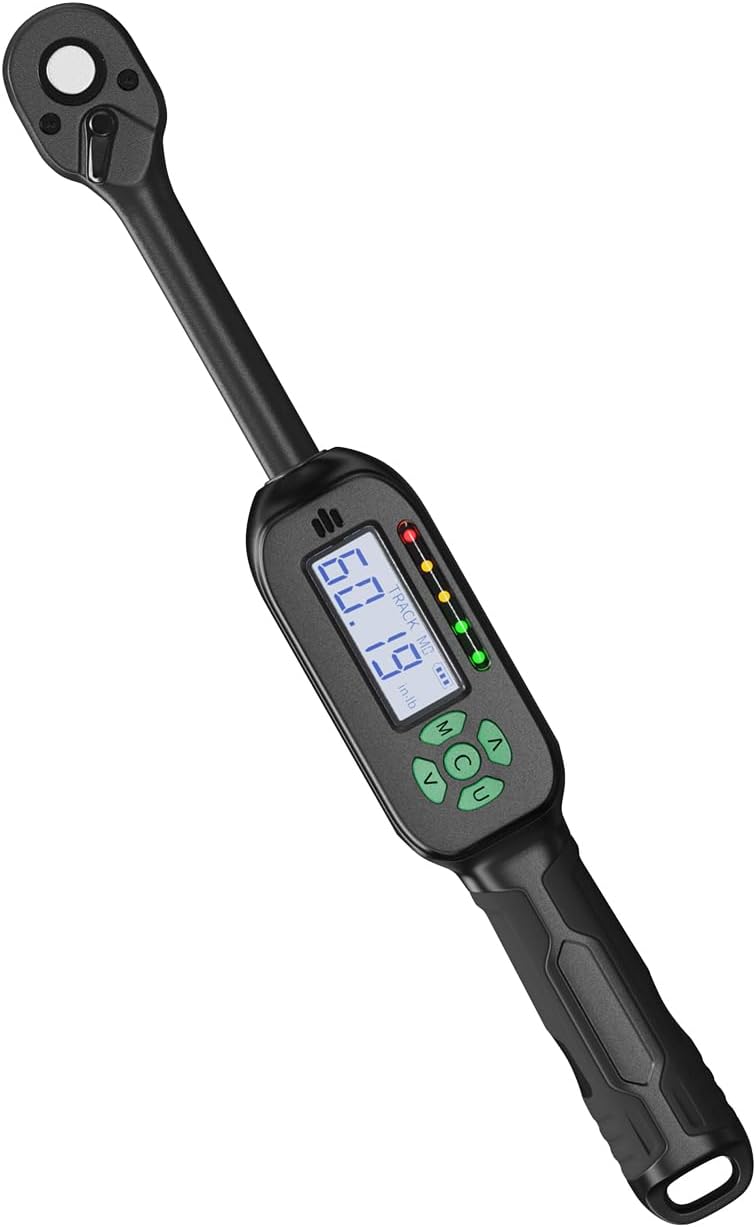
Figure 1: LLAVETOR Digital Torque Wrench LS3135C. This image shows the overall design of the digital torque wrench, highlighting its compact form factor and digital display.
2. Product Features
- Sturdy Material: Crafted from durable Chrome Vanadium Steel for reliability and longevity.
- Mini Design: Compact size for convenient carrying, storage, and use without compromising accuracy.
- Quick Release Design: Ratchet head features a quick-release mechanism for rapid accessory changes and secure socket retention.
- Advanced LCD Display: Large, easy-to-read, high-backlight screen for clear readings, even in dim environments.
- Accurate Measurement: Digital display with an accuracy of ±2%.
- Four Measurement Modes: Supports kg-cm, Nm, in-lb, and ft-lb units.
- Ergonomic Design: Handle designed for comfortable and secure grip during operation.
- Buzzer and LED Notification: Provides audible and visual alerts upon reaching the target torque value.
- Preset Values: Ability to save up to 10 preset torque values (M0-M9) for frequently used settings.
- Track and Peak Modes: Allows for real-time torque display (Track Mode) or capturing the maximum torque applied (Peak Mode).
3. Components and Parts Identification
Familiarize yourself with the various parts of your digital torque wrench:

Figure 2: Key components of the LLAVETOR Digital Torque Wrench. This diagram labels the socket release, clockwise/counter-clockwise switch, square drive, digital display, control buttons (M, C, U, Up, Down), anti-slip handle, and battery compartment.
- Square Drive: For attaching sockets.
- Socket Release: Button to quickly release attached sockets.
- Clockwise/Counter-Clockwise Switch: Lever to change the direction of ratcheting.
- Digital Display: LCD screen showing torque values, mode, and unit.
- Control Buttons:
- M (Memory/Mode) Button: Used to select preset values (M0-M9) and enter/exit setting modes.
- C (Clear/Power) Button: Powers the unit on/off and clears current readings.
- U (Unit/Mode) Button: Switches between measurement units (Nm, ft-lb, in-lb, kgf-cm) and toggles between Track and Peak modes.
- Up/Down Arrows: Adjusts target torque values and navigates menus.
- Anti-slip Handle: Ergonomically designed for a secure grip.
- Battery Compartment: Located at the base of the handle.
4. Setup
4.1 Battery Installation
The LLAVETOR Digital Torque Wrench requires 2 AA batteries (included) for operation. Follow these steps to install them:
- Locate the battery compartment cover at the bottom of the wrench handle.
- Using a small Phillips head screwdriver, carefully open the back case/battery cover.
- Insert 2 AA batteries, ensuring correct polarity (+/-) as indicated inside the compartment.
- Replace the battery cover and secure it with the screw.
- Press the 'C' button to power on the device.

Figure 3: Step-by-step guide for battery installation. This image illustrates opening the battery compartment, inserting AA batteries, and powering on the device.
5. Operating Instructions
5.1 Power On/Off
- To power on, press the C button.
- To power off, press and hold the C button for a few seconds until the display turns off. The wrench will also automatically power off after a period of inactivity to conserve battery life.
5.2 Switching Measurement Units
The wrench supports four measurement units: Nm, ft-lb, in-lb, and kgf-cm.
- Press the U button repeatedly to cycle through the available units. The selected unit will be displayed on the LCD screen.
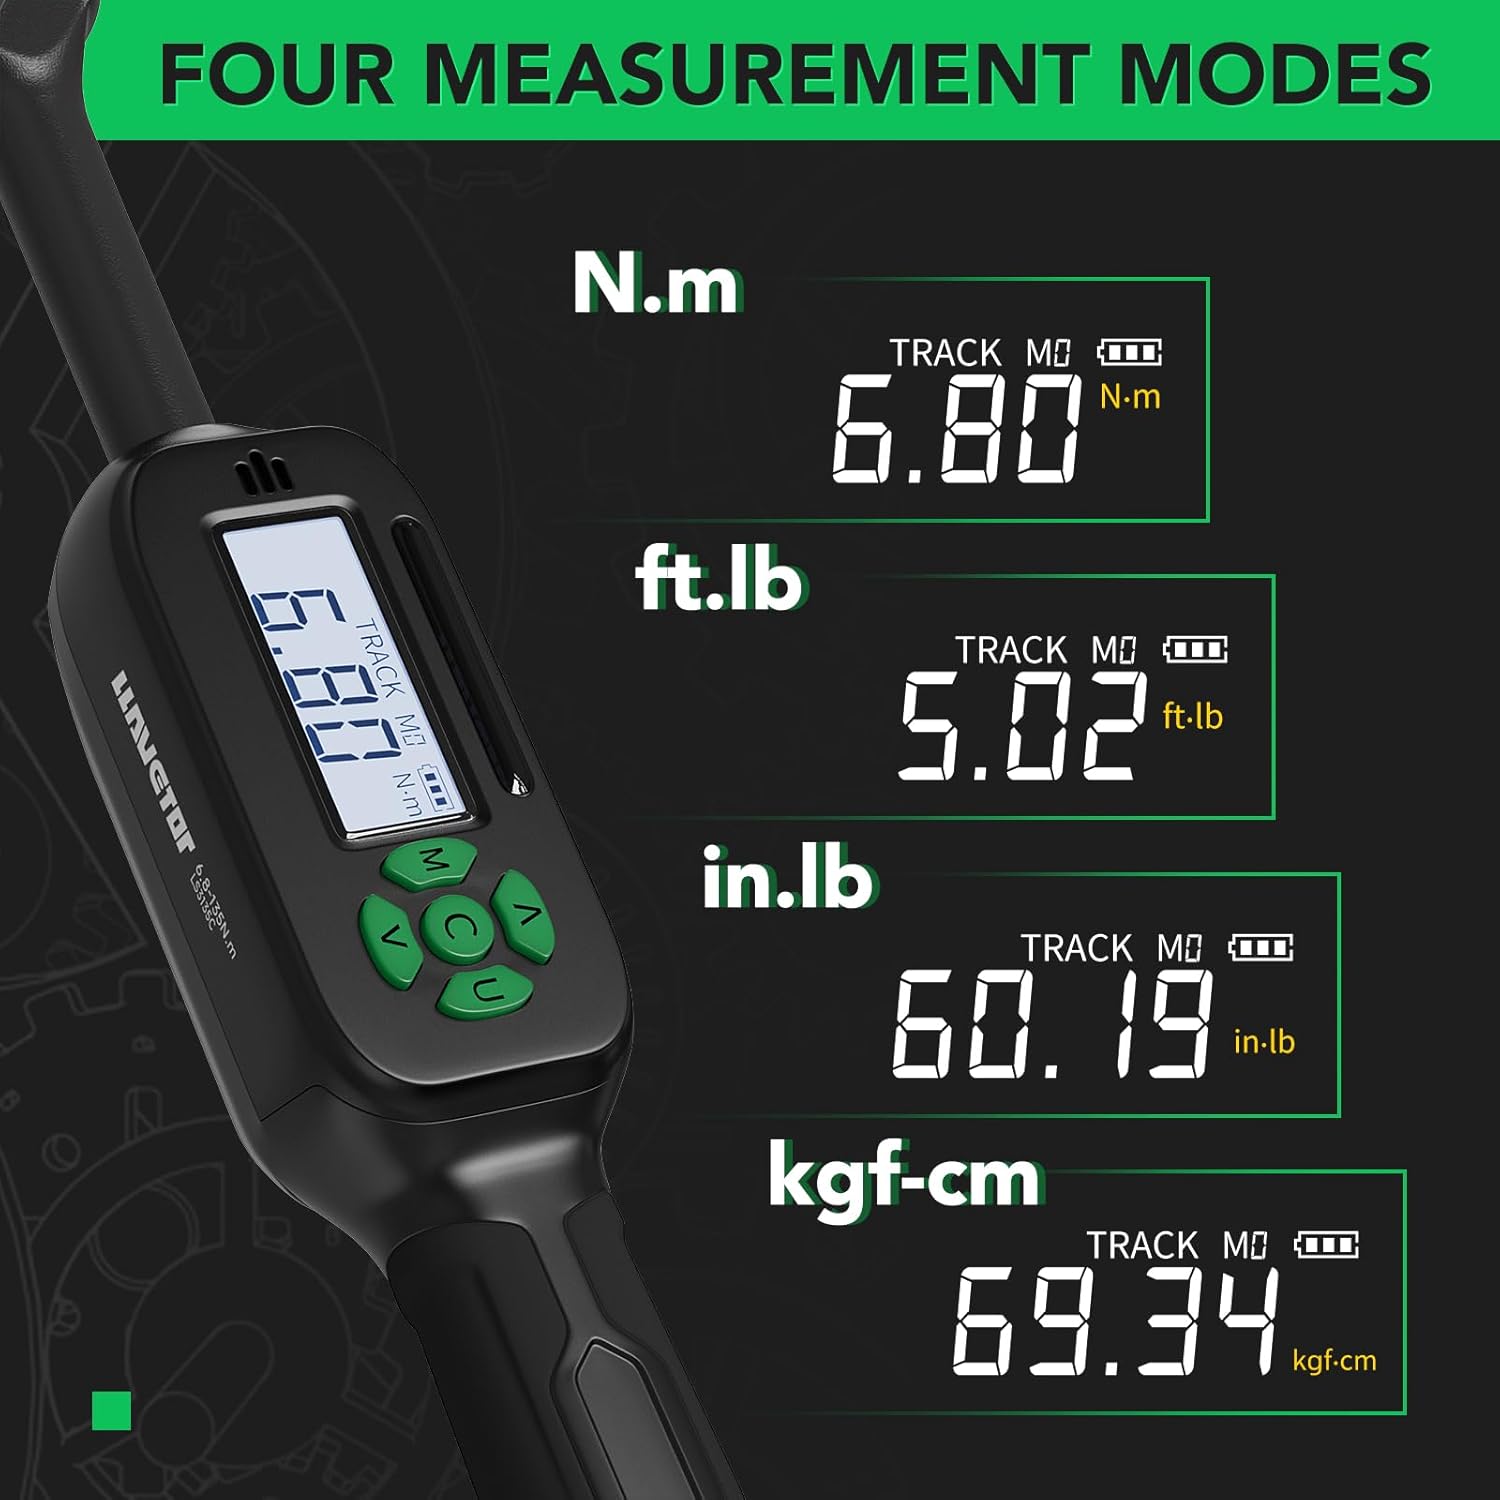
Figure 4: Display showing the four available measurement units: N.m, ft.lb, in.lb, and kgf-cm. The image demonstrates how the digital display changes to reflect the selected unit.
5.3 Switching Track / Peak Mode
The wrench operates in two primary modes:
- Track Mode: Displays the torque value in real-time as force is applied.
- Peak Mode: Captures and displays the maximum torque value reached during an application.
- To switch between Track and Peak modes, press the U button. The display will indicate the current mode.

Figure 5: Comparison of Track Mode and Peak Mode displays. Track Mode shows real-time torque, while Peak Mode shows the maximum torque achieved.
5.4 Setting Target Torque Values and Presets
The wrench allows you to set a target torque value and save up to 10 preset values (M0-M9).
- To set a target torque value:
- In either Track or Peak mode, press the M button to enter the setting mode.
- Use the Up and Down arrow buttons to adjust the desired torque value.
- Press the M button again to confirm and exit the setting mode.
- To save a preset value (M0-M9):
- Set the desired torque value as described above.
- While in setting mode, press and hold the M button. The display will show "M" followed by a number (e.g., M0).
- Use the Up and Down arrow buttons to select the desired preset memory location (M0-M9).
- Release the M button to save the current torque value to that preset.
- To recall a preset value:
- Press the M button repeatedly to cycle through the saved preset values (M0-M9). The wrench will automatically load the selected preset as the target torque.

Figure 6: Illustration of the 10 preset value groups (M0-M9) feature. This allows users to save and quickly recall frequently used torque settings.
5.5 Applying Torque
Once your target torque value is set:
- Attach the appropriate socket to the square drive.
- Place the socket onto the fastener.
- Apply steady, increasing force to the wrench handle. Observe the digital display for the real-time torque reading (in Track Mode).
- As you approach the target torque, the LED lights on the wrench will illuminate, and a buzzer will sound, indicating that the target torque has been reached.
- Stop applying force immediately once the target torque is achieved to prevent over-tightening.
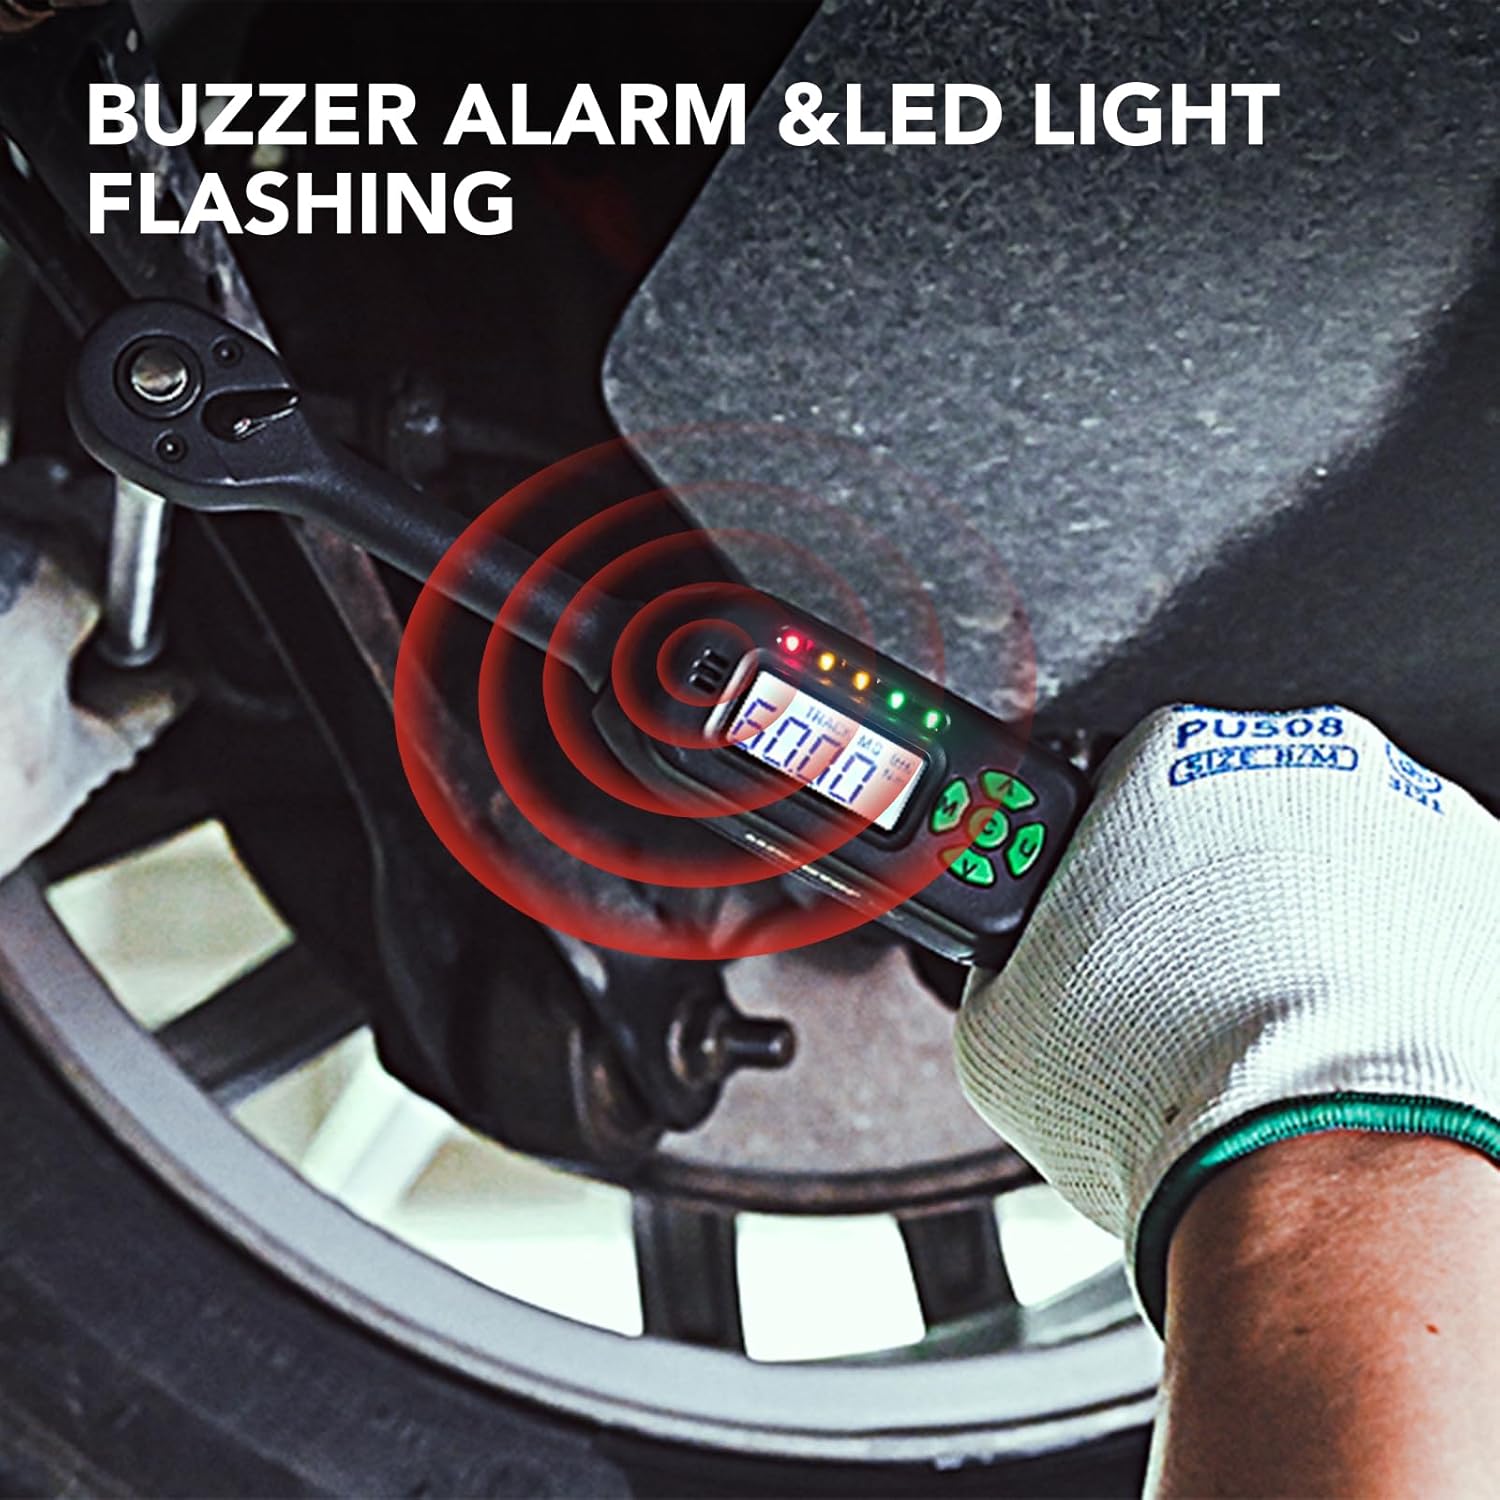
Figure 7: Visual representation of the buzzer alarm and LED light notification system. This feature alerts the user when the target torque is reached, ensuring precise application.

Figure 8: Demonstrates the digital torque wrench being used to tighten lug nuts on a vehicle wheel. This shows a practical application of the tool.

Figure 9: Shows the digital torque wrench being used to tighten a fastener under a vehicle. This highlights the tool's utility in various automotive applications.
6. Maintenance
- Cleaning: Wipe the wrench clean with a soft, dry cloth after each use. Do not use abrasive cleaners or solvents, as they may damage the display or finish.
- Storage: Store the torque wrench in its protective case in a dry, clean environment away from extreme temperatures and direct sunlight.
- Battery Care: Remove batteries if the wrench will not be used for an extended period to prevent leakage and damage.
- Calibration: While the wrench is factory calibrated to ±2% accuracy, regular calibration by a certified facility is recommended for professional use or after significant impact. LLAVETOR operates ISO 6789-compliant calibration labs.
- Avoid Overload: Do not exceed the maximum torque capacity of the wrench (99.5 ft-lbs / 135 Nm), as this can damage the internal mechanism and affect accuracy.
7. Troubleshooting
| Problem | Possible Cause | Solution |
|---|---|---|
| Wrench does not power on. | Dead or incorrectly installed batteries. | Check battery polarity. Replace batteries with new AA batteries. |
| Inaccurate readings. | Wrench may require recalibration; improper handling (e.g., dropping). | Ensure proper technique (steady pull). If issues persist, contact LLAVETOR support for calibration services. |
| Buzzer/LED not activating. | Target torque not reached; unit malfunction. | Verify the target torque setting. Ensure the wrench is functioning correctly by testing with a known load. If still not working, contact support. |
| Display is dim or flickering. | Low battery power. | Replace batteries. |
8. Specifications
| Feature | Detail |
|---|---|
| Brand | LLAVETOR |
| Model Number | LS3135C |
| Torque Range | 5-99.5 ft-lbs / 6.8-135 Nm |
| Accuracy | ±2% |
| Drive Size | 3/8 Inch Square Drive |
| Measurement Units | Nm, ft-lb, in-lb, kgf-cm |
| Head Style | Square Drive |
| Material | Chrome Vanadium Steel |
| Finish Type | Powder Coated |
| Item Length | 7.5 Inches |
| Item Weight | 2.14 pounds |
| Batteries Required | 2 AA batteries (included) |
| Included Components | 3/8 Digital Torque Wrench, Storage Box |
9. Warranty and Support
LLAVETOR is committed to providing high-quality tools. While specific warranty details are not provided in this manual, LLAVETOR operates its own ISO 6789-compliant factory with calibration labs, ensuring the reliability and precision of its products.
For technical support, calibration services, or any inquiries regarding your LLAVETOR Digital Torque Wrench, please contact LLAVETOR customer service through the retailer where the product was purchased or visit the official LLAVETOR website for contact information.
no relevant documents