1. Introduction
Thank you for choosing the DJAUYB X8 Smart Biometric Fingerprint Door Lock. This manual provides detailed instructions for the installation, setup, operation, and maintenance of your new smart lock. Please read this manual carefully before installation and keep it for future reference.
2. Product Overview
2.1 Package Contents
- Front panel x 1
- Rear panel x 1
- Mortise lock x 1 (options available)
- Smart card x 5
- Mechanical Key x 2
- Screw Kit x 1
2.2 Key Features
- Multiple Unlock Modes: APP (Tuya), Fingerprint, Password, Smart Card, Mechanical Key.
- Advanced Fingerprint Sensor: FPC Semiconductor Sensor for reliable recognition.
- Temporary and Timed Passwords: Generate access codes for guests or specific periods.
- Passage Mode: Allows the door to remain unlocked for convenient access.
- Virtual Password Function: Prevents password peeping.
- Durable Construction: Aluminium Alloy material with IML touch screen.
- English Voice Prompts: Guides users through operations.
- Universal Design: Suitable for both right and left-handed doors.
2.3 Component Identification

Image 1: Front and Rear Panel Components. This diagram illustrates the various parts of the smart lock. The front panel includes the keypad area, swipe card area, fingerprint sensor, and speaker. The rear panel features the battery cover, rear handle, back locking switch, intelligence cover, keyhole, and USB interface.

Image 2: DJAUYB X8 Smart Lock Overview. This image displays the complete front and rear panels of the smart lock, highlighting its sleek design and integrated handle.
3. Installation Guide
3.1 Door Compatibility
The DJAUYB X8 Smart Lock is suitable for door thicknesses between 35mm and 55mm. If your door thickness falls outside this range, please contact customer support for assistance.

Image 3: Door Thickness Compatibility. This diagram visually confirms the compatible door thickness range of 35mm to 55mm for installation.
The lock is suitable for Wooden doors, Metal doors, and Aluminium doors.
3.2 Mortise Lock Selection
It is crucial to select the correct mortise lock size for proper installation. Please measure your existing mortise lock's dimensions (length, width, and backset) to choose the corresponding size. The lock supports various mortise sizes.

Image 4: Mortise Lock Size Selection. This image provides guidance on how to measure your current mortise lock to ensure you select the correct replacement size for the X8 Smart Lock.
3.3 Installation Steps (General)
- Prepare the Door: Ensure your door meets the thickness requirements. If replacing an existing lock, remove it.
- Install Mortise Lock: Insert the selected mortise lock into the door edge.
- Mount Front Panel: Position the front panel, ensuring the spindle and wiring pass through the door. The lock features an adjustable design to align with existing door holes, minimizing the need for new drilling.
- Mount Rear Panel: Connect the wiring from the front panel to the rear panel. Secure the rear panel to the door using the provided screws.
- Insert Batteries: Open the battery cover on the rear panel and insert 4 x AA 1.5V batteries (not included).
- Test Operation: After installation, test all unlock methods and ensure the handle operates smoothly.

Image 5: Adjustable Installation. This diagram highlights the adjustable mounting points of the lock, designed to simplify installation by adapting to existing door holes and reducing the need for additional drilling.
3.4 Replacing Handle Panels Only
If you wish to retain your existing mortise lock, you can replace only the handle panels. Ensure the square shaft hole diameter of your existing mortise lock is 8mm. The lock is universal for right/left direction and can be adjusted freely.
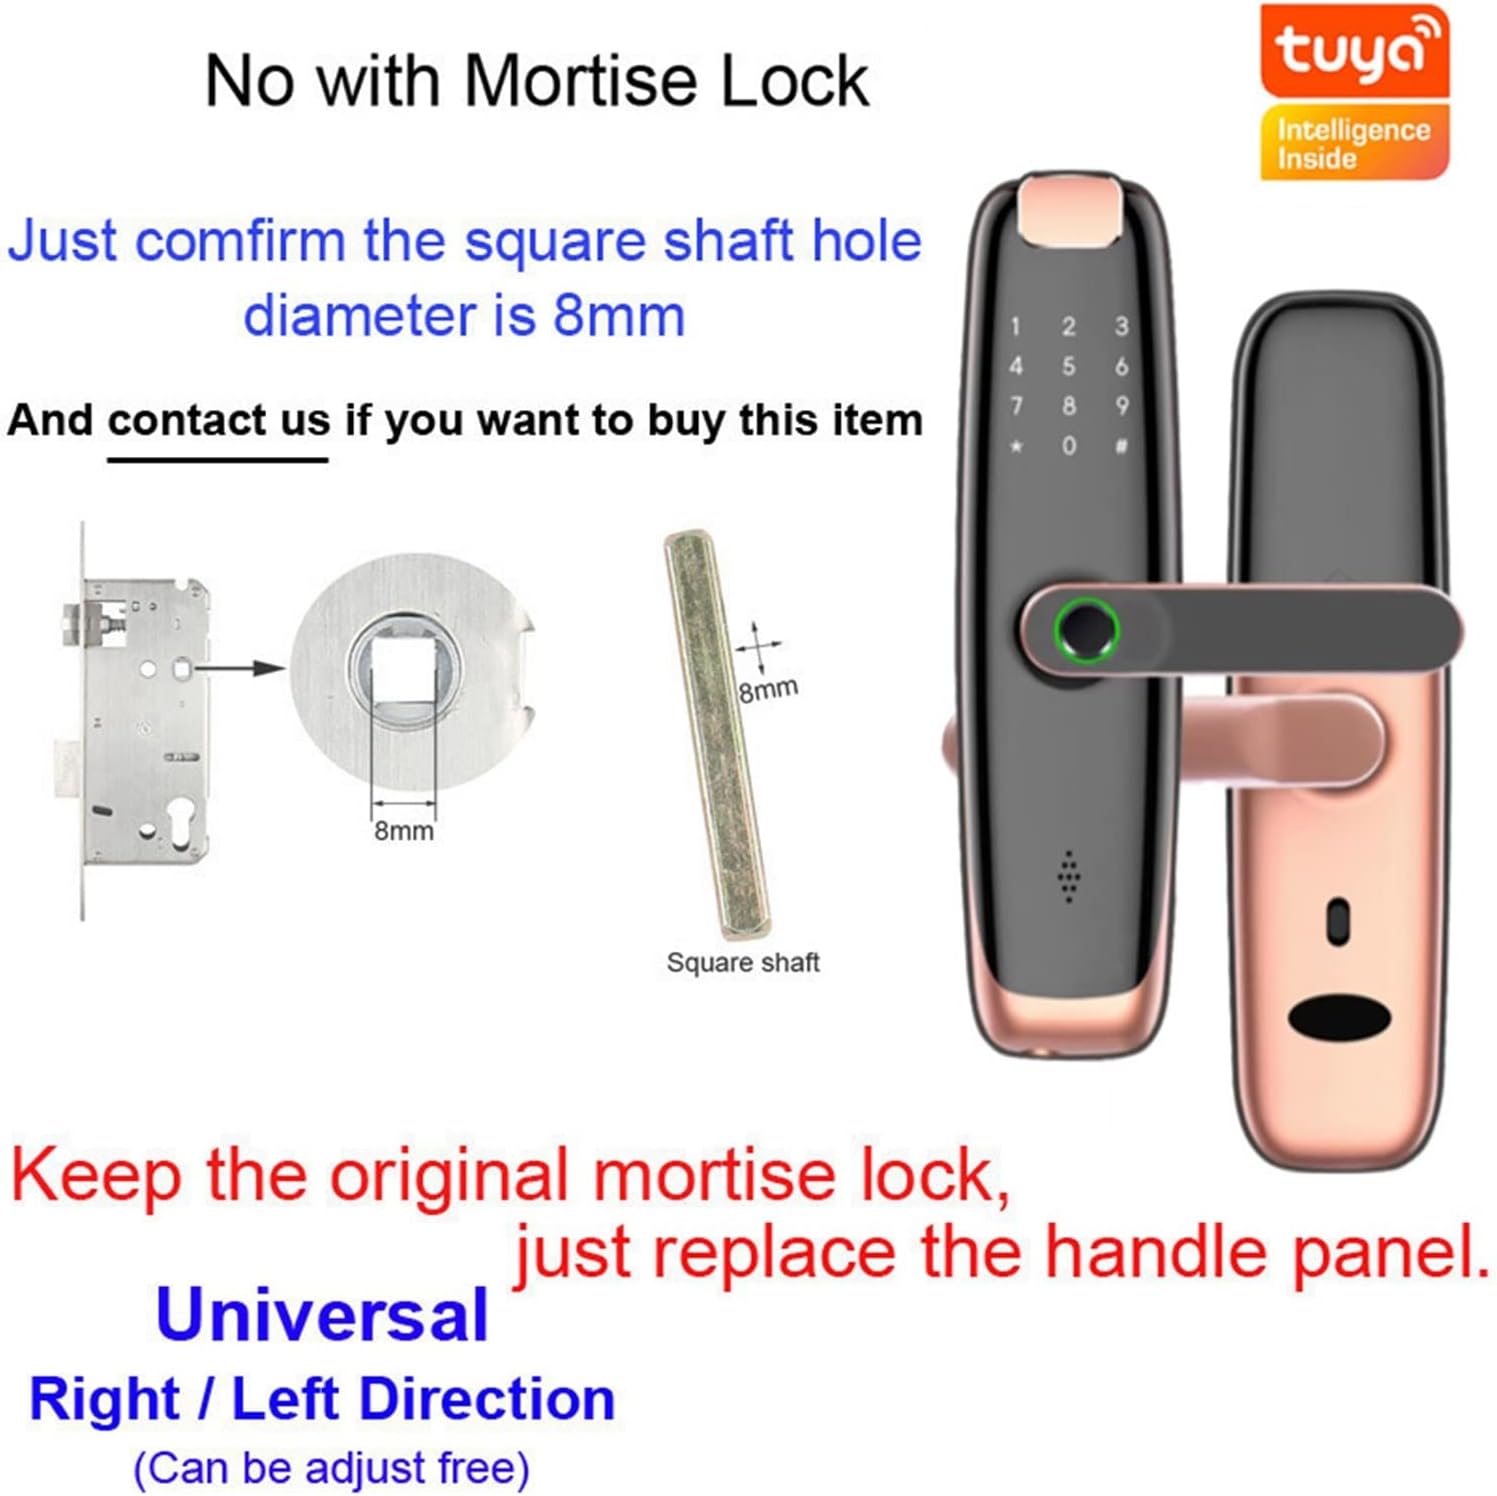
Image 6: Handle Panel Replacement. This image illustrates the requirement for an 8mm square shaft diameter if only replacing the handle panels while keeping the original mortise lock. The lock's universal design allows for right or left door adjustment.
4. Setup
4.1 Tuya APP Connection
- Download the Tuya Smart or TT Lock APP from your smartphone's app store.
- Register an account and log in.
- Follow the in-app instructions to add your X8 Smart Lock. Ensure Bluetooth is enabled on your phone and you are close to the lock during the pairing process.
- Once connected, you can manage users, generate temporary passwords, view access logs, and control the lock remotely (if a Wi-Fi gateway is used).
4.2 User Management
The lock supports up to 99 users (fingerprint/card/password combinations).
- Adding Fingerprints: Access the fingerprint management section in the APP or follow the lock's voice prompts. Place your finger on the sensor multiple times until successfully registered.
- Adding Smart Cards: In the APP, select 'Add Card' and then tap the smart card against the swipe card area on the lock.
- Setting Passwords: Create permanent, temporary, or timed passwords via the APP. You can also set a master password directly on the lock's keypad.
5. Operating Instructions
5.1 Unlock Modes

Image 7: Unlock Methods. This image visually summarizes the five primary ways to unlock the DJAUYB X8 Smart Lock: via the TT Lock APP, fingerprint, IC card, password, or a traditional mechanical key.
- Fingerprint Unlock: Place your registered finger on the fingerprint sensor. The lock will unlock if the fingerprint is recognized.
- Password Unlock: Enter your registered password on the keypad, followed by '#'. Use the virtual password function by entering random digits before and after your actual password to prevent others from guessing it.
- Smart Card Unlock: Tap a registered smart card against the swipe card area on the front panel.
- APP Unlock: Use the Tuya APP on your smartphone to unlock the door remotely (requires Wi-Fi gateway) or via Bluetooth when nearby.
- Mechanical Key Unlock: In case of emergency or battery depletion, insert the mechanical key into the keyhole and turn to unlock.
5.2 Temporary and Timed Passwords
These can be generated and managed through the Tuya APP. They are ideal for granting temporary access to guests, service providers, or for specific timeframes.
5.3 Passage Mode
Activate Passage Mode via the APP or lock settings. In this mode, the lock will remain unlocked, allowing free entry and exit without requiring authentication. Deactivate it when normal security is desired.
6. Maintenance
- Battery Replacement: The lock operates on 4 x AA 1.5V batteries. When the battery level is low, the lock will provide a voice prompt. Replace all four batteries promptly to ensure continuous operation.
- Cleaning: Wipe the lock's surface with a soft, dry cloth. Avoid using abrasive cleaners or solvents that could damage the finish or electronic components.
- Fingerprint Sensor: Keep the fingerprint sensor clean and dry for optimal performance.
7. Troubleshooting
- Lock not responding: Check battery level and replace if necessary. Ensure the lock is properly installed and all connections are secure.
- Fingerprint not recognized: Ensure your finger is clean and dry. Try re-registering your fingerprint if the issue persists.
- Keypad not responding: Check for any physical obstructions. If the screen is unresponsive, try replacing batteries.
- APP connection issues: Ensure Bluetooth is enabled on your phone and you are within range. Check your Wi-Fi gateway connection if attempting remote access.
- Lock makes unusual noises: This may indicate a mechanical issue. Contact customer support.
8. Specifications
| Model | X8 |
| Unlock Modes | APP (Tuya), Fingerprint, Password, Smart Card, Mechanical Key |
| Fingerprint Sensor | FPC Semiconductor Sensor |
| Material | Aluminium Alloy |
| Chip Type | Dual Core Driver |
| Touch Screen | IML Material |
| Power Supply | 4 x AA 1.5V batteries (not included) |
| Operating Temperature | -20 to 55 Centigrade |
| User Capacity | Up to 99 (fingerprint/card/password) |
| Door Thickness | 35mm - 55mm |
| Manufacturer | WOANZX |
| Part Number | BROdlnKDJZ2502jyUB |
9. Warranty and Support
For warranty information and technical support, please refer to the product packaging or contact your retailer. Keep your purchase receipt as proof of purchase.