1. Product Overview
The Rionhex Wireless CarPlay & Android Auto Screen is a portable in-car entertainment and navigation system designed to integrate smartphone functionalities into any vehicle. It features a 10.26-inch HD touchscreen, a built-in 4K dash camera, and supports a 1080p backup camera. This device enhances driving safety and convenience by providing access to navigation, music, messages, and voice control without modifying the car's original console.

Figure 1.1: Overview of the Rionhex Wireless CarPlay & Android Auto Screen, showing the main unit, dash camera, mounting bracket, and included backup camera.

Figure 1.2: The Rionhex 10.26-inch CarPlay Screen, highlighting its primary function as a wireless CarPlay and Android Auto device with an integrated 4K dash camera.
Key Features:
- Wireless CarPlay & Android Auto: Seamless integration with iOS and Android smartphones for navigation, music, and communication.
- 10.26-inch HD Touchscreen: High-resolution (1600*600P) display with anti-glare IPS technology and automatic brightness adjustment for optimal visibility.
- Integrated 4K Dash Cam: Front-facing camera for high-resolution video recording, supporting loop recording.
- 1080p Backup Camera: Includes a rear camera for enhanced safety during reversing and parking, with a 170-degree ultra-wide angle and night vision.
- Voice Control: Supports Siri and Google Assistant for hands-free operation.
- Multiple Audio Output Options: Bluetooth 5.0, built-in speakers, AUX, and FM transmitter for versatile audio integration with your car's sound system.
- Mirror Link Functionality: Wirelessly mirror your smartphone screen (AirPlay/Android Cast) onto the display.
- Split-Screen Mode: Allows simultaneous viewing of camera footage and CarPlay/Android Auto interface.
- Wide Vehicle Compatibility: Operates on DC 12V~36V, suitable for various vehicles including cars, RVs, trucks, and pickups.

Figure 1.3: Visual representation of the product's key highlights, including CarPlay, Android Auto, dual cameras, split-screen, voice control, GPS, Wi-Fi, FM transmitter, Bluetooth, and Mirror Link.
2. Setup & Installation
2.1 Unboxing and Components
Before beginning installation, ensure all components are present. The package includes:
- 1 x 10.26" Carplay Screen for car
- 2 x Bracket Stand (Dashboard Suction Mount, Adhesive Sticker Bracket)
- 1 x Power Cord (Cigarette lighter power source)
- 1 x 64GB MicroSD Card
- 1 x Aux Cable
- 1 x 1080P AHD Backup Camera
- 1 x User Manual

Figure 2.1: Dimensions of the main unit and a visual representation of all included accessories: Dash Mount Bracket, Suction Mount Bracket, 64GB SD Card, Cigarette Lighter Power Cable, Backup Camera (16.4ft), and AUX Audio Cable.
2.2 Main Unit Installation
The Rionhex CarPlay screen offers flexible installation options to suit various vehicle dashboards. No disassembly of your car's console is required.
- Choose Mounting Method: Select either the Dashboard Suction Mount Bracket or the Adhesive Sticker Bracket based on your preference and dashboard surface.
- Attach Bracket to Unit: Securely attach the chosen bracket to the back of the CarPlay screen.
- Mount Unit to Dashboard/Windshield:
- For Suction Mount: Clean the desired area on your dashboard or windshield. Press the suction cup firmly and engage the lever to secure it. The mount allows 90° adjustment for optimal viewing.
- For Adhesive Sticker: Clean and dry the desired area thoroughly. Peel off the protective film from the adhesive base and firmly press the bracket onto the dashboard for at least 30 seconds. Allow adhesive to cure for 24 hours before heavy use.
- Connect Power: Plug the power cord into the unit and then into your car's DC 12V~36V cigarette lighter power source.

Figure 2.2: Demonstrates various installation methods including Dashboard Suction Mount, Adhesive Sticker Bracket, Telescopic Regulation, and Windshield Suction Mount Bracket.

Figure 2.3: Detailed view of the Suction Cup Bracket with its retractable arm and the Adhesive Bracket, illustrating how they attach to the screen and car surface.

Figure 2.4: Simplified diagram showing the connection points for the Carplay screen head unit (A), Cigarette lighter (B), and Backup Camera (C) within a car's interior.
2.3 Backup Camera Installation (Optional)
For optimal reverse assistance, install the included 1080P AHD Backup Camera.
- Mount Camera: Securely mount the backup camera at the rear of your vehicle, typically near the license plate light or trunk handle. Ensure it has a clear view.
- Connect Video Cable: Run the video cable from the backup camera to the "AV IN" port on the CarPlay screen.
- Connect Power to Reverse Light: Connect the red wire from the backup camera's power cable to your car's reverse light positive wire. This ensures the camera automatically activates when the vehicle is put into reverse.

Figure 2.5: Step-by-step guide for installing the rear camera, showing the connection of the red wire to the reversing light positive and the AV IN connection to the portable CarPlay screen.
2.4 Wireless Connection Setup
The Rionhex screen supports wireless CarPlay, Android Auto, AirPlay, and Android Cast (Mirror Link).
2.4.1 Wireless CarPlay Connection (for iOS devices)
- Ensure your iPhone is running iOS 13 or later.
- On the Rionhex screen, switch to CarPlay mode.
- On your iPhone, go to Settings > Bluetooth and Wi-Fi, and turn them on.
- Select the Bluetooth device named "T93_xxxx" for connection and pairing.
- Confirm the pairing request on both devices.
- Once connected, the screen will prompt you to use CarPlay. Tap "Use CarPlay".
- To enable voice assistant Siri, ensure your phone's microphone is on and Siri is enabled on your iPhone.

Figure 2.6: Step-by-step visual guide for connecting an iPhone to the Rionhex screen via Wireless CarPlay, including Bluetooth pairing and CarPlay activation.
2.4.2 Wireless Android Auto Connection (for Android devices)
- Ensure your phone is running Android 11.0 or later. (Google or Samsung phones require Android 10.0 or later).
- On the Rionhex screen, switch to Android Auto mode.
- On your Android phone, go to Connections > Bluetooth and Wi-Fi, and turn them on.
- Select the device named "T93_xxxx" for connection and pairing.
- Confirm the pairing request on both devices.
- Connection successful.

Figure 2.7: Step-by-step visual guide for connecting an Android phone to the Rionhex screen via Wireless Android Auto, including Bluetooth pairing.
2.4.3 Wireless AirPlay Connection (for iOS Mirror Link)
- AirPlay is not available on iOS 17.2 and above.
- AirPlay cannot be used while CarPlay is connected.
- On the Rionhex screen, switch to AirPlay mode.
- On your iPhone, turn on Bluetooth and Wi-Fi.
- Connect to the Wi-Fi network named "DY_AP_xxx".
- Turn on screen mirroring on your iPhone and select the device.
- Connection successful.

Figure 2.8: Step-by-step visual guide for connecting an iPhone to the Rionhex screen via Wireless AirPlay for screen mirroring.
2.4.4 Wireless Android Cast Connection (for Android Mirror Link)
- Note: Mirror Link and Android Auto cannot be used at the same time.
- On the Rionhex screen, switch to Android Cast mode.
- On your Android phone, turn on Bluetooth and Wi-Fi.
- Scan the QR code displayed on the screen to download the Dylink app.
- Install the Dylink app and grant necessary permissions (e.g., "Draw over other apps").
- Open the Dylink app and connect to the device.
- Connection successful.

Figure 2.9: Step-by-step visual guide for connecting an Android phone to the Rionhex screen via Wireless Android Cast for screen mirroring, including Dylink app installation.
3. Operation
3.1 Navigating the Touchscreen Interface
The 10.26-inch HD touchscreen provides an intuitive interface for accessing all functions. Tap icons to open applications, swipe to navigate menus, and use pinch-to-zoom gestures where applicable (e.g., maps).
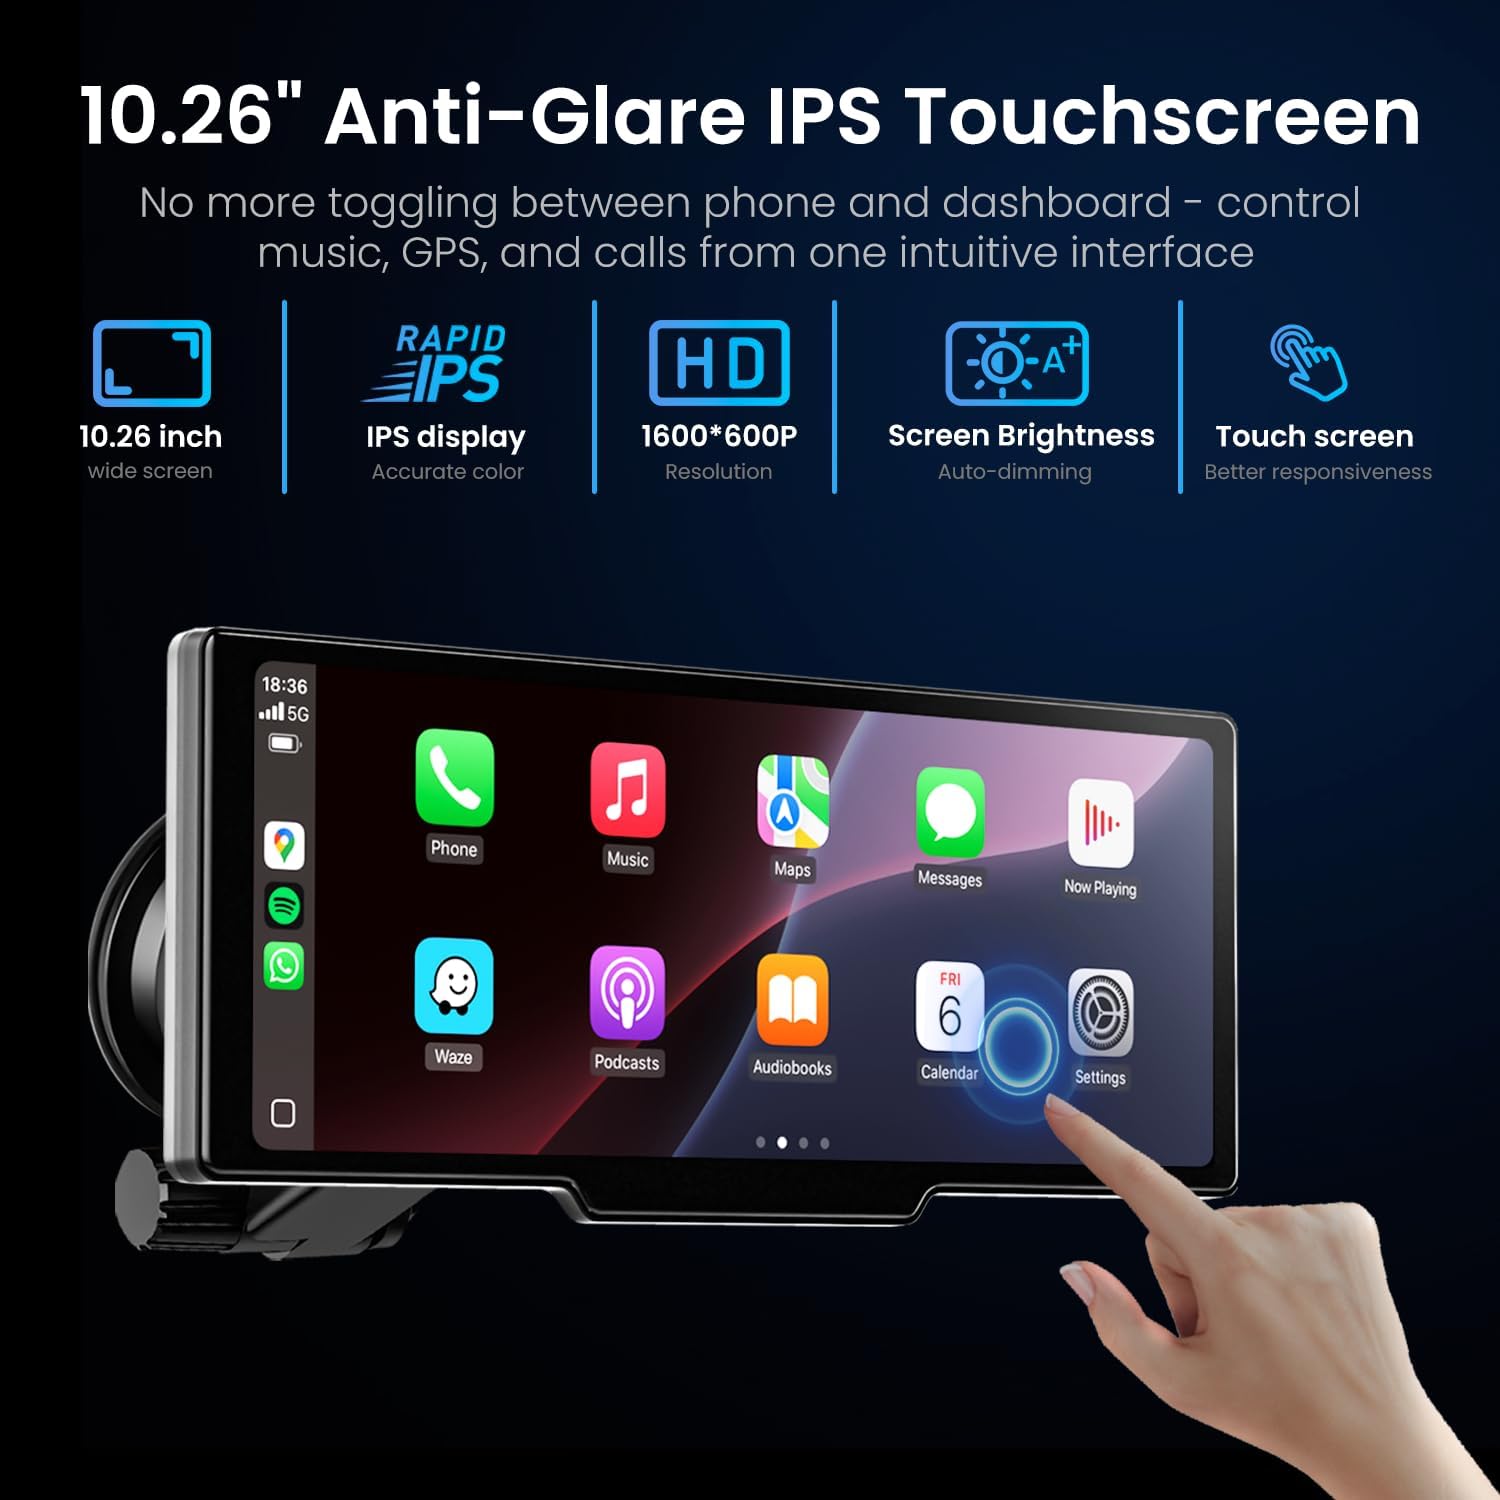
Figure 3.1: Features of the 10.26-inch Anti-Glare IPS Touchscreen, including its wide screen, IPS display, HD resolution, auto-dimming brightness, and responsive touch capabilities.

Figure 3.2: Close-up view of the 10.26-inch HD screen, emphasizing its sleek touch panel and responsiveness to various touch gestures.
3.2 CarPlay & Android Auto Functions
Once connected, your smartphone's compatible apps will appear on the Rionhex screen, allowing you to access navigation, music, messages, and calls directly from the display.
- Navigation: Use Apple Maps, Google Maps, Waze, or other supported navigation apps for real-time directions and traffic updates.
- Music & Media: Play audio from Spotify, Apple Music, Podcasts, and other media applications.
- Communication: Make and receive calls, send and read messages using voice commands or the touchscreen.

Figure 3.3: Examples of the Wireless CarPlay and Android Auto interfaces, showing various app icons for navigation, calls, messages, and music.

Figure 3.4: Demonstrates the full-screen display of both Apple CarPlay and Android Auto interfaces on the Rionhex unit.

Figure 3.5: Illustrates real-time GPS navigation capabilities when connected to CarPlay or Android Auto, showing popular navigation apps like Google Maps and Apple Maps.

Figure 3.6: Shows the music playback interface within CarPlay, emphasizing the high-quality audio experience through Bluetooth or AUX connections.
3.3 Voice Control
Utilize Siri or Google Assistant for hands-free control of your device and smartphone functions. Activate the voice assistant by saying "Hey Siri" or "Hi Google" (ensure enabled on your phone) or by tapping the voice control icon on the screen.
- "Navigate Home"
- "Play music"
- "Call [Contact Name]"
- "Send a message to [Contact Name]"
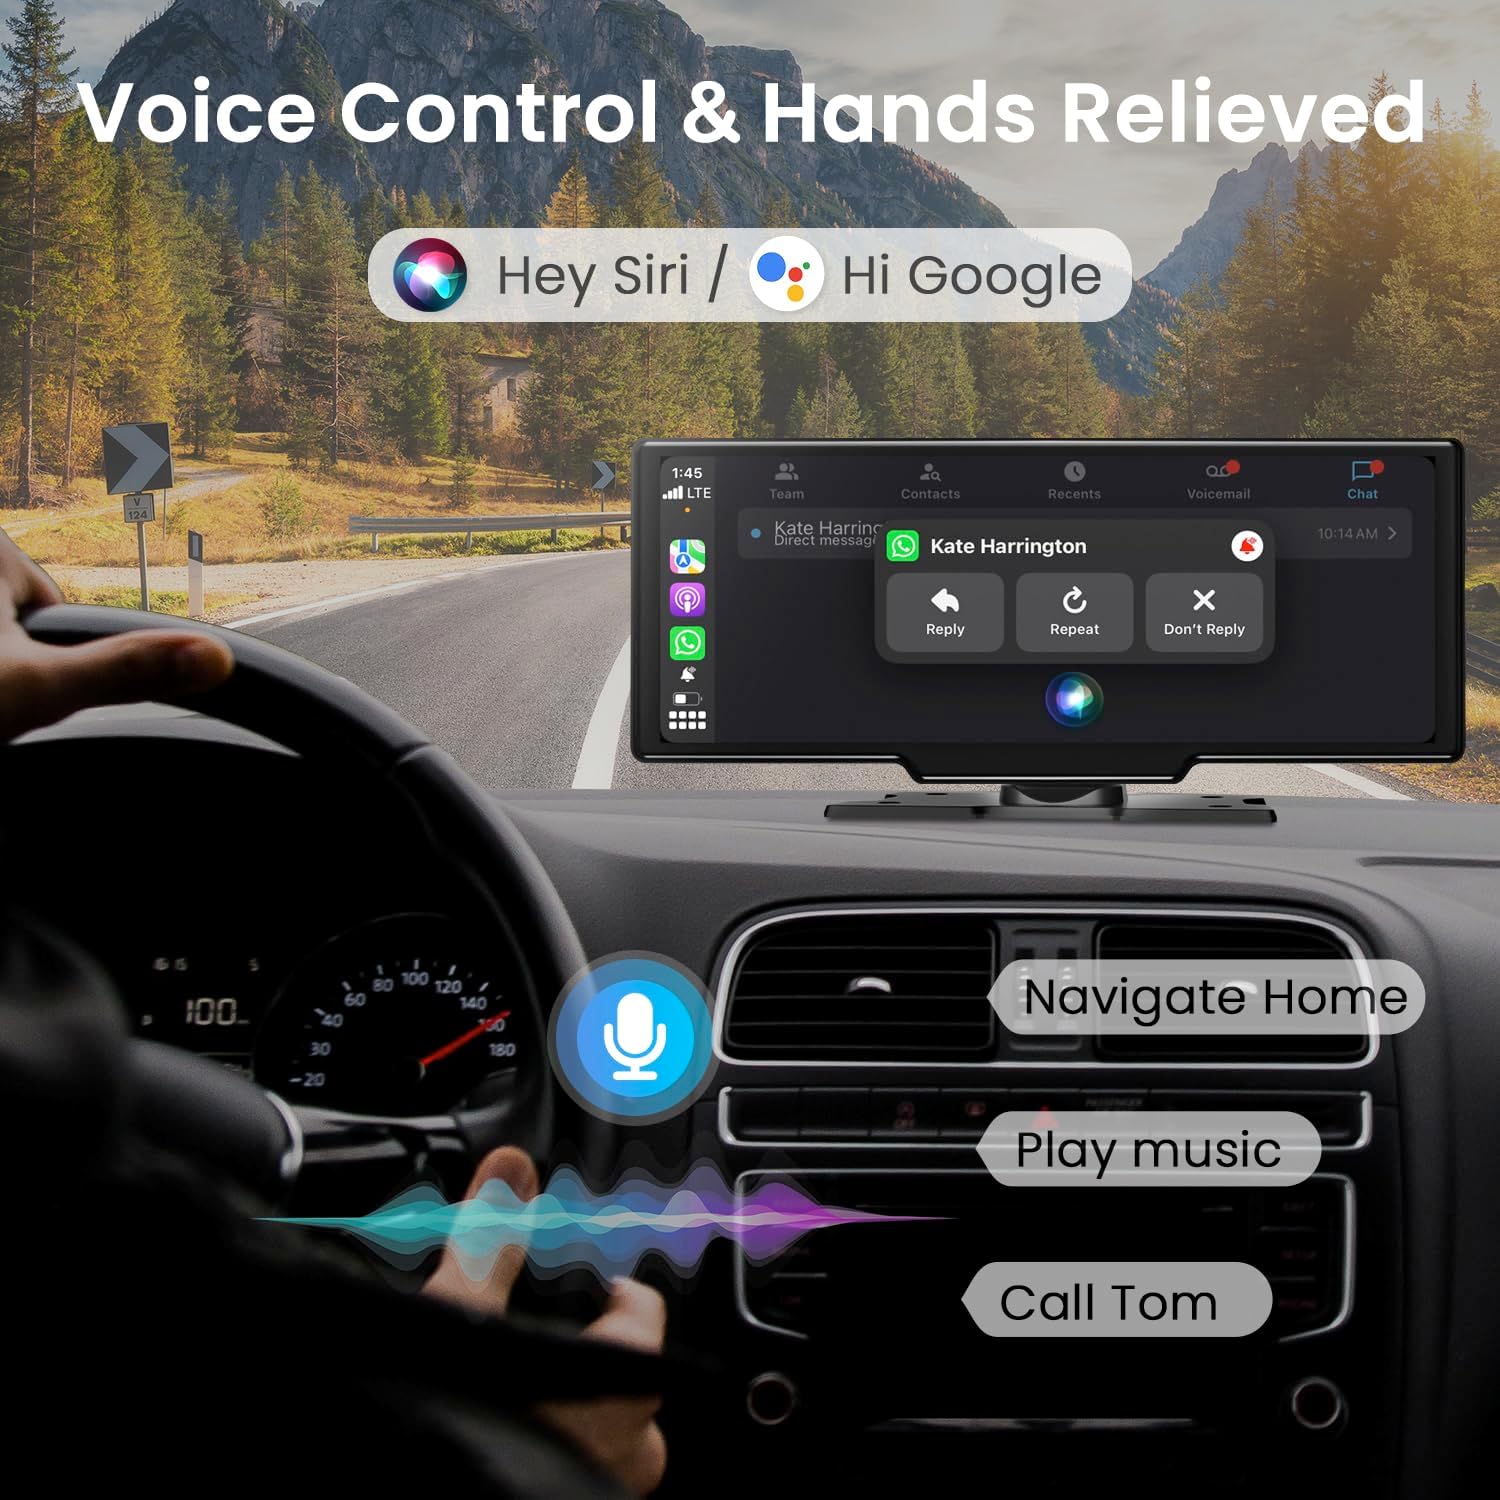
Figure 3.7: Depicts the voice control feature in action, showing how Siri and Google Assistant can be used for navigation, music playback, and making calls.

Figure 3.8: Illustrates the hands-free operation enabled by Siri and Google Voice Control, particularly for managing calls and messages while driving.
3.4 Audio Output Options
The Rionhex screen offers four ways to output audio to your car's sound system:
- Bluetooth 5.0: Connect your phone to the Rionhex screen via Bluetooth, and the screen can then transmit audio to your car's Bluetooth-enabled stereo.
- Built-in Speaker: The unit has a mono speaker for direct audio output. This is suitable for basic audio but external options provide superior sound quality.
- AUX Connection: Use the included 3.5mm AUX cable to connect the Rionhex screen to your car's AUX input for high-quality audio transmission. (Recommended)
- FM Transmitter: Set the Rionhex screen to an unused FM frequency, and then tune your car's FM radio to the same frequency. Audio will be transmitted wirelessly. (Recommended)

Figure 3.9: Visual guide to the four audio output options: Built-in Speaker, FM Transmitter, and AUX Connection, along with Bluetooth connectivity.

Figure 3.10: Detailed illustration of the four audio output modes: Bluetooth Connection, AUX Connection, Built-in Speaker, and FM Transmitter, showing their respective setup screens or connections.
3.5 Camera Functions and Display Modes
The Rionhex screen integrates a 4K front dash cam and supports the included 1080p rear backup camera.
- Dual Recording: The front 4K camera and rear 1080p camera can record simultaneously.
- Loop Recording: Footage is continuously captured, with older files being overwritten by new ones to ensure continuous recording. You can set loop recording intervals to 1 or 2 minutes.
- Backup Camera Display: When the vehicle is in reverse, the 1080p rear camera view automatically displays on the screen, complete with reversing lines for assistance.
- MicroSD Card Support: The unit supports up to a 256GB MicroSD card (64GB included) for storing recordings. Use a recommended U3 or higher brand for optimal performance.
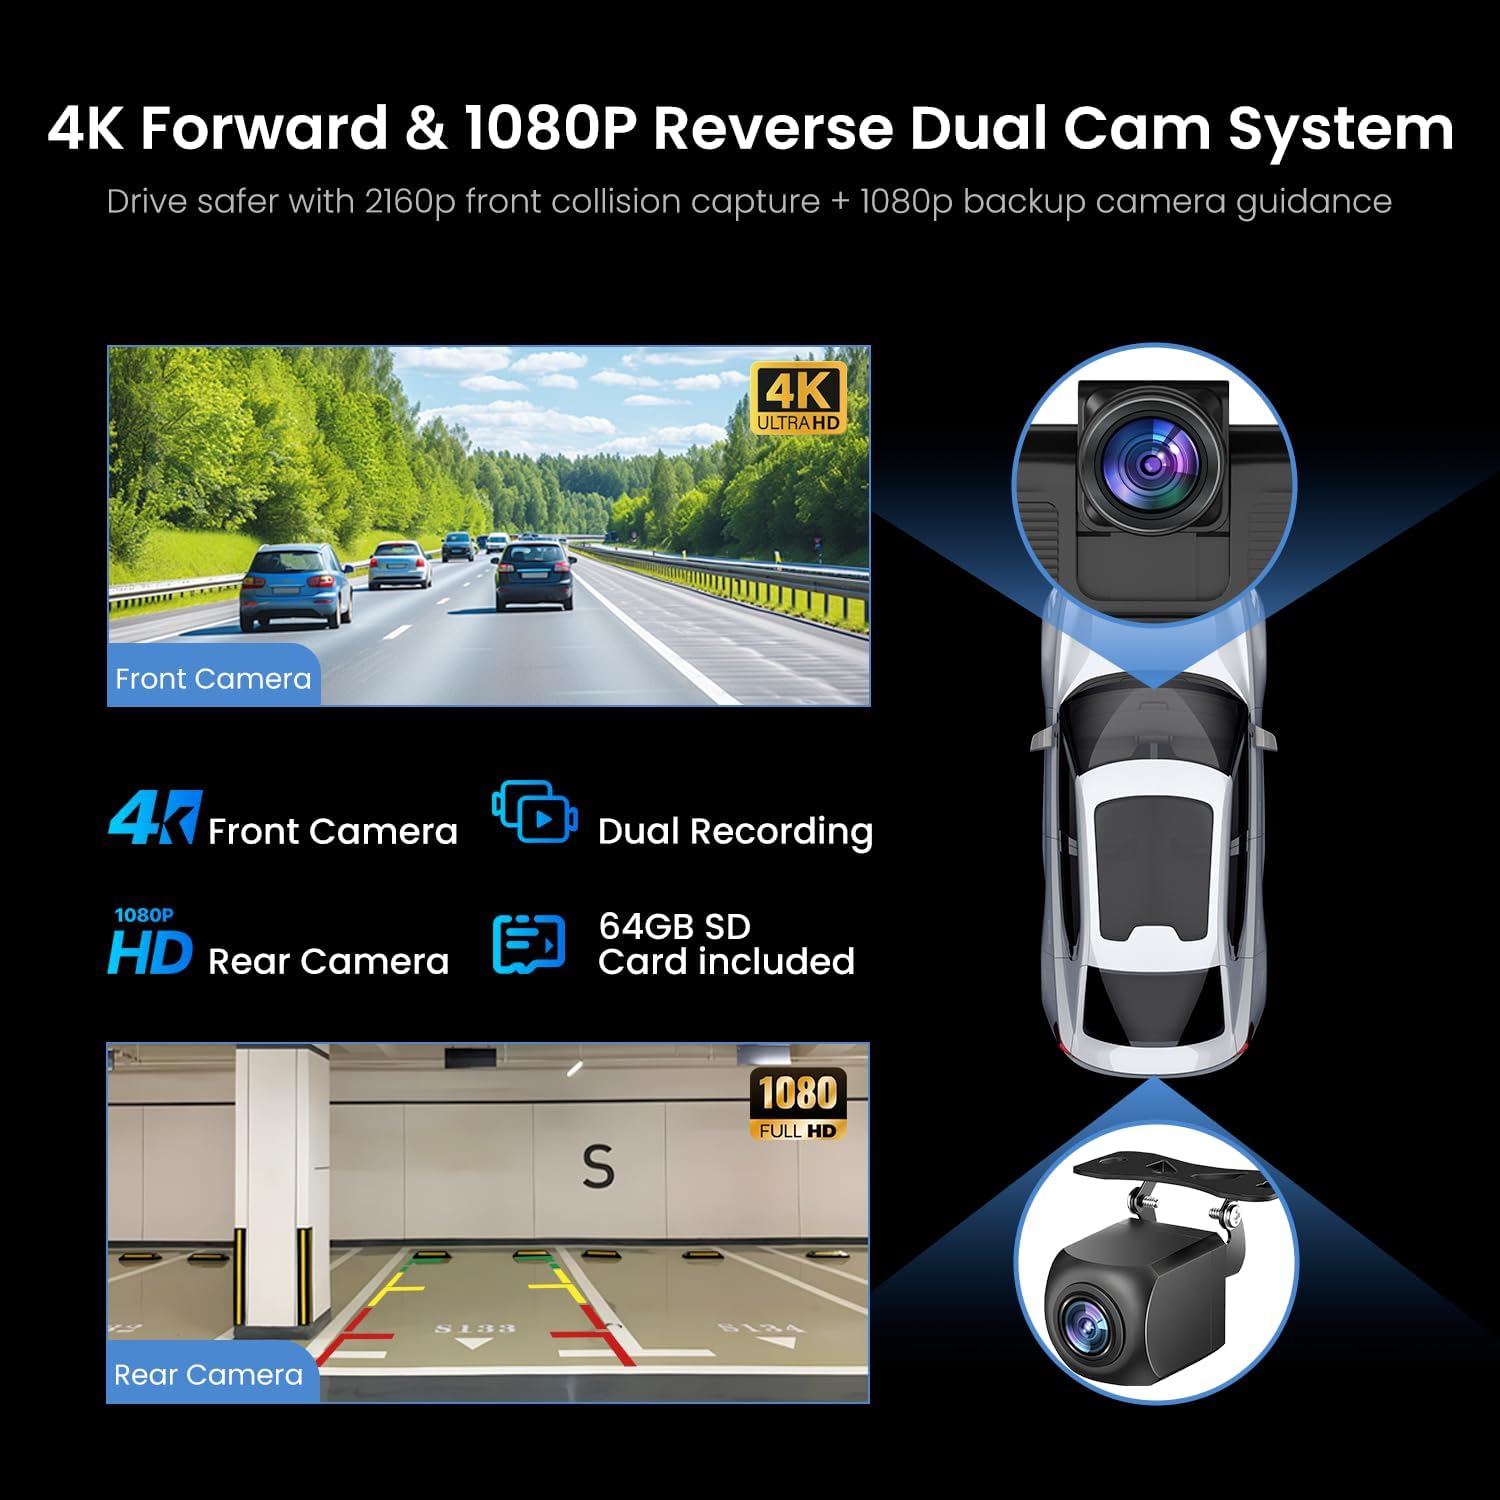
Figure 3.11: Diagram illustrating the 4K front camera and 1080P rear camera system, highlighting dual recording capability and the inclusion of a 64GB SD card.

Figure 3.12: Comparison view of the footage quality from the front 4K UHD camera and the rear 1080P AHD camera.

Figure 3.13: Features of the 1080P rear camera, including IR night vision, 170-degree ultra-wide angle, waterproof design, and reversing lines for parking assistance.

Figure 3.14: Explanation of the endless loop recording feature, showing how the oldest files are replaced to ensure continuous capture of footage.

Figure 3.15: Details on the MicroSD card support, indicating compatibility with up to 256GB cards for extended recording, with a 64GB card included.
3.6 Multiple Display Modes
The screen supports various display configurations to suit your needs:
- Full-Screen CarPlay/Android Auto: Maximize the interface for navigation or media.
- Full-Screen Camera View: View the front or rear camera in full screen.
- Split-Screen Mode: Simultaneously view camera footage (front or rear) on one side and CarPlay/Android Auto on the other.

Figure 3.16: Examples of multiple display modes, including full-screen front camera, CarPlay + front camera, front camera + rear camera, and CarPlay + rear camera.
3.7 Auto-Dimming Screen
The exclusive light sensor automatically adjusts screen brightness based on ambient lighting conditions, ensuring comfortable viewing day or night and reducing glare and eye strain.

Figure 3.17: Illustration of the auto-dimming screen feature, showing how brightness adjusts automatically between day and night conditions for optimal visibility.
4. Maintenance
Proper maintenance ensures the longevity and optimal performance of your Rionhex Wireless CarPlay & Android Auto Screen.
- Cleaning the Screen: Use a soft, lint-free cloth, slightly dampened with water or a screen-safe cleaner, to gently wipe the touchscreen. Avoid abrasive materials or harsh chemicals that could damage the display.
- Cleaning Camera Lenses: Gently wipe the front and rear camera lenses with a microfiber cloth to ensure clear recording quality. Avoid touching the lens directly with fingers.
- Cable Management: Ensure all cables are neatly routed and secured to prevent tangling, damage, or interference with driving controls.
- Storage: If storing the device for an extended period, disconnect it from power and store it in a cool, dry place away from direct sunlight and extreme temperatures.
- Firmware Updates: Periodically check the manufacturer's website for any available firmware updates to ensure the device operates with the latest features and bug fixes.
5. Troubleshooting
This section addresses common issues you might encounter with your Rionhex Wireless CarPlay & Android Auto Screen.
5.1 General Issues
- Device not powering on:
- Ensure the power cord is securely plugged into both the unit and the car's cigarette lighter socket.
- Check if the car's cigarette lighter socket is receiving power (e.g., by testing with another device).
- Verify the car's voltage is within the supported 12V~36V range.
- Screen is slow or unresponsive:
- Restart the device by unplugging and re-plugging the power cord.
- Ensure no excessive background processes are running if applicable (e.g., too many apps open on connected phone).
- Screen knob keeps loosening:
- Regularly check and re-tighten the screen knob at the back of the unit to maintain stability.
- Ensure the mounting surface is clean and stable.
- Screen has a crack or app buttons do not work:
- This indicates physical damage. Contact customer support for assistance under warranty.
5.2 Connectivity Issues
- Wireless CarPlay/Android Auto not connecting:
- Ensure Bluetooth and Wi-Fi are enabled on your smartphone.
- Verify your phone's operating system meets the minimum requirements (iOS 13+ for CarPlay, Android 11.0+ for Android Auto).
- Forget the device from your phone's Bluetooth settings and re-pair.
- Restart both the Rionhex unit and your smartphone.
- Ensure no other devices are simultaneously trying to connect via Bluetooth or Wi-Fi.
- Poor audio quality or no sound:
- Check the selected audio output mode (Bluetooth, AUX, FM Transmitter, Built-in Speaker).
- If using AUX, ensure the cable is fully inserted into both the unit and your car's AUX input.
- If using FM Transmitter, ensure the frequency on the Rionhex unit matches your car radio's frequency and that the chosen frequency is clear of other radio stations.
- Adjust volume levels on both the Rionhex unit and your car stereo.
- Cannot be heard during calls (Android Auto):
- Ensure the microphone on the Rionhex unit is not obstructed.
- Check microphone permissions for Android Auto on your phone.
- Try restarting the connection or the device.
- If the issue persists, it may indicate a hardware fault; contact customer support.
5.3 Camera Issues
- Backup camera not displaying:
- Ensure the video cable is securely connected to the "AV IN" port on the Rionhex unit.
- Verify the red power wire of the backup camera is correctly connected to your car's reverse light positive.
- Check if the camera lens is clean and free from obstructions.
- Recording issues (dash cam):
- Ensure a MicroSD card is inserted and properly formatted.
- Check if the MicroSD card has sufficient free space.
- If loop recording is enabled, older files are automatically overwritten.
- Try using a different, high-quality (U3 or higher) MicroSD card.
If you encounter issues not listed here or if the suggested solutions do not resolve the problem, please contact Rionhex customer support for further assistance.
6. Specifications
| Feature | Detail |
|---|---|
| Brand | Rionhex |
| Model | 10 Inch 4K dashcam |
| Screen Size | 10.26 inches |
| Resolution | 1600*600P |
| Front Camera Resolution | 4K UHD (2160p) |
| Rear Camera Resolution | 1080P AHD |
| Connectivity Technology | Auxiliary, Bluetooth 5.0, Wi-Fi |
| Controller Type | iOS, Android |
| Compatible Devices | Smartphone (iPhone, Android) |
| Connector Type | 3.5mm Jack, USB Type-C |
| Audio Output Mode | Stereo (via external connection), Mono (built-in speaker) |
| Video Encoding | MOV |
| Power Input | DC 12V~36V |
| Item Weight | 11.1 ounces |
| Package Dimensions | 10.91 x 5.59 x 4.09 inches |
| Max SD Card Support | 256GB (64GB included) |
7. Warranty & Support
Rionhex is committed to providing high-quality products and excellent customer service.
- Warranty: The product comes with a 2-YEAR WARRANTY.
- Replacement: Replacement is available within 24 months of purchase.
- Technical Support: Lifetime after-sales consultation and technical support are provided.
- Customer Service Response: Expect a satisfaction reply within 12 hours for any inquiries.
For any questions or assistance, please do not hesitate to contact Rionhex customer support.

Figure 7.1: Rionhex customer support commitment, highlighting 12-hour quick reply, 24-month replacement, and lifetime technical support.