1. Product Overview
The Veement V5F Type-C Dash Cam Hardwire Kit provides a continuous power supply to your dash camera, enabling features like 24-hour parking monitoring and low voltage protection. This kit converts 12V-24V vehicle power to 5V 3A, suitable for compatible Veement dash cam models including V200, V200Pro, V300, S80, and VT10.
Key Features:
- Low Voltage Protection: Adjustable cut-off voltage to prevent vehicle battery drain.
- 24-Hour Parking Monitor: Provides constant power for continuous surveillance even when the vehicle is off.
- Multiple Safety Design: Includes protection against short circuits, overheating, and cable reversal.
- Automatic Engine Detection: Enables the dash cam to record without manual setting based on engine status.
- Upgraded Type-C Connector: Offers stronger power supply capacity, faster charging, and improved durability.

Figure 1: Multi-Protection Features of the Hardwire Kit

Figure 2: Upgraded Type-C Connector Benefits
2. Installation Guide
Important Safety Notice:
- Professional installation of the hardwire kit is strongly recommended. Veement is not responsible for any product or vehicle damage, or personal injuries resulting from improper installation.
- Ensure the vehicle's ignition is OFF before beginning installation.
- Use appropriate tools to test and confirm polarity and grounding before finalizing connections.
- Do not use fuse slots connected to critical vehicle components, such as airbags, for safety reasons.
Components:
- Veement V5F Hardwire Kit (Type-C connector)
- 4 x Fuse Taps (Micro Mini, Mini, Small, Medium)
Wiring Instructions:
- Identify Fuse Box: Locate your vehicle's fuse box. Refer to your vehicle's owner's manual to identify suitable fuse slots.
- Select Fuse Taps: The kit includes four types of fuse taps. Select the appropriate type that matches your vehicle's fuse box.
- Connect Yellow Wire (BAT): Connect the yellow wire of the hardwire kit to a constant fuse slot in the fuse box. This slot provides power even when the engine is off, essential for parking surveillance.
- Connect Red Wire (ACC): Connect the red wire to an ACC (Accessory) fuse slot. This slot only receives power when the vehicle's ignition is on.
- Connect Black Wire (GND): Securely attach the black wire to a metal ground bolt or screw on the vehicle's chassis. Ensure a good electrical connection.
- Route Cable: Carefully route the hardwire cable from the fuse box to the dash camera's mounting location, tucking it neatly behind trim panels to maintain a clean interior.
- Connect to Dash Cam: Plug the Type-C connector of the hardwire kit into your compatible Veement dash camera.

Figure 3: Hardwire Kit Wired Connection Diagram

Figure 4: Included Fuse Tap Types
3. Operating Instructions
Setting Cut-Off Voltage Protection:
The Veement V5F Hardwire Kit features adjustable low voltage protection to prevent your vehicle's battery from draining completely.
- Activate Display: Long press any button on the hardwire kit for 3 seconds. The LED display will illuminate.
- Adjust Voltage: Use the '+' and '-' buttons on the hardwire kit to set your desired cut-off voltage. A recommended setting is 11.8V.
- Confirm Setting: After selecting the voltage, wait for the LED display to flash three times. This indicates the setting has been saved.
When the vehicle's voltage drops below the set cut-off value, the hardwire kit will automatically stop power output after 1 minute to protect the battery.
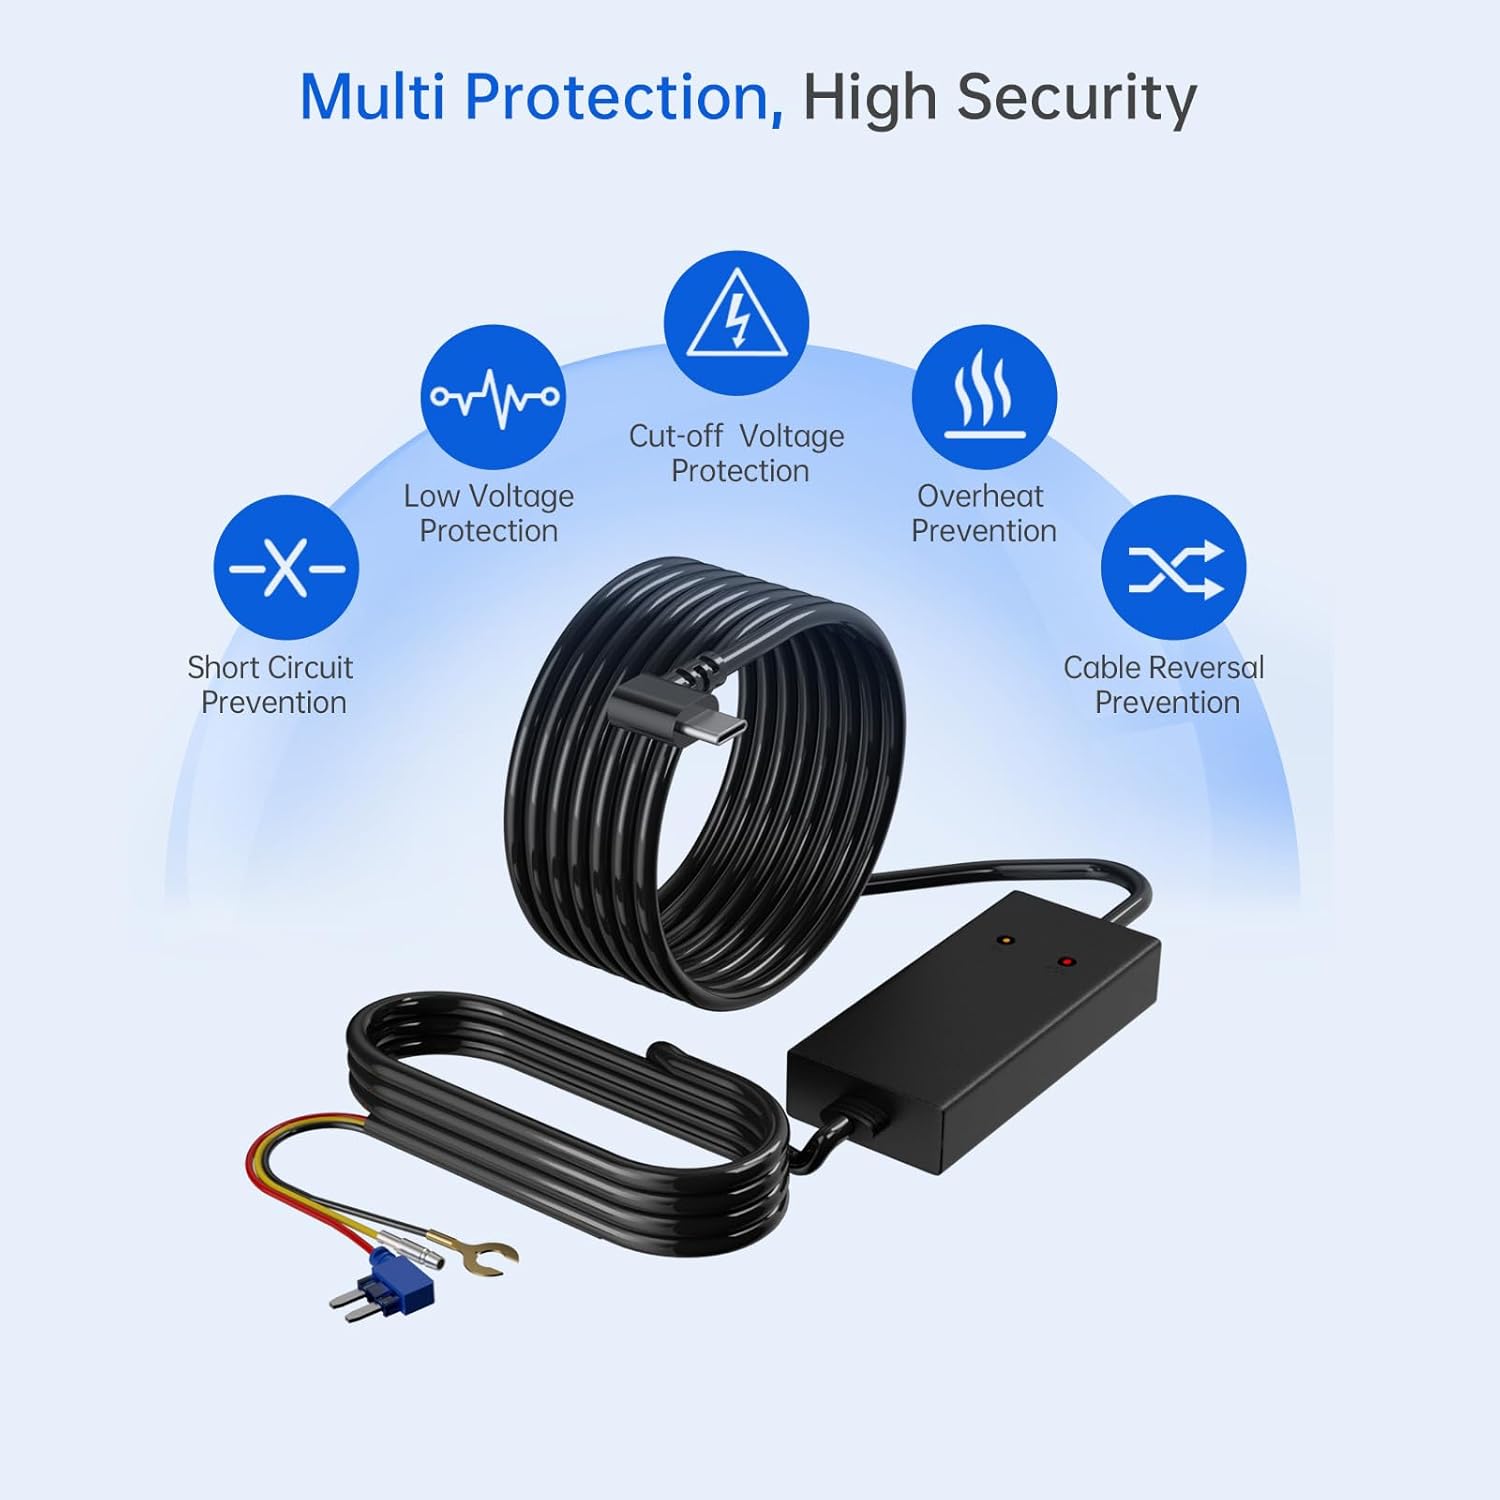
Figure 5: Adjustable Low Voltage Protection Interface
24-Hour Parking Surveillance:
To enable continuous parking monitoring, ensure the hardwire kit is correctly installed and configured.
- Verify Connection: Confirm the hardwire kit is correctly connected to both constant and ACC fuse slots as per the installation guide.
- Dash Cam Settings: Access your dash camera's menu. Navigate to Setting > Parking Guard and set it to ON.
- Time-Lapse Recording (Optional): For efficient storage, you may enable time-lapse recording. Go to Setting > Time-lapse and set it to ON. This compresses video footage (e.g., 30 minutes of video into 1 minute).
When the vehicle's engine is turned off, the dash cam will automatically enter parking monitor mode.
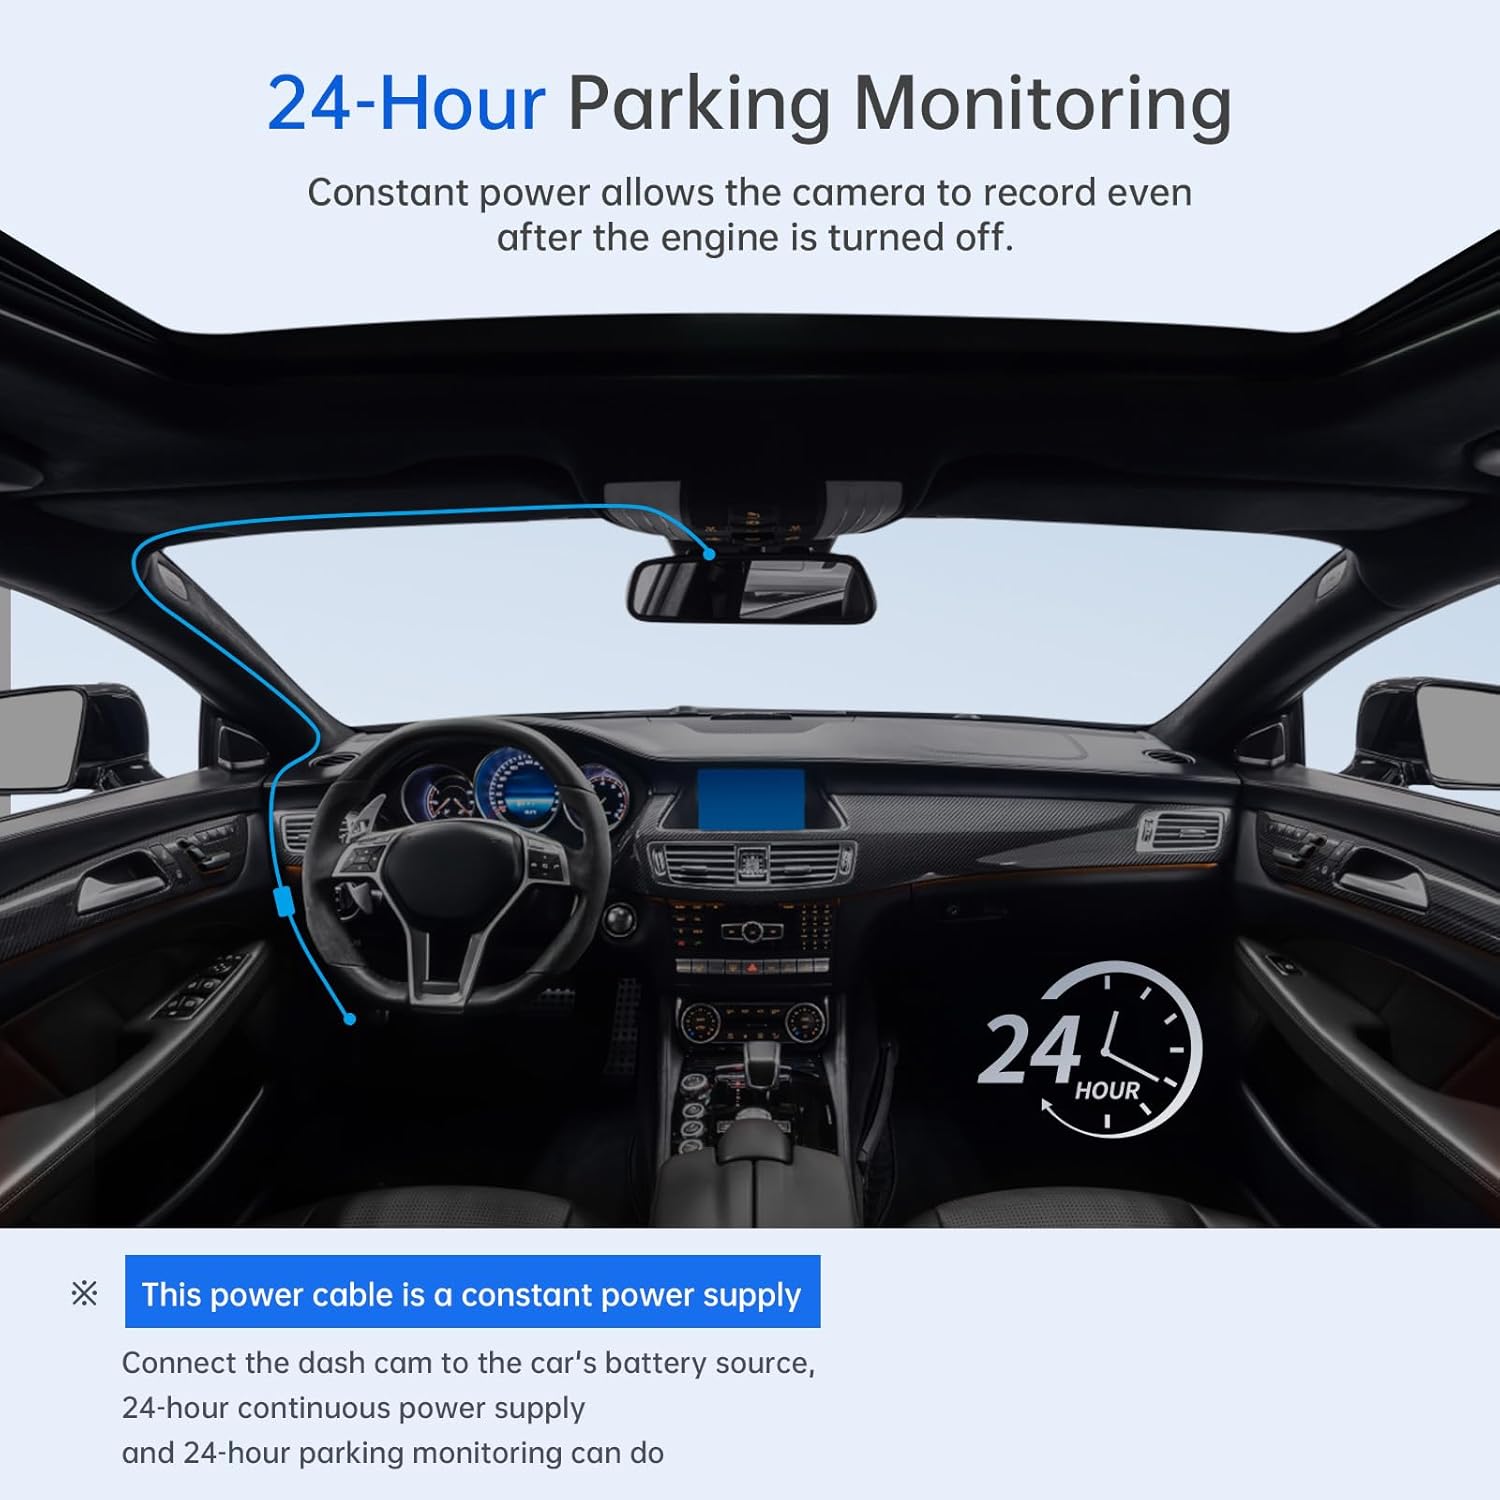
Figure 6: 24-Hour Parking Monitoring in Action
Automatic Engine Detection:
The 3-in-1 cable design of the hardwire kit automatically detects the engine's status, allowing the dash cam to switch between normal recording and parking mode without manual intervention.

Figure 7: Automatic Engine Status Detection Wiring
4. Maintenance
To ensure optimal performance and longevity of your Veement V5F Hardwire Kit, consider the following maintenance tips:
- Regular Inspection: Periodically check all cable connections (fuse box, ground, dash cam) to ensure they are secure and free from corrosion or damage.
- Cable Management: Ensure cables are not pinched, frayed, or exposed to excessive heat or sharp edges. Proper routing helps prevent wear and tear.
- Cleanliness: Keep the hardwire kit module and dash cam free from dust and debris. Use a soft, dry cloth for cleaning.
- Software Updates: Regularly check for firmware updates for your compatible Veement dash camera, as these may include improvements related to power management and parking mode functionality.
5. Troubleshooting
If you encounter issues with your Veement V5F Hardwire Kit, refer to the following common problems and solutions:
Problem: Dash Cam Does Not Power On
- Check Connections: Ensure all wires (Yellow BAT, Red ACC, Black GND) are securely connected to their respective points in the fuse box and chassis.
- Verify Fuses: Check the fuses in the fuse taps and the vehicle's fuse box. Replace any blown fuses.
- Test Power: Use a multimeter to confirm that the selected fuse slots are providing power (constant for BAT, ignition-switched for ACC).
- Dash Cam Compatibility: Ensure your dash cam is a compatible Veement model (V200, V200Pro, V300, S80, VT10) and that its Type-C port is functional.
Problem: 24-Hour Parking Mode Not Activating
- Constant Power Check: Verify that the yellow wire (BAT) is connected to a fuse slot that provides continuous power even when the ignition is off.
- ACC Power Check: Confirm the red wire (ACC) is connected to a fuse slot that only receives power when the ignition is on. The dash cam uses the change in power status to detect engine off.
- Dash Cam Settings: Double-check that 'Parking Guard' is enabled in your dash camera's settings menu.
- Low Voltage Cut-off: If the vehicle battery voltage is already below the set cut-off value, the hardwire kit will not supply power for parking mode. Charge your vehicle battery.
Problem: Vehicle Battery Drains
- Adjust Cut-Off Voltage: Ensure the low voltage cut-off is set appropriately (e.g., 11.8V for 12V systems). A lower setting might allow the battery to drain too much.
- Vehicle Battery Health: A weak or old vehicle battery may struggle to support parking mode for extended periods. Consider having your battery tested.
- Dash Cam Power Consumption: Some dash cam features (e.g., high resolution, Wi-Fi) consume more power. Adjust dash cam settings if battery drain is excessive.
6. Specifications
| Brand | Veement |
| Model Name | V5F |
| Input Voltage | DC 12V-24V |
| Output Voltage/Current | DC 5V / 3A |
| Cable Length | 11.5 ft (3.5m) |
| Connector Type | Type-C |
| Special Features | Low Voltage Protection, 24H Parking Monitor, Automatic Engine Detection, Multi-Protection System |
| Included Components | Hardwire Kit, 4 Fuse Taps (Micro Mini, Mini, Small, Medium) |
| Compatible Devices | Veement V200, V200Pro, V300, S80, VT10 |
| Product Dimensions (Module) | 1"D x 2"W x 1.5"H (approximate) |
7. Warranty Information
The Veement V5F Hardwire Kit comes with a 12-Month Replacement Service and a 45-Day Refund Guarantee. Please retain your proof of purchase for warranty claims. For specific terms and conditions, refer to the product packaging or contact Veement customer support.
8. Customer Support
If you have any questions, require assistance with installation, or need troubleshooting support, please do not hesitate to contact Veement customer service. You can typically find contact information on the product packaging, the official Veement website, or through your purchase platform.
When contacting support, please provide your product model (V5F) and a detailed description of the issue to help us assist you more efficiently.

