1. Introduction
This manual provides essential information for the safe and efficient operation, installation, and maintenance of your VEVOR ML90L-4-1.5kW-B3 single-phase electric motor. Please read these instructions thoroughly before installation or operation to ensure proper use and to prevent injury or damage.
The VEVOR ML90L-4-1.5kW-B3 is a general-purpose AC motor designed for various applications, including water pumps, agricultural machinery, and other general equipment. It features robust construction, reversible rotation, and reliable performance.

Figure 1: VEVOR ML90L-4-1.5kW-B3 Electric Motor Overview with Key Specifications.
2. Safety Instructions
Always observe the following safety precautions to reduce the risk of electric shock, fire, or serious injury.
- Electrical Safety: Ensure the motor is properly grounded. Disconnect power before performing any installation, maintenance, or repair work. All electrical connections must be made by a qualified electrician and comply with local and national electrical codes.
- Mechanical Safety: Keep hands, hair, and clothing clear of rotating parts. Ensure the motor is securely mounted before operation. Do not operate the motor if any guards or covers are removed or damaged.
- Environment: Operate the motor in a well-ventilated area. Avoid exposure to excessive moisture, dust, or corrosive environments unless the motor is specifically rated for such conditions.
- Overload Protection: Install appropriate overload protection devices to prevent motor damage from excessive current.
3. Product Overview and Features
The VEVOR ML90L-4-1.5kW-B3 electric motor is engineered for reliable performance in demanding applications.
Key Features:
- Powerful Performance: 1.5 kW (2 HP) single-phase motor with a full load current of 9.85 A, operating at 220-240 V AC, 50 Hz, and a high speed of 1400 RPM.
- Robust Frame Type: Features a 90L frame with B3 mounting, a 24 mm keyed shaft, 50 mm shaft length, and an 8 mm keyway size.
- Dual Rotation Direction: Offers reversible CW/CCW rotation, simplifying wiring installation and providing versatile connections for various applications.
- Durable Construction: Equipped with a sturdy rolled steel shell that resists rust and corrosion, ensuring extended lifespan and reliable performance.
- Versatile Applications: Suitable for water pumps, agricultural machinery, and general equipment, making it ideal for DIY projects and repair replacements.

Figure 2: Motor internal components highlighting 1400 RPM high-speed rotation for improved efficiency.

Figure 3: Detailed view of the motor shaft and its dimensions, emphasizing dual rotation capability.
4. Specifications
Detailed technical specifications for the VEVOR ML90L-4-1.5kW-B3 electric motor:
| Specification | Value |
|---|---|
| Model Number | ML90L-4-1.5kW-B3 |
| Voltage | AC 220-240 V |
| Frequency | 50 Hz |
| Power | 1.5 kW / 2 HP |
| Current | 9.85 A |
| Frame Size | 90L, B3 |
| Rotation Speed | 1400 RPM |
| Shaft Diameter | 24 mm |
| Shaft Length | 50 mm |
| Keyway Size | 8 mm |
| Net Weight | 15.2 kg / 33.5 lb |
| Product Dimensions (L x W x H) | 360 x 175 x 240 mm / 14.2 x 6.9 x 9.4 inches |
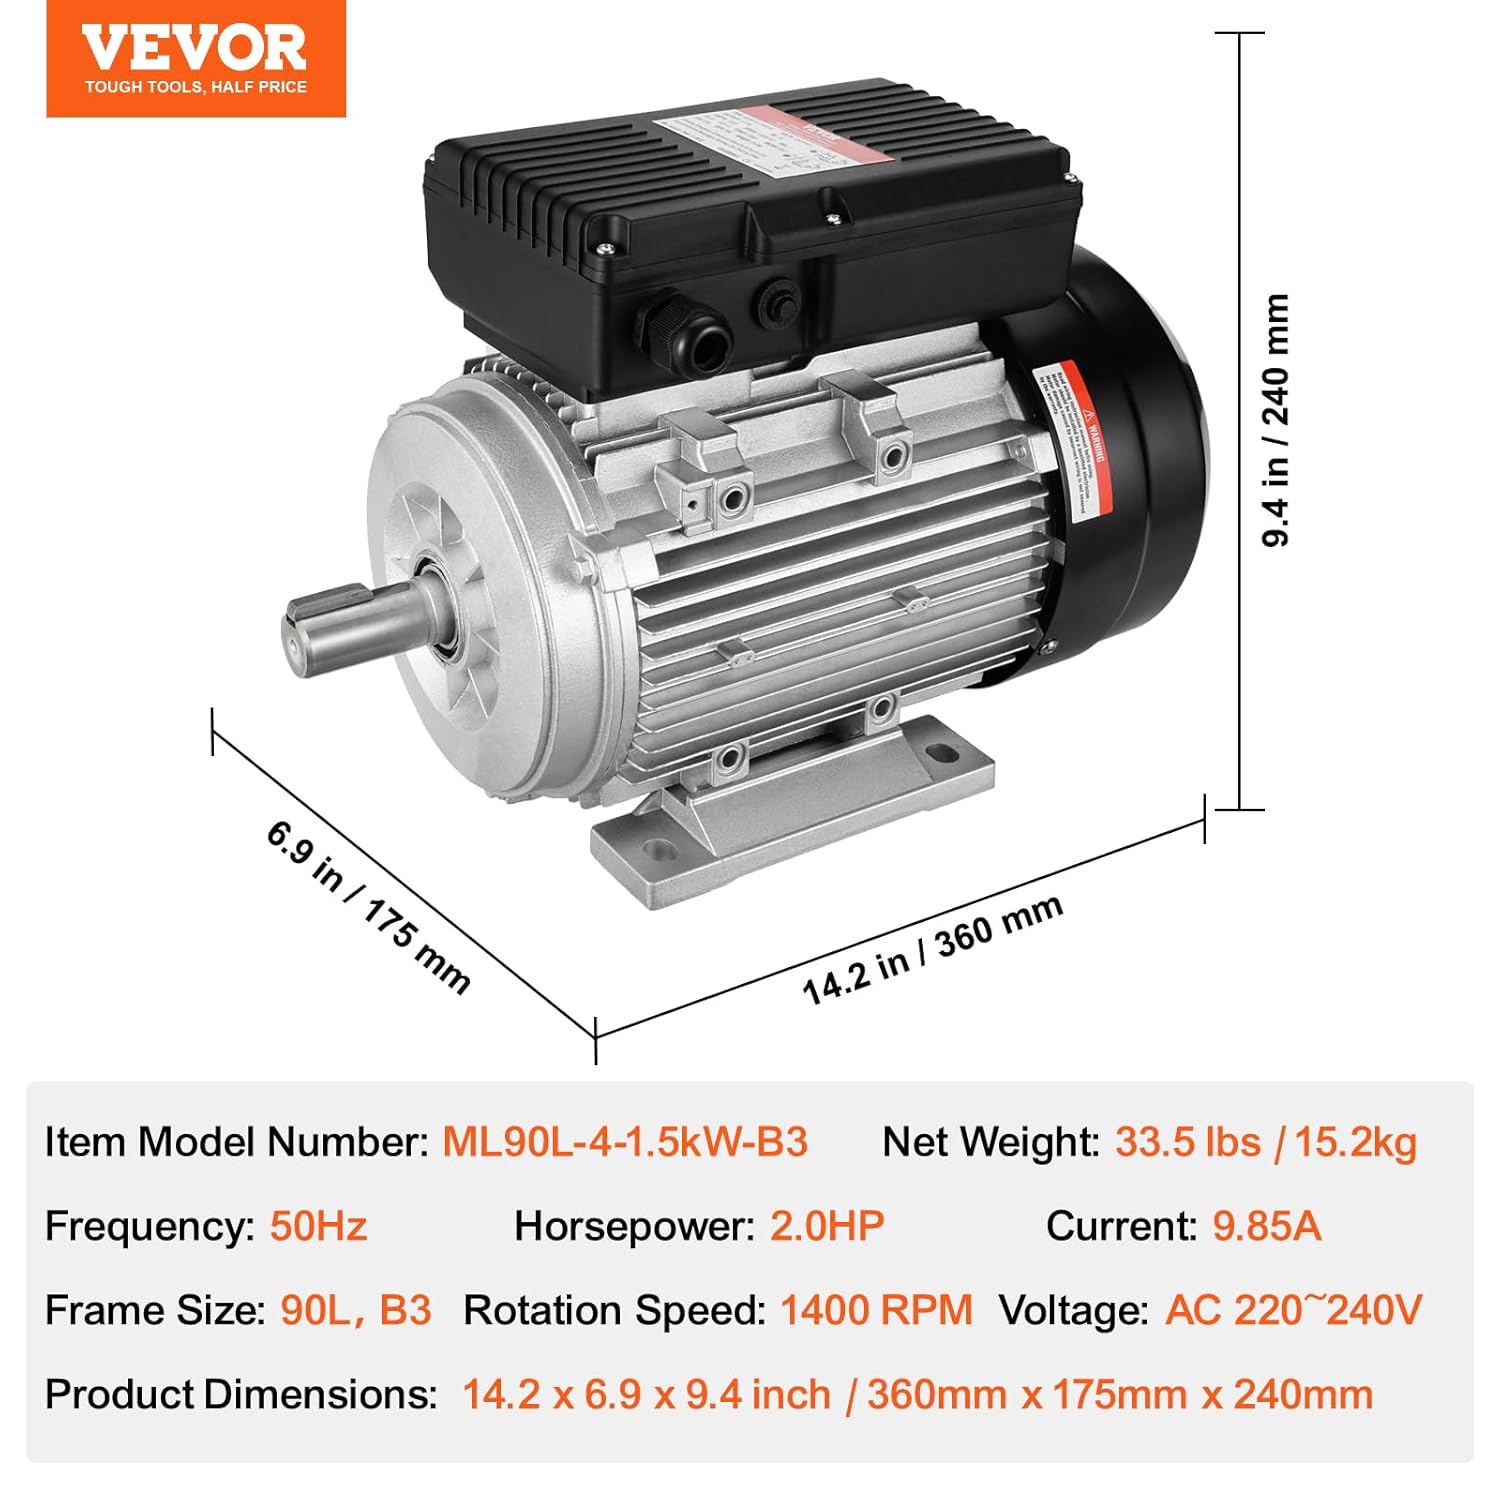
Figure 4: Dimensional drawing of the VEVOR electric motor.
5. Setup and Installation
Proper installation is crucial for the motor's performance and longevity.
5.1 Mounting
- The motor features a B3 frame, indicating foot mounting. Ensure the mounting surface is flat, rigid, and capable of supporting the motor's weight and operational forces.
- Use appropriate bolts and washers to secure the motor firmly to the base. Check for proper alignment with the driven equipment to prevent excessive vibration and premature bearing wear.
5.2 Electrical Connection
All electrical work must be performed by a qualified electrician.
- Power Supply: Connect the motor to a 220-240 V AC, 50 Hz single-phase power supply. Ensure the circuit has adequate current capacity (9.85 A nominal) and is protected by a suitable circuit breaker or fuse.
- Grounding: Properly ground the motor frame to prevent electric shock.
- Rotation Direction (CW/CCW): The motor supports reversible rotation. Refer to the wiring diagram provided on the motor's terminal box cover for instructions on how to change the rotation direction (Clockwise/Counter-Clockwise). Typically, this involves reconfiguring the capacitor connections or main winding leads.
- Cable Glands: Use appropriate cable glands to ensure a secure and sealed entry for power cables into the terminal box, maintaining the motor's ingress protection rating.
6. Operating Instructions
Follow these guidelines for safe and efficient operation of your motor.
6.1 Pre-Operation Check
- Verify all mounting bolts are tight.
- Ensure all electrical connections are secure and properly insulated.
- Confirm that the motor shaft rotates freely by hand (when power is disconnected).
- Check that the driven equipment is properly aligned and free of obstructions.
6.2 Starting the Motor
- Apply power to the motor. The motor should start smoothly and reach its operating speed of 1400 RPM.
- Listen for any unusual noises or vibrations. If detected, immediately shut off power and investigate the cause.
6.3 During Operation
- Monitor the motor for signs of overheating, excessive vibration, or unusual sounds.
- Ensure adequate ventilation around the motor to prevent heat buildup.

Figure 5: Motor cooling system for optimal thermal management.
7. Maintenance
Regular maintenance ensures optimal performance and extends the motor's lifespan.
7.1 Cleaning
- Keep the motor clean and free from dust, dirt, and debris, especially around the cooling fins and fan cover, to ensure efficient heat dissipation.
- Use a soft brush or compressed air to clean the exterior. Do not use water or solvents that could damage electrical components.
7.2 Inspection
- Periodically inspect the motor for any signs of wear, damage, or loose connections.
- Check mounting bolts for tightness.
- Inspect power cables for fraying or damage.
- Listen for unusual bearing noises, which may indicate a need for bearing replacement.
7.3 Lubrication
This motor typically uses sealed bearings that are lubricated for life and do not require additional lubrication. If the motor exhibits unusual bearing noise, consult a qualified technician for inspection or replacement.
8. Troubleshooting
This section provides solutions to common issues you might encounter.
| Problem | Possible Cause | Solution |
|---|---|---|
| Motor does not start | No power supply, tripped circuit breaker, faulty wiring, seized shaft/bearings, faulty capacitor. | Check power supply, reset breaker, inspect wiring, check for mechanical obstruction, test/replace capacitor. |
| Motor overheats | Overload, insufficient ventilation, high ambient temperature, incorrect voltage, bearing failure. | Reduce load, clear ventilation, ensure proper voltage, inspect bearings. |
| Excessive vibration | Improper mounting, misalignment with driven equipment, unbalanced load, worn bearings. | Tighten mounting bolts, check alignment, balance load, replace bearings. |
| Unusual noise | Worn bearings, loose parts, foreign objects, fan rubbing. | Inspect bearings, tighten loose components, remove obstructions, check fan clearance. |
If you encounter problems not listed here or if solutions do not resolve the issue, contact VEVOR customer support or a qualified service technician.
9. Warranty and Support
VEVOR products are designed for durability and performance. For warranty information, please refer to the warranty card included with your purchase or visit the official VEVOR website.
For technical support, spare parts, or service inquiries, please contact VEVOR customer service through their official channels. When contacting support, please have your product model number (ML90L-4-1.5kW-B3) and purchase information readily available.