1. Product Overview
The JUBEST Concealed Sliding Barn Door offers a modern and space-saving solution for interior doorways. Designed for smooth operation and durability, this door features a hidden track system and soft-close mechanisms for quiet and effortless use. Its waterproof and scratch-resistant PVC surface ensures longevity and easy maintenance.

Figure 1: Product features including soft close, waterproof, and scratch-resistant surface.
2. Safety Information
- Always wear appropriate safety gear, including gloves and eye protection, during installation.
- Ensure the wall structure is capable of supporting the weight of the door and hardware. Consult a professional if unsure.
- Use caution when handling heavy door panels. Two people are recommended for lifting and positioning the door.
- Keep children and pets away from the installation area.
- Do not install on carpeted floors as this may affect door operation and stability.
3. Package Contents
Verify all components are present before beginning installation:
- 1 Pre-grooved barn door panel
- 1 Top track
- 1 Top roller
- 2 Soft close mechanisms
- 2 End caps
- 2 Bottom rollers
- 1 Bottom track
- 1 Floor guide
- Necessary screws and wrench
- Detailed instructions (this manual)

Figure 2: Included components and hardware kit.
4. Specifications
| Feature | Detail |
|---|---|
| Brand | JUBEST |
| Model Number | YCM01-32IN |
| Door Dimensions (W x H x T) | 32" x 86" x 1.57" (81.28 cm x 218.44 cm x 3.99 cm) |
| Recommended Opening Size | 24"-28" x 84" (60.96-71.12 cm x 213.36 cm) |
| Material | Aluminum, Wood (PVC covered) |
| Color | White |
| Item Weight | 64 Pounds (29.03 kg) |
| Assembly Required | Yes |

Figure 3: Detailed size chart for door and opening dimensions.
5. Pre-Installation
5.1 Door Opening Preparation
Ensure your door opening is within the recommended dimensions of 24"-28" wide and 84" high. The door panel itself is 32" wide and 86" high. Refer to the provided diagrams for precise measurements and clearances for different installation methods.
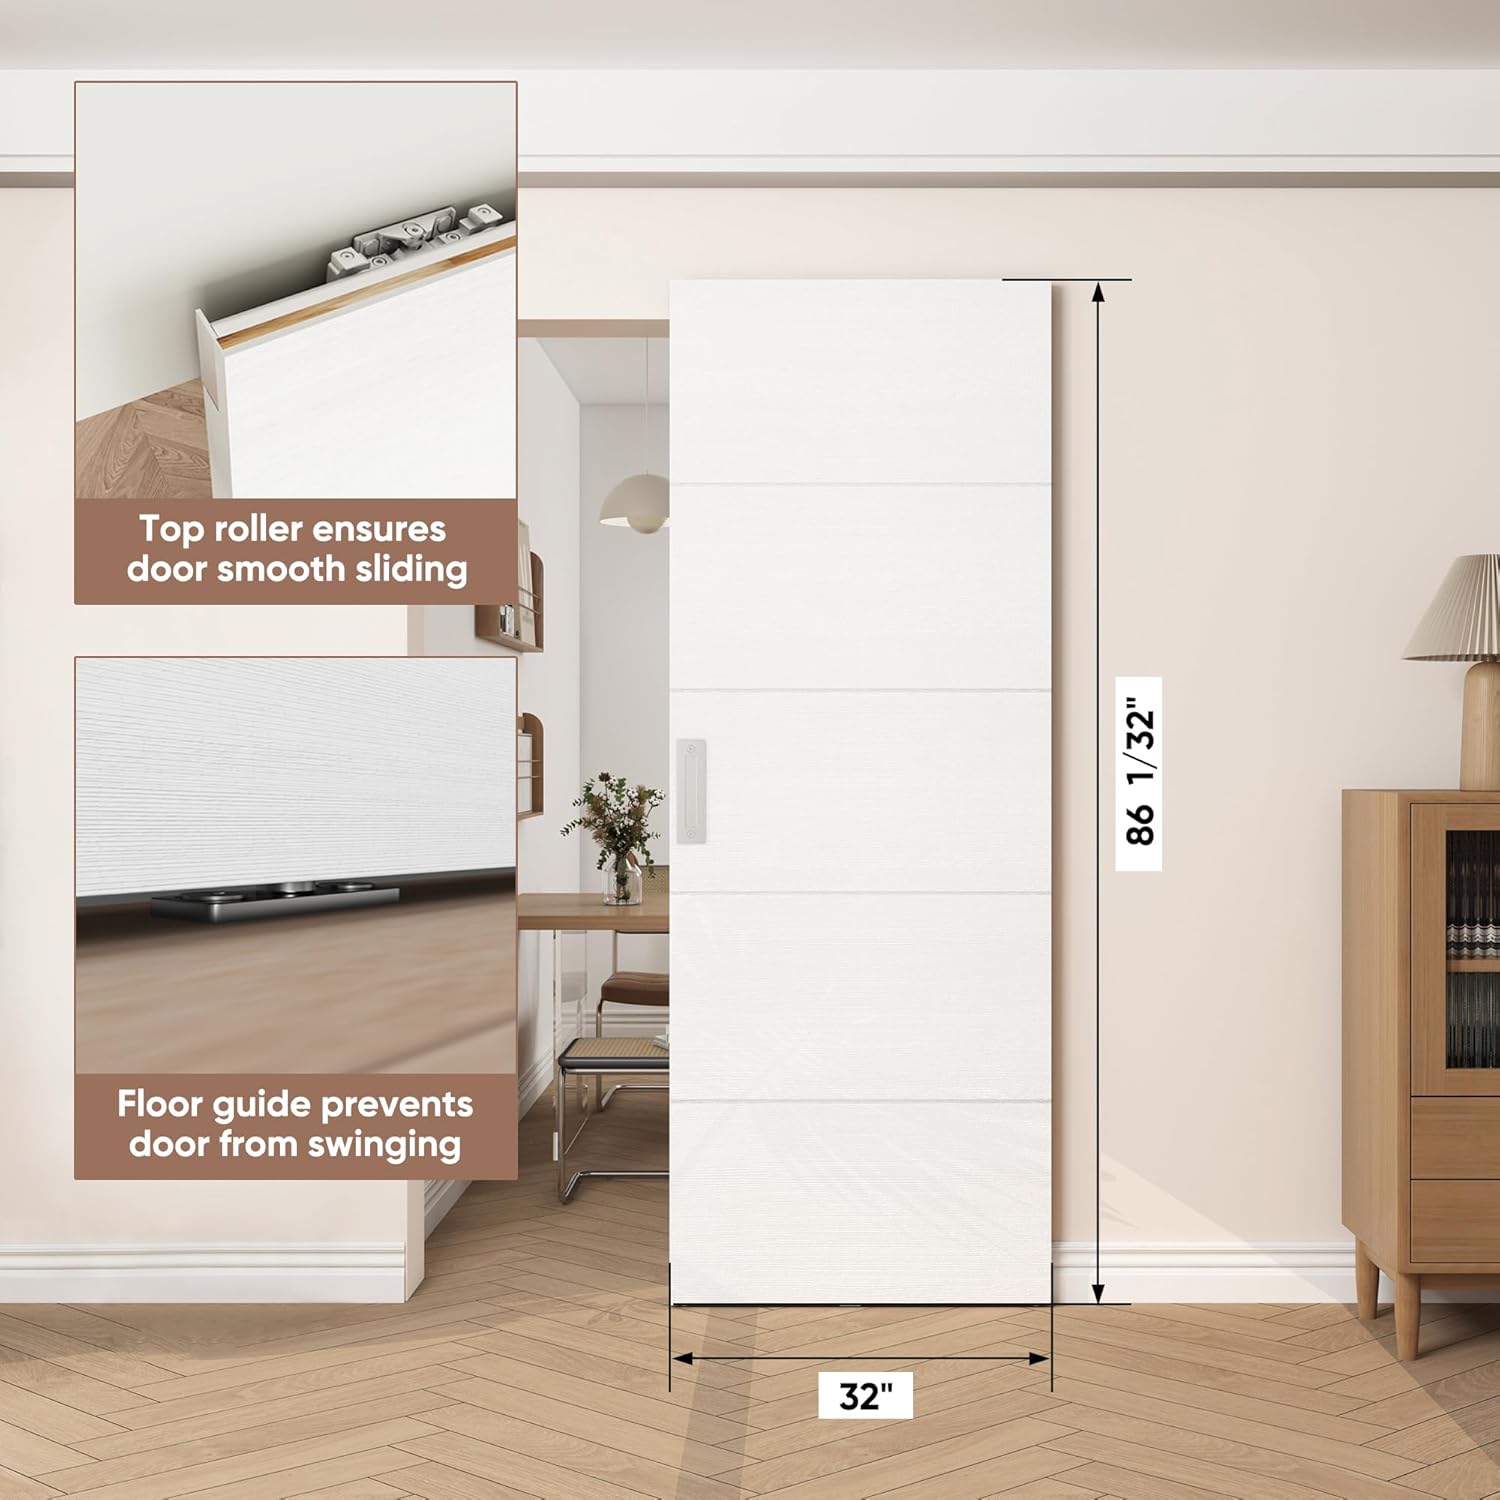
Figure 4: Door dimensions and key hardware components.
5.2 Required Tools (Not Included)
- Measuring tape
- Pencil
- Drill with appropriate bits (e.g., 5/16" or 8mm)
- Saw (for cutting tracks to length)
- Screwdriver
- Level
6. Installation Steps
Follow these steps carefully for proper installation. For visual guidance, refer to the official installation video below.
6.1 Prepare Door Panel Grooves
The door panel comes pre-grooved. Ensure the L-groove at the top and the U-channel at the bottom are clear and ready for hardware insertion.

Figure 5: Detail of the L-groove at the top of the door panel.

Figure 6: Detail of the bottom roller and U-channel at the bottom of the door panel.
6.2 Cut Tracks to Length
Cut the top and bottom tracks to the specified lengths based on your door width. The top track length is typically (Door Width - 20mm) and the bottom track length is (Door Width - 130mm).
6.3 Install Soft Close Mechanisms and Top Track
Loosen the screws on the soft close mechanisms and position them at both ends of the top track. Fasten the top track securely onto the door's L-groove. Ensure the soft close mechanisms are flush with the track ends and tighten their screws.
6.4 Install Bottom Rollers and Bottom Track
Remove the wheel from the bottom roller body. Fasten the bottom roller body into the door's U-channel first, then reinsert the wheel part. Insert the cut bottom track into the U-channel.
6.5 Mount Hanger onto Wall
Remove the anti-jump block from the hanger. Mark and drill holes on the wall according to the hanger's dimensions and your desired door height. Securely mount the hanger onto the wall using the provided screws and anchors.
6.6 Mount Floor Guide
Position the floor guide on the floor, aligning it with the door's bottom track. Mark and drill holes, then secure the floor guide to the floor.
6.7 Hang Door Panel and Adjust
Carefully lift the door panel and insert the floor guide into the bottom track. Then, hang the door panel onto the hanger in the middle of the top track. Adjust the height of the top roller wheel by rotating the screw until the door fits the rail completely. Tighten the anti-jump block screws.
6.8 Final Adjustments
Move the door left and right to ensure the actuator engages correctly with the soft close fins. If the door panel is not parallel with the wall, loosen both adjustment screws on the top roller, hold the door parallel by hand, and then tighten the screws.
6.9 Optional Handle Installation
A handle is included in the package. You may choose to install it for easier opening and closing, or omit it to maintain the hidden design of the door.

Figure 7: JUBEST Concealed Sliding Barn Door in an interior setting.
6.10 Installation Video Guide
Video 1: Official installation guide for the JUBEST Concealed Sliding Door System by BARN DOOR WAREHOUSE.
7. Operating Instructions
To open or close the door, gently push or pull the door panel. The integrated soft-close mechanisms will engage near the ends of the track, slowing the door's movement for a quiet and smooth stop. Avoid forcing the door against the soft-close mechanism.
8. Maintenance
- Cleaning: The PVC surface is waterproof and scratch-resistant. Clean the door panel with a soft, damp cloth and mild detergent. Avoid abrasive cleaners.
- Hardware Check: Periodically inspect all screws and connections for tightness. Tighten any loose fasteners to ensure continued smooth operation and safety.
- Track Maintenance: Keep the top and bottom tracks free from dust and debris to prevent obstruction of the rollers.
9. Troubleshooting
- Door not sliding smoothly: Check the tracks for debris. Ensure all rollers are clean and properly aligned. Verify that the door is parallel to the wall and the adjustment screws are tightened correctly.
- Soft close not engaging: Ensure the soft close mechanisms are correctly positioned at the ends of the track and their screws are tight. Check that the actuator on the door panel is properly aligned to engage with the soft close fins.
- Door feels unstable or pops out of track: This can occur if the hardware is not fully secured or if the door is not parallel to the wall. Re-check all mounting screws for the hanger and floor guide. Ensure the anti-jump blocks are tightened. If the issue persists, re-evaluate the wall mounting for proper support.
10. Warranty and Support
JUBEST products are manufactured with quality and durability in mind. This product is covered by a manufacturer's warranty. For specific warranty details, please refer to the documentation included with your purchase or contact customer service.
For any issues, questions, or support needs regarding this product, please contact our professional customer service team. We are dedicated to ensuring customer satisfaction and will assist you in resolving any problems in a timely manner.
Contact information can typically be found on the product packaging or the official JUBEST website.


