1. Important Safety Information
Please read all instructions carefully before operating the TAZPI Commercial Ice Maker Machine. Retain this manual for future reference.
- Ensure the appliance is properly grounded.
- Do not operate the machine with a damaged power cord or plug.
- Keep the machine away from heat sources and direct sunlight.
- Ensure adequate ventilation around the unit. Maintain at least 5 inches of clearance on all sides.
- Do not immerse the appliance, cord, or plug in water or other liquids.
- Unplug the machine before cleaning or performing any maintenance.
- This appliance is not intended for use by persons (including children) with reduced physical, sensory, or mental capabilities, or lack of experience and knowledge, unless they have been given supervision or instruction concerning use of the appliance by a person responsible for their safety.
2. Product Components
Familiarize yourself with the main parts of your TAZPI Commercial Ice Maker Machine.

Image 2.1: Overview of the TAZPI Commercial Ice Maker Machine and included accessories.
Included Accessories:
- Inlet Hose
- Outlet Hose (Drainage)
- Adjustable Feet (pre-installed or for adjustment)
- Ice Scoop
- User Manual (this document)
3. Setup and Installation
3.1 Unpacking
- Carefully remove all packaging materials.
- Inspect the machine for any shipping damage. Contact customer support if damage is found.
- Remove any protective films from the stainless steel surfaces.
3.2 Placement
The TAZPI Commercial Ice Maker Machine offers versatile installation options, including under-counter, freestanding, or under-countertop placement. Its compact design measures approximately 14.96"L x 15.94"W x 29.3"H.
- Place the machine on a flat, stable surface capable of supporting its weight when full of ice and water.
- Ensure adequate air circulation. Maintain at least 5 inches of clearance on the back and sides for proper ventilation.
- Avoid placing the unit near heat-generating appliances or in direct sunlight.
- Adjust the bottom feet to ensure the machine is level.

Image 3.1: The ice maker can be placed under a counter, on a countertop, or freestanding.
3.3 Water Supply Connection
The machine supports two water supply methods: direct connection to a tap or using a gallon bottled water supply.

Image 3.2: Diagram illustrating direct tap water connection and gallon bottled water setup.
Direct Tap Water Connection:
- Locate the water inlet port at the back of the machine.
- Remove the blue ring from the inlet port.
- Firmly insert the provided inlet hose into the port.
- Buckle the blue ring back to secure the hose.
- Connect the other end of the inlet hose to a potable water supply tap. Ensure all connections are tight to prevent leaks.
Gallon Bottled Water Supply:
- Place a standard gallon water bottle (not included) on top of the machine's designated water dispenser area.
- The machine will draw water automatically from the bottle.
3.4 Drainage Connection
- Locate the water outlet port at the back of the machine.
- Plug the provided outlet hose into the port.
- Direct the other end of the outlet hose to a suitable drain or container. Ensure the hose is sloped downwards for proper drainage.
Video 3.1: This video demonstrates the quick installation process for the TAZPI ice machine, focusing on water inlet and outlet connections.
4. Operating Instructions
4.1 Control Panel Overview
The machine features an intuitive LCD control panel for easy operation.
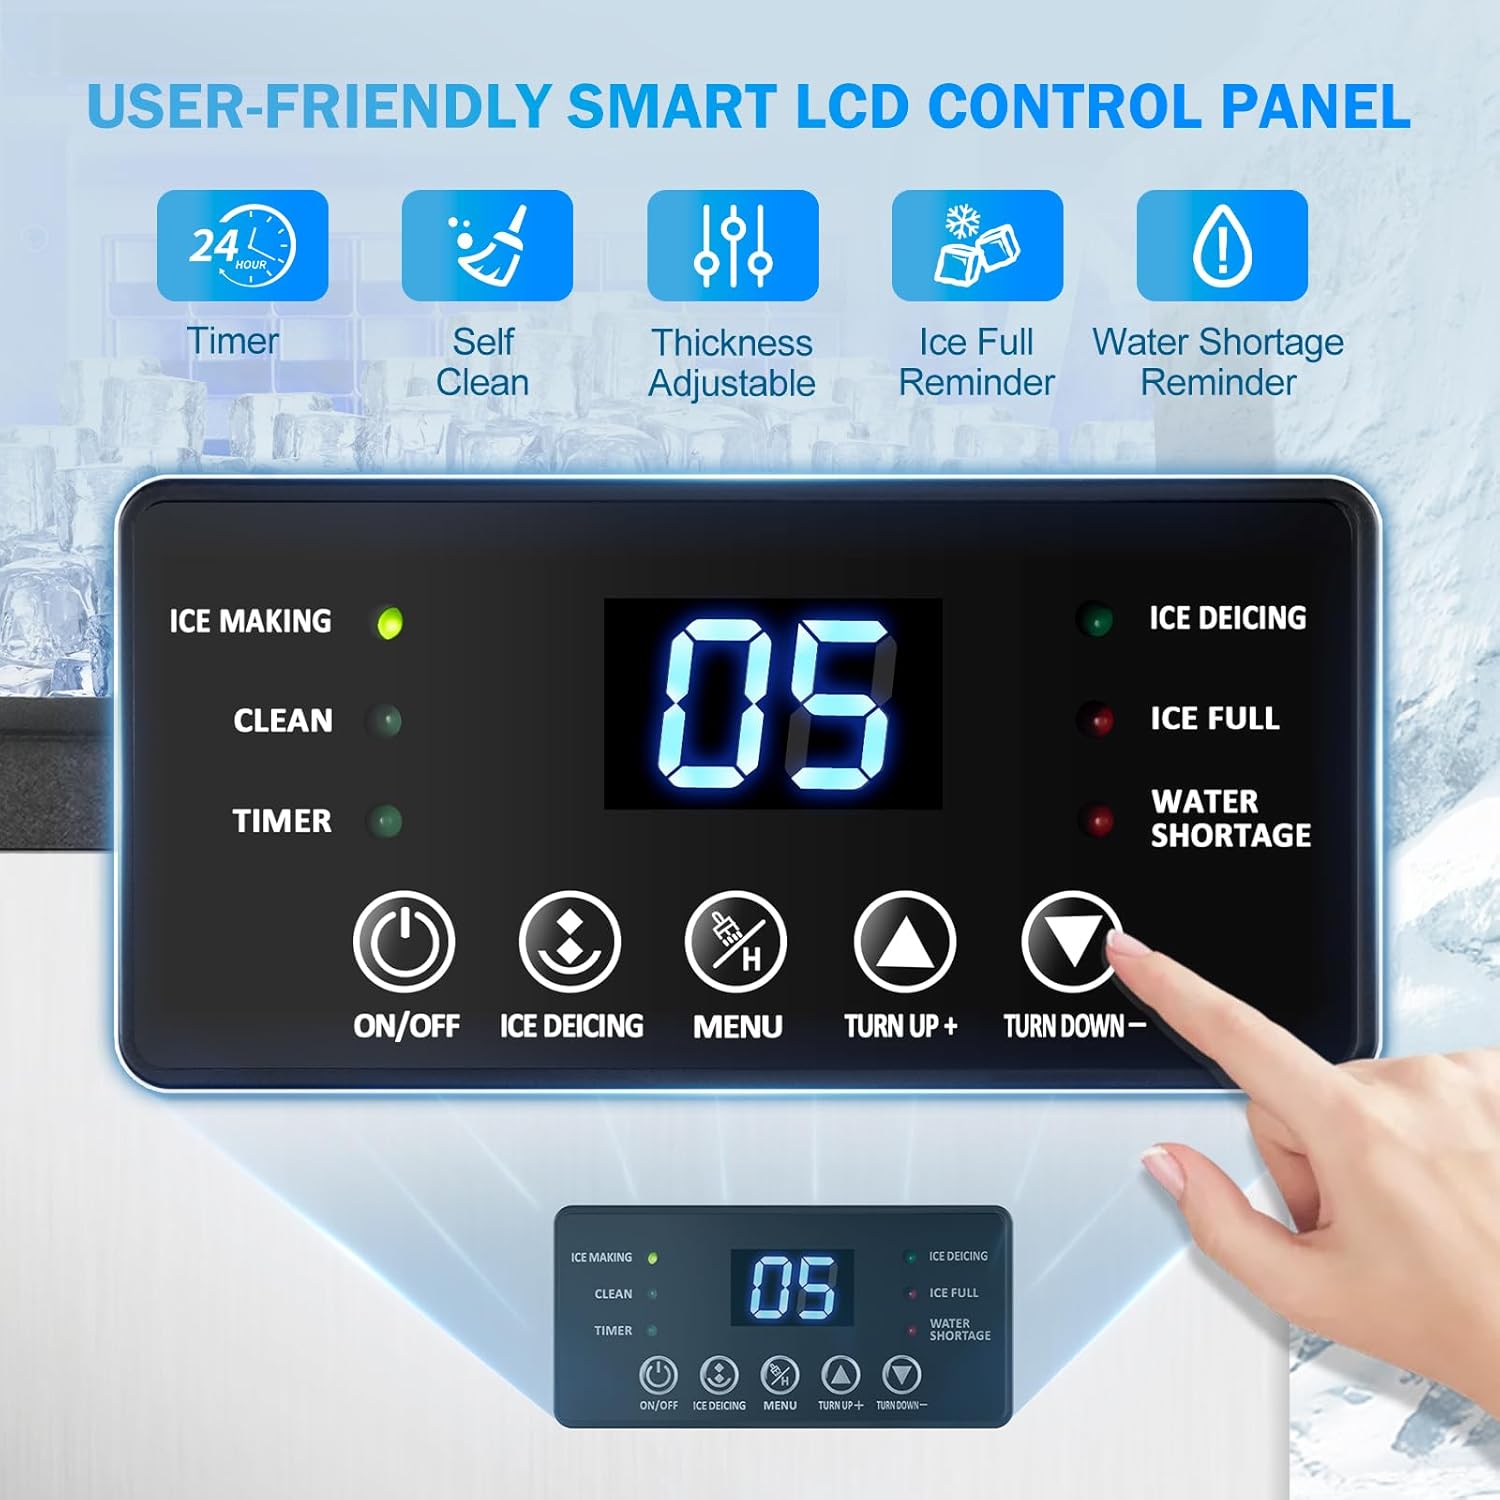
Image 4.1: Smart LCD Control Panel with indicators for Ice Making, Clean, Timer, Ice Deicing, Ice Full, and Water Shortage. Buttons include ON/OFF, Ice Deicing, Menu, Turn Up+, and Turn Down-.
4.2 Initial Start-up and Ice Making
- Ensure the water supply and drainage are correctly connected.
- Plug the power cord into a grounded electrical outlet.
- Press the ON/OFF button to power on the machine.
- The machine will automatically begin the ice-making cycle. The 'ICE MAKING' indicator will illuminate.
- Ice cubes will be ready in approximately 4-15 minutes, producing up to 45 cubes per cycle.

Image 4.2: The machine produces 45 ice cubes per batch, with a daily output of up to 130 lbs and 35 lbs ice storage capacity.
4.3 Adjusting Ice Cube Thickness
You can adjust the thickness of the ice cubes to suit your preference.
- Press the MENU button to enter the ice thickness adjustment mode.
- Use the Turn Up+ and Turn Down- buttons to select the desired thickness (Thin, Medium, Thick).
- The selected thickness will affect the ice-making time.

Image 4.3: Adjustable ice cube thickness options: Thin (4-6 min, for seafood), Medium (7-9 min, for drinking), and Thick (10-15 min, for beer).
4.4 Scheduled Ice Making (Timer)
The timer function allows you to schedule when the ice maker starts or stops.
- Press the TIMER button.
- Use the Turn Up+ and Turn Down- buttons to set the desired time.
- Confirm the setting by pressing MENU or waiting a few seconds.
4.5 Alerts and Indicators
- WATER SHORTAGE: Illuminates when the water level is low. Refill the water supply.
- ICE FULL: Illuminates when the ice storage bin is full. Remove ice to resume production.
- ICE DEICING: Illuminates during the ice release cycle.
Video 4.1: This video provides a demonstration on how to use the TAZPI Commercial Ice Maker, covering basic operation and features.
5. Maintenance and Cleaning
Regular cleaning ensures optimal performance and hygiene of your ice maker.
5.1 Automatic Cleaning
The machine is equipped with an automatic cleaning function.
- Ensure the machine is powered on and has sufficient water.
- Press the CLEAN button on the control panel.
- The machine will initiate a cleaning cycle. Follow any on-screen prompts.
- Once the cycle is complete, drain any remaining water.
5.2 Manual Cleaning
- Exterior: Wipe the exterior surfaces with a soft cloth and mild detergent. Avoid abrasive cleaners.
- Interior: Periodically clean the ice storage bin and water reservoir with a solution of water and mild detergent. Rinse thoroughly with clean water.
- Drainage: Ensure the drainage hose is clear of any obstructions.
5.3 Long-Term Storage
If the machine will not be used for an extended period:
- Perform an automatic cleaning cycle.
- Drain all water from the machine.
- Unplug the power cord.
- Store the machine in a dry, well-ventilated area.
6. Troubleshooting Guide
Before contacting customer support, please refer to the following common issues and solutions:
| Problem | Possible Cause | Solution |
|---|---|---|
| Machine not making ice | No water supply; Power issue; Ambient temperature too high. | Check water connections and supply; Ensure power is connected; Operate in a cooler environment. |
| Ice production is slow | Poor ventilation; Water temperature too high; Dirty condenser. | Ensure adequate clearance around the unit; Use colder water; Clean the condenser (refer to maintenance). |
| "WATER SHORTAGE" indicator on | Water tank empty or low. | Refill the water tank or check direct water supply connection. |
| "ICE FULL" indicator on | Ice storage bin is full. | Remove ice from the storage bin. |
| Water leakage | Loose hose connections; Blocked drain. | Check and tighten all water inlet and outlet hose connections; Clear any blockages in the drain hose. |
7. Product Specifications
- Model: Commercial Ice Maker
- Brand: TAZPI
- Ice Production Capacity: Up to 130 lbs (59 kg) per 24 hours
- Ice Storage Capacity: 35 lbs (15.9 kg)
- Ice Making Cycle: 4-15 minutes per batch
- Ice Cubes per Cycle: 45
- Dimensions (L x W x H): 14.96" x 15.94" x 29.3" (38cm x 40.5cm x 74.5cm)
- Wattage: 120.00 W
- Material: Stainless steel exterior, food-grade PP injection inner lining
- Water Supply Modes: Direct tap connection, Gallon bottled water

Image 7.1: The machine features a robust construction with four layers of protection for durability and insulation.
8. Warranty and Customer Support
8.1 Warranty Information
The TAZPI Commercial Ice Maker Machine comes with a 1-year warranty from the date of purchase, covering manufacturing defects and malfunctions under normal use.
- This warranty does not cover damage caused by misuse, accident, unauthorized modification, or improper installation.
- Proof of purchase is required for all warranty claims.
8.2 Customer Support
For any questions, concerns, or technical assistance, please contact TAZPI customer support. We are committed to providing exceptional service with a 24-hour response time.
Contact Information:
- Email: [Insert Customer Support Email Here]
- Phone: [Insert Customer Support Phone Number Here]
- Website: TAZPI Official Store