1. Introduction
This manual provides comprehensive instructions for the installation, operation, and maintenance of your Thermalright Frozen Prism 360 Black All-In-One (AIO) CPU Liquid Cooler. Please read this manual carefully before installation to ensure proper setup and optimal performance. This cooler is designed to provide efficient thermal management for high-performance CPUs, featuring a 360mm radiator and three 120mm PWM fans.
2. Product Overview
The Thermalright Frozen Prism 360 Black is a high-performance liquid cooling solution for your CPU. It features a copper cold plate, a 360mm aluminum fin radiator, and polymer-braided water tubes for enhanced durability and reduced evaporation. The integrated pump design includes a removable magnetic top cover with 5V ARGB lighting, offering both aesthetic appeal and efficient, low-vibration operation. The included TL-E12 V2 PWM fans automatically adjust speed based on CPU temperature, minimizing noise while maximizing cooling efficiency.

Image 2.1: Overview of the Thermalright Frozen Prism 360 Black AIO Liquid Cooler components.
3. Package Contents
Verify that all components are present in the package:
- 1x Thermalright Frozen Prism 360 Black AIO Liquid Cooler (Radiator, Pump/Waterblock, and 3x TL-E12 V2 120mm PWM Fans pre-mounted)
- Mounting hardware for Intel sockets (LGA1700/1150/1151/1200/20XX)
- Mounting hardware for AMD sockets (AM4/AM5)
- Fan splitter cable
- ARGB cable
- Thermal paste syringe
- User Manual
4. Specifications

Image 4.1: Technical diagram with key dimensions and specifications.
| Component | Specification |
|---|---|
| Waterblock Dimensions | 61.7mm * 61.7mm * 53mm |
| Radiator Dimensions | 396mm * 120mm * 27mm |
| Pump Speed | 3300 RPM ± 10% |
| Pump Noise Level | ≤23 dBA |
| Pump Rated Current | 0.40 ± 10% A |
| Pump Power | ≤4.8W |
| Pump Bearing | Ceramic Bearing |
| Pump Power Connector | DC 12V 4-PIN |
| Pump ARGB Connector | +5V 3-PIN ARGB |
| Pump Lifespan | 40,000 hours |
| Fan Model | TL-E12B V2 |
| Fan Dimensions | 120mm * 120mm * 25mm |
| Fan Speed | 1850 RPM ± 10% |
| Fan Noise Level | ≤27 dBA |
| Fan Airflow | 70.4 CFM (MAX) |
| Fan Static Pressure | 2.64 mmH2O (MAX) |
| Fan Connector | 4-PIN PWM |
| Fan Rated Voltage | DC 12V |
| Fan Rated Current | 0.18A (MAX) |
| Fan Bearing Type | S-FDB Bearing |
| Cooling Method | Liquid (Water) |
| Compatible Devices | Desktop Computer |
| Compatible Sockets | Intel: LGA1700/1150/1151/1200/20XX, AMD: AM4/AM5 |
5. Installation Guide
Before beginning installation, ensure your system is powered off and unplugged. Refer to your motherboard manual for specific header locations.
5.1 Prepare the Radiator and Fans
The three 120mm PWM fans are typically pre-mounted to the 360mm radiator. Ensure they are oriented to push or pull air as desired for your case airflow. Connect the fans to the included fan splitter cable, then connect the splitter to a CPU_FAN or AIO_PUMP header on your motherboard.
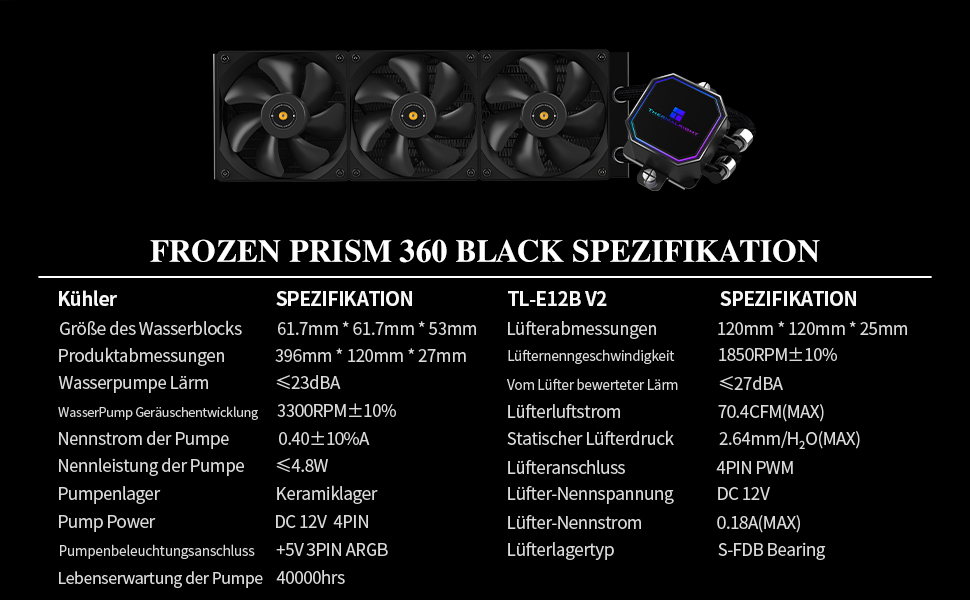
Image 5.1: TL-E12B V2 Fan details, including anti-vibration pads.
5.2 Install the Radiator
Mount the radiator to an available 360mm mounting location in your PC case (e.g., front, top). Use the provided screws to secure it firmly.
5.3 Prepare the CPU and Waterblock
- Clean the CPU surface thoroughly with isopropyl alcohol to remove any old thermal paste or residue.
- Apply a small amount of thermal paste (pea-sized dot) to the center of the CPU's Integrated Heat Spreader (IHS).
- Attach the correct mounting brackets for your CPU socket (Intel or AMD) to the waterblock.
5.4 Mount the Waterblock
Carefully place the waterblock onto the CPU, aligning the mounting holes. Secure it with the appropriate screws and backplate (if required for your socket type). Tighten screws in a diagonal pattern until snug, ensuring even pressure.

Image 5.2: The AIO cooler installed in a PC system.
5.5 Connect Cables
- Connect the pump's 4-pin PWM cable to the AIO_PUMP or CPU_OPT header on your motherboard.
- Connect the pump's 3-pin 5V ARGB cable to a compatible ARGB header on your motherboard.
- Ensure all fan cables are connected to the fan splitter, and the splitter is connected to a motherboard fan header.
6. Operating Instructions
6.1 Initial Startup
After installation, power on your system. The pump and fans will begin operating. It is recommended to run the system horizontally for 15-20 minutes during the first startup to allow any trapped air in the loop to settle and move to the radiator. This helps prevent gurgling noises and ensures optimal thermal performance.
6.2 Fan and Pump Control
The TL-E12 V2 fans and pump are PWM controlled. Their speeds will automatically adjust based on CPU temperature, as configured in your motherboard's BIOS/UEFI settings or through compatible software. For optimal performance and noise balance, ensure the AIO_PUMP header is set to run at 100% speed continuously, while the CPU_FAN header (connected to the fans) can be set to a temperature-controlled curve.
6.3 ARGB Lighting Control
The 5V ARGB lighting on the pump block can be controlled and synchronized using your motherboard's compatible RGB software (e.g., ASUS Aura Sync, MSI Mystic Light, Gigabyte RGB Fusion, ASRock Polychrome Sync). Connect the 3-pin 5V ARGB cable to the appropriate header on your motherboard.

Image 6.1: The pump block featuring customizable ARGB lighting.
7. Maintenance
Regular maintenance helps ensure the longevity and optimal performance of your liquid cooler.
- Dust Cleaning: Periodically clean dust from the radiator fins and fan blades using compressed air. Ensure fans are not spinning during cleaning to prevent damage.
- Cable Management: Check all cables (fan, pump, ARGB) to ensure they are securely connected and not interfering with fan operation or other components.
- Visual Inspection: Occasionally inspect the water tubes for any signs of leaks, kinks, or damage. While the polymer braiding offers protection, regular checks are advisable.
- Thermal Paste: The thermal paste applied during initial installation is designed for long-term use. Reapplication is generally not necessary unless the cooler is removed from the CPU.
8. Troubleshooting
If you encounter issues with your Thermalright Frozen Prism 360 Black, refer to the following common problems and solutions:
- No Power/Fans Not Spinning/Pump Not Working:
- Check all power connections: Ensure the pump's 4-pin PWM cable is securely connected to the motherboard's AIO_PUMP or CPU_OPT header, and fan cables are connected to the fan splitter and motherboard fan header.
- Verify BIOS settings: Ensure the AIO_PUMP header is enabled and set to an appropriate speed (e.g., 100% for the pump).
- High CPU Temperatures:
- Check waterblock contact: Ensure the waterblock is securely mounted to the CPU with even pressure. Re-seat if necessary, reapplying thermal paste.
- Verify pump operation: Listen for pump noise or check motherboard monitoring software to confirm the pump is running.
- Check fan operation: Ensure all fans are spinning correctly and are oriented for proper airflow (e.g., intake or exhaust).
- Air in loop: During initial setup, trapped air can cause temperature spikes. Run the system horizontally for 15-20 minutes to help purge air.
- Excessive Noise (Gurgling/Whining):
- Gurgling is often caused by air in the loop. Ensure the radiator is mounted higher than the pump block if possible, and run the system horizontally during initial use.
- Whining from the pump may indicate an issue. Ensure the pump is receiving stable power.
- Fan noise: Adjust fan curves in BIOS/UEFI to find a balance between cooling and noise. Ensure anti-vibration pads are correctly installed on fans.
- ARGB Lighting Not Working:
- Check ARGB cable connection: Ensure the 3-pin 5V ARGB cable is securely connected to the correct motherboard header.
- Verify motherboard software: Use your motherboard's RGB software to control and troubleshoot lighting. Ensure the ARGB header is enabled in BIOS.
9. Warranty and Support
Thermalright products are manufactured to high-quality standards. This product comes with a standard manufacturer's warranty. Please refer to the warranty card included in your package or visit the official Thermalright website for detailed warranty terms and conditions.
For technical support, troubleshooting assistance, or warranty claims, please contact Thermalright customer service through their official website or authorized distributors. When contacting support, please have your product model (Frozen Prism 360 Black) and proof of purchase readily available.
Official Website: www.thermalright.com