Cupohus 25FT
Cupohus Heat Tape for Water Pipes with Digital Display Thermostat (25FT) Instruction Manual
Model: 25FT | Brand: Cupohus
1. Product Overview
The Cupohus Heat Tape is a self-regulating heat trace cable designed to prevent water pipes from freezing. It features a digital display thermostat for precise temperature control and is suitable for various applications including metal and plastic home pipes, roofs, and RVs. This 25-foot model operates on 110-120V.

Image 1.1: The Cupohus 25FT Heat Tape for Water Pipes, showing the coiled cable and the digital display thermostat unit.
2. Safety Information
Read all instructions carefully before installation and use. Failure to follow these instructions may result in fire, electric shock, or injury.
- Operate only with a 120V power supply and an external Ground Fault Circuit Interrupter (GFCI) outlet to prevent electrical hazards.
- Ensure all built-in wires are completely wrapped to prevent water seepage and malfunction.
- Do not overlap the heating cable on itself, as this can cause overheating.
- Do not install the heat tape in areas where it may be damaged by sharp objects or excessive bending.
- Keep the thermostat and power connections dry and protected from moisture.
- The heating tape casing is designed with flame-resistant material. In case of fire exposure, it chars to form a protective barrier, preventing flames from spreading.
Video 2.1: Demonstration of the flame-resistant properties of the Cupohus heat tape casing.

Image 2.2: Illustration of an electrical hazard with a burning plug and cable, emphasizing the importance of proper installation and GFCI protection.
3. Setup and Installation
The Cupohus Heat Tape is designed for easy installation. Follow these steps to ensure proper setup:
- Prepare the Pipe: Ensure the water pipe surface is clean and dry.
- Lay the Cable: Lay the heating tape straight along the water pipe. For pipes with a diameter larger than 30 inches, an "S" wrap method is recommended to ensure adequate coverage.
- Secure the Cable: Use the supplied fiberglass tape to secure the heating cable firmly to the pipe. Ensure the cable is in full contact with the pipe surface.
- Position the Thermostat Probe: Place the temperature sensing probe in the coldest area of the pipe or the area most susceptible to freezing.
- Connect to Power: Plug the heat tape into a 110-120V external GFCI power outlet.
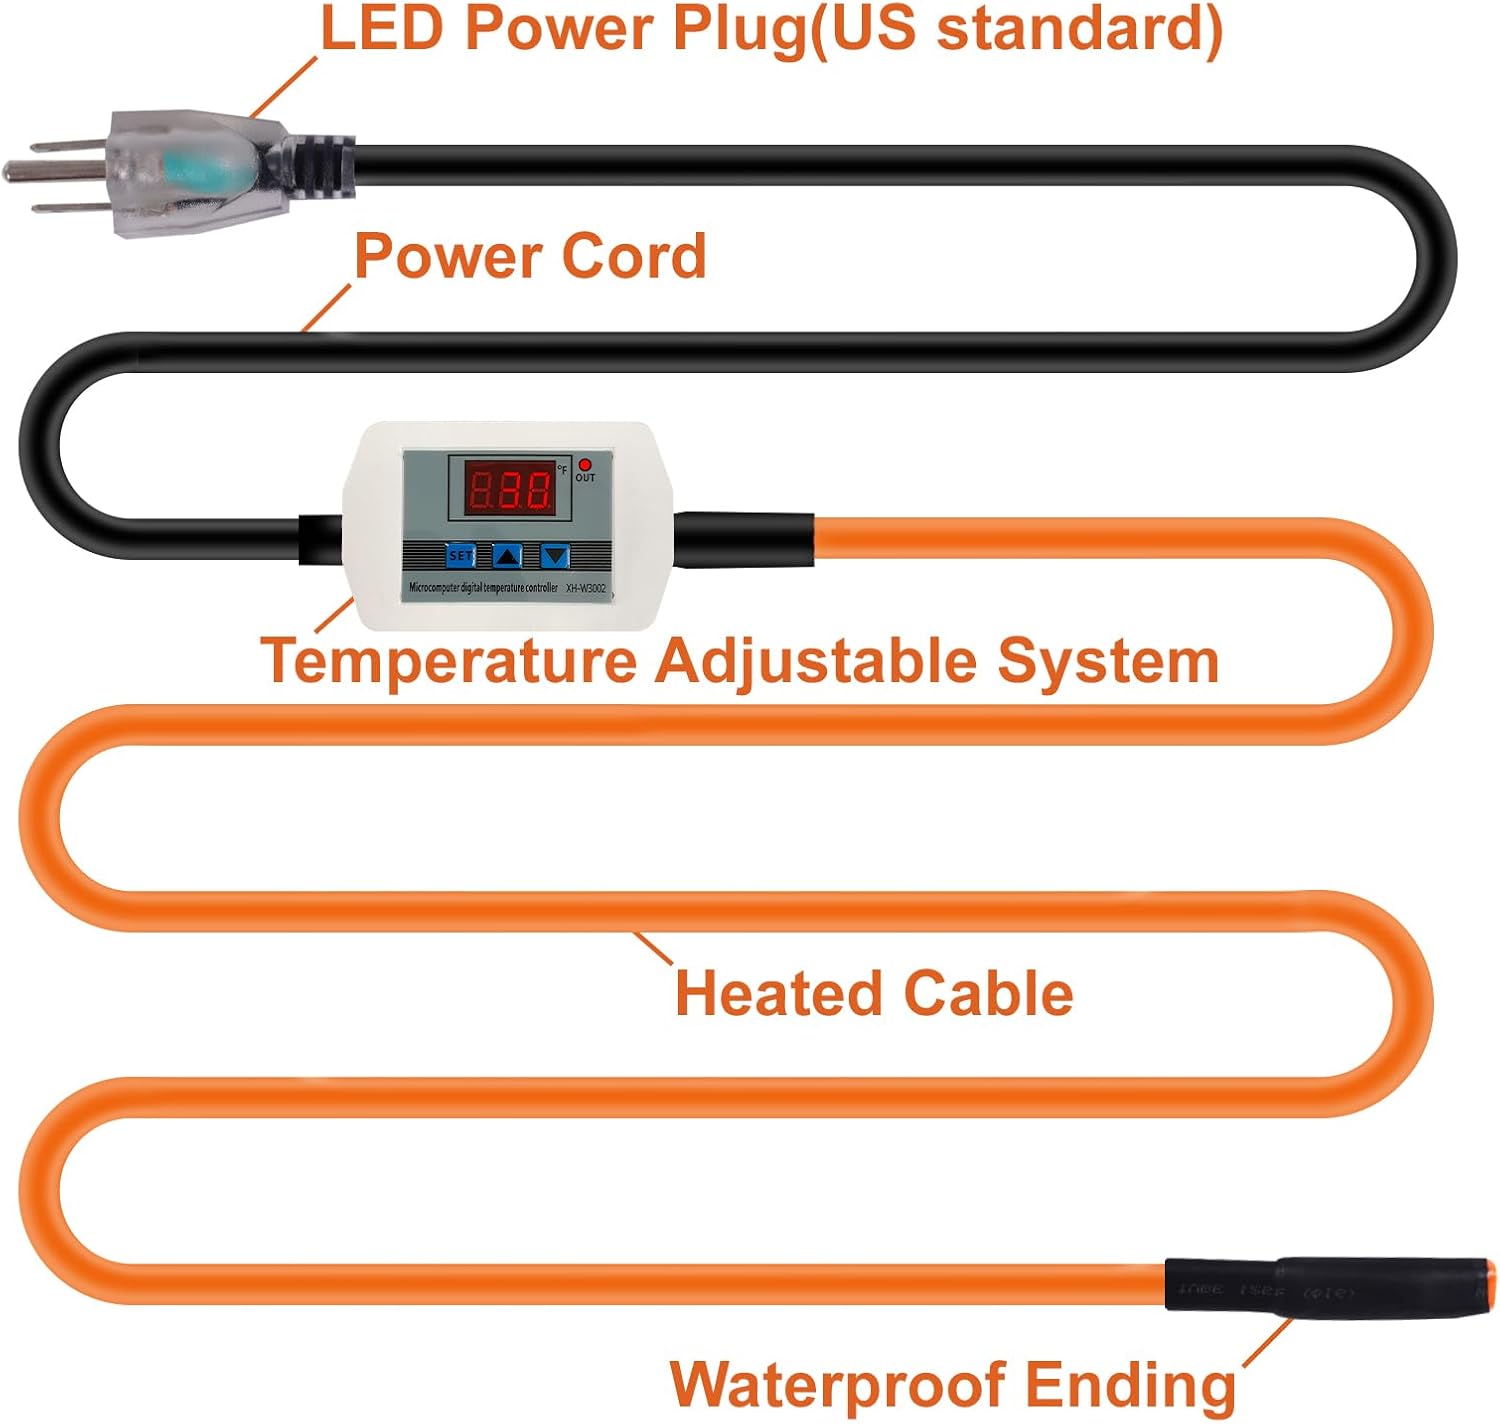
Image 3.1: Diagram illustrating the main components of the heat tape system, including the LED power plug, power cord, temperature adjustable system, heated cable, and waterproof ending.

Image 3.2: Visual guide for installing the heat tape on a pipe, showing the use of fiberglass tape to secure the cable.
4. Operating Instructions
The digital display thermostat allows for precise control over the heating process. The display shows the current temperature in real-time.
4.1. Temperature Control System
The temperature adjustable system allows you to set the start and stop heating temperatures. The preset start temperature is 37.4°F (3°C) and the stop heating temperature is 59°F (15°C).

Image 4.1: Close-up of the digital display thermostat, illustrating the adjustable start and stop temperature ranges (23-77°F).

Image 4.2: Diagram explaining the energy-saving smart temperature control, showing heating activation below 37.4°F (3°C) and deactivation above 59°F (15°C).
4.2. Testing the Temperature Adjustable System
To verify the functionality of the thermostat:
- Plug in the heat tape.
- Place the metal temperature probe into ice water.
- If the probe detects a temperature below 37.4°F (3°C), the indicator light on the thermostat should illuminate, and the cable will begin to heat up.
- Remove the probe from the ice water and allow it to warm up.
- Once the probe detects a temperature above 59°F (15°C), the indicator light should turn off, and the cable will stop heating.
Video 4.3: Detailed demonstration on how to test the temperature adjustable system using ice water to trigger heating and ambient air to stop heating.
4.3. Resetting the Thermostat Settings
To reset or adjust the thermostat's start and stop temperatures:
- Press the SET button. The display will show "P0".
- Press the SET button again to confirm.
- Use the UP or DOWN buttons to adjust the initial temperature (e.g., to 45°F).
- Press the SET button again. The display will show "P1".
- Press the SET button again to confirm.
- Use the UP or DOWN buttons to adjust the cutoff temperature (e.g., to 70°F).
- Wait a few seconds for the settings to save automatically.
Video 4.4: Step-by-step guide on how to reset and adjust the temperature settings on the digital display thermostat.
5. Typical Applications
The Cupohus Heat Tape provides freeze protection in various cold weather scenarios:
- Home Plumbing: Protects exposed water pipes in residential settings.
- Valves: Prevents freezing of outdoor faucets and valves.
- Roof and Gutters: Helps prevent ice dams and ensures proper water drainage.
- RV and Mobile Homes: Ideal for protecting water lines in recreational vehicles during winter.
- Farm and Agricultural Use: Safeguards water supply lines for livestock and irrigation.
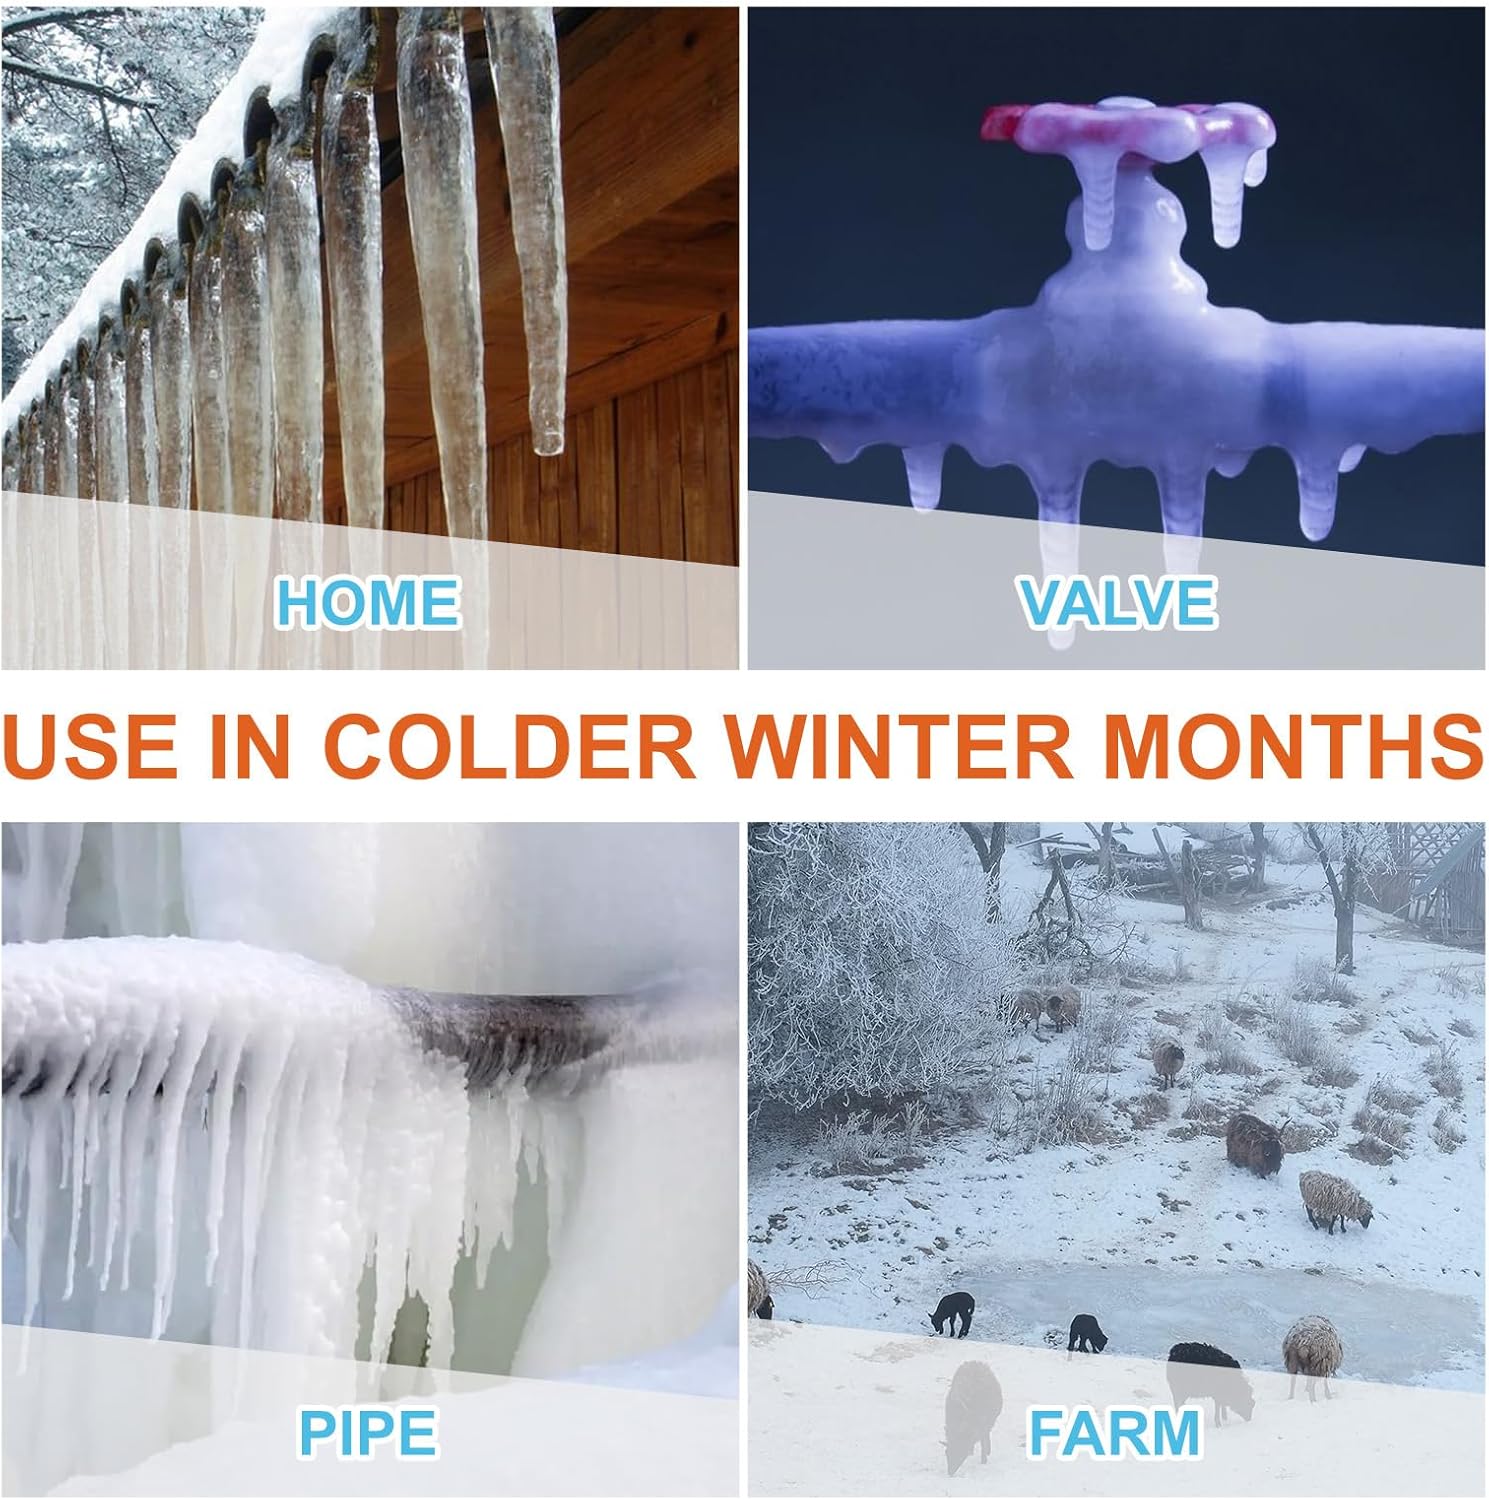
Image 5.1: Collage showing different environments where the heat tape can be used, including residential homes, outdoor valves, exposed pipes, and farm settings.

Image 5.2: Visual representation of the heat tape's freeze protection capability down to -40°F, featuring a frozen pipe and icicles.
6. Maintenance
Regular maintenance ensures optimal performance and longevity of your heat tape:
- Visual Inspection: Periodically inspect the entire length of the heat tape and its connections for any signs of damage, wear, or loose connections.
- Cleanliness: Keep the thermostat unit and probe clean and free from debris.
- Seasonal Check: Before the onset of cold weather each year, perform a functional test (as described in Section 4.2) to ensure the system is operating correctly.
- Storage: If removing the heat tape for off-season storage, coil it loosely and store it in a dry, protected area.
7. Troubleshooting
If your Cupohus Heat Tape is not functioning as expected, consider the following:
- No Heat/Indicator Light Off:
- Check if the power outlet is working.
- Ensure the GFCI outlet has not tripped. Reset if necessary.
- Verify the temperature probe is in a cold environment (below the set start temperature). Refer to Section 4.2 for testing.
- Confirm the thermostat settings are correct (P0 and P1 values). Refer to Section 4.3 for resetting.
- Constant Heating/Indicator Light Always On:
- Ensure the temperature probe is not continuously exposed to cold temperatures.
- Verify the thermostat's cutoff temperature (P1) is set correctly and the ambient temperature around the probe is above this setting.
- Physical Damage: Inspect the cable for any cuts, abrasions, or signs of burning. If damaged, discontinue use and replace the unit.
If troubleshooting steps do not resolve the issue, please contact customer service.
8. Specifications
| Feature | Detail |
|---|---|
| Brand | Cupohus |
| Model Number | 25FT |
| Length | 25 feet |
| Voltage | 110-120V |
| Thermostat Type | Digital Display, Adjustable |
| Start Heating Temperature | Adjustable (Default: 37.4°F / 3°C) |
| Stop Heating Temperature | Adjustable (Default: 59°F / 15°C) |
| Freeze Protection Down To | -40°F (-40°C) |
| Item Weight | 2.51 pounds |
| Product Dimensions | 11 x 11 x 1.5 inches |
9. Warranty and Support
The Cupohus Heat Tape comes with a 3-year warranty service. For any questions, feedback, or support needs regarding your product, please contact Cupohus customer service. We are committed to providing assistance and ensuring your satisfaction.
Please refer to your purchase documentation or the official Cupohus website for specific contact details.
Ask a question about this manual
Ask about setup, troubleshooting, compatibility, parts, safety, or missing instructions. Manuals+ will review the question and use this page’s manual context to help answer it.