1. Introduction
This manual provides instructions for the installation, operation, and troubleshooting of the CKL 2 Port KVM Switch Dual Monitor DisplayPort 4K 60Hz (Model: 622DH-MST). This device allows control of two computers from a single set of keyboard, mouse, and two monitors.
2. Product Features
- DisplayPort 1.4 MST Technology: Utilizes Multi-stream Transport (MST) to enable dual extended or mirrored displays from a single DP 1.4 video source, reducing cable clutter.
- Dual Monitor Support: Controls two computers using one keyboard, mouse, and two monitors. Each PC connects via one DisplayPort 1.4 input to one DisplayPort and one HDMI output.
- High Resolution and Refresh Rate: Supports dual monitor output up to 4K@60Hz simultaneously. Single monitor output supports up to 4K@144Hz. Requires compatible graphics cards, monitors, and cables.
- Multiple Switching Modes: Offers switching via push button, keyboard hotkey, mouse hotkey, and wired remote.
- Integrated USB 3.0, Audio, and Microphone: Provides connectivity for peripherals and audio devices.
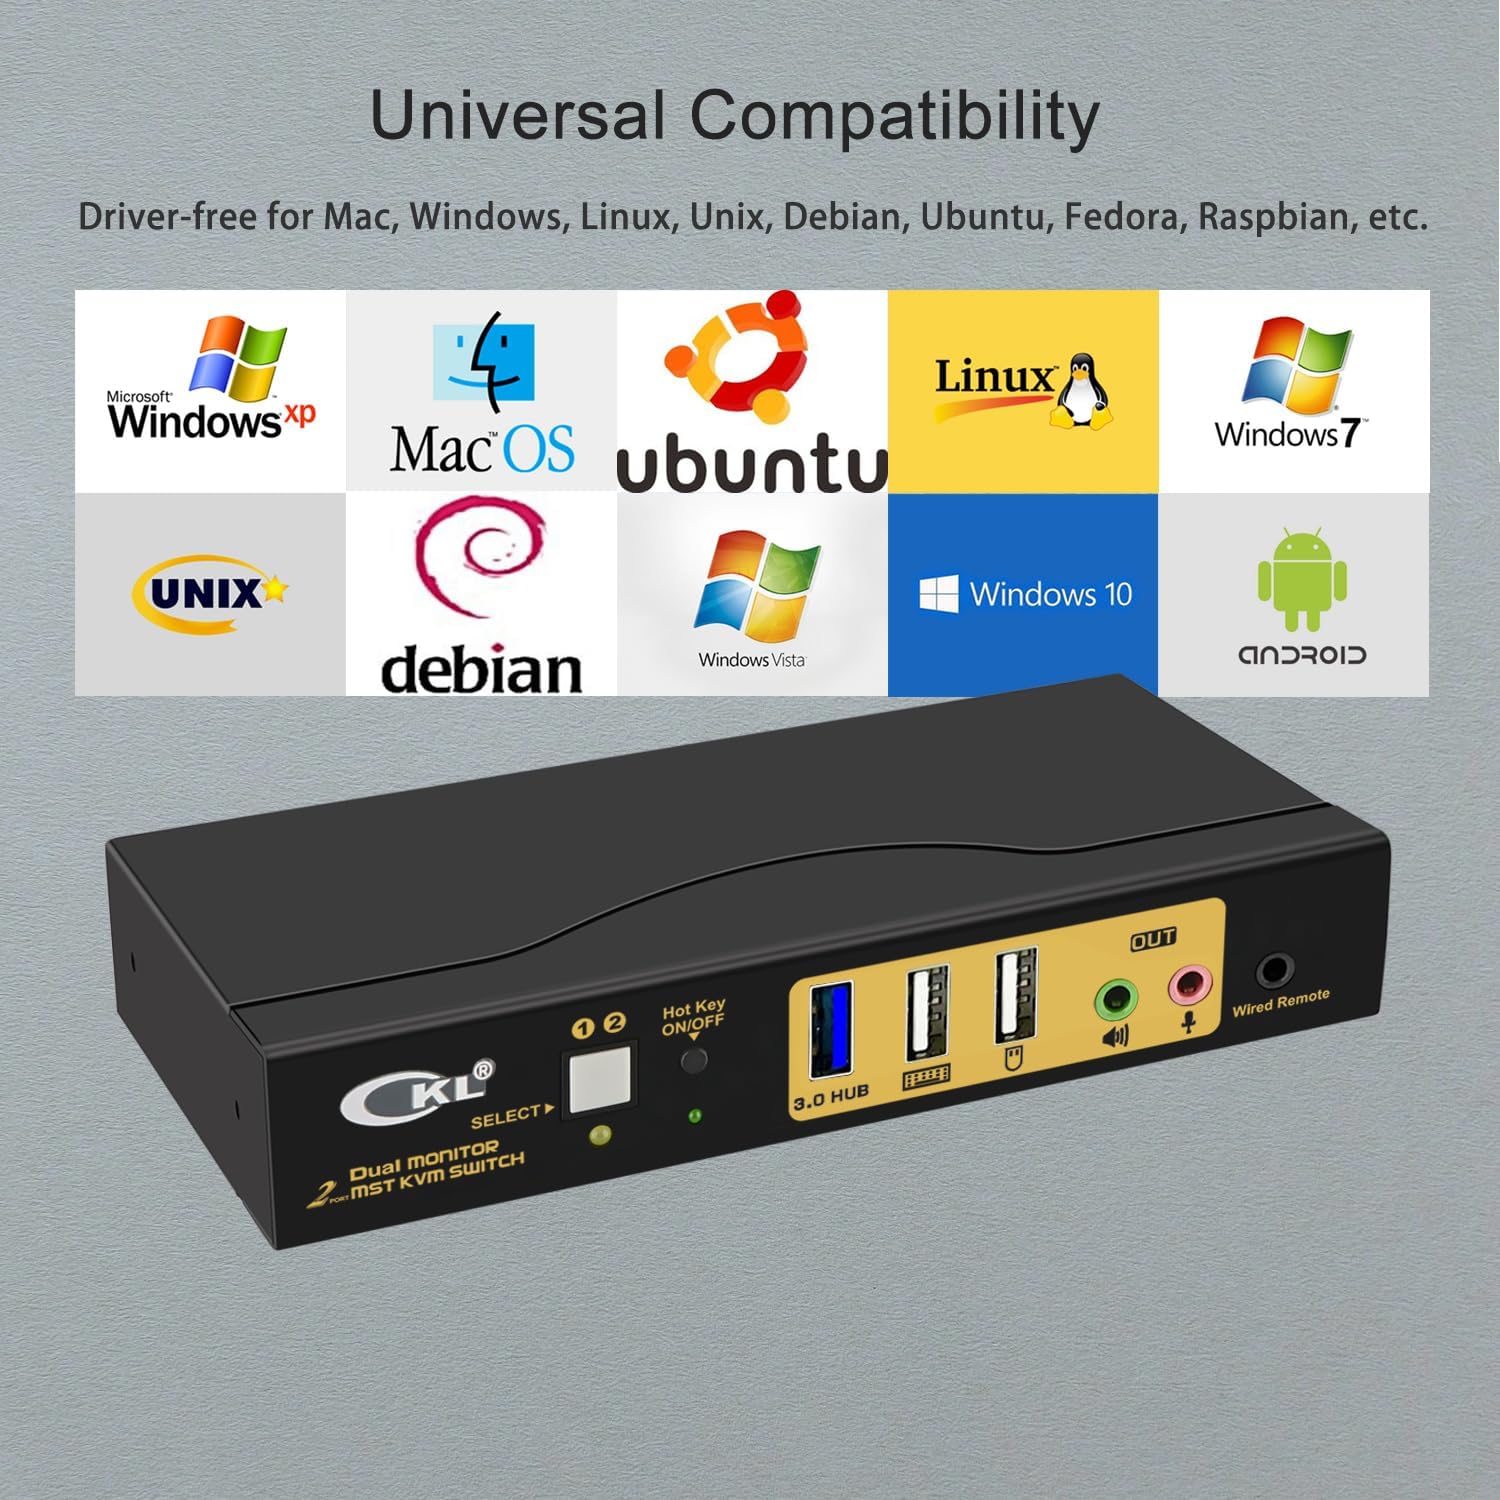
- Wide Operating System Compatibility: Compatible with various operating systems including Windows, macOS, Linux, Unix, Debian, Ubuntu, Fedora, and Raspbian. Plug and Play functionality, no software installation required.
3. Package Contents
Verify that all items are present in the package:
- 1 x CKL 2 Port DisplayPort MST KVM Switch (622DH-MST)
- 1 x Mini USB Cable + Wired Remote
- 2 x DP1.4 Cables
- 2 x USB3.0 Cables
- 1 x USB Power Adapter
- 1 x User Manual
Note: Monitor cables are not included.

4. Product Layout
Familiarize yourself with the ports and indicators on the KVM switch.
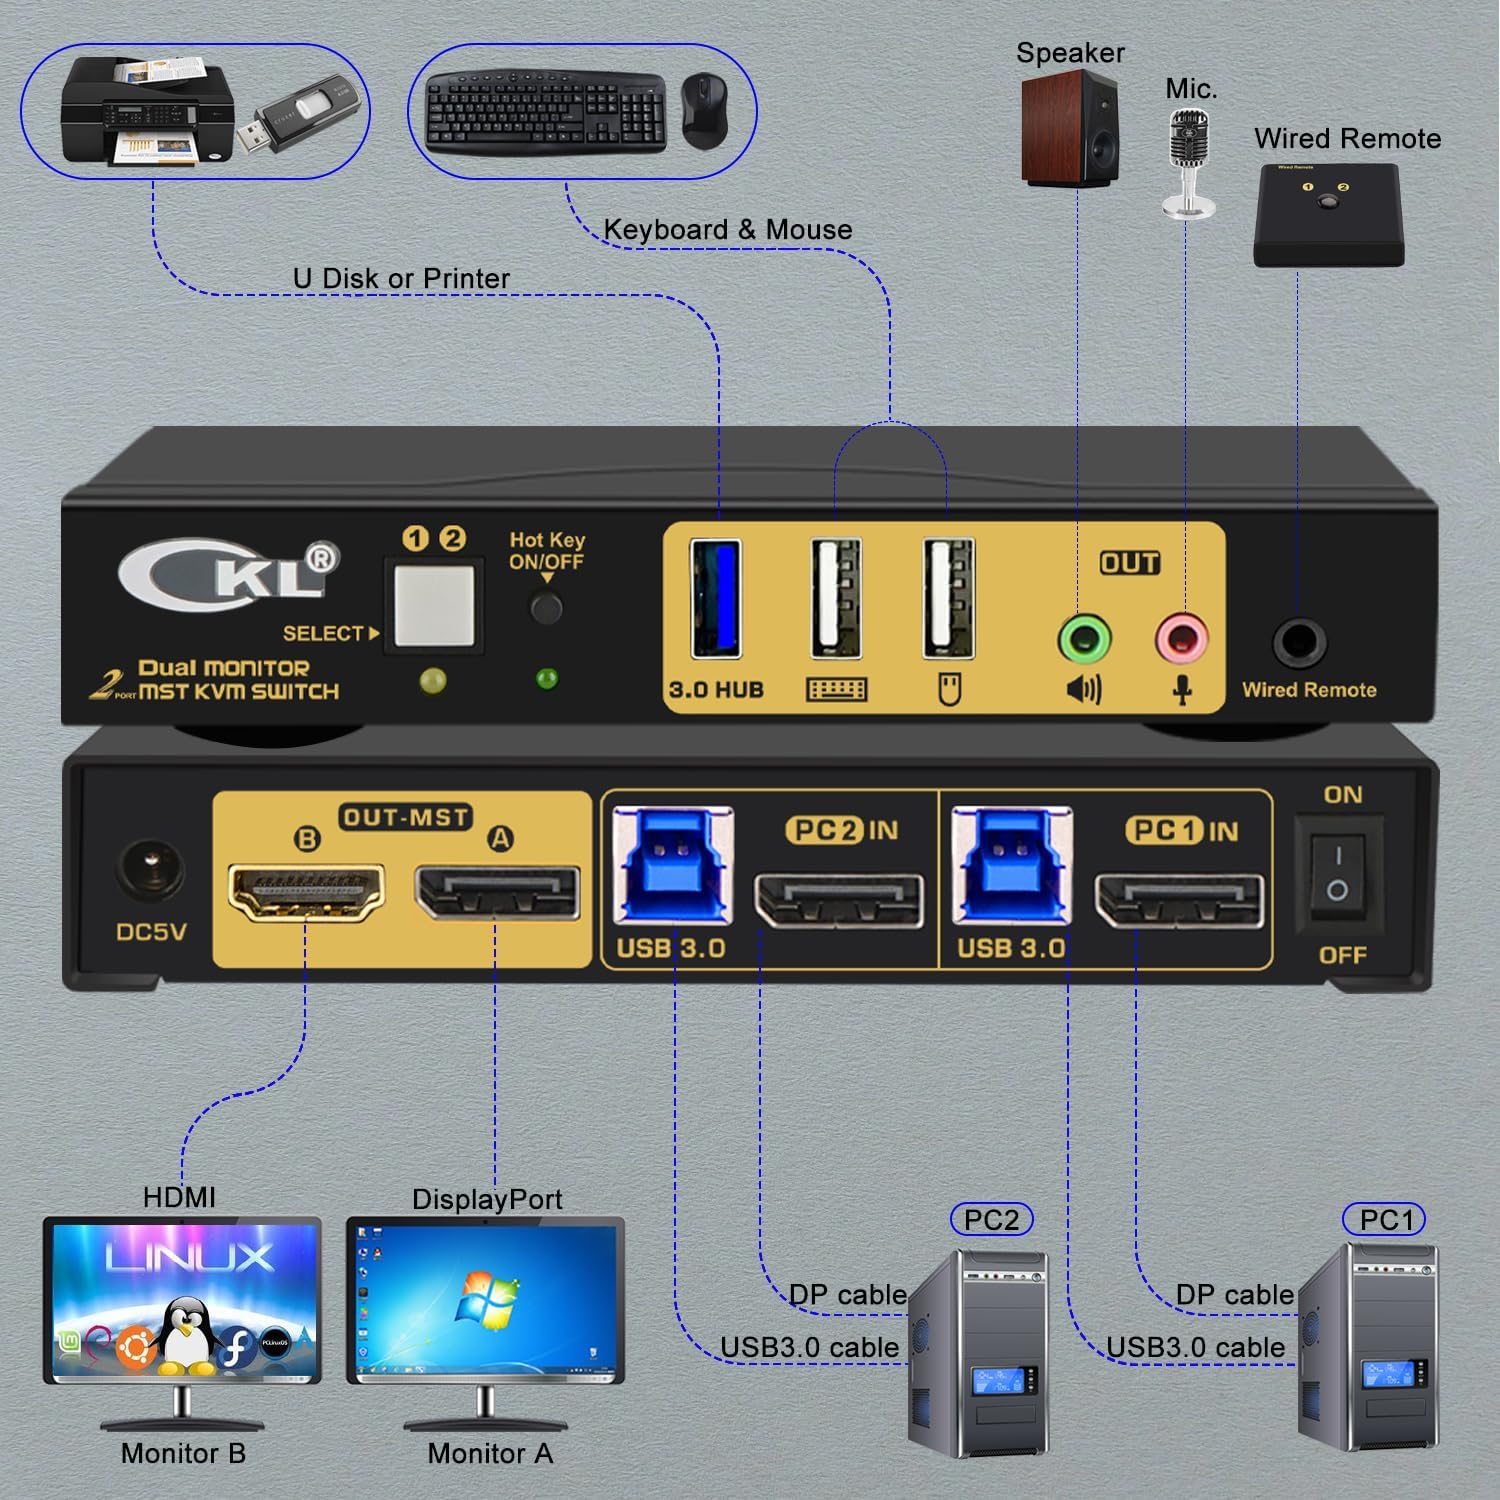
Front Panel
- A B Toggle Switch: Selects between PC1 and PC2.
- Indicator LED x 2: Shows active PC.
- Hot Key ON/OFF: Enables or disables hotkey switching.
- 3.0 HUB x 1 (No Hotkey): USB 3.0 port for general peripherals.
- USB Keyboard (Hotkey): Dedicated USB port for keyboard, supports hotkey switching.
- USB Mouse (Hotkey): Dedicated USB port for mouse, supports hotkey switching.
- Mic. Output: 3.5mm jack for microphone.
- Audio Output: 3.5mm jack for audio output.
- Wired Remote: Port for connecting the wired remote control.
Back Panel
- DC 5V: Power input port.
- DP Output A: DisplayPort output for Monitor A.
- HDMI Output B: HDMI output for Monitor B.
- PC1 DP Input: DisplayPort input for Computer 1.
- PC1 USB3.0 Input: USB 3.0 input for Computer 1.
- PC2 DP Input: DisplayPort input for Computer 2.
- PC2 USB3.0 Input: USB 3.0 input for Computer 2.
- I/O (ON/OFF): Power switch for the KVM device.
5. Setup Instructions
Follow these steps to connect your KVM switch:
- Power Off Devices: Ensure both computers and monitors are powered off before making any connections.
- Connect Monitors: Connect your primary monitor to the KVM's "DP Output A" port using a DisplayPort cable. Connect your secondary monitor to the KVM's "HDMI Output B" port using an HDMI cable.
- Connect Computers (PC1):
- Connect a DisplayPort cable from PC1's DisplayPort output to the KVM's "PC1 DP Input".
- Connect a USB 3.0 cable from PC1's USB 3.0 port to the KVM's "PC1 USB3.0 Input".
- Connect Computers (PC2):
- Connect a DisplayPort cable from PC2's DisplayPort output to the KVM's "PC2 DP Input".
- Connect a USB 3.0 cable from PC2's USB 3.0 port to the KVM's "PC2 USB3.0 Input". (For laptops with USB-C video, use a USB-C to DisplayPort adapter if needed).
- Connect Keyboard and Mouse: Connect your USB keyboard to the KVM's "USB Keyboard (Hotkey)" port and your USB mouse to the KVM's "USB Mouse (Hotkey)" port.
- Connect Peripherals: Connect any additional USB devices (e.g., printer, USB drive) to the KVM's "3.0 HUB" port.
- Connect Audio: Connect your speakers to the KVM's "Audio Output" and your microphone to the "Mic. Output" if desired.
- Connect Wired Remote: Plug the wired remote into its dedicated port on the KVM.
- Power On: Connect the provided USB power adapter to the KVM's "DC 5V" port and then plug it into a power outlet. Turn on the KVM switch using the I/O switch on the back panel.
- Power On Computers and Monitors: Power on your computers and monitors.

6. Operating Instructions
6.1 Switching Between Computers
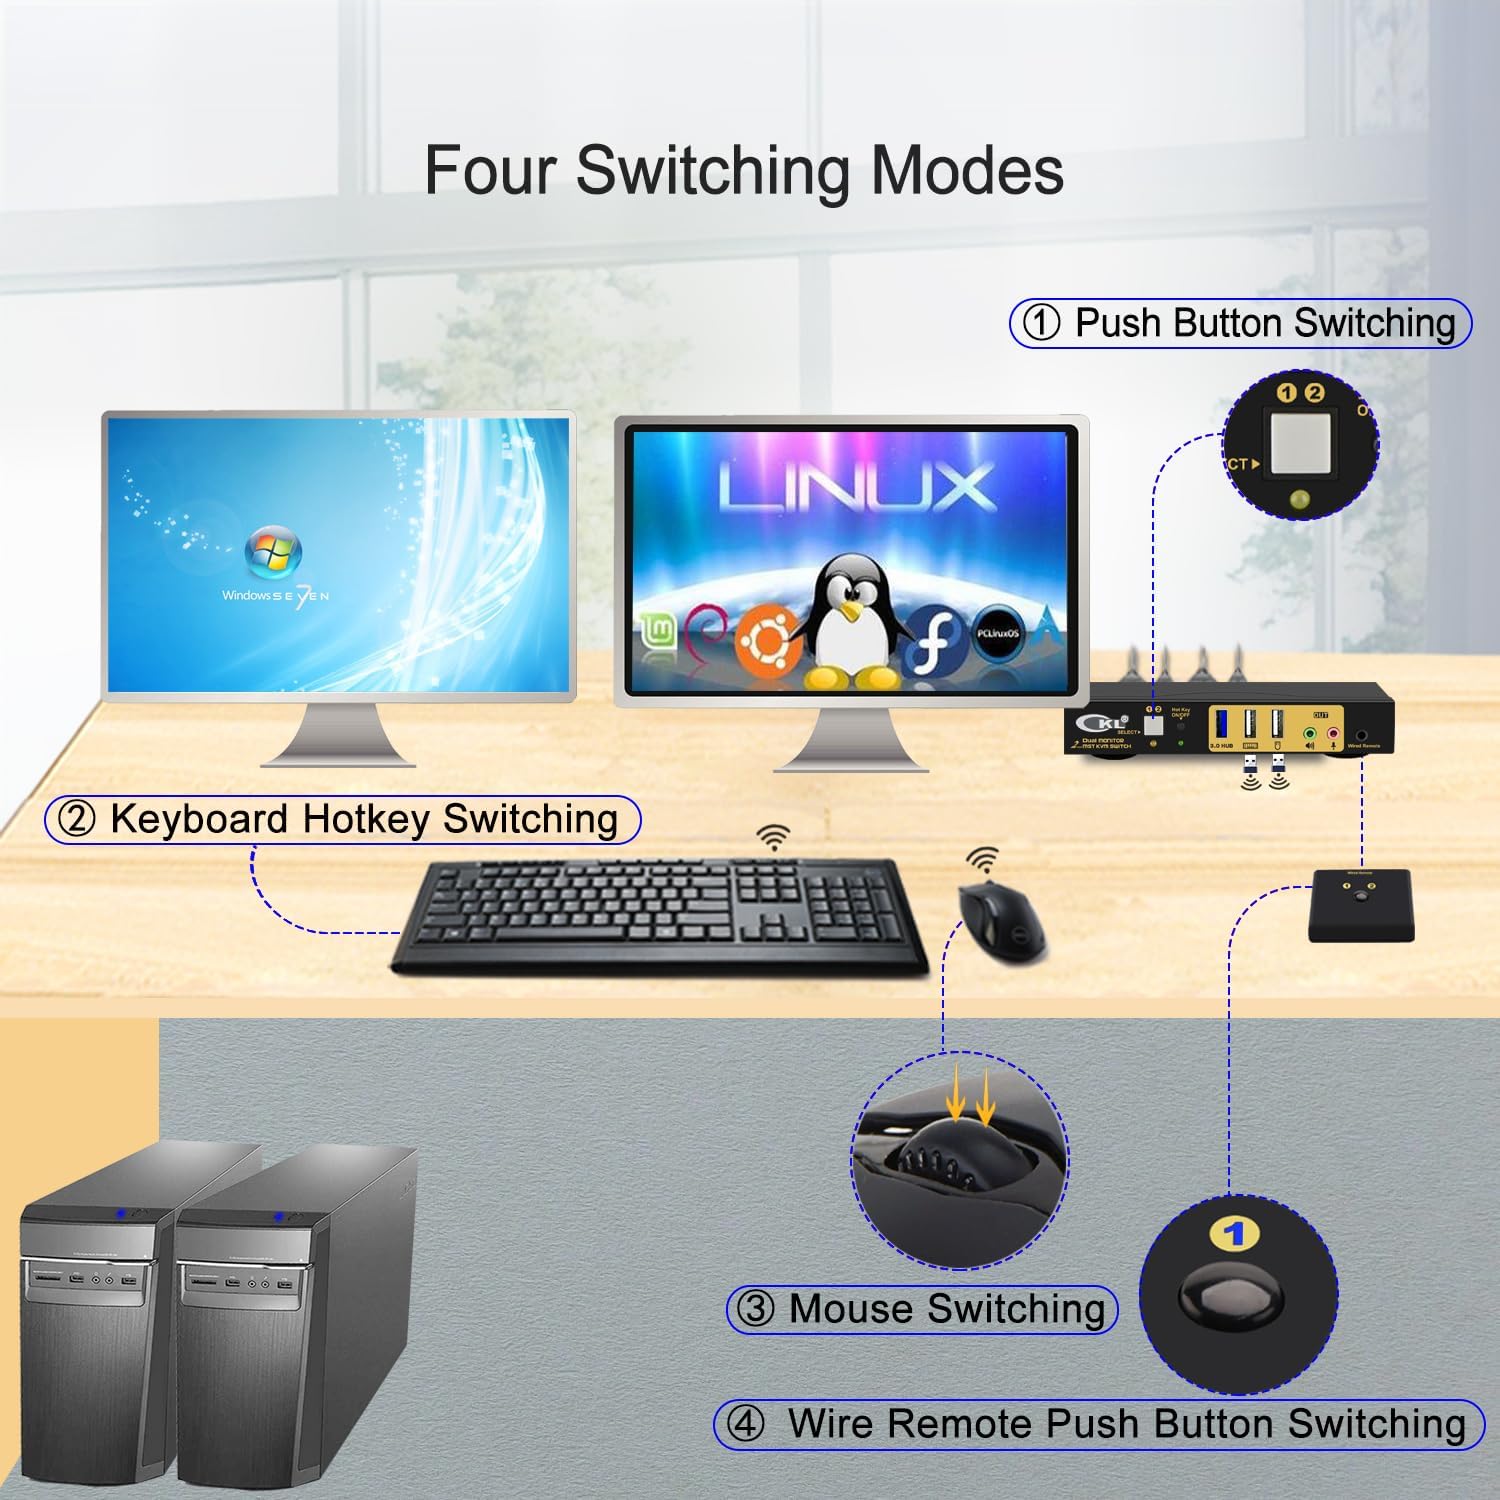
The KVM switch offers four methods to switch between connected computers:
- Push Button Switching: Press the "SELECT" button on the front panel of the KVM switch to cycle between PC1 and PC2. The corresponding LED indicator will illuminate.
- Keyboard Hotkey Switching: Ensure the "Hot Key ON/OFF" switch on the front panel is in the ON position. Use the following hotkey commands:
- Press Scroll Lock twice quickly, then 1 for PC1.
- Press Scroll Lock twice quickly, then 2 for PC2.
- Other hotkey combinations may be available; refer to the full manual for advanced hotkey functions.
- Mouse Hotkey Switching: Double-click the middle scroll wheel of your mouse to switch between computers. This feature requires the mouse to be connected to the dedicated "USB Mouse (Hotkey)" port.
- Wired Remote Switching: Press the button on the wired remote control to switch between PC1 and PC2.
6.2 Display Modes
The KVM switch supports various display configurations for your monitors:
- Mirrored Display: Both monitors display the same content from the selected computer.
- Extended Display: The desktop of the selected computer is extended across both monitors, providing more screen real estate.
- Splicing Wall: Content is stretched across both monitors, creating a larger single display area.
These display modes are configured through your computer's operating system display settings.
7. Compatibility
The CKL 2 Port KVM Switch is designed for broad operating system compatibility, requiring no additional drivers for basic functionality.

Supported operating systems include, but are not limited to:
- Windows (XP, Vista, 7, 10, etc.)
- macOS
- Linux (Ubuntu, Debian, Fedora, Raspbian, etc.)
- Unix
8. Troubleshooting
If you encounter issues, refer to the following common problems and solutions:
- No Display on Monitors:
- Ensure all DisplayPort and HDMI cables are securely connected between the computers, KVM, and monitors.
- Verify the KVM switch is powered on and the correct PC is selected.
- Check if the monitors are powered on and set to the correct input source.
- Test with different cables if possible.
- Keyboard or Mouse Not Responding:
- Ensure the keyboard and mouse are connected to the dedicated hotkey USB ports on the KVM.
- Check USB cable connections from the computers to the KVM.
- Try connecting the keyboard/mouse directly to the computer to confirm they are functional.
- Disable and re-enable the Hot Key function on the KVM.
- Audio Issues:
- Verify audio cables are correctly connected.
- Check audio settings on the selected computer.
- Resolution or Refresh Rate Problems:
- Ensure your graphics cards, monitors, and cables all support the desired resolution and refresh rate.
- Update graphics drivers on your computers.
- KVM Not Powering On:
- Verify the power adapter is securely connected to the KVM and a working power outlet.
- Ensure the I/O power switch on the back of the KVM is in the ON position.
9. Specifications
| Feature | Specification |
|---|---|
| Model Number | 622DH-MST |
| Operation Mode | ON-OFF |
| Current Rating | 2 Amps |
| Operating Voltage | 5 Volts |
| Connector Type | Plug In |
| Switch Type | Push Button |
| Material | Metal |
| Item Dimensions (L x W x H) | 5.71 x 2.95 x 0.98 inches |
| Circuit Type | 2-way |
| Upper Temperature Rating | 50 Degrees Celsius |
| International Protection Rating | IP62 |
10. Maintenance
To ensure optimal performance and longevity of your KVM switch, follow these maintenance guidelines:
- Keep the device in a cool, dry, and well-ventilated area.
- Avoid exposing the device to extreme temperatures, humidity, or direct sunlight.
- Clean the exterior of the device with a soft, dry cloth. Do not use liquid or aerosol cleaners.
- Ensure all cables are securely connected and not under strain.
11. Safety Information
Please read and follow these safety precautions:
- Do not attempt to open or modify the device. This may void the warranty and pose a safety risk.
- Use only the provided power adapter. Using an incorrect power adapter may damage the device.
- Keep the device away from water or other liquids.
- If the device is damaged or malfunctions, disconnect it from power immediately and contact support.
12. Warranty and Support
CKL products are designed for reliability and performance. For warranty information or technical support, please refer to the warranty card included in your package or visit the official CKL website. Please have your model number (622DH-MST) and purchase information ready when contacting support.


