FATORRI FT-SC1290-A
FATORRI Shoe Cabinet Storage for Entryway Instruction Manual
Brand: FATORRI
Model: FT-SC1290-A
1. Introduction
This manual provides comprehensive instructions for the assembly, operation, and maintenance of your FATORRI Freestanding Shoe Cabinet. Designed for entryways, hallways, and other living spaces, this cabinet offers a practical and elegant solution for organizing shoes, coats, and accessories.
The FATORRI Shoe Cabinet features a combination of rustic oak wood grain and white oak finishes, two flip drawers for shoe storage, and a coat rack with multiple hooks. Its sturdy construction from engineered wood ensures durability and stability.

Image: The FATORRI Shoe Cabinet, showcasing its design and functionality in a home setting.
2. Important Safety Information
WARNING: To prevent tipping, this furniture must be permanently attached to the wall using the anti-tip over devices provided. Failure to do so can result in serious or fatal crushing injuries.
- Always secure the cabinet to the wall using the provided anti-tip over devices.
- Be cautious when assembling the cabinet to avoid injury from sharp edges or heavy components.
- Do not allow children to climb on or play with the cabinet.
- Ensure all screws and fasteners are tightened securely before use. Periodically check and re-tighten as needed.
- Do not overload shelves or hooks beyond their intended capacity.
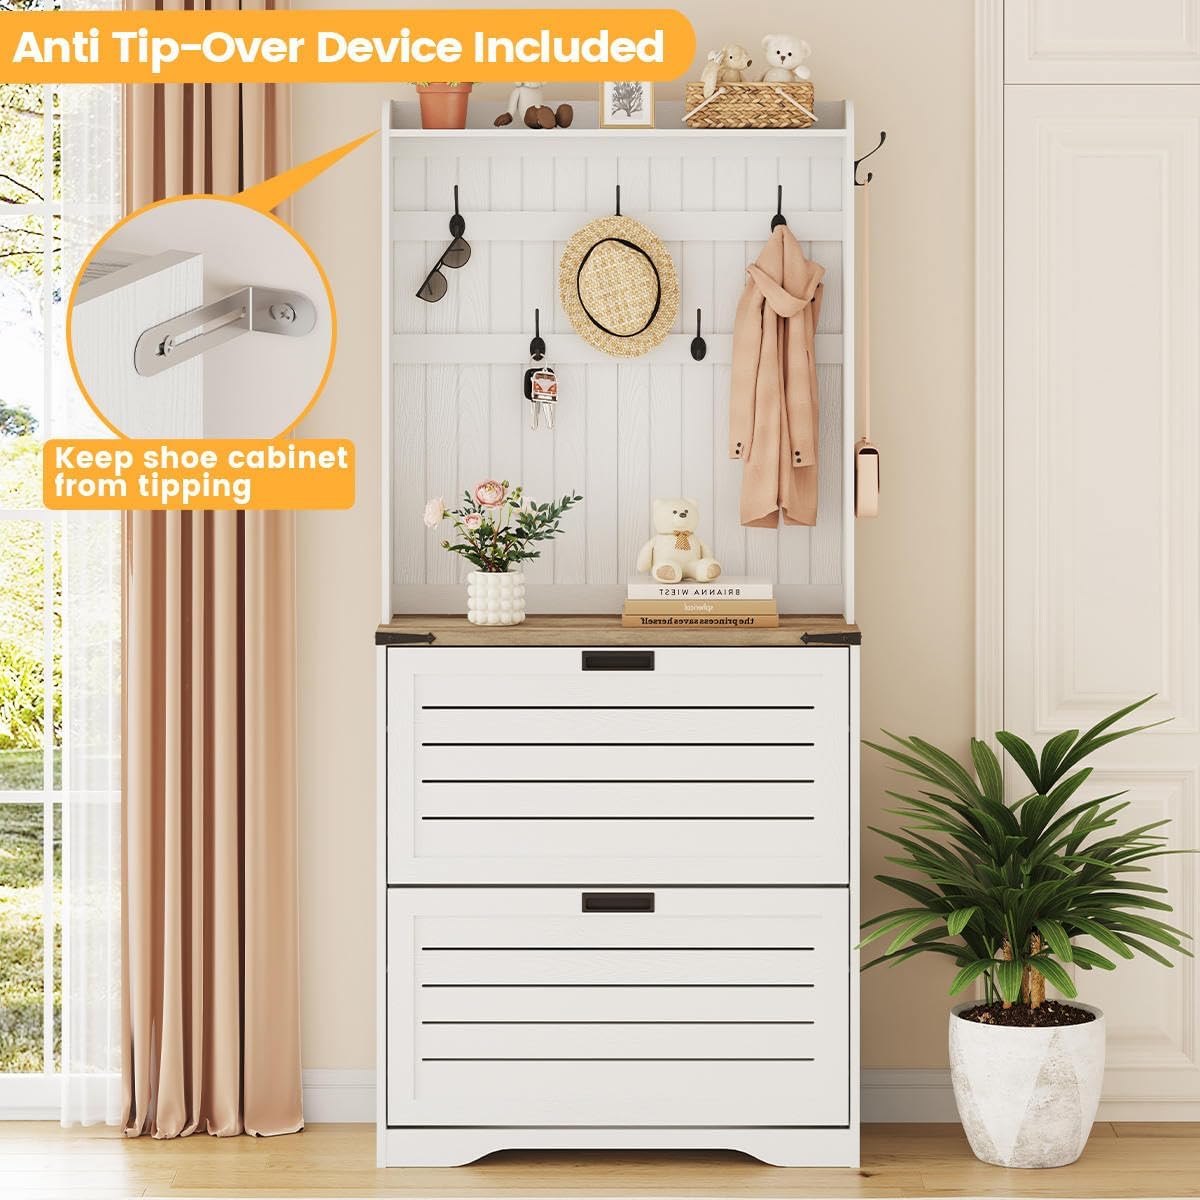
Image: Detail of the anti-tip over device, crucial for securing the cabinet to the wall.
3. Package Contents
Before beginning assembly, ensure all parts and hardware are present and undamaged. Refer to the included parts list in your manual for specific quantities.
Included Components:
- Cabinet Panels (Engineered Wood)
- Flip Drawers with adjustable shelves
- Coat Rack with 7 hooks (5 on back panel, 2 on sides)
- Assembly Hardware (screws, cam locks, wood dowels, etc.)
- Anti-Tip Over Devices
- Instruction Manual
- Basic Assembly Tools (screwdriver, Allen wrenches)
4. Assembly Instructions
Assembly typically takes around 45 minutes. Follow these steps carefully. It is recommended to have a second person for certain steps to ensure stability.
Step 4.1: Prepare Panels and Install Cam Screws
Identify the main panels for the top and bottom sections of the cabinet. Insert the cam screws into the designated holes on these panels. Use a hammer or mallet to gently tap in any wood dowels where indicated.

Image: Preparation of cabinet panels with hardware insertion.
Step 4.2: Assemble the Top Section
Connect the side panels to the top shelf using the cam locks and screws. Ensure all connections are secure. This forms the upper part of the cabinet, including the coat rack area.
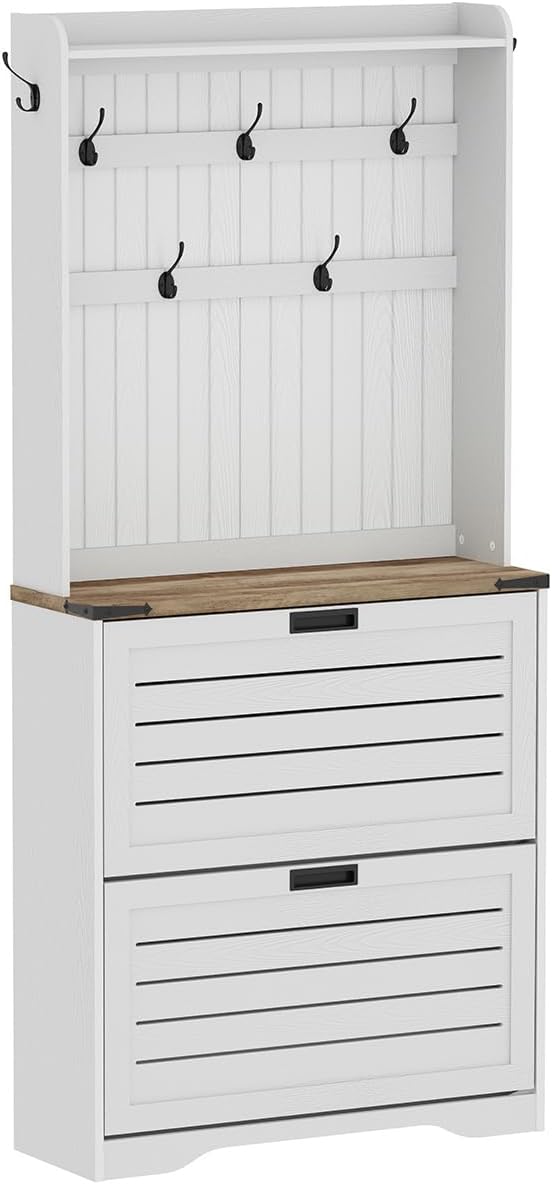
Image: Side view of the partially assembled top section.
Step 4.3: Assemble the Bottom Section (Shoe Storage)
Assemble the base and side panels for the shoe storage section. This section will house the flip drawers. Ensure all connections are firm for stability.

Image: Internal structure of the shoe storage section.
Step 4.4: Connect Top and Bottom Sections
Carefully align and connect the assembled top section to the assembled bottom section. Use the remaining cam locks and screws to secure these two main pieces together. Ensure the unit is upright and stable.
Step 4.5: Install Backing Panel and Hooks
Attach the backing panel to the rear of the cabinet. Then, install the 5 main coat hooks on the back panel and the 2 side hooks as per the instructions. Cover any visible cam locks with the provided white stickers for a clean finish.

Image: Front view of the cabinet with hooks in place.
Step 4.6: Install Flip Drawers
Insert the flip drawers into their respective compartments in the bottom section. The internal shelves within the flip drawers are adjustable and can be removed to accommodate different shoe heights, such as boots or high-top sneakers.

Image: Adjustable and removable panels within the flip drawers.
Step 4.7: Secure to Wall
Using the provided anti-tip over devices, secure the cabinet to a wall stud. This is a critical safety step to prevent accidental tipping.
5. Operating Instructions
5.1: Using the Flip Drawers
To access your shoes, gently pull the handle on the front of each drawer. The drawer will flip open, revealing two tiers for shoe storage. Each tier can hold approximately 4 pairs of adult shoes, depending on their size and style. To close, simply push the drawer back into place until it clicks securely.

Image: The flip drawers can hold up to 12 pairs of shoes.
5.2: Adjusting Shoe Storage Space
The internal divider panels within each flip drawer can be adjusted vertically or completely removed. This allows you to customize the space to accommodate taller footwear such as boots or high-top sneakers.
5.3: Utilizing the Coat Rack and Top Shelf
The upper section features 7 sturdy hooks (5 on the back panel and 2 on the sides) for hanging coats, bags, umbrellas, and other items. The top shelf and the surface above the flip drawers are fenced, providing additional space for decorative items, keys, or small plants without worrying about them falling.

Image: Product features including coat hooks and top storage space.
6. Maintenance
- Cleaning: Wipe surfaces with a soft, damp cloth. Avoid harsh chemicals or abrasive cleaners, as they may damage the finish.
- Dusting: Regularly dust the cabinet with a dry, soft cloth to prevent buildup.
- Hardware Check: Periodically inspect all screws, cam locks, and other hardware to ensure they remain tight. Re-tighten as necessary to maintain stability.
- Material Care: The cabinet is crafted from engineered wood (MDF). Avoid prolonged exposure to moisture or direct sunlight to prevent warping or discoloration.
7. Troubleshooting
Issue: Cabinet feels unstable or wobbly.
Solution: Ensure all cam locks and screws are fully tightened. If the issue persists, verify that the anti-tip over devices are correctly installed and securely anchored to a wall stud. If the cabinet was recently moved, re-tighten all cam heads.
Issue: Flip drawers do not close smoothly or are difficult to open.
Solution: Check for any obstructions inside the drawer or along the tracks. Ensure shoes are properly placed and not overfilling the compartments. Verify that the internal adjustable shelves are correctly seated.
Issue: Parts appear bent or damaged upon arrival.
Solution: While packaging is designed to protect components, occasional transit damage can occur. If you receive bent or damaged parts, contact customer support for replacement parts. Do not attempt to force damaged parts into place as this may compromise the cabinet's integrity.
8. Specifications
| Feature | Detail |
|---|---|
| Brand | FATORRI |
| Model Number | FT-SC1290-A |
| Product Dimensions | 11.1"D x 31.5"W x 69.53"H |
| Color | Rustic Oak + White Oak |
| Material | Engineered Wood (MDF) |
| Mounting Type | Floor Mount (Freestanding with Anti-Tipping device) |
| Special Features | Anti-Tipping, Flip Drawer, Removable Shelf, Adjustable Shelf |
| Number of Shelves | 3 (internal to flip drawers) |
| Included Components | Replacement Hardware, Shelves, Manual, Hardware, Coat Rack |
| Assembly Required | Yes (approx. 45 minutes) |
| Item Weight | 61.2 pounds |
9. Warranty and Support
FATORRI stands behind the quality of its products. If you encounter any issues with defects, we will replace the affected part to ensure your satisfaction.
For further assistance, replacement parts, or any inquiries, please contact FATORRI Customer Support. Refer to your purchase documentation or the FATORRI brand store on Amazon for contact details.
You can visit the FATORRI Store for more information: FATORRI Store
Ask a question about this manual
Ask about setup, troubleshooting, compatibility, parts, safety, or missing instructions. Manuals+ will review the question and use this page’s manual context to help answer it.