1. Introduction
This manual provides essential instructions for the safe and efficient operation of your LOEFME 12L/Day Digital Dehumidifier. Please read this manual thoroughly before using the appliance and retain it for future reference. This dehumidifier is designed to reduce humidity levels in indoor environments, contributing to a more comfortable and healthier living space.
2. Safety Instructions
Observe the following safety precautions to prevent injury or damage to the appliance:
- Ensure the power supply matches the voltage specified on the rating label.
- Do not operate the dehumidifier with a damaged power cord or plug.
- Keep the appliance away from heat sources, flammable materials, and direct sunlight.
- Do not block the air inlet or outlet. Maintain at least 20 cm clearance around the unit.
- Always place the dehumidifier on a stable, level surface to prevent water spillage.
- Unplug the unit before cleaning, maintenance, or when not in use for extended periods.
- Do not insert objects into the air vents.
- This appliance is not intended for use by persons with reduced physical, sensory, or mental capabilities, or lack of experience and knowledge, unless they have been given supervision or instruction concerning use of the appliance by a person responsible for their safety.
- Children should be supervised to ensure they do not play with the appliance.
3. Product Overview
Familiarize yourself with the main components of your LOEFME Dehumidifier.

Figure 3.1: Front view of the LOEFME 12L/Day Digital Dehumidifier. This image shows the compact design and the digital display on the top panel.
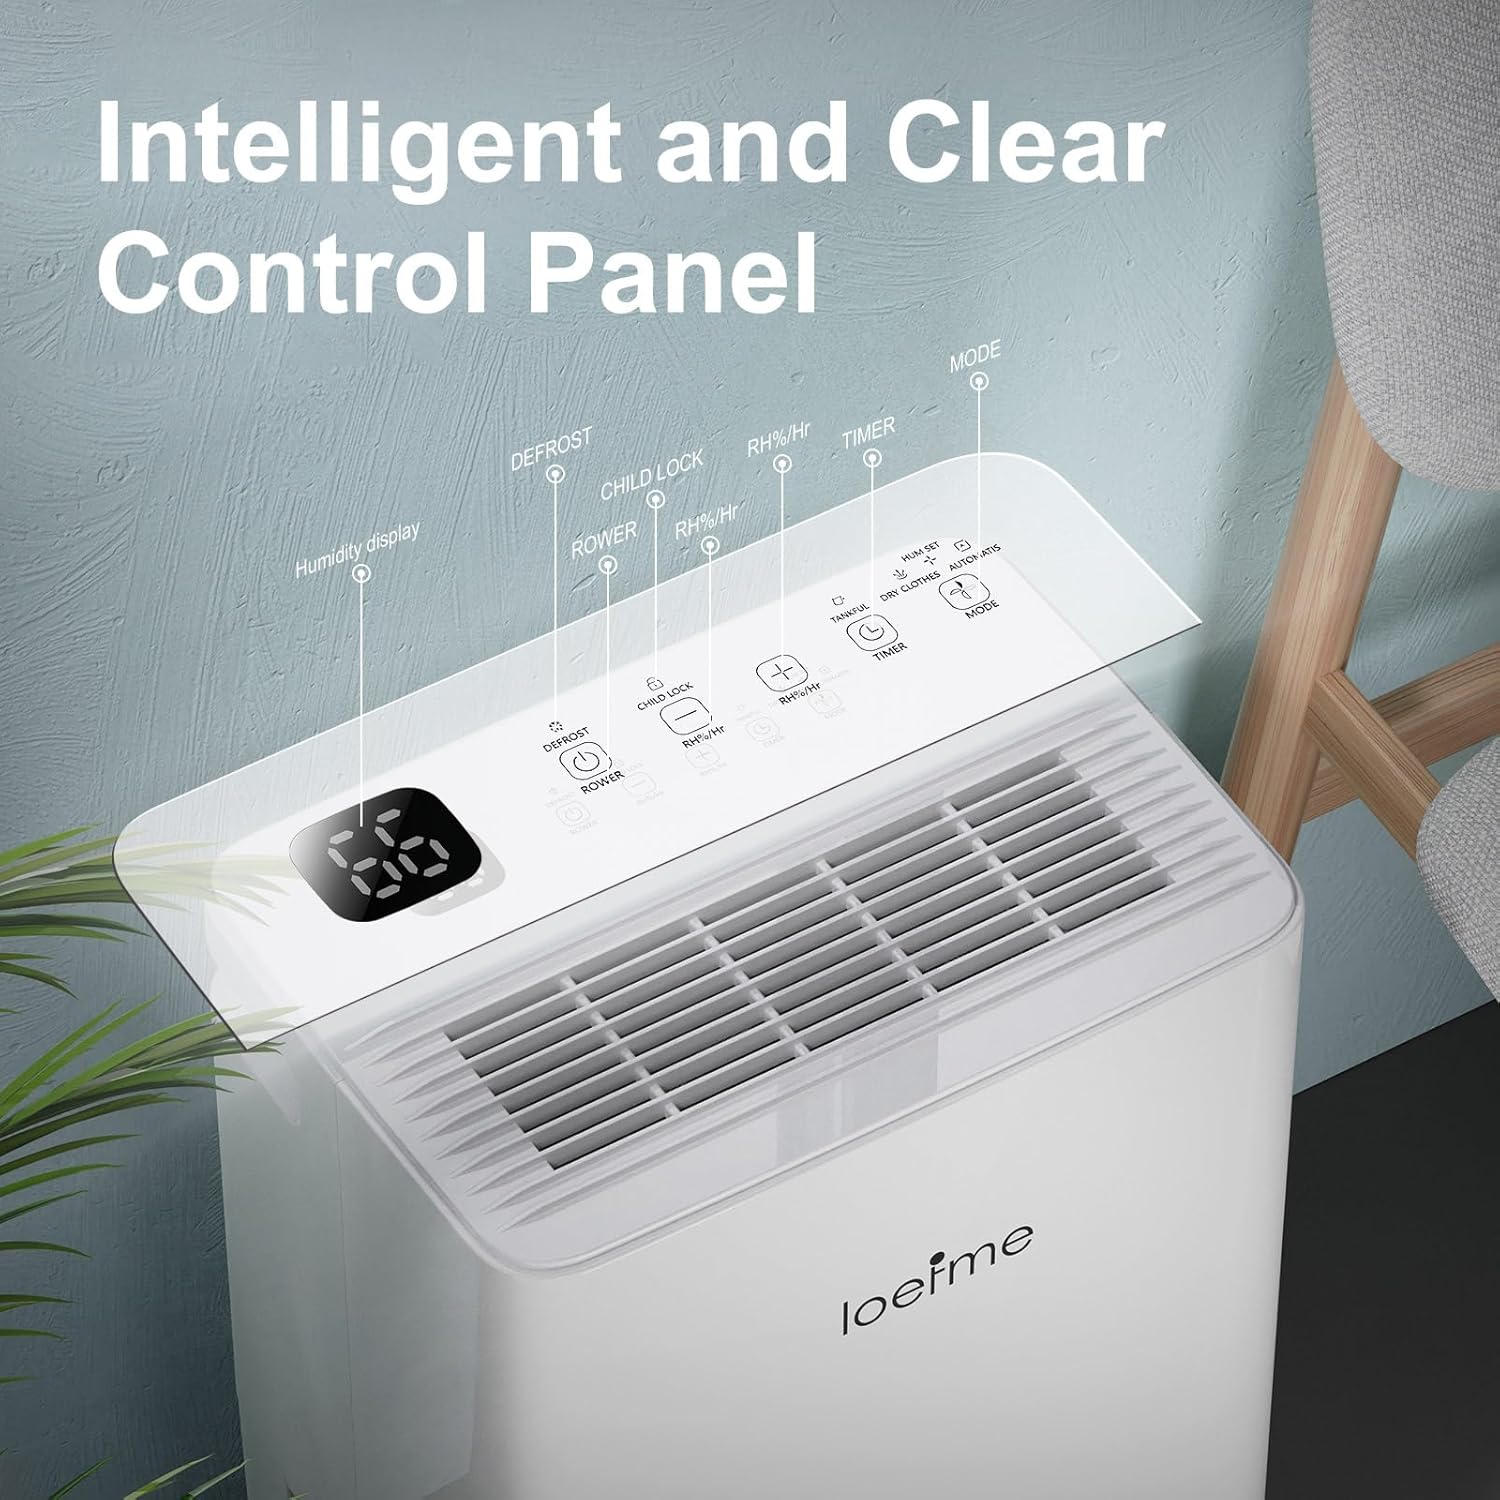
Figure 3.2: Close-up of the intelligent control panel. Key functions include Humidity Display, Defrost indicator, Child Lock, Power button, RH%/Hr (humidity/timer setting), Timer, and Mode selection.
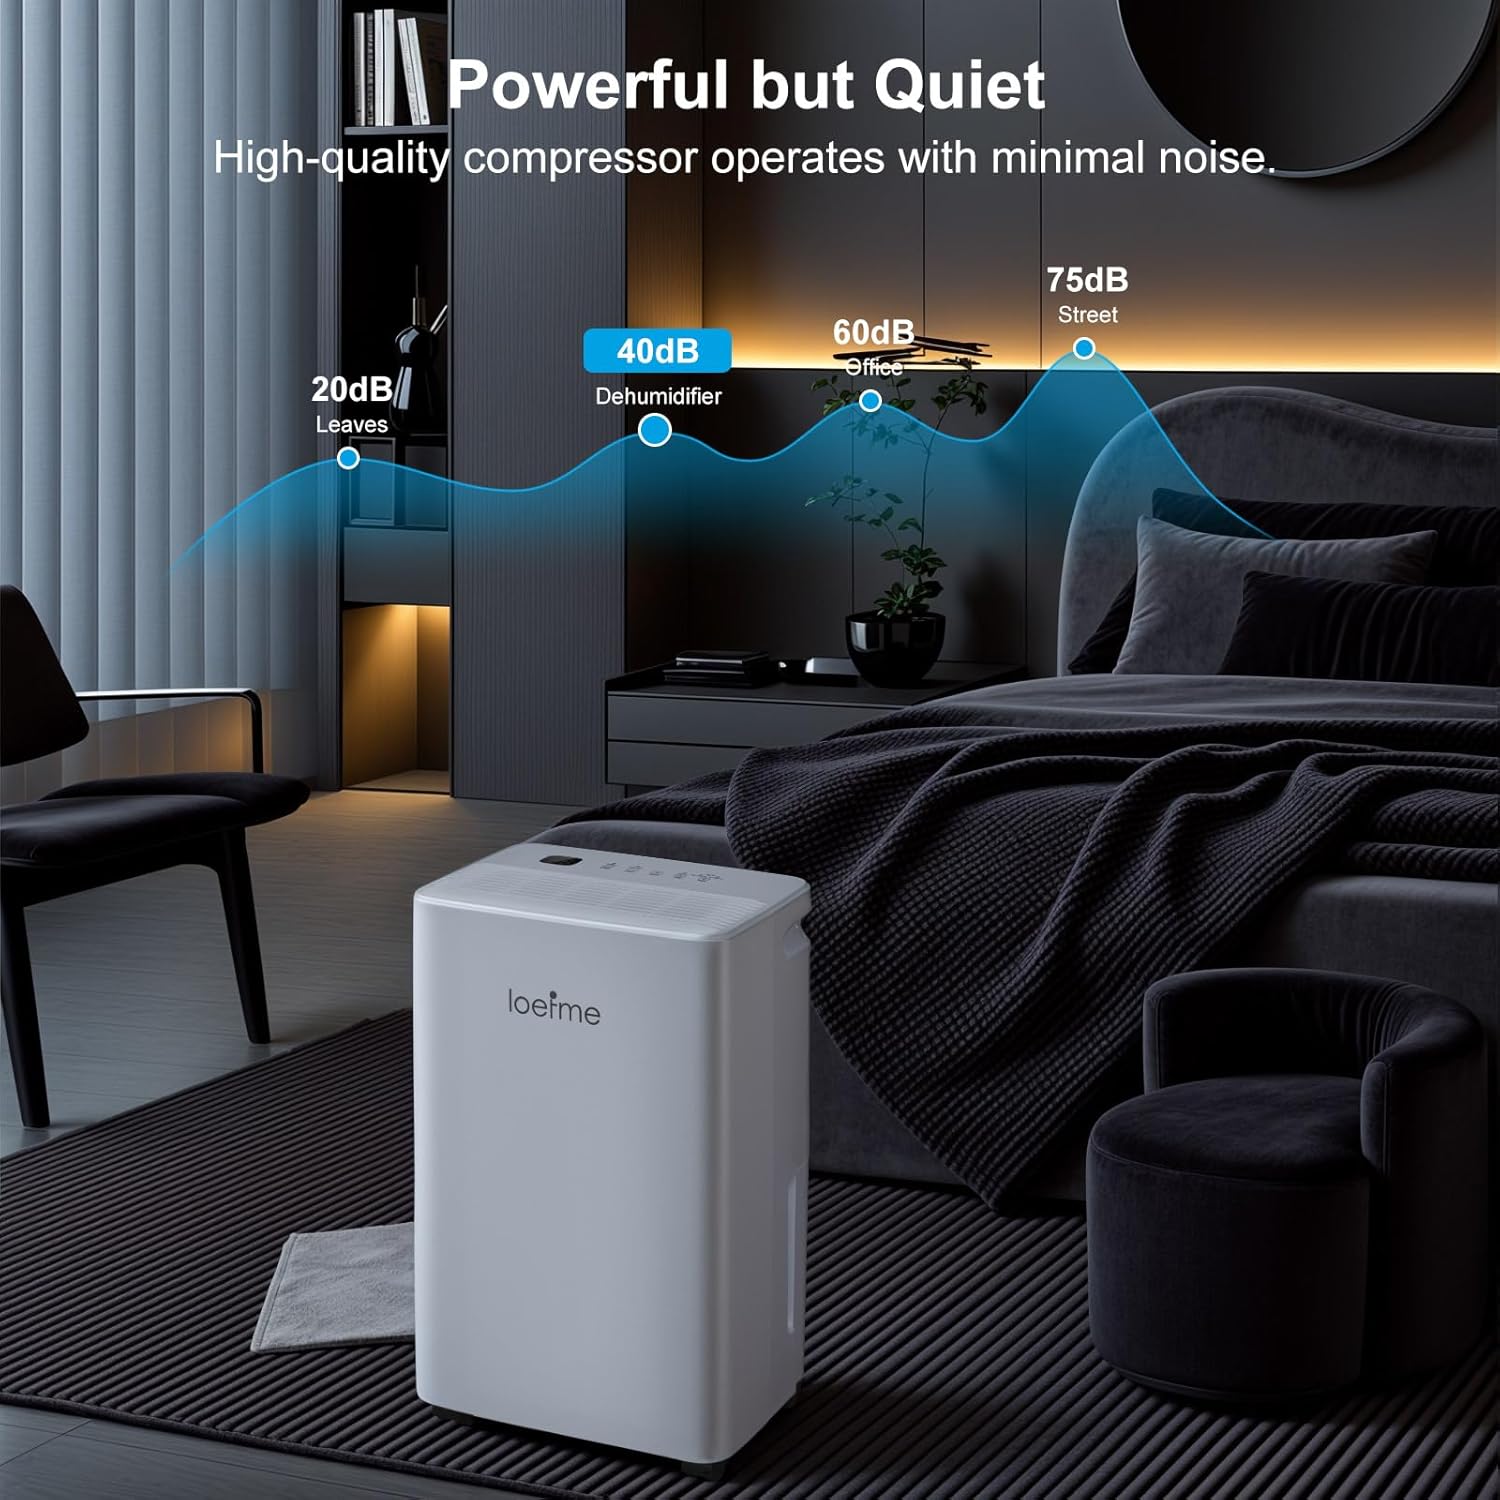
Figure 3.3: Illustration of the two drainage options: the removable 2-liter water tank and the continuous drainage outlet with an attached hose.

Figure 3.4: Diagram illustrating the Nano-level filter, designed to capture dust and inhalable particles, improving air quality.
4. Setup
- Unpacking: Carefully remove the dehumidifier from its packaging. Retain the packaging materials for future storage or transport.
- Placement: Place the unit upright on a firm, level surface. Ensure there is at least 20 cm (8 inches) of clear space around the air inlet and outlet to allow for proper airflow. Avoid placing it in direct sunlight or near heat sources.
- Power Connection: Plug the power cord into a grounded electrical outlet.
- Initial Use: For optimal performance, allow the unit to stand upright for at least 2 hours before plugging it in and turning it on, especially if it was transported horizontally.
5. Operating Instructions
5.1 Control Panel Functions
The digital control panel allows for easy operation and setting adjustments.
- Power Button: Press to turn the dehumidifier ON or OFF.
- Mode Button: Cycles through the available operating modes: Dehumidify, Powerful, and Custom.
- RH%/Hr Button:
- In Dehumidify or Custom mode, press to set the target humidity level (e.g., 40% to 80%).
- Press and hold to set the timer for automatic ON/OFF operation.
- Child Lock: Press and hold the Child Lock button to activate or deactivate. This prevents accidental changes to settings.
- Defrost Indicator: Illuminates when the unit is performing an automatic defrost cycle. This is normal operation in low temperatures.
- Humidity Display: Shows the current ambient humidity level or the set target humidity.
5.2 Operating Modes
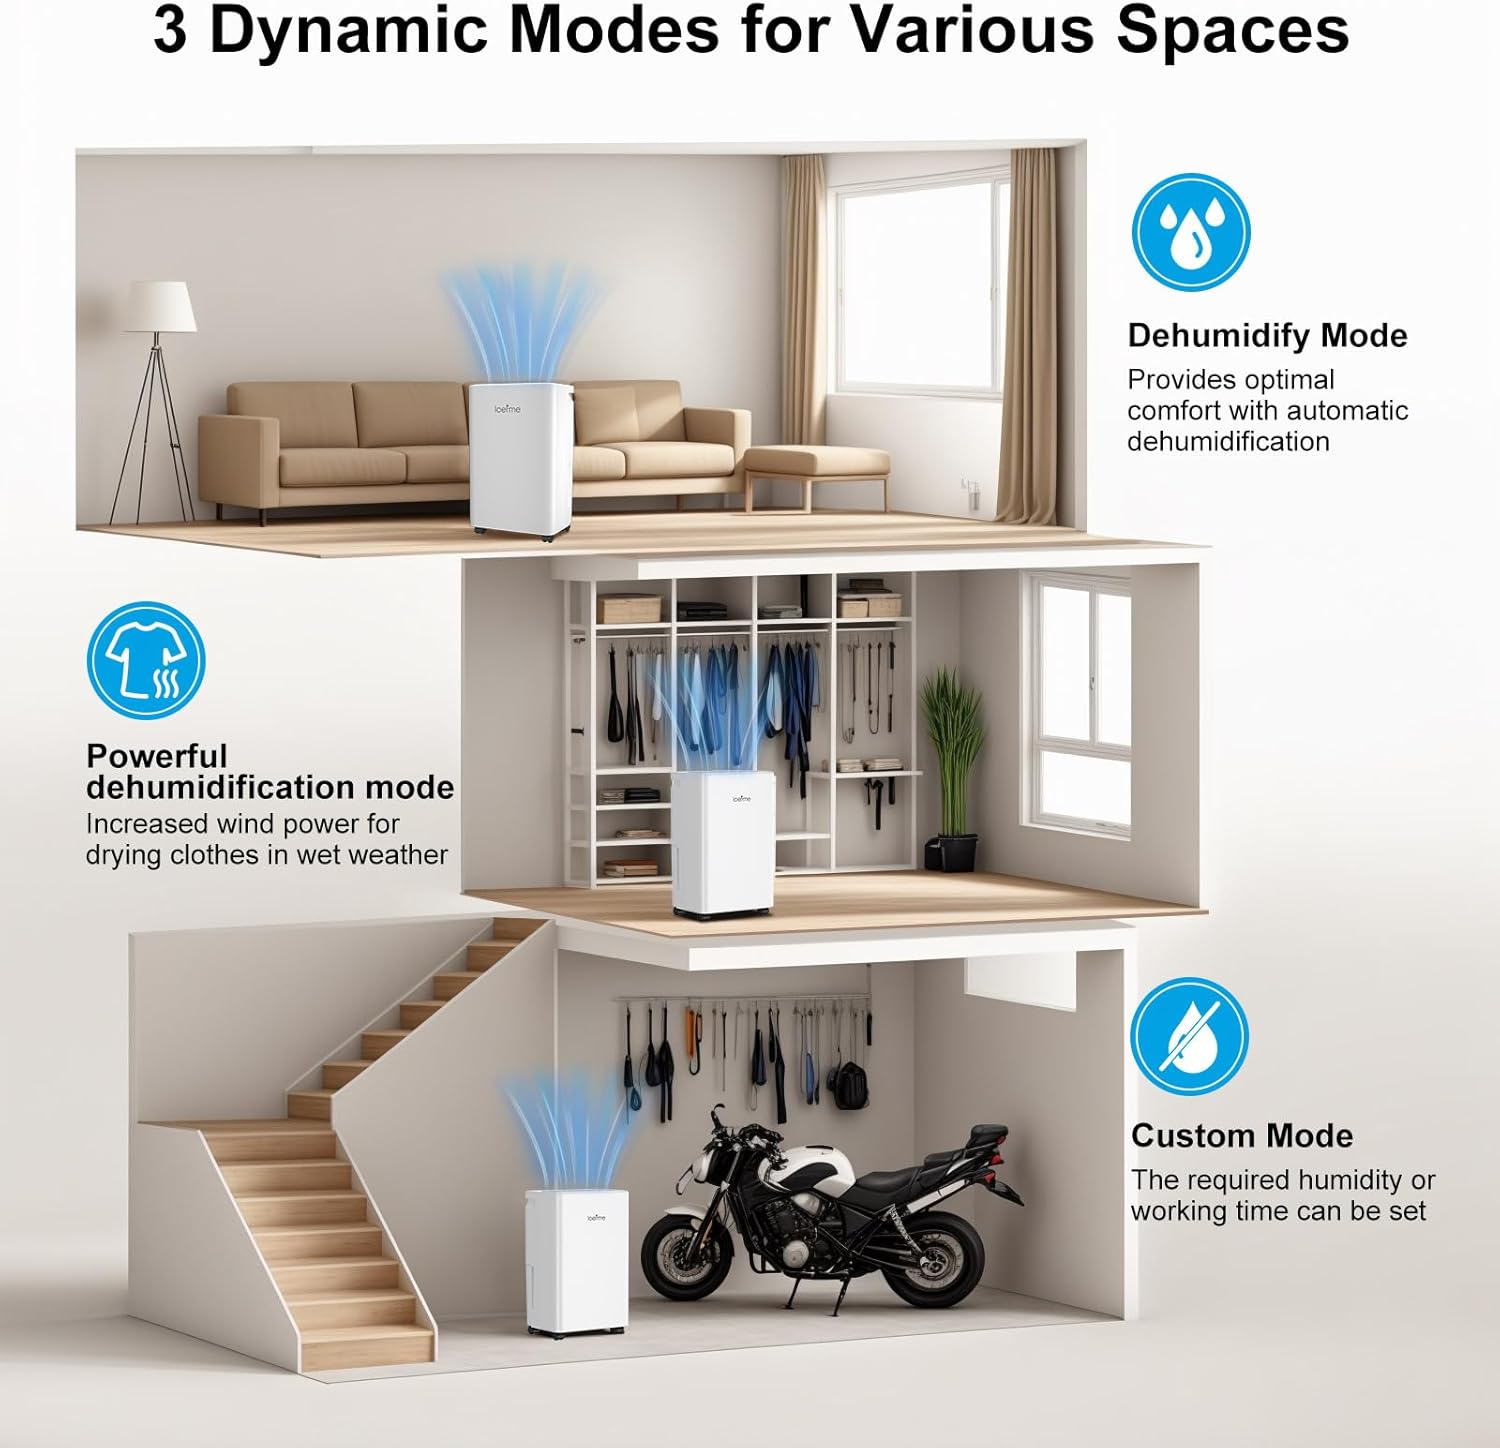
Figure 5.1: Visual representation of the three dynamic operating modes for various spaces.
- Dehumidify Mode: Provides optimal comfort by automatically maintaining a healthy humidity level. The unit will operate to keep humidity between 40% and 80%.
- Powerful Dehumidification Mode: Increases fan speed and dehumidification power for faster moisture removal, ideal for drying clothes indoors or in very damp conditions.
- Custom Mode: Allows you to set a specific target humidity level or a working time according to your preference.
5.3 Drainage Options
Your dehumidifier offers two methods for water removal:
- Water Tank Drainage:
The dehumidifier collects water in its internal 2-liter water tank. When the tank is full, the unit will automatically shut off and an indicator light will illuminate. Carefully remove the tank, empty the collected water, and reinsert it securely. The unit will resume operation.
- Continuous Drainage:
For continuous operation without needing to empty the tank, connect the provided drainage hose to the continuous drainage outlet on the back of the unit. Ensure the hose is sloped downwards to allow gravity to drain the water into a suitable drain or container. Do not allow the hose to be kinked or blocked.
6. Maintenance
Regular maintenance ensures optimal performance and extends the lifespan of your dehumidifier.
6.1 Cleaning the Air Filter
- The air filter should be cleaned every two weeks or more frequently depending on usage and air quality.
- Turn off and unplug the dehumidifier.
- Locate and remove the air filter (typically on the back or side of the unit).
- Wash the filter with clean water (not hotter than 40°C) and a mild detergent.
- Rinse thoroughly and allow it to air dry completely before reinserting. Do not expose to direct sunlight.
6.2 Cleaning the Water Tank
- Empty the water tank regularly.
- Clean the tank with a mild detergent and water to prevent mold and mildew growth.
- Rinse thoroughly and dry before placing it back into the unit.
6.3 External Cleaning
- Wipe the exterior of the unit with a soft, damp cloth.
- Do not use abrasive cleaners or solvents.
6.4 Storage
- If storing the unit for an extended period, ensure the water tank is empty and clean, and the filter is clean and dry.
- Store the dehumidifier in an upright position in a cool, dry place, preferably in its original packaging.
7. Troubleshooting
Refer to this section for common issues and their solutions.
| Problem | Possible Cause | Solution |
|---|---|---|
| Dehumidifier does not turn on. | No power supply. Water tank is full or incorrectly inserted. | Check power cord connection and outlet. Empty and reinsert the water tank correctly. |
| No water collected. | Ambient humidity is too low. Air filter is clogged. Temperature is too low. Unit is in continuous drainage mode. | Dehumidifier may not be needed. Clean the air filter. Operating temperature range is typically 5-35°C. Check if the continuous drainage hose is connected and functioning. |
| Unit is noisy. | Unit is not on a level surface. Air filter is clogged. | Place the unit on a flat, stable surface. Clean the air filter. |
| Dehumidification is slow. | Room size is too large. Doors/windows are open. Air filter is clogged. | Ensure the unit is suitable for the room size. Close doors and windows. Clean the air filter. |
8. Specifications
| Feature | Specification |
|---|---|
| Brand | LOEFME |
| Model | LOEFME Dehumidifier |
| Dehumidification Capacity | 12 Liters/day (at 30°C, 80% RH) |
| Water Tank Capacity | 2 Liters |
| Power Consumption | 220 Watts |
| Noise Level | Approximately 38 dB |
| Product Dimensions (L x W x H) | 27.5 x 19.5 x 44.5 cm |
| Item Weight | 8.8 Kilograms |
| Automatic Shut-off | Yes (when water tank is full) |
| Humidity Control Range | 40% - 80% |
9. Warranty and Support
For warranty information or technical support, please refer to the warranty card included with your product or contact LOEFME customer service through the retailer where the product was purchased. Please have your purchase receipt and product model information ready when contacting support.