1. Introduction
This manual provides comprehensive instructions for the installation, operation, and maintenance of your new Android 12 Car Stereo. Designed for Ford F150, F250, and F350 models from 2004 to 2008, this 7-inch IPS touchscreen unit offers advanced features including Wireless CarPlay, Android Auto, GPS navigation, Bluetooth connectivity, and FM/RDS radio. Please read this manual thoroughly before installation and use to ensure proper functionality and safety.
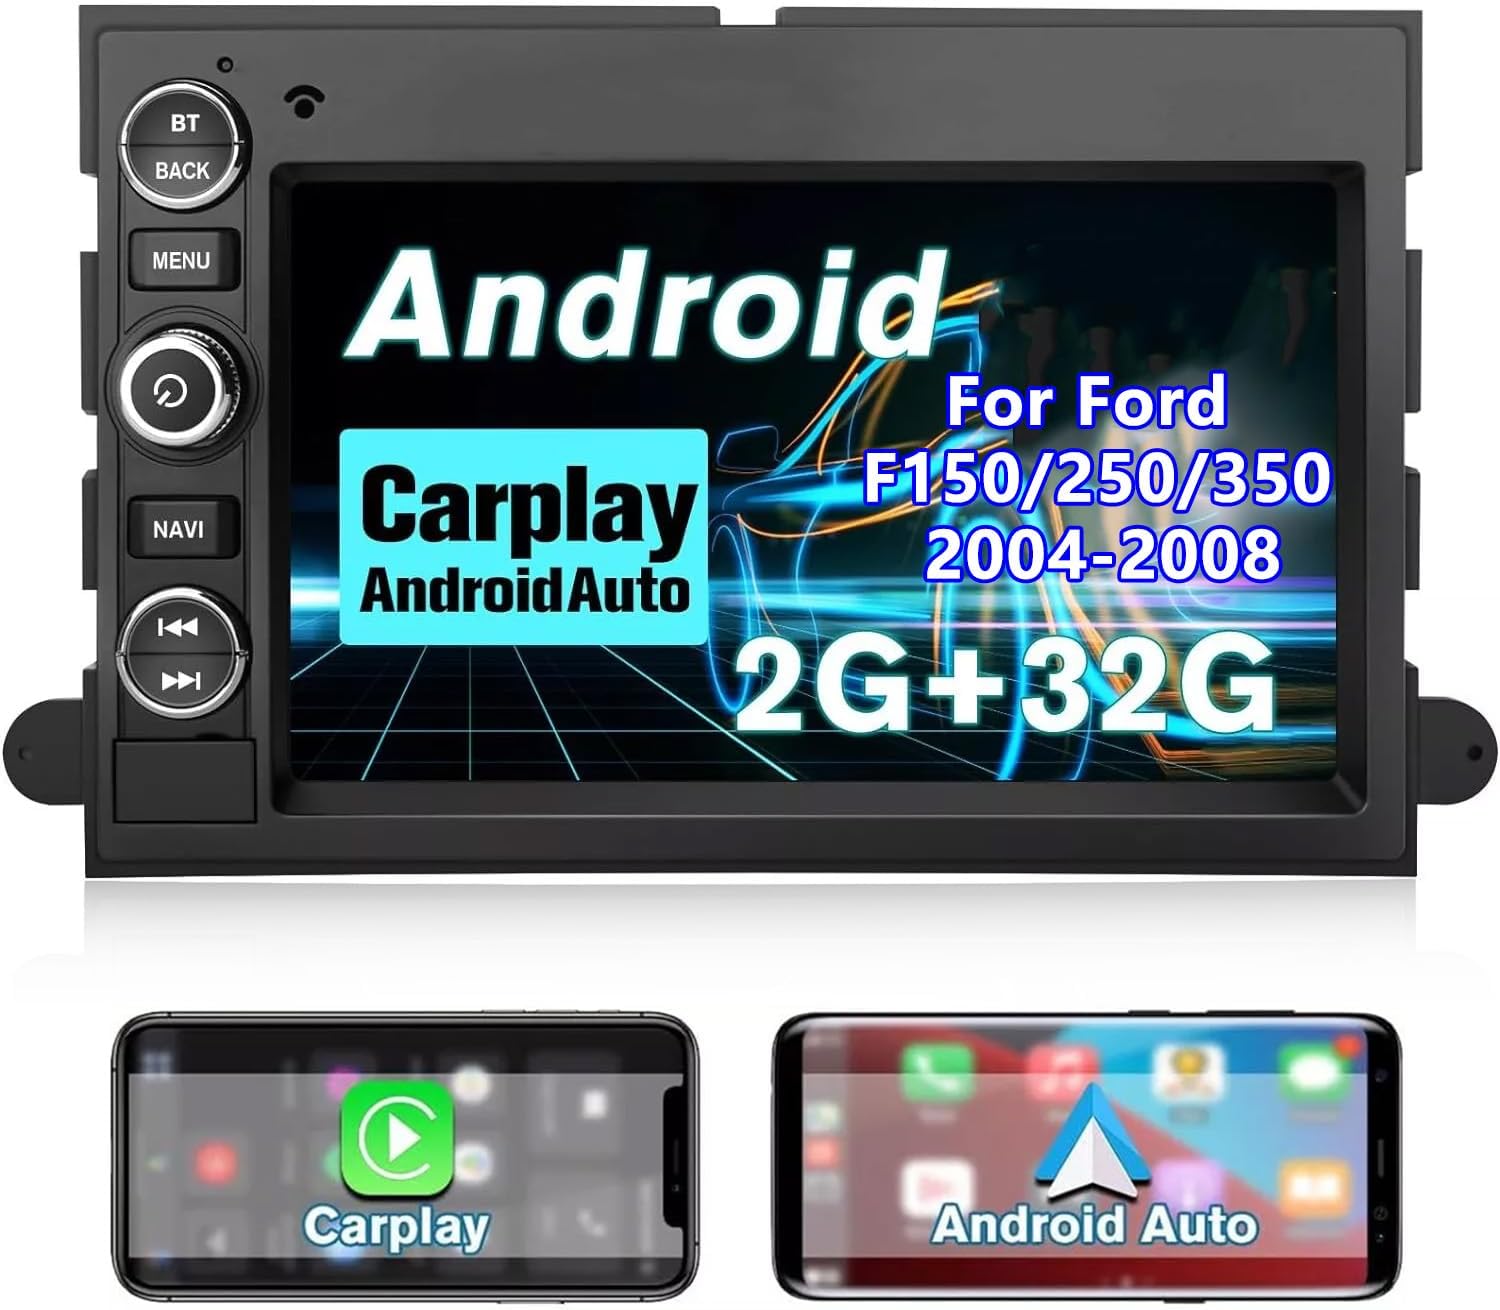
Image: The 7-inch IPS touchscreen car stereo unit, showcasing its Android interface and highlighting Wireless CarPlay and Android Auto capabilities. Below the main unit, two smartphone screens illustrate the CarPlay and Android Auto interfaces.
2. Package Contents
Verify that all items listed below are included in your package:
- 1 x 7-inch Screen Car Radio Unit
- 1 x Power Cord/Harness
- 1 x GPS Antenna
- 1 x Microphone
- 1 x RCA Cable
- 1 x USB Cable
- 1 x User Guide (this manual)
- Installation Tools (if included in your specific package)
3. Product Features
3.1 Android 12 System
Equipped with Android 12, 2GB RAM, and 32GB ROM, this system ensures smooth operation and quick response times. The ample storage allows for installation of various applications. With Wi-Fi connectivity, you can access the Application Store and enjoy online surfing directly from your car stereo.
3.2 Wireless CarPlay & Android Auto
Seamlessly integrate your smartphone with the car stereo using wireless CarPlay and Android Auto. This feature allows you to use voice commands (Siri or Google Assistant) for calls, music, messages, and navigation, promoting safer driving by minimizing distractions.
3.3 GPS Navigation
The unit supports both offline and online GPS navigation, providing voice and visual turn-by-turn directions. Pre-installed offline maps are available, and the system is compatible with popular navigation apps like Google Maps, Waze, and Navitel.

Image: The car stereo display showing a GPS navigation map with route details, alongside icons for Google Map, Waze, Sygic, and Navitel applications.
3.4 Bluetooth Connectivity
Connect your phone via Bluetooth for hands-free calling and audio streaming. The built-in microphone ensures clear call quality, allowing you to stay connected safely while driving.
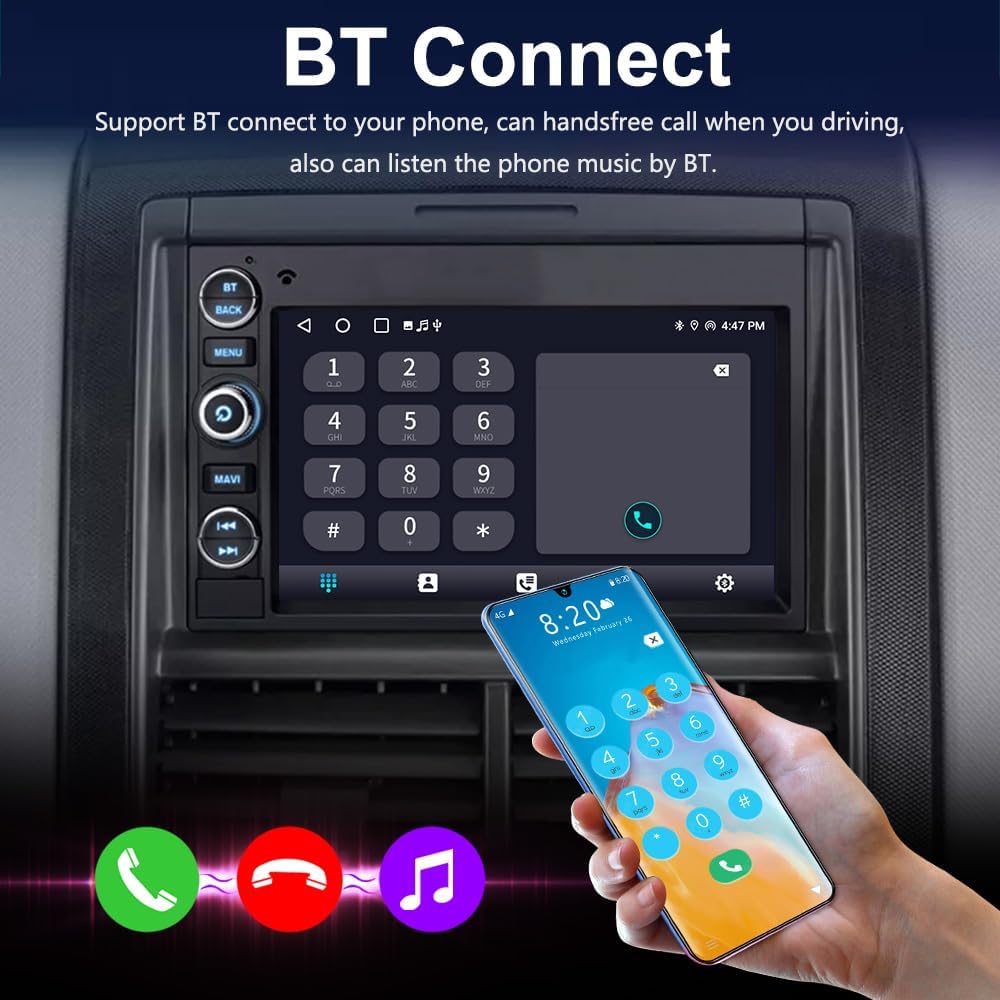
Image: The car stereo display showing the Bluetooth connection interface with a phone dial pad. A hand holds a smartphone, illustrating the connection process, with music and call icons at the bottom.
3.5 Multi EQ Settings & FM/RDS Radio
Customize your audio experience with preset multi EQ settings and adjustable volume, balance, treble, and bass controls. The built-in FM/RDS radio provides excellent reception, allowing you to enjoy your favorite stations.

Image: The car stereo display showing the Digital Sound Processor (DSP) system's equalizer settings with frequency adjustments and sound position adjustment interface.

Image: The car stereo display showing the FM Radio interface, displaying the current frequency (90.10 MHz) and preset station buttons.
4. Setup & Installation
This section provides general guidelines for installing the car stereo. Professional installation is recommended if you are unfamiliar with car audio wiring.
4.1 Compatibility
This unit is designed to fit Ford F150, F250, and F350 models manufactured between 2004 and 2008.

Image: A side-by-side comparison showing the vehicle's dashboard with the original radio ("Before installation") and the new Android 12 car stereo installed ("After installation") in a Ford F150 (2004-2008).
4.2 Wiring Connections
Refer to the diagram below for connecting the various cables to the back of the unit. Ensure all connections are secure before powering on the device.

Image: A detailed view of the car stereo's rear panel, indicating various connection ports with numbered labels: (1) Power Cable interface, (2) Fuse (10A), (3) RCA harness Cable, (4) USB Cable Adapter 1, (5) Reversing camera adapter cable input, (6) USB Cable Adapter 2, (7) Radio Antenna, (8) GPS Antenna.
- Disconnect Battery: Before starting, disconnect the negative terminal of your vehicle's battery to prevent electrical shorts.
- Remove Old Radio: Carefully remove the existing car radio from the dashboard.
- Connect Power Harness: Connect the provided power harness to the vehicle's wiring harness. Match wire colors and functions.
- Connect Antennas: Connect the GPS antenna (8) and Radio antenna (7) to their respective ports. Position the GPS antenna in a location with a clear view of the sky.
- Connect USB/RCA Cables: Connect the USB cable adapters (4, 6) and RCA harness cable (3) as needed for external devices or amplifiers.
- Connect Reverse Camera (Optional): If installing a reverse camera, connect its cable to the reversing camera adapter cable input (5).
- Mount New Radio: Securely mount the new car stereo into the dashboard opening.
- Test Functionality: Reconnect the vehicle battery and test all functions of the stereo (power, audio, radio, GPS, Bluetooth, CarPlay/Android Auto) before fully reassembling the dashboard.
- Reassemble Dashboard: Once all functions are verified, carefully reassemble the dashboard components.
5. Operating Instructions
This section details the operation of your car stereo's main features.
5.1 Front Panel Controls
Familiarize yourself with the physical buttons on the left side of the unit:

Image: The front view of the car stereo, highlighting the physical buttons on the left side with corresponding labels: (1) BT (Bluetooth), (2) BACK, (3) MENU, (4) Power, (5) NAVI (Navigation), (6) Previous Track, (7) Next Track.
- 1. BT (Bluetooth): Access Bluetooth functions for pairing and calls.
- 2. BACK: Go back to the previous screen or menu.
- 3. MENU: Access the main menu or settings.
- 4. Power: Turn the unit on/off or mute/unmute audio (short press).
- 5. NAVI (Navigation): Quickly launch the navigation application.
- 6. Previous Track: Skip to the previous audio track.
- 7. Next Track: Skip to the next audio track.
5.2 Android System Navigation
The touchscreen interface operates similarly to an Android tablet. Swipe to navigate between screens, tap icons to open applications, and use the 'Back' button or on-screen navigation bar for system control.
5.3 Wireless CarPlay & Android Auto
- Ensure Bluetooth and Wi-Fi are enabled on your smartphone.
- On the car stereo, open the CarPlay or Android Auto application.
- Follow the on-screen prompts to pair your phone via Bluetooth.
- Once paired, the system will automatically connect to CarPlay or Android Auto via Wi-Fi.
- Use voice commands (Siri/Google Assistant) or the touchscreen to control navigation, music, calls, and messages.
5.4 Bluetooth Operation
- Press the 'BT' button or tap the Bluetooth icon on the screen.
- Enable Bluetooth on your phone and search for available devices.
- Select "HC-8163-RK-F150" (or similar name) from your phone's list and confirm pairing.
- Once connected, you can make/receive calls, access your phonebook, and stream audio.
5.5 FM/RDS Radio
- Tap the "Radio" icon on the main screen.
- Use the on-screen arrows or seek function to tune to stations.
- Press and hold a preset button (P1-P6) to save the current station.
- RDS (Radio Data System) will display station information where available.
5.6 Audio Equalizer (EQ)
- Access the "DSP" or "EQ" application from the main menu.
- Choose from various preset EQ modes (e.g., Pop, Rock, Jazz).
- Adjust individual frequency bands, balance, and fader settings to customize your sound.
6. Maintenance
- Cleaning: Use a soft, dry cloth to clean the screen and unit. For stubborn smudges, a slightly damp cloth with a mild, non-abrasive cleaner can be used, then wipe dry immediately. Do not use harsh chemicals or abrasive materials.
- Software Updates: Periodically check for software updates via the system settings or the manufacturer's website to ensure optimal performance and access to new features.
- Fuse Replacement: If the unit loses power, check the 10A fuse located on the power cable (refer to Section 4.2, item 2). Replace with a fuse of the same rating if blown.
7. Troubleshooting
| Problem | Possible Cause | Solution |
|---|---|---|
| No Power | Blown fuse; incorrect wiring; loose power connection. | Check the 10A fuse. Verify all power connections are secure. Consult a professional if wiring is suspected. |
| No Sound | Volume too low; mute activated; speaker wiring issue; incorrect audio source. | Increase volume. Check if unit is muted. Verify speaker connections. Ensure correct audio source is selected. |
| GPS Not Working / Poor Signal | GPS antenna not connected or poorly positioned; software issue. | Ensure GPS antenna is securely connected and placed in a clear line of sight to the sky. Restart the unit. |
| Bluetooth Not Connecting | Bluetooth not enabled on phone/unit; incorrect pairing process; interference. | Ensure Bluetooth is on for both devices. Delete previous pairings and re-pair. Move phone closer to unit. |
| CarPlay/Android Auto Not Launching | Incorrect phone settings; app not installed/updated; connection issue. | Ensure Wi-Fi and Bluetooth are on. Check phone settings for CarPlay/Android Auto permissions. Restart phone and unit. |
8. Specifications
Key technical specifications for the HC-8163-RK-F150 Car Stereo:
- Model Name: HC-8163-RK-F150
- Brand: Generic
- Operating System: Android 12
- Memory: 2GB RAM + 32GB ROM
- Display Size: 7 Inches IPS Touchscreen
- Product Dimensions: 7.4 x 3.54 x 11.42 inches
- Item Weight: 3.97 pounds
- Connectivity Technology: Bluetooth, Wi-Fi, USB
- Special Features: Touchscreen, Bluetooth, Wireless CarPlay, Android Auto, GPS, FM/RDS Radio, Multi EQ Settings
- Audio Output Mode: Stereo
- Mounting Type: Dashboard Mount
- Voice Command: Via Touchscreen, Microphone
- Map Type: North America (pre-installed offline maps)

Image: A diagram illustrating the physical dimensions of the car stereo unit, showing measurements of 198mm (7.8 inches) width at the top, 188mm (7.4 inches) width at the bottom, 130mm (5.1 inches) height, and 120mm (4.7 inches) screen height, with a total width of 226mm (8.9 inches) including mounting brackets.
9. Warranty & Support
9.1 Warranty Information
This product comes with a 1-year warranty from the date of purchase. The warranty covers defects in materials and workmanship under normal use. It does not cover damage caused by improper installation, accident, misuse, abuse, neglect, or unauthorized modification.
9.2 Customer Support
For technical assistance, troubleshooting, or warranty claims, please contact the seller or manufacturer through the platform where the product was purchased. Please have your purchase details and product model number (HC-8163-RK-F150) ready when contacting support.