1. Introduction
This instruction manual provides essential information for the proper use, installation, and maintenance of your Generic 3 Ton Car Floor Jack Hydraulic Seal Repair Kit. This kit is designed to restore the hydraulic functionality of compatible 3-ton horizontal floor jacks by replacing worn or damaged seals. Please read this manual thoroughly before attempting any repairs to ensure safety and optimal performance.
2. Product Overview and Features
The Generic 3 Ton Car Floor Jack Hydraulic Seal Repair Kit is a comprehensive solution for maintaining and extending the life of your floor jack. It includes a variety of seals and O-rings necessary for a complete hydraulic unit overhaul.
- Complete Hydraulic Seal Kit: Tailored for 16T-20T floor jacks, offering all necessary seals for a thorough hydraulic unit repair.
- All-Inclusive Package: Features 15 pieces, including everything needed for hydraulic unit maintenance.
- Comprehensive Restoration: Provides all components for a complete restoration, ensuring peace of mind and a swift return to optimal floor jack performance.
- Durable Materials: Made from robust rubber, ensuring longevity and strength for repeated use.
- Efficient Repair Solution: Designed to restore your floor jack quickly and effectively, guaranteeing enhanced functionality and reliability.

Figure 2.1: The complete 15-piece Generic 3 Ton Car Floor Jack Hydraulic Seal Repair Kit components laid out.
3. Package Contents
The repair kit includes 15 pieces of various hydraulic seals and O-rings. These components are designed to replace the critical sealing elements within your floor jack's hydraulic system.

Figure 3.1: A visual representation of the 15-piece hydraulic seal repair kit components, highlighting the quantity and variety of seals included.

Figure 3.2: Detailed image of various O-rings and seals from the repair kit, with some dimensions indicated, showing different sizes and types.
4. Safety Information
WARNING: Always prioritize safety when working with hydraulic equipment. Failure to follow these instructions may result in serious injury or property damage.
- Ensure the floor jack is completely depressurized and free of load before beginning any repair.
- Wear appropriate personal protective equipment (PPE), including safety glasses and gloves.
- Work in a well-lit and stable environment.
- Keep all components clean and free from dirt or debris during the repair process.
- Dispose of old hydraulic fluid and seals responsibly according to local regulations.
- Never use a damaged or improperly repaired jack.

Figure 4.1: Contextual image of a red floor jack positioned under a car, illustrating typical use. Always ensure the vehicle is properly supported by jack stands before working underneath.
5. Setup and Installation
This section outlines the general steps for replacing the hydraulic seals in a 3-ton floor jack. Specific disassembly and reassembly procedures may vary slightly depending on your jack's model. Refer to your jack's original manual for detailed instructions on disassembling its hydraulic unit.
5.1 Required Tools
- Basic hand tools (wrenches, screwdrivers)
- Clean rags or shop towels
- New hydraulic fluid (compatible with your jack)
- Seal pick or small flat-head screwdriver (for removing old seals)
- Gloves and safety glasses
5.2 Seal Replacement Procedure
- Prepare the Jack: Ensure the jack is on a flat, stable surface. Lower the jack completely and remove any load.
- Drain Hydraulic Fluid: Locate the fill plug or bleed screw on the hydraulic unit. Carefully open it to drain the old hydraulic fluid into a suitable container.
- Disassemble Hydraulic Unit: Following your jack's specific instructions, carefully disassemble the hydraulic cylinder, pump assembly, and any other components containing seals. Keep track of all parts and their orientation.
- Remove Old Seals: Using a seal pick or small screwdriver, carefully remove all old O-rings and seals from their grooves. Inspect the grooves for any damage or debris.
- Clean Components: Thoroughly clean all hydraulic components with a clean rag. Ensure no dirt, metal shavings, or old fluid residue remains.
- Install New Seals: Match the new seals from the repair kit to the old ones. Lightly lubricate the new seals with clean hydraulic fluid before installation. Carefully seat each new seal into its respective groove, ensuring it is not twisted or pinched.
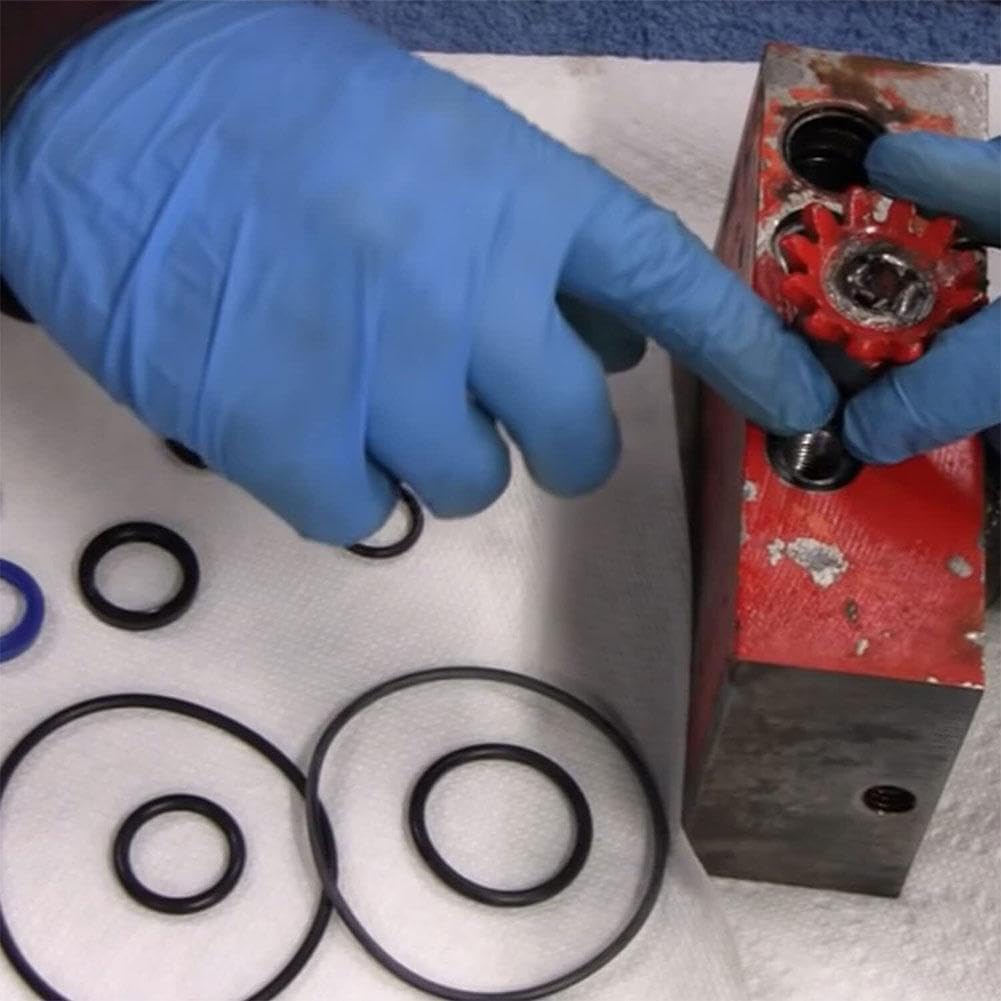
Figure 5.1: Close-up image of hands wearing blue gloves, performing maintenance or repair on a floor jack's hydraulic unit, with various seals visible.
- Reassemble Hydraulic Unit: Reassemble the hydraulic unit in reverse order of disassembly. Ensure all connections are secure and tightened to the manufacturer's specifications.
- Refill Hydraulic Fluid: Fill the hydraulic reservoir with new, clean hydraulic fluid up to the recommended level. Do not overfill.
- Bleed Air: Follow your jack's instructions to bleed any air from the hydraulic system. This typically involves opening the release valve and pumping the handle several times without a load.
- Test the Jack: Slowly raise and lower the jack a few times to ensure proper operation before applying any load. Check for any leaks.
5.3 Installation Video Guide
Video 5.1: This video demonstrates the replacement process for O-ring seals in a floor jack, providing visual guidance for installation. (Source: Willga)
Video 5.2: A short video showcasing various auto jack accessories, including seals, which may be similar to the components in this kit. (Source: Ziyiiu)
6. Maintenance
Regular maintenance is crucial for the longevity and safe operation of your floor jack.
- Fluid Checks: Periodically check the hydraulic fluid level and top up if necessary with compatible hydraulic jack oil.
- Cleanliness: Keep the jack clean and free from dirt, grease, and corrosive materials.
- Storage: Store the jack in a dry, clean environment with the ram fully retracted.
- Inspect Seals: Regularly inspect seals for any signs of wear, cracking, or leakage. Replace them promptly using this repair kit if damage is observed.
7. Troubleshooting
If your floor jack is not performing correctly after seal replacement, consider the following common issues:
| Problem | Possible Cause | Solution |
|---|---|---|
| Jack does not lift or lifts slowly | Low hydraulic fluid level, air in the system, or damaged seals. | Check fluid level and refill. Bleed air from the system. Re-inspect and replace seals if necessary. |
| Jack leaks hydraulic fluid | Improperly installed seals, damaged seals, or loose fittings. | Ensure seals are correctly seated. Replace any damaged seals. Tighten all fittings. |
| Jack drifts down under load | Internal seal leakage or faulty release valve. | Re-inspect and replace internal seals. Check the release valve for proper function. |
8. Specifications
- Brand: Generic
- Model Number: Generic-8d96f7
- Material: Rubber
- Load Capacity: 3 tons (for compatible jacks)
- Quantity: 15 pieces
- Color: Black (seals)
- Vehicle Service Type: Car
9. Warranty and Support
For warranty information or technical support regarding this Generic 3 Ton Car Floor Jack Hydraulic Seal Repair Kit, please refer to the seller's contact information on your purchase receipt or the product listing page. Keep your proof of purchase for any warranty claims.


