
GarveeLife Power Cage
GarveeLife Power Cage with SmithBar Instruction Manual
Model: Power Cage
1. Introduction
This manual provides essential information for the safe and effective use of your GarveeLife Power Cage with SmithBar. This multi-functional strength training system is designed to offer a comprehensive workout experience, integrating various gym equipment into a single, space-efficient unit. Please read this manual thoroughly before assembly and operation to ensure proper setup and to maximize your training potential.
2. Safety Information
Your safety is paramount. Adhere to the following guidelines:
- Consult a physician before beginning any exercise program.
- Ensure all bolts, nuts, and connections are securely tightened before each use.
- Do not exceed the maximum weight capacities: 2000 lbs for the overall machine, 550 lbs for the pull-up bar, 500 lbs for J-hooks, and 400 lbs for dip bars.
- Always use safety spotter arms when performing exercises like squats and bench presses, especially when lifting heavy weights.
- Keep children and pets away from the equipment during use.
- Perform exercises with controlled movements; avoid sudden jerks or drops.
- Inspect the equipment regularly for wear and tear, especially cables, pulleys, and structural components. Replace worn parts immediately.
- Ensure adequate space around the power cage for safe operation and movement.
3. Package Contents
The GarveeLife Power Cage is shipped in multiple packages. Please verify all components are present before beginning assembly. The complete package includes:

Figure 3.1: All included attachments and main power cage components.
- Power Cage Frame (main uprights, crossbars, base)
- Smith Bar
- 2 Nylon Safety Straps
- 2 J-hooks
- 2 Dip bars
- 4 Resistance Band Pegs
- Lat Pull Down Bar
- Cable Bar
- 360 Degree Detachable Landmine Attachment
- Ankle Strap
- Tricep Rope
- 2 Cable Handles
- Chain
- 4 Weight Holder Clips
- Footboard
- Assembly Hardware (bolts, washers, nuts)
- Detailed Instruction Manual (separate booklet)
Note: The power cage ships in 3 separate packages. They may arrive on different dates, typically within a 3-day interval.
4. Assembly Instructions
Detailed assembly instructions are provided in a separate manual included with your purchase. It is highly recommended that two people assemble the power cage to ensure safety and efficiency. Please follow the step-by-step guide carefully.

Figure 4.1: Key components of the GarveeLife Power Cage.
Before starting, lay out all parts and compare them with the parts list in the dedicated assembly manual. Ensure you have all necessary tools. Do not fully tighten bolts until instructed to do so, as this allows for easier alignment of components.
5. Setup and Placement
Choose a flat, stable surface for the power cage. Ensure there is sufficient clearance around the unit for safe operation of all attachments and exercises. The compact design requires a modest 18.6 sq. ft. footprint, but additional space is needed for movement and accessory use.
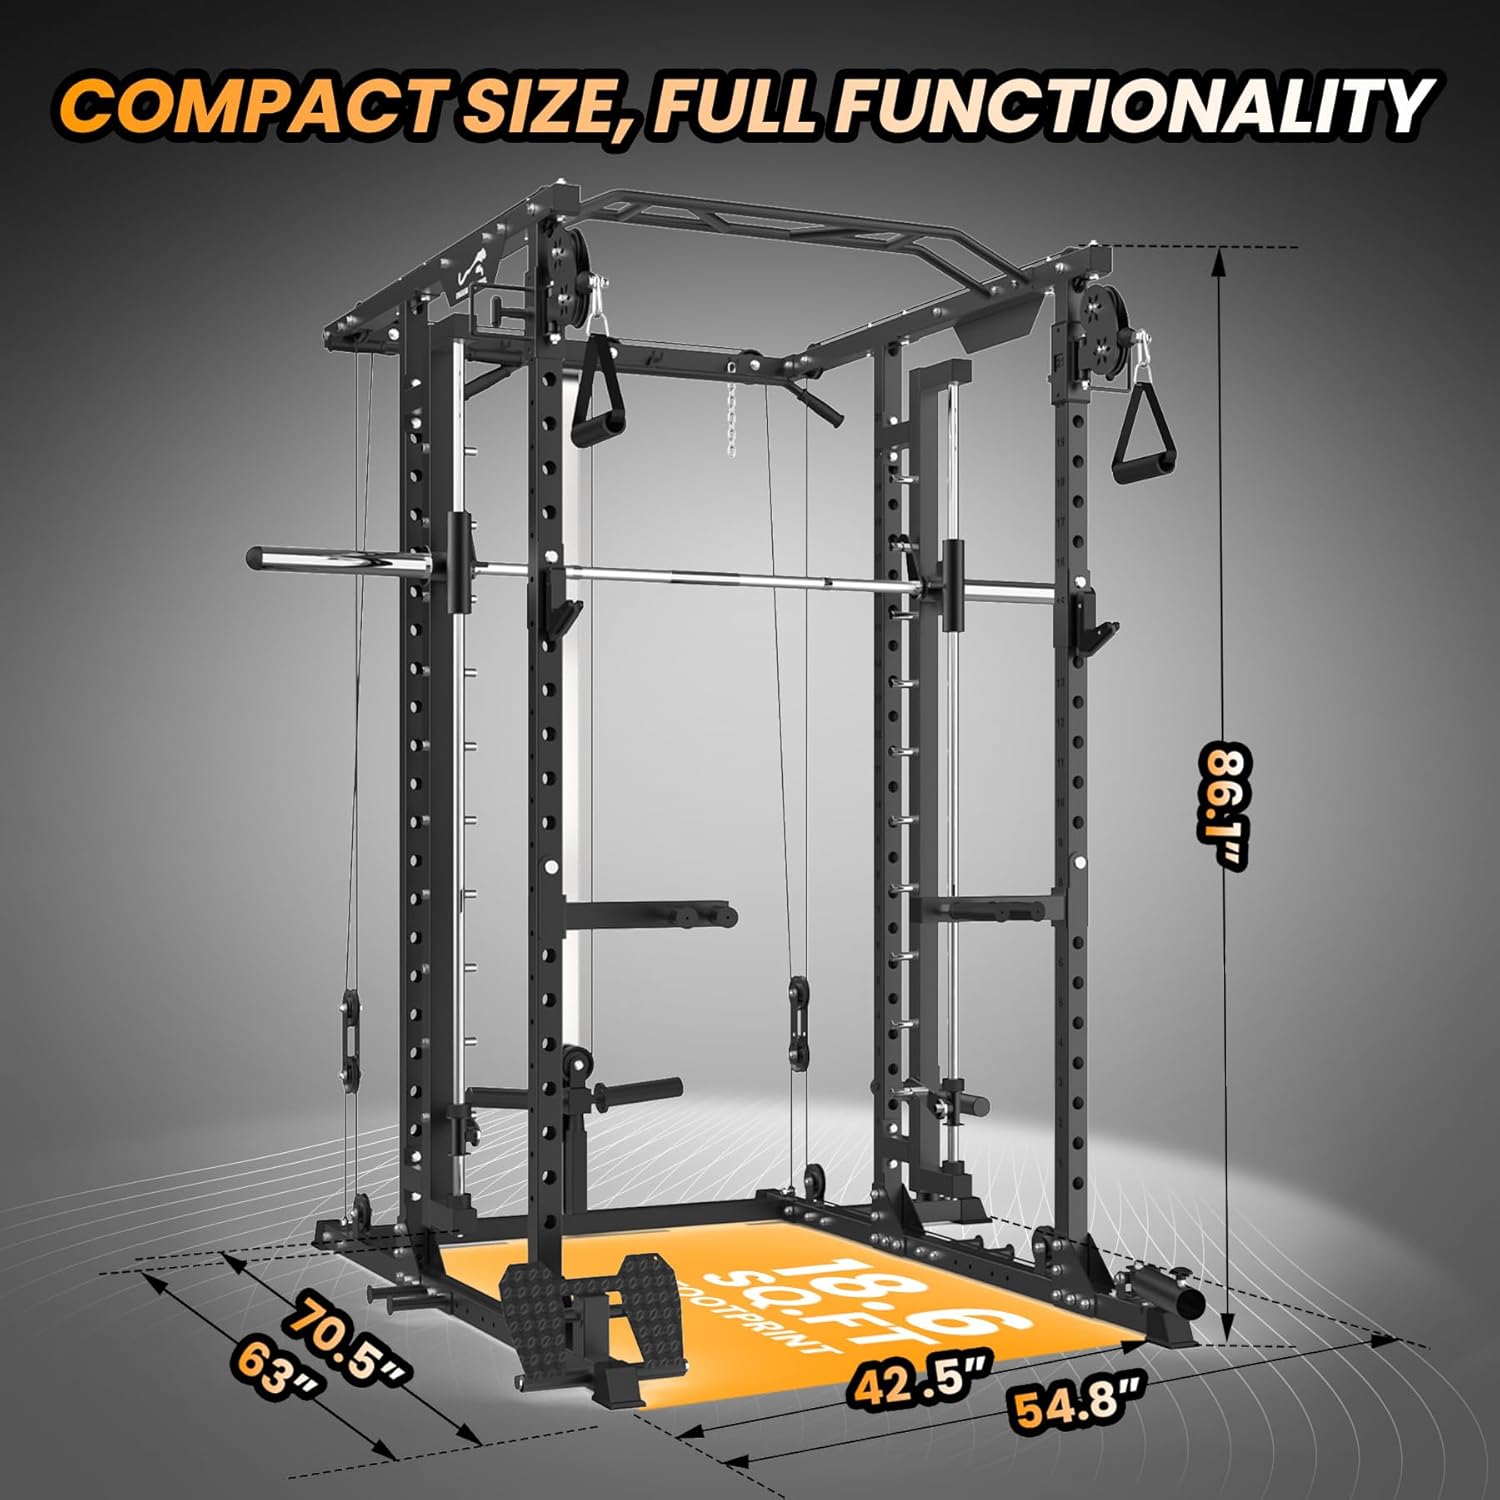
Figure 5.1: Dimensions and footprint of the Power Cage.
- Dimensions (L x W x H): Approximately 71" x 55" x 86"
- Footprint: 18.6 sq. ft.
- Walk-in Area: 63" (for squats and bench presses)
- Assembled Weight: 304 lbs
6. Operating Instructions
The GarveeLife Power Cage offers a wide range of exercises. Below are instructions for using some of its primary functions. Always ensure proper form and use appropriate weight.
6.1 Smith Machine Operation
The integrated Smith Bar provides a guided barbell path for exercises like squats and bench presses, enhancing safety and stability.

Figure 6.1: Examples of Smith Machine exercises (Squat, Bench Press).
- To unlock the Smith Bar, rotate the bar to disengage the safety hooks from the uprights.
- To re-rack, lift the bar slightly and rotate it back to engage the safety hooks.
- Adjust the safety spotter arms to the appropriate height for your exercise to prevent injury in case of failure.
6.2 Cable Cross-Over System
The dual cable system allows for a variety of exercises targeting different muscle groups, such as cable crossovers, shoulder presses, and triceps extensions.

Figure 6.2: Examples of Cable System exercises.
- Attach desired cable handles or accessories to the carabiners on the cable ends.
- Adjust the pulley height by pulling the pop-pin and sliding the pulley assembly to the desired numbered position on the uprights. Ensure the pin fully re-engages.
- Load weight plates onto the weight plate holders connected to the cable system.
6.3 LAT Pull Down and Low Row Station
Utilize the high pulley for lat pulldowns and the low pulley with the footboard for seated rows.
- For Lat Pulldowns: Attach the Lat Pull Down Bar to the top cable. Sit on a bench (not included) facing the machine and perform the exercise.
- For Low Rows: Attach the cable bar or desired handle to the bottom cable. Place your feet on the footboard and perform seated rows.
6.4 Dip Station and Chin-Up Bar
- Dip Bars: Insert the dip bars into the desired height holes on the uprights. Ensure they are securely locked in place before use.
- Chin-Up Bar: The multi-grip pull-up bar is located at the top of the cage. Use various grips (wide, narrow, neutral) for different muscle activation.
6.5 Landmine Station
The 360-degree detachable landmine attachment allows for rotational exercises, rows, and presses.
- Insert one end of a barbell (not included) into the landmine sleeve.
- Perform exercises such as landmine rows, presses, or rotational movements.
6.6 Instructional Video
For a visual guide on various exercises and features of the GarveeLife Power Cage, please watch the official product video below:
Video 6.1: Overview of the GarveeLife Power Cage with SmithBar, demonstrating various exercises including squats, bench press, cable crossovers, triceps arm training, cable hammer curls, seated rowing, lat pulldowns, and reverse cable fly. This video highlights the versatility and functionality of the equipment for a full-body workout.
7. Maintenance
Regular maintenance ensures the longevity and safe operation of your power cage.
- Cleaning: Wipe down the frame and components with a damp cloth after each use to remove sweat and dust. Avoid abrasive cleaners.
- Inspection: Periodically check all nuts, bolts, and connections for tightness. Re-tighten as necessary.
- Cables and Pulleys: Inspect cables for fraying or wear. Ensure pulleys move smoothly and are free of debris. Lubricate moving parts if needed (consult a professional if unsure).
- Storage: Store the power cage in a dry environment to prevent rust.
8. Troubleshooting
If you encounter issues with your GarveeLife Power Cage, refer to the table below for common problems and solutions.
| Problem | Possible Cause | Solution |
|---|---|---|
| Equipment feels unstable or wobbly. | Loose bolts or uneven surface. | Ensure all assembly bolts are securely tightened. Move the unit to a flat, level surface. |
| Smith Bar or cable system not moving smoothly. | Debris in tracks/pulleys, lack of lubrication, or misaligned components. | Clean tracks and pulleys. Apply a silicone-based lubricant to guide rods and cables. Check for proper alignment during assembly. |
| Missing parts during unboxing. | Packages may arrive separately. | Wait up to 3 days for all packages to arrive. If still missing, contact customer support with your order details. |
9. Specifications
Key technical specifications for the GarveeLife Power Cage:
| Feature | Detail |
|---|---|
| Brand | GarveeLife |
| Model Name | Power Cage |
| Material | Alloy Steel |
| Color | Black |
| Product Dimensions (L x W x H) | 71" x 55" x 86" (approximate) |
| Assembled Weight | 304 lbs |
| Overall Weight Capacity | Up to 2000 lbs |
| Pull-Up Bar Weight Capacity | Up to 550 lbs |
| J-Hook Weight Capacity | Up to 500 lbs |
| Dip Bar Weight Capacity | Up to 400 lbs |
| Upright Size | 2" x 2" |
| Included Components | Smith Bar, J-hooks, Dip bars, Cable handles, Lat pulldown bar, Landmine, etc. (24 attachments total) |

Figure 9.1: Weight capacities and structural details.
10. Warranty and Customer Support
Your GarveeLife Power Cage comes with a 1-Year Warranty from the date of purchase, covering manufacturing defects. Please retain your proof of purchase for warranty claims.
For any questions, concerns, or assistance with assembly, operation, or warranty claims, please contact GarveeLife customer service through the platform where you made your purchase. We are committed to providing prompt and helpful support.

Figure 10.1: Important shipping information and customer support reminder.
Ask a question about this manual
Ask about setup, troubleshooting, compatibility, parts, safety, or missing instructions. Manuals+ will review the question and use this page’s manual context to help answer it.