
1. Introduction
This manual provides essential instructions for the assembly, setup, operation, and maintenance of your FAIR RC Arrows 50mm Viper EDF RC Airplane. This model is designed for both adult and beginner pilots, featuring a Vector Flight Stabilization System for enhanced control. Please read this manual thoroughly before operating the aircraft to ensure safe and correct usage.
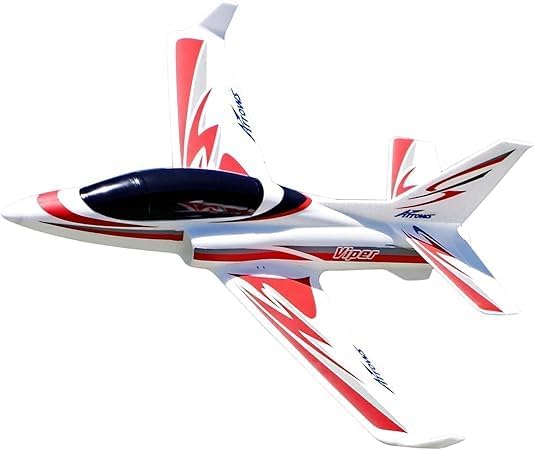
Image 1.1: The FAIR RC Arrows 50mm Viper EDF RC Airplane.
2. Safety Information
Operating remote-controlled aircraft requires caution. Failure to follow safety guidelines can result in injury or property damage. Always operate in open areas away from people, buildings, and obstacles. Keep hands and loose clothing away from the propeller and moving parts. Ensure all components are securely attached before flight.
- Always perform pre-flight checks.
- Never fly near airports or restricted airspace.
- Maintain a safe distance from spectators.
- Do not operate in adverse weather conditions (high winds, rain).
- Disconnect the battery when not in use or during maintenance.
3. Package Contents
The FAIR RC Arrows 50mm Viper EDF RC Airplane is a Plug-N-Play (PNP) model. This means it includes the airframe, motor, Electronic Speed Controller (ESC), and servos. The following items are not included and must be purchased separately:
- 6-Channel Remote Control Transmitter
- 6-Channel Receiver
- LiPo Battery (recommended 3S or 4S, 1300mAh to 1800mAh)
- Compatible LiPo Battery Charger

Image 3.1: Main components of the Arrows 50mm Viper EDF RC Airplane.
4. Assembly Instructions
The Arrows 50mm Viper features a simple, lightweight design for straightforward assembly.
- Wing Attachment: Carefully slide the main wing into the fuselage slot. Ensure it is fully seated and secured according to the provided hardware (if any). The design incorporates a rigid single-piece wing structure.
- Stabilizer Installation: Attach the horizontal and vertical stabilizers to the rear of the fuselage. Verify they are aligned correctly and firmly attached.
- Control Surface Connections: Connect the pushrods from the servos to the respective control horns on the ailerons and elevator. Ensure free movement and correct orientation.

Image 4.1: Detail of the swept-back wing design.
5. Setup
Proper setup of your radio system and battery is crucial for flight performance.
5.1. Receiver and Radio Setup
- Install Receiver: Place your 6-channel receiver into the designated compartment within the fuselage. Ensure it is secured to prevent movement during flight.
- Connect Servos: Connect the aileron and elevator servos to the appropriate channels on your receiver.
- Vector Flight Stabilization System: The integrated Vector Flight Stabilization System should be connected to an auxiliary 3-way switch on your transmitter. This allows you to select different stabilization modes (e.g., off, partial assist, full assist) during flight. Refer to your transmitter's manual for switch assignment.
- Binding: Bind your receiver to your transmitter according to your radio system's instructions.
- Control Surface Check: With the transmitter and receiver powered on, verify that all control surfaces (ailerons, elevator) move in the correct direction relative to your stick inputs. Adjust servo reverse settings on your transmitter if necessary.
5.2. Battery Installation
The aircraft features an oversized battery compartment designed to accommodate a variety of battery sizes.
- Charge Battery: Fully charge your LiPo battery using a compatible LiPo charger.
- Install Battery: Carefully insert the charged battery into the battery compartment. Secure it with the provided hook-and-loop straps or other retention methods to prevent shifting during flight.
- Connect Battery: Connect the battery to the ESC. Ensure the connection is firm.

Image 5.1: The spacious battery compartment allows for various battery sizes.

Image 5.2: Large air intake for efficient component cooling.
6. Operating Instructions
6.1. Pre-Flight Checks
Before each flight, perform the following:
- Ensure battery is fully charged and securely installed.
- Verify all control surfaces move freely and correctly.
- Check for any damage to the airframe, wings, or tail.
- Confirm transmitter and receiver are bound and functioning.
- Check weather conditions, avoiding high winds.
6.2. Launching
The Arrows 50mm Viper is designed for hand launching. Utilize the ergonomic grab handles for a secure grip.
- Hold the aircraft firmly by the designated grab handles.
- Advance the throttle to approximately 70-80%.
- Launch the aircraft with a firm, level throw directly into the wind.
- Immediately apply gentle elevator input to gain altitude.

Image 6.1: Ergonomic grab handles for hassle-free hand launches.
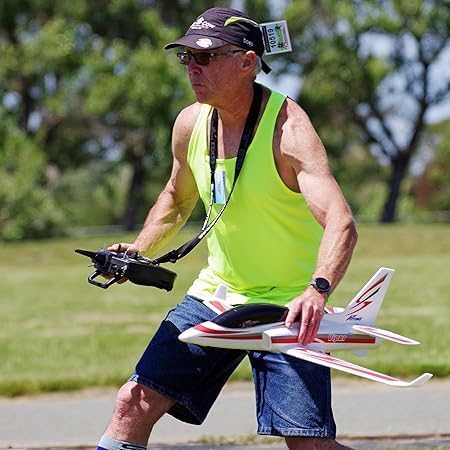
Image 6.2: A pilot demonstrating the hand launch technique.
6.3. Flight
The Vector Flight Stabilization System assists in maintaining stable flight, especially for beginners or in windy conditions. Experiment with the stabilization modes using your assigned transmitter switch.
- Start with gentle maneuvers to familiarize yourself with the aircraft's response.
- The 50mm EDF system provides ample power for various aerobatic maneuvers.
- Monitor battery voltage during flight to avoid over-discharging.
6.4. Landing
The Arrows 50mm Viper is designed for belly landings on grass or soft surfaces. The aircraft fuselage is strategically protected for this purpose.
- Reduce throttle and begin a gradual descent.
- Maintain sufficient airspeed to keep control.
- Flare gently just above the landing surface, reducing throttle completely as it touches down.

Image 6.3: Fuselage protection for belly landings.
7. Maintenance
Regular maintenance ensures the longevity and performance of your RC airplane.
- Cleaning: After each flight, wipe down the airframe to remove dirt, grass, or debris.
- Inspection: Regularly inspect all control surfaces, linkages, and hinges for wear or damage.
- Motor/ESC: Check the motor and ESC for any signs of overheating or damage. Ensure the air intake remains clear for proper cooling.
- Battery Care: Store LiPo batteries at a storage charge (approximately 3.8V per cell) when not in use. Do not overcharge or over-discharge.
- Propeller/Fan: Inspect the EDF unit for any foreign objects or damage to the fan blades.
8. Troubleshooting
This section addresses common issues you might encounter.
| Problem | Possible Cause | Solution |
|---|---|---|
| Aircraft does not respond to controls. | Unbound receiver, dead battery (aircraft or transmitter), loose connections. | Re-bind receiver, charge batteries, check all wiring connections. |
| Motor not spinning. | Battery not connected, ESC not armed, motor/ESC damage. | Connect battery, ensure throttle is at zero before connecting battery to arm ESC, inspect motor/ESC for damage. |
| Aircraft flies erratically. | Incorrect control surface trim, stabilization system settings, damaged control surface. | Adjust trims on transmitter, check stabilization mode, inspect control surfaces for damage. |
| Short flight times. | Undercharged battery, old/damaged battery, aggressive flying. | Ensure full battery charge, replace old batteries, fly more efficiently. |
9. Specifications
| Feature | Detail |
|---|---|
| Model Number | AH012P-VEC |
| Brand | FAIR RC (Manufacturer: Arrows) |
| EDF Unit | 50mm |
| Motor | 2627-KV4500 |
| ESC | 30A |
| Flight Stabilization | Vector Flight Stabilization System |
| Channels Required | 6-Channel |
| Battery (Recommended) | 3S or 4S LiPo, 1300mAh - 1800mAh |
| Item Weight | 4.29 pounds |
| Package Dimensions | 31.26 x 11.81 x 7.32 inches |
10. Warranty and Support
For warranty information and technical support, please refer to the documentation provided with your purchase or contact FAIR RC customer service directly. Keep your proof of purchase for any warranty claims.