1. Introduction
This manual provides essential instructions for the safe and efficient use of your EVMaster Level 2 EV Charger. Please read this manual thoroughly before installation and operation to ensure proper functionality and to prevent damage or injury. Keep this manual for future reference.

Figure 1: EVMaster Level 2 EV Charger (18FT Wallbox)
2. Safety Information
Adherence to the following safety guidelines is crucial for safe operation and to prevent electrical hazards.
- Professional Installation: The charger must be hardwired by a qualified and licensed electrician in accordance with all local and national electrical codes.
- Grounding: Ensure the charger is properly grounded to prevent electric shock.
- Environmental Conditions: This wall-mounted station is designed for indoor/outdoor use. Ensure the installation location is protected from direct water spray and extreme weather conditions beyond its operating temperature range.
- Protection Features: The intelligent chip provides comprehensive protection against lightning, leakage, faulty grounding, over/under voltage, overcurrent, and overheating. Do not attempt to bypass or modify these safety features.
- Cable Management: Avoid kinking, crushing, or driving over the charging cable. Ensure the cable is stored properly when not in use to prevent damage.
- Emergency Stop: Familiarize yourself with the location and operation of the emergency stop button on the control unit.

Figure 2: Built-in Protection Mechanisms
3. Product Overview
The EVMaster Level 2 EV Charger consists of the following main components:
- Control Unit: The main housing containing the charging electronics and indicator lights.
- EV Cable: The 18-foot cable connecting the control unit to the vehicle connector.
- Vehicle Connector (SAE J1772): The plug that connects to your electric vehicle's charging port.
- Charging Dock: A wall-mounted holder for the vehicle connector when not in use.
- Power Cord: The cable connecting the control unit to the electrical supply.
- Power Plug: The connector for the electrical supply (hardwired installation).
- Indicator Light: Displays the current charging status.
- Stop Button: Used to manually stop the charging process.
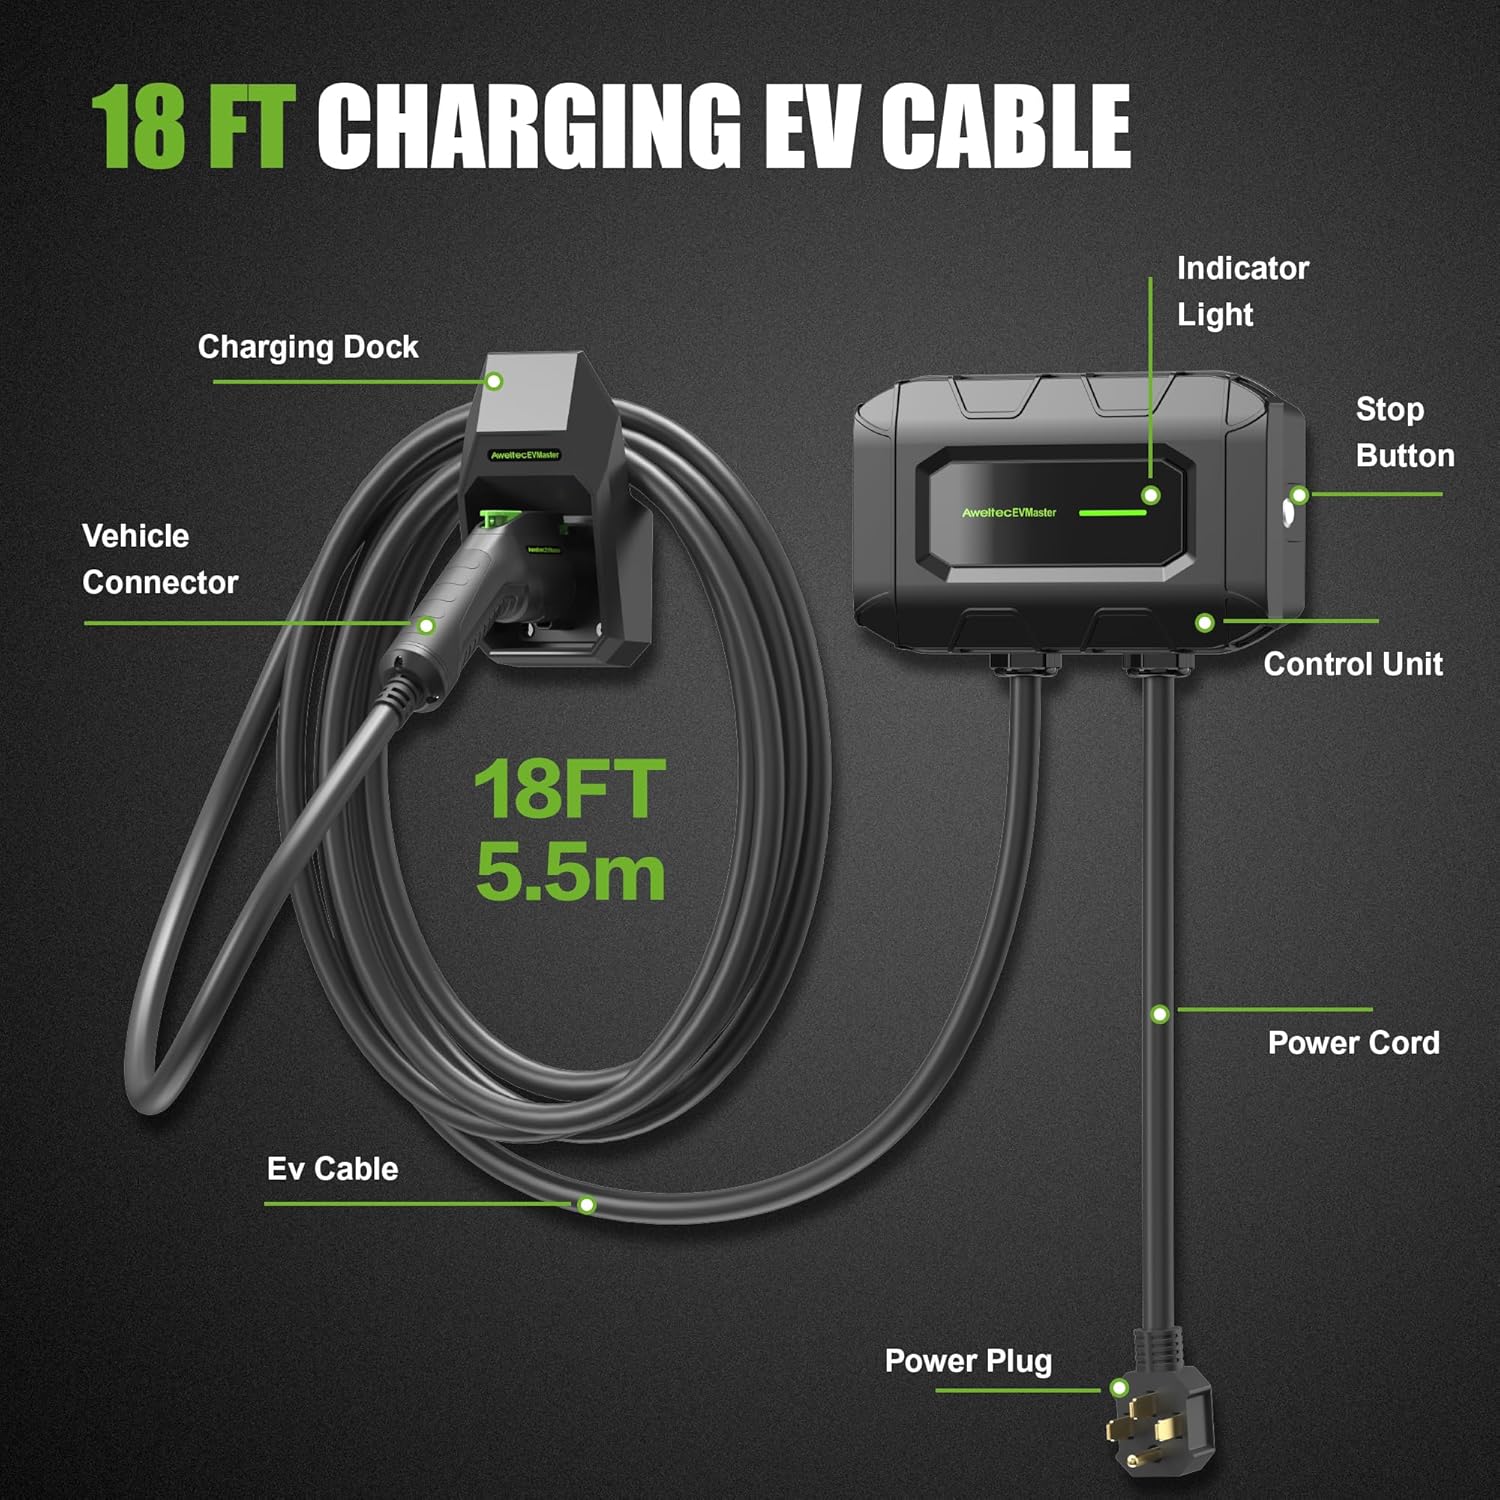
Figure 3: Charger Components
4. Setup and Installation
The EVMaster Level 2 EV Charger is designed for permanent wall-mounted installation and requires hardwiring.
- Site Selection: Choose a suitable location for installation, such as a garage or driveway, ensuring it is within reach of your vehicle's charging port and protected from severe weather.
- Electrical Requirements: The charger operates on 240V AC. Ensure your electrical panel can support a dedicated circuit for the charger with appropriate amperage (32 Amp). Consult a qualified electrician to verify your electrical system's capacity.
- Professional Hardwiring: It is mandatory to have the unit hardwired by a licensed electrician. This ensures a secure and compliant connection to your home's electrical system.
- Mounting: Securely mount the control unit and the charging dock to a sturdy wall surface using appropriate hardware (not included, typically provided by the electrician).

Figure 4: Wall-mounted Installation and Charging
5. Operating Instructions
The EVMaster Level 2 EV Charger offers a straightforward plug-and-charge experience.
- Connect to Vehicle: Remove the vehicle connector from its charging dock. Open your electric vehicle's charging port cover. Insert the SAE J1772 connector firmly into the vehicle's charging port until it clicks into place.
- Initiate Charging: Once connected, the charger will automatically begin the charging process. No apps, Wi-Fi, or complex setups are required.
- Monitor Status: Observe the indicator light on the control unit to monitor the charging status.
- Stop Charging: To stop charging, press the stop button on the control unit, or simply disconnect the vehicle connector from your car.
- Store Connector: After charging, return the vehicle connector to its charging dock to protect it from damage and keep the area tidy.
5.1 Indicator Light Status
The LED indicator light provides visual feedback on the charger's operational status:
- Green (Solid): Waiting for connection.
- Green (Pulsing): Charging in progress.
- Green (Solid, after pulsing): Fully charged.
- Red (Solid): Error detected. Refer to the Troubleshooting section.

Figure 5: LED Indicator Light Status
5.2 Charging Performance
This Level 2 charger delivers high-power current, significantly reducing charging times compared to standard Level 1 chargers. A full charge typically takes 8-10 hours, depending on your vehicle's battery capacity and current charge level.

Figure 6: Typical Charging Duration
5.3 Universal Compatibility
The EVMaster Level 2 EV Charger is compatible with most electric vehicles and plug-in hybrid vehicles that comply with the SAE J1772 standard. For Tesla vehicles, an appropriate adapter is required (sold separately).

Figure 7: Vehicle Compatibility
6. Maintenance
Regular maintenance helps ensure the longevity and optimal performance of your EVMaster EV Charger.
- Cleaning: Periodically wipe the control unit and cable with a soft, damp cloth. Do not use harsh chemicals or abrasive cleaners. Ensure the unit is unplugged (if applicable) or the circuit breaker is off before cleaning.
- Cable Inspection: Regularly inspect the charging cable and vehicle connector for any signs of wear, cuts, fraying, or damage. If any damage is observed, discontinue use immediately and contact support.
- Connector Care: Keep the vehicle connector clean and free of debris. Ensure the protective cap is used when the connector is not in use.
- Storage: When not in use, ensure the charging cable is neatly coiled and the vehicle connector is securely placed in its dock.
7. Troubleshooting
If you encounter issues with your EVMaster EV Charger, refer to the following common troubleshooting steps:
| Problem | Possible Cause | Solution |
|---|---|---|
| Charger not turning on / No indicator light | No power supply; Circuit breaker tripped. | Check the main power supply. Reset the circuit breaker if it has tripped. Ensure the charger is properly hardwired. |
| Indicator light is Red (Error) | Internal fault; Overcurrent/Overvoltage; Ground fault; Leakage. | Disconnect the charger from the vehicle and power supply. Wait a few minutes, then reconnect. If the error persists, contact customer support. Do not attempt to repair. |
| Charging not starting | Vehicle connector not fully inserted; Vehicle charging port issue; Charger fault. | Ensure the vehicle connector is securely and fully inserted into the vehicle's charging port. Check your vehicle's dashboard for any charging errors. Try restarting the charging process. |
| Slow charging speed | Vehicle limitations; Electrical supply issues. | Verify your vehicle's maximum AC charging rate. Ensure the electrical supply to the charger is stable and meets the 240V 32A requirement. |
If the problem persists after attempting these solutions, please contact EVMaster customer support for further assistance.
8. Specifications
Key technical specifications for the EVMaster Level 2 EV Charger:
- Model: B0D8KXJDT7
- Input/Output Voltage: 240 Volts AC
- Maximum Current: 32 Amp
- Cable Length: 18 Feet (5.5 meters)
- Connector Type: SAE J1772 (Type 1)
- Certifications: FCC, ETL
- Product Dimensions: 16.9 x 10 x 13 inches (Control Unit)
- Item Weight: 13.47 pounds
- Operating Temperature: -22°F to +122°F (-30°C to +50°C)

Figure 8: Key Product Specifications
9. Warranty and Support
For warranty information, please refer to the documentation included with your product at the time of purchase or visit the official EVMaster brand store. For technical support, troubleshooting assistance, or any other inquiries, please contact EVMaster customer service.
EVMaster Brand Store: Visit the EVMaster Store