Fuers A6716LME 16CH DVR
Fuers 16 Channel Security Recorder DVR User Manual
Model: A6716LME 16CH DVR
Introduction
This manual provides comprehensive instructions for the installation, operation, and maintenance of your Fuers 16 Channel Security Recorder DVR. This hybrid 6-in-1 surveillance digital video recorder supports various camera types including AHD, TVI, CVI, CVBS, IP, and XVI, offering high-definition 1080p recording and intelligent features like human detection and remote access. It comes equipped with a 1TB hard drive for continuous recording.
What's in the Box
- 1x 16CH DVR recorder
- 1x 1TB HDD (pre-installed)
- Power Adapter
- USB Mouse
- User Manual (this document)

Figure 1: Fuers 16 Channel DVR with included 1TB Hard Drive.
Specifications
| Brand | Fuers |
| Model Number | A6716LME 16CH DVR |
| Number of Channels | 16 |
| Video Capture Resolution | 1080p (supports up to 5MP AHD/TVI/CVI/CVBS/IP/XVI cameras) |
| Supported Camera Types | AHD, TVI, CVI, CVBS, IP, XVI (6-in-1 Hybrid) |
| Memory Storage Capacity | 1 TB (expandable up to 14 TB) |
| Video Compression | H.265+ |
| Connectivity Technology | Wired (Ethernet for remote access) |
| Special Features | App Control, Human Detection, Remote Access, Continuous Motion Detection Recording |
| Dimensions (L x W x H) | 10.03 x 9.96 x 1.85 inches |
Setup Guide
1. Initial Hardware Connection
- Connect Display: Plug an HDMI or VGA cable from your monitor to the corresponding port on the DVR.
- Connect USB Mouse: Insert the USB mouse into one of the USB ports on the DVR.
- Connect Cameras: Connect your surveillance cameras to the BNC video input ports (V1-V16) on the back of the DVR. Ensure secure connections.
- Connect Power: Plug the DVR power adapter into the DVR's power input and then into a power outlet.
Video 1: Step-by-step guide on connecting the DVR to a monitor, mouse, and cameras. This video demonstrates the physical setup process.

Figure 2: Diagram illustrating the various input and output ports on the DVR, including video, audio, network, and power connections.
2. Network Connection for Remote Access
To utilize remote monitoring features, the DVR must be connected to your network via an Ethernet cable. This cable is not included with the DVR.
- Connect Ethernet Cable: Plug one end of an Ethernet cable into the LAN port on the back of the DVR and the other end into your router or network switch.
- Verify Connection: Once connected, the network indicator lights on the DVR's LAN port should illuminate.
Video 2: Instructions on connecting the DVR to a wired network and setting up the mobile application for remote viewing.

Figure 3: Visual guide for connecting the CCTV system to the network, downloading the app, and enjoying live view.
3. Mobile App Setup for Remote Viewing
The DVR supports remote viewing via mobile applications such as XMeye and Icsee. Follow these steps to connect:
- Download App: Scan the QR code displayed on your monitor (or search for "XMeye" or "Icsee" in your app store) to download the mobile application.
- Register/Login: Create an account or log in to the app.
- Add Device: In the app, select "Add Device" and use the scan function to scan the QR code displayed on your DVR's monitor. This will automatically add your DVR to the app.
- Live View: Once added, you can select your device to view live camera feeds from anywhere.
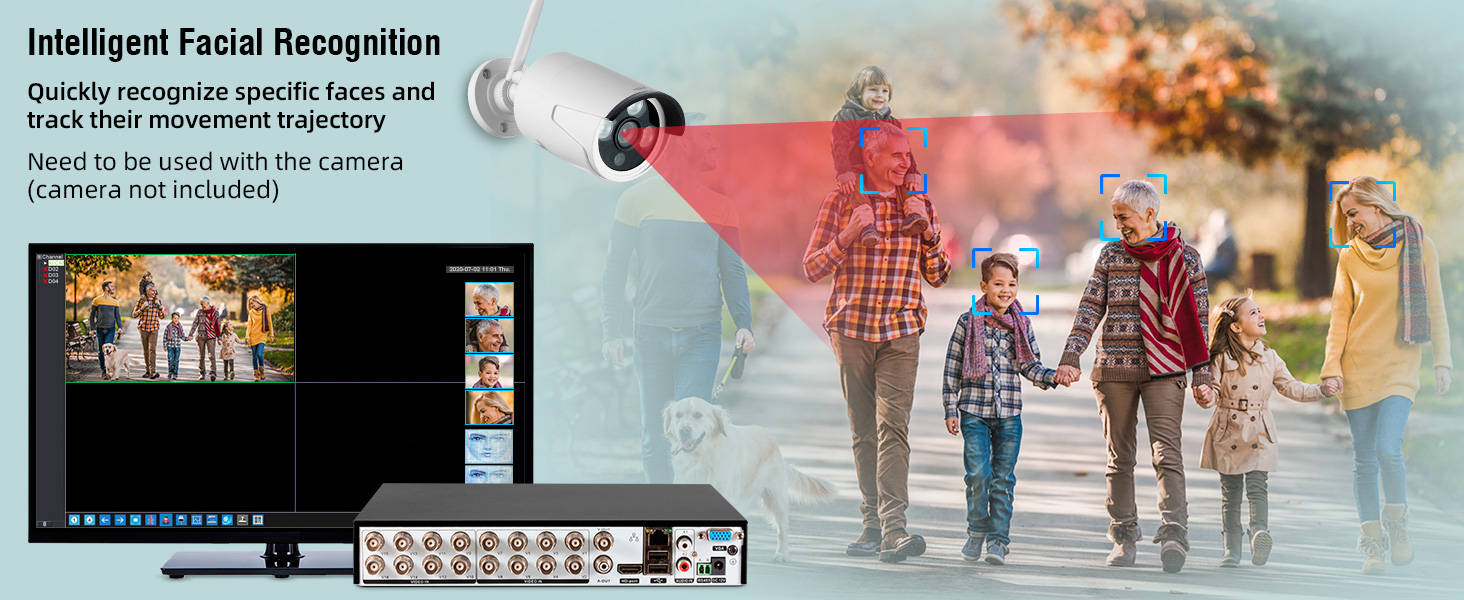
Figure 4: Access your security system from your smartphone, tablet, or PC for convenient remote monitoring.
Operating the DVR
1. User Interface Navigation
Navigate the DVR's on-screen display using the connected USB mouse. Right-click to access the main menu, which includes options for Record, Alarm, System, Advanced, Info, and Logout.
2. Recording Modes
- Continuous Recording: The DVR records 24/7, ensuring constant surveillance.
- Motion Detection Recording: The system records only when motion is detected, saving storage space. Instant notifications and email reminders can be configured.

Figure 5: The intelligent alert system sends notifications to your phone or email upon motion detection.
3. Playback
Access recorded footage through the 'Playback' option in the main menu. The system supports smart playback to quickly locate human/vehicle events, saving time during review.

Figure 6: Smart playback allows for efficient review of recorded events.
Maintenance
1. Storage Management
The DVR comes with a pre-installed 1TB hard drive. For additional storage, an external hard drive up to 14TB can be added. The H.265+ video compression technology optimizes storage by reducing data transmission by up to 80% compared to H.264, allowing for longer recording times.

Figure 7: The DVR supports expandable storage capacity for extended recording.

Figure 8: H.265+ compression offers significant storage savings and improved image quality over H.264.
2. Software Updates
Periodically check the DVR's system settings or the mobile application for available software updates to ensure optimal performance and access to new features.
Troubleshooting
- No Video Output:
- Ensure all cables (HDMI/VGA, video input) are securely connected.
- Verify the monitor is powered on and set to the correct input source.
- Check if the DVR is powered on.
- Remote Access Issues:
- Confirm the DVR is connected to the internet via an Ethernet cable.
- Check your router's internet connection.
- Ensure the mobile app is updated to the latest version.
- Verify correct device ID and password in the app.
- Poor Image Quality:
- Ensure cameras are clean and free from obstructions.
- Check camera resolution settings in the DVR menu.
- Verify camera compatibility with the DVR's supported resolutions (e.g., 5MP, 4MP, 1080P).
- No Recording:
- Check hard drive status in the DVR's system information.
- Ensure recording schedules are properly configured.
- Verify sufficient storage space is available.
Important Compatibility Notes
When connecting cameras to this DVR, please ensure compatibility based on the following parameters:
- The DVR supports 16* 5MP@12fps, compatible with cameras having frame rates not exceeding 12fps and resolutions not exceeding 5MP. Supports 6-in-1 (AHD/TVI/CVI/CVBS/IP/XVI) Cameras.
- Supports 16* 4MP@15fps, compatible with cameras having frame rates not exceeding 15fps and resolutions not exceeding 4MP. Supports 6-in-1 (AHD/TVI/CVI/CVBS/IP/XVI) Cameras.
- Supports 16* 1080P@15fps (XVI), compatible with cameras having frame rates not exceeding 15fps and resolutions not exceeding 1080P.

Figure 9: Overview of supported camera types and connection points on the DVR.
Ask a question about this manual
Ask about setup, troubleshooting, compatibility, parts, safety, or missing instructions. Manuals+ will review the question and use this page’s manual context to help answer it.