Introduction
This manual provides detailed instructions for the installation, operation, and maintenance of your CAMECHO Android 13 Car Radio. This double DIN unit features a 9-inch display and is designed for Hyundai Santa Fe models from 2006 to 2012. It includes advanced features such as Android 13 OS, 4GB RAM + 64GB ROM, GPS navigation, wireless CarPlay, Android Auto, Bluetooth 5.0, RDS/FM radio, and MirrorLink functionality.
Please read this manual thoroughly before installation and use to ensure proper functionality and to avoid damage to the unit or your vehicle.
Package Contents
Verify that all items listed below are included in your package. If any items are missing or damaged, please contact customer support.
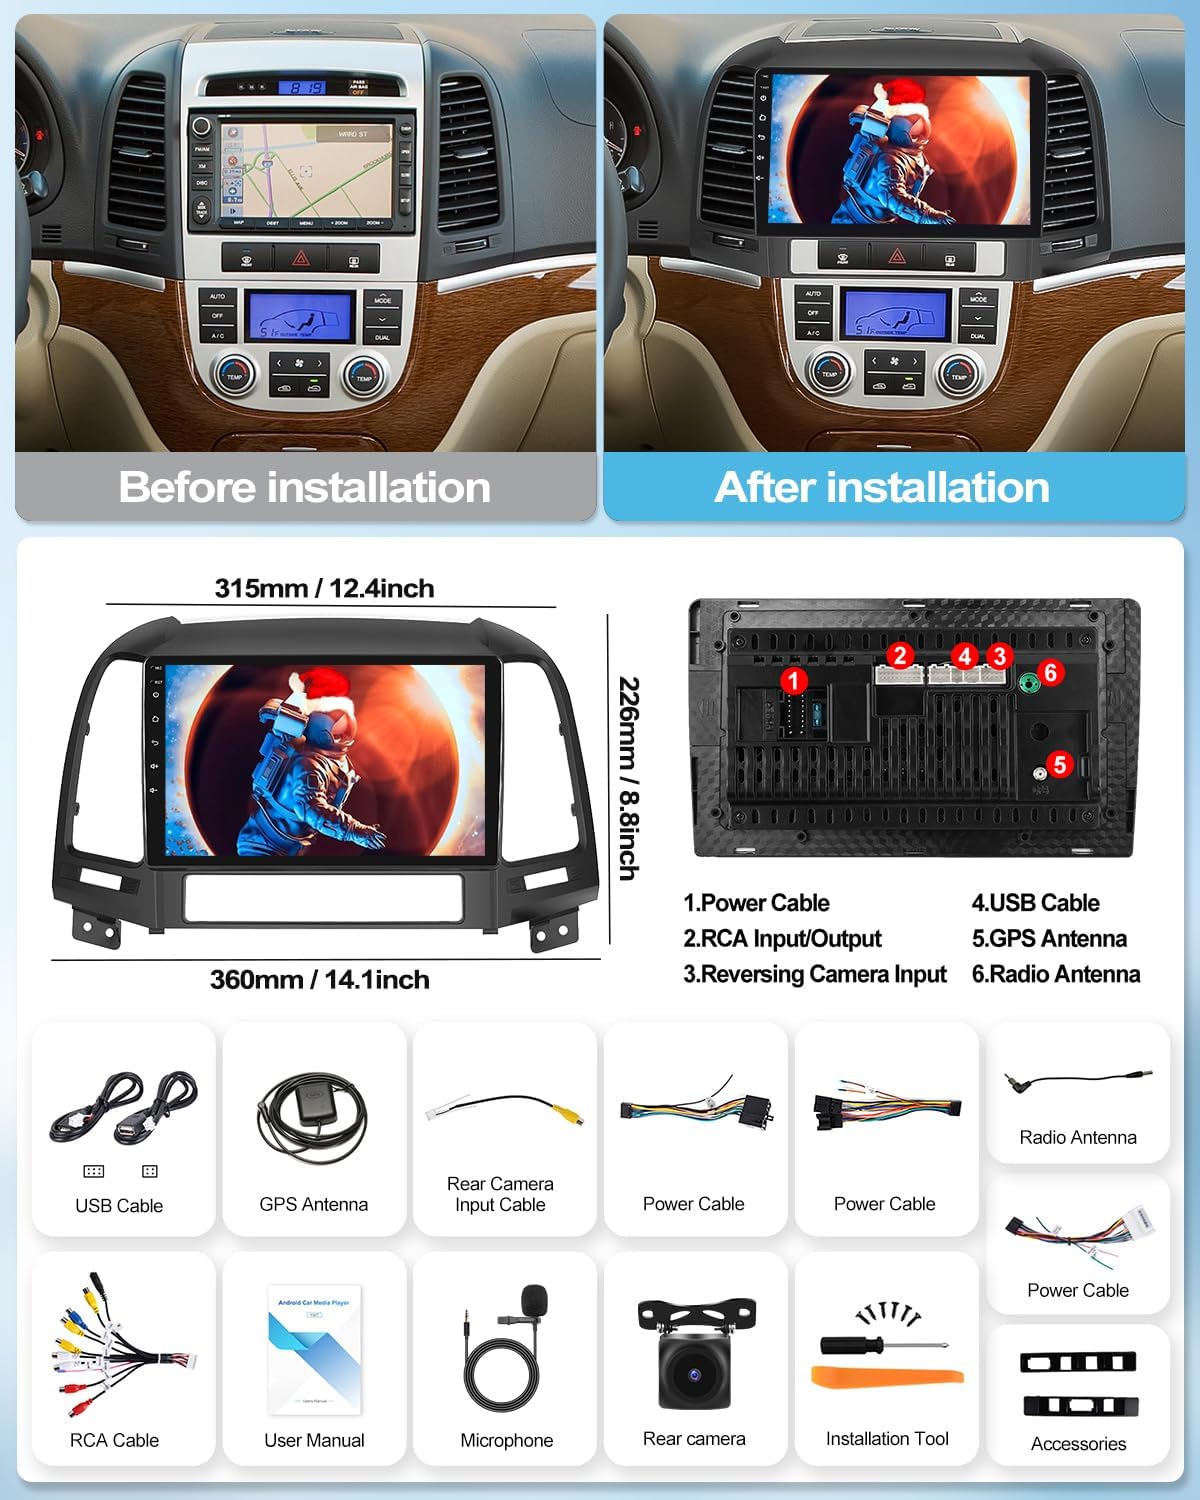
Image showing the car radio unit, USB cables, GPS antenna, rear camera input cable, power cables, radio antenna, RCA cable, user manual, microphone, rear camera (optional), installation tool, and other accessories.
- CAMECHO Android 13 Car Radio Unit (9-inch display)
- Power Cable Harness
- USB Cables (x2)
- GPS Antenna
- Rear Camera Input Cable
- RCA Cable
- Radio Antenna
- User Manual (this document)
- Microphone
- Installation Tools
- Accessories (mounting brackets, screws)
- Note: Rear camera is often sold separately.
Specifications
| Operating System | Android 13 |
| RAM | 4GB |
| ROM | 64GB |
| Display Size | 9 inches |
| Display Resolution | 1080P HD Touchscreen |
| Processor | 4 Cores |
| Connectivity | Wi-Fi, Bluetooth 5.0, USB, RCA |
| Navigation | Built-in GPS (Online/Offline support) |
| Smartphone Integration | Wireless CarPlay, Wireless Android Auto, MirrorLink |
| Radio Tuner | FM/RDS Radio |
| Audio Output Mode | Stereo, Surround (4.0 channel configuration) |
| Video Encoding Support | AVC, MPEG-4, MKV, WMV |
| Compatible Vehicles | Hyundai Santa Fe (2006-2012) |

This image highlights key features such as the 1080P touchscreen, 4-core processor, built-in WiFi, wireless CarPlay, GPS navigation, Android Auto, steering wheel control, rear camera compatibility, FM/RDS radio, EQ sound tuning, and Bluetooth connectivity.
Installation Guide
Professional installation is recommended. If you choose to install the unit yourself, ensure the vehicle's battery is disconnected before starting. Refer to your vehicle's service manual for specific dashboard removal instructions.
Compatibility Check
This car radio is designed for Hyundai Santa Fe models from 2006 to 2012. If you are unsure about compatibility, please provide a photo of your car's central console and the back of your original CD player to customer support for verification.

This image illustrates the appearance of the car's dashboard before and after the installation of the CAMECHO Android 13 car radio, showing the integrated 9-inch display.
Wiring Diagram
The following diagram shows the rear connections of the car radio unit. Ensure all cables are securely connected to their corresponding ports.

Detailed rear view of the car radio unit, indicating connection points for: 1. Power Cable, 2. RCA Input/Output, 3. Reversing Camera Input, 4. USB Cable, 5. GPS Antenna, 6. Radio Antenna.
- Disconnect Battery: Before beginning, disconnect the negative terminal of your vehicle's battery.
- Remove Old Radio: Carefully remove the trim panels and screws securing the factory radio. Disconnect all wiring harnesses.
- Connect Wiring Harness: Connect the provided power cable harness to the vehicle's wiring and the new head unit. Ensure all connections are firm.
- Connect Peripherals:
- GPS Antenna: Mount the GPS antenna in a location with a clear view of the sky (e.g., dashboard, A-pillar). Connect it to the GPS antenna port.
- USB Cables: Route the USB cables to a convenient location (e.g., glove box, center console) for connecting USB devices.
- Radio Antenna: Connect the vehicle's radio antenna to the unit.
- Rear Camera (Optional): If installing a rear camera, connect its video input to the "Reversing Camera Input" port and its power to the reverse light circuit.
- RCA Cables: Connect RCA cables for external amplifiers or subwoofers if applicable.
- Microphone: Connect the external microphone for improved call quality.
- Test Unit: Before fully reassembling the dashboard, temporarily reconnect the battery and test the unit's basic functions (power on, radio, sound, touch screen).
- Secure Unit: Mount the new car radio into the dashboard opening using the provided brackets and screws.
- Reassemble Dashboard: Carefully reattach all trim panels and secure them.
- Reconnect Battery: Reconnect the negative terminal of the vehicle's battery.
Initial Setup and Configuration
First Power On
Upon the first power-on, the system will boot up. You may be prompted to select your language and time zone. Follow the on-screen instructions.
Wi-Fi Connection
To access online features, download apps, or use online navigation, connect the unit to a Wi-Fi network.
- Go to Settings > Network & Internet > Wi-Fi.
- Turn on Wi-Fi and select your desired network from the list.
- Enter the password if prompted and connect.

This image displays the car radio's interface for Wi-Fi connection, showing various applications and social media icons, indicating internet access capabilities.
GPS Navigation Setup
The unit comes with built-in GPS. For offline navigation, you need to download maps.
- Connect to Wi-Fi.
- Open the pre-installed navigation app (e.g., Here WeGo).
- Download the required regional maps for offline use.

This image shows the car radio screen displaying GPS navigation, with a route highlighted and icons for different navigation applications.
Operating Instructions
Wireless CarPlay & Android Auto
Connect your smartphone wirelessly to access CarPlay or Android Auto features, including navigation, calls, messages, and music.
- Ensure Bluetooth and Wi-Fi are enabled on your smartphone.
- On the car radio, open the "Zlink" application (or similar CarPlay/Android Auto app).
- Pair your phone via Bluetooth with the car radio.
- Follow the on-screen prompts to activate CarPlay or Android Auto.

This image shows the car radio screen running both Wireless CarPlay and Android Auto, displaying common applications like Phone, Maps, Messages, and Music.
MirrorLink Function
MirrorLink allows you to display your phone's screen directly on the car radio's display.
- Connect your phone to the car radio via USB or Wi-Fi hotspot.
- Open the MirrorLink application on the car radio.
- For iOS devices, activate AirPlay on your iPhone and select the car radio.
- For Android devices, enable USB debugging in developer options and select "USB data transfer" mode, then follow the app's instructions.

This image demonstrates the MirrorLink feature, showing a smartphone screen being mirrored onto the car radio's display.
Bluetooth 5.0
Use Bluetooth for hands-free calling and audio streaming.
- Go to the Bluetooth application on the car radio.
- Enable Bluetooth on your phone and search for available devices.
- Select the car radio (e.g., "CAMECHO_BT") from your phone's list and pair.
- Confirm the pairing code if prompted.

This image shows the Bluetooth 5.0 interface on the car radio, illustrating hands-free calling and music playback features.
FM/RDS Radio
Access FM radio stations and RDS information.
- Open the "Radio" application.
- Use the scan function to find available stations or manually tune.
- Press and hold a station number for three seconds to save it as a preset.

This image shows the FM/RDS radio interface on the car radio, displaying station frequencies, signal strength, and controls for tuning and presets.
Split Screen Function
Run two applications simultaneously on the screen, such as navigation and music playback.
- Open the first application.
- Press and hold the recent apps button (usually a square icon) or swipe up from the bottom and hold.
- Drag the first app to one side of the screen.
- Select the second app to fill the other side.

This image demonstrates the split-screen functionality, showing navigation on one side of the display and a music player on the other, allowing simultaneous use of two applications.
Steering Wheel Control
The unit supports original steering wheel controls. Configuration may be required.
- Go to Settings > Steering Wheel Control.
- Follow the on-screen instructions to map your vehicle's steering wheel buttons to the corresponding functions on the car radio. This typically involves pressing and holding a button on the steering wheel, then selecting the desired function on the screen.

This image shows the car radio's interface for configuring steering wheel controls, allowing users to assign functions to their vehicle's steering wheel buttons.
Rear Camera Display
If a rear camera is connected, the display will automatically switch to the camera view when the vehicle is put into reverse gear.

This image shows the car radio displaying the rear camera view, complete with parking guidelines and icons indicating features such as HD image quality, waterproof design, night vision, and wide-angle view.
Optional Functions (Accessories Not Included)
The car radio supports various external accessories to enhance its functionality. These accessories are not included in the standard package and must be purchased separately.
- DVR (Digital Video Recorder): Connect an external DVR for recording driving footage.
- DAB+ (Digital Audio Broadcasting): Add a DAB+ receiver for digital radio broadcasts.
- OBD2 (On-Board Diagnostics): Connect an OBD2 scanner via Bluetooth to monitor vehicle data.
- Video Output: Connect external monitors for rear-seat entertainment.
- External Microphone: For improved voice clarity during calls or voice commands.
- 360 Panoramic Camera: For a comprehensive view around your vehicle.

This image illustrates various optional functions that can be integrated with the car radio, such as DVR, DAB+, 360-degree panoramic camera, OBD2 diagnostics, video output, and an external microphone.
Troubleshooting
If you encounter issues with your car radio, refer to the following common problems and solutions:
| Problem | Possible Cause | Solution |
|---|---|---|
| Unit does not power on. | Loose power connection, blown fuse, incorrect wiring. | Check power cable connections. Inspect vehicle's fuse box and the unit's fuse. Verify wiring against the diagram. |
| No sound. | Volume too low, mute activated, speaker wiring issue, incorrect audio source. | Increase volume. Check if mute is active. Verify speaker wiring. Select correct audio source. |
| Bluetooth not connecting. | Bluetooth off on phone/unit, incorrect pairing process, interference. | Ensure Bluetooth is enabled on both devices. Delete previous pairings and re-pair. Move closer to the unit. |
| GPS signal lost or inaccurate. | GPS antenna obstruction, poor antenna placement, outdated maps. | Ensure GPS antenna has a clear view of the sky. Reposition antenna if necessary. Update maps via Wi-Fi. |
| CarPlay/Android Auto not starting. | Incorrect connection method, app not installed/updated, phone compatibility. | Ensure correct wireless connection (Bluetooth + Wi-Fi). Update "Zlink" app. Check phone compatibility and OS version. |
| Steering wheel controls not working. | Incorrect wiring, controls not configured. | Verify steering wheel control wiring. Perform the steering wheel control learning process in settings. |
If the problem persists after trying these solutions, please contact customer support for further assistance.
Maintenance
To ensure the longevity and optimal performance of your CAMECHO car radio, follow these maintenance guidelines:
- Cleaning the Screen: Use a soft, lint-free cloth to gently wipe the screen. For stubborn smudges, slightly dampen the cloth with water or a screen-safe cleaner. Avoid harsh chemicals or abrasive materials.
- Software Updates: Periodically check for system software updates via the unit's settings menu (requires Wi-Fi connection). Keeping the software updated ensures optimal performance and access to new features.
- Avoid Extreme Temperatures: Do not expose the unit to extreme temperatures for prolonged periods, as this can affect its electronic components.
- Protect from Liquids: Prevent any liquids from entering the unit, as this can cause severe damage.
- Cable Connections: Periodically check that all cables connected to the unit are secure and free from damage.
Warranty and Customer Support
Your CAMECHO car radio comes with a standard manufacturer's warranty. Please refer to the warranty card included in your package for specific terms and conditions.
Contact Support
For technical assistance, troubleshooting beyond this manual, or warranty inquiries, please contact CAMECHO customer support.
Email: CAMECHOVIP@126.com
Please provide your product model number (B0D8KB4ZW3) and a detailed description of the issue when contacting support.

Image of a customer support representative, indicating available assistance.


