Feonase 749D4
Feonase Twin Bed Frame Instruction Manual
Model: 749D4
Introduction
Thank you for choosing the Feonase Twin Bed Frame. This manual provides detailed instructions for the safe assembly, operation, maintenance, and troubleshooting of your new bed frame. Please read this manual thoroughly before beginning assembly and retain it for future reference. This bed frame is designed to provide a sturdy and comfortable foundation for your mattress, featuring a luxury wingback upholstered headboard with a built-in charging station and ample under-bed storage.

Image: The Feonase Twin Bed Frame in black, showcasing its upholstered wingback headboard and overall design.
Safety Information
WARNING: Failure to follow these safety instructions could result in injury or damage to the product.
- Exercise caution around sharp edges during assembly and handling.
- Do not load the bed frame with more than 1000 pounds (453 kg). Exceeding this weight capacity may compromise structural integrity.
- Follow all assembly instructions carefully and precisely to prevent instability or collapse. Ensure all bolts and fasteners are securely tightened.
- Keep small parts and packaging materials away from children to prevent choking hazards.
- Ensure the bed frame is placed on a level surface to prevent wobbling and ensure stability.
- Do not jump on the bed frame.
- Before moving the bed frame, remove the mattress and any items from the headboard storage and under-bed space.
Package Contents
Before beginning assembly, verify that all parts are present and undamaged. If any parts are missing or damaged, please contact customer support immediately.

Image: An exploded view showing all major components of the Feonase bed frame, including the headboard, side rails, footboard, and support legs.
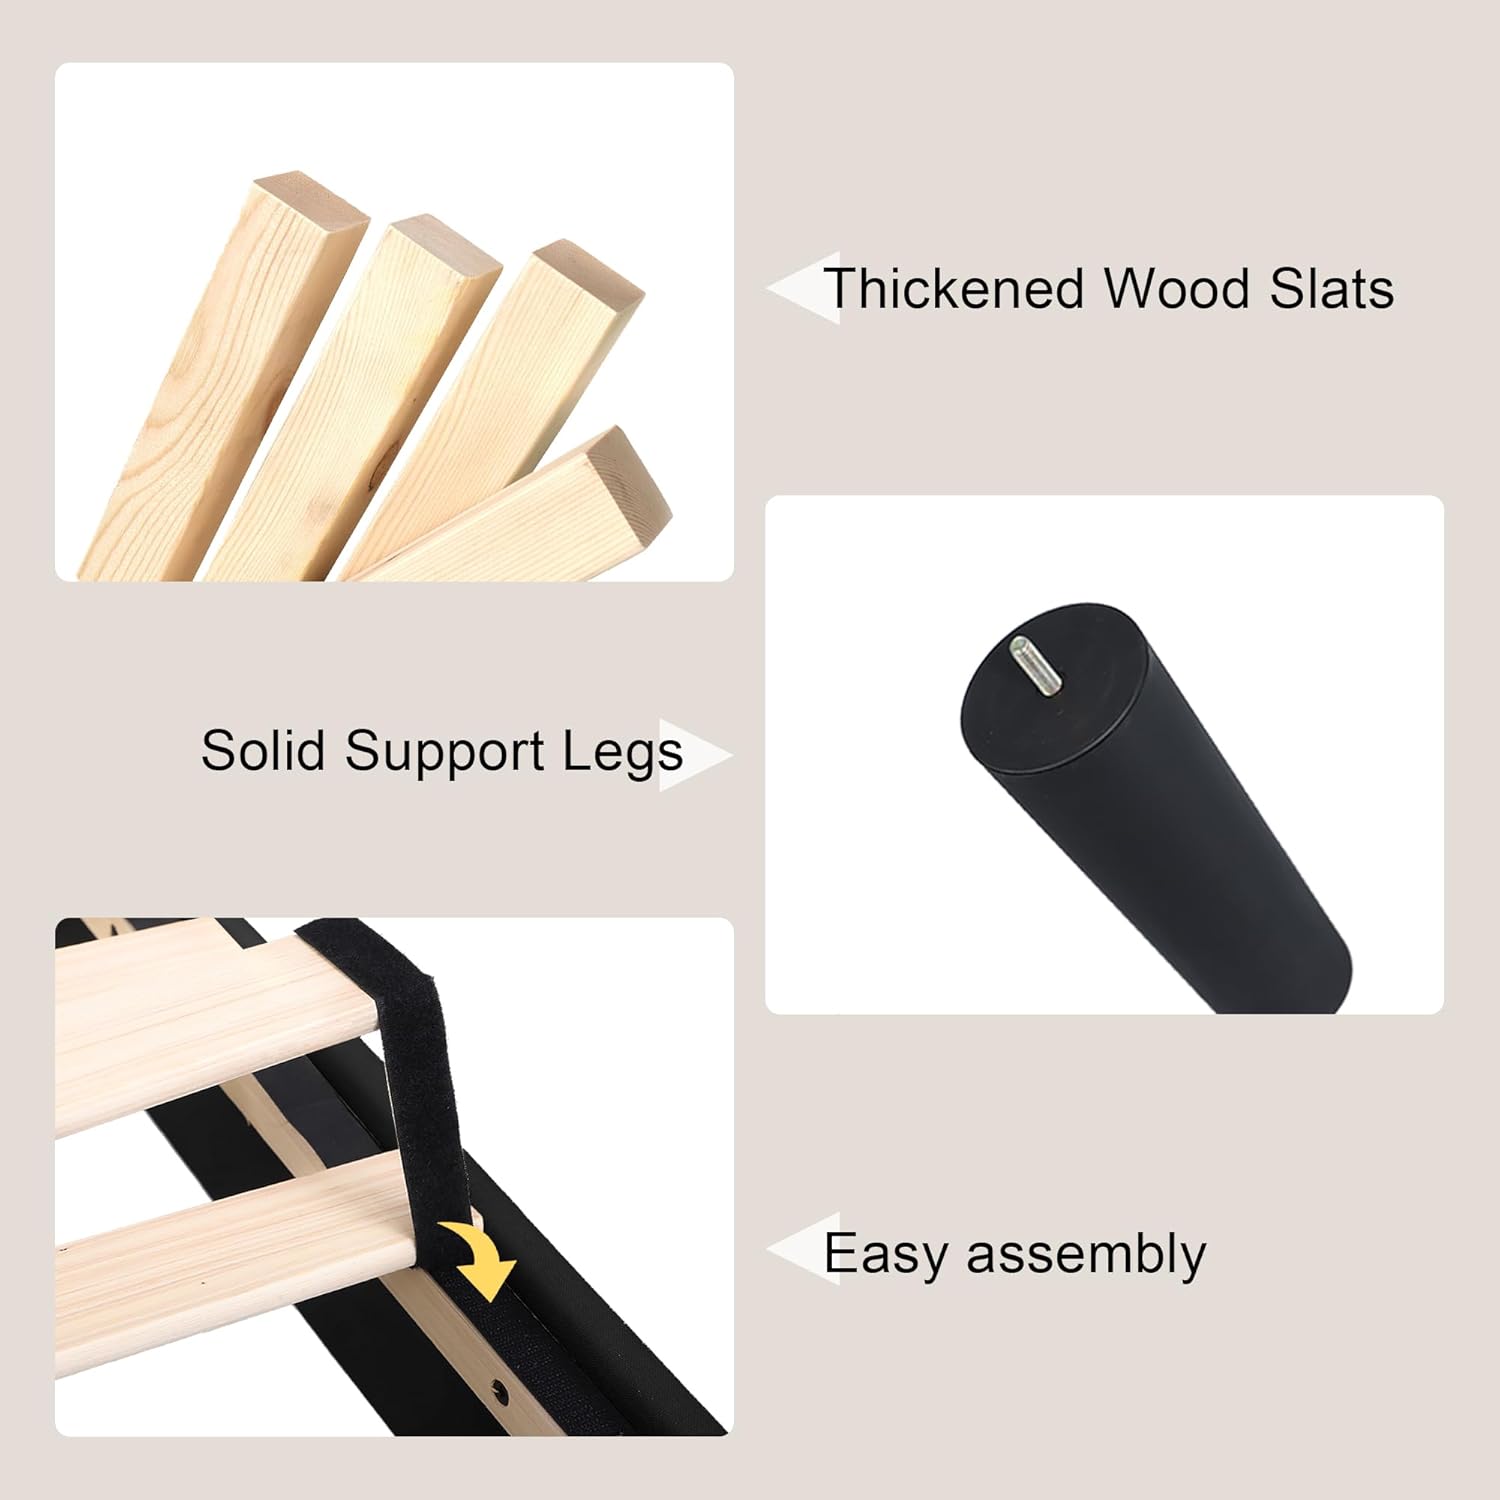
Image: Detailed view of thickened wood slats, solid support legs, and the Velcro attachment system for easy assembly.
Typical Components List:
- Upholstered Headboard with Charging Station
- Side Rails (Left & Right)
- Footboard
- Wooden Slats (with Velcro attachment)
- Center Support Beam(s)
- Support Legs
- Hardware Pack (bolts, washers, Allen wrench, etc.)
- Power Cord for Charging Station
Setup & Assembly
Assembly is designed to be straightforward and can typically be completed by one person within 30 minutes. All pieces are marked with sequence numbers for easy identification.
Required Tools:
- Included Allen Wrench
Assembly Steps:
- Unpack and Identify Parts: Lay out all components on a clean, soft surface to prevent scratches. Refer to the package contents list and diagrams to identify each part.
- Assemble the Headboard: Attach the wingback sections to the main headboard if they are separate. Ensure all connections are secure.
- Attach Side Rails: Connect the side rails to the headboard using the provided bolts and Allen wrench. Do not fully tighten bolts until all major components are assembled.
- Attach Footboard: Connect the footboard to the other end of the side rails.
- Install Center Support: Place the center support beam(s) into their designated slots or brackets along the length of the frame. Attach any necessary support legs to the center beam(s).
- Install Wooden Slats: Unroll the wooden slats. The slats are connected by Velcro strips, which align with corresponding Velcro on the bed frame rails. Press firmly to secure the slats in place. Ensure EVA strips are positioned between slats and the metal frame to prevent noise.
- Tighten All Bolts: Once all components are in place and aligned, go back and fully tighten all bolts. Do not overtighten.
- Connect Charging Station: Plug the power cord from the headboard's charging station into a wall outlet.

Image: Illustration of initial assembly steps, showing how the headboard sections connect.

Image: Diagram showing the attachment of side rails to the headboard and footboard.

Image: Visual guide for correctly installing the wooden slats onto the bed frame.
Operating Instructions
Charging Station Usage:
The integrated charging station in the headboard provides convenient access to power for your electronic devices.
- Ensure the bed frame's power cord is securely plugged into a functional wall outlet.
- The charging station features 2 AC outlets (110V/12A) and 2 USB ports (5V/2A).
- Plug your devices directly into the appropriate outlets or USB ports.
- Do not overload the charging station. Avoid plugging in high-power appliances that exceed the specified amperage.

Image: Close-up view of the headboard's top ledge, showing the integrated 2 AC outlets and 2 USB ports for charging devices.
Storage Headboard & Under-Bed Space:
- The 4-inch wide top storage ledge on the headboard is ideal for placing small items such as phones, books, or glasses.
- The 8-inch under-bed clearance provides ample space for storage boxes, shoes, or other items, helping to keep your room tidy.
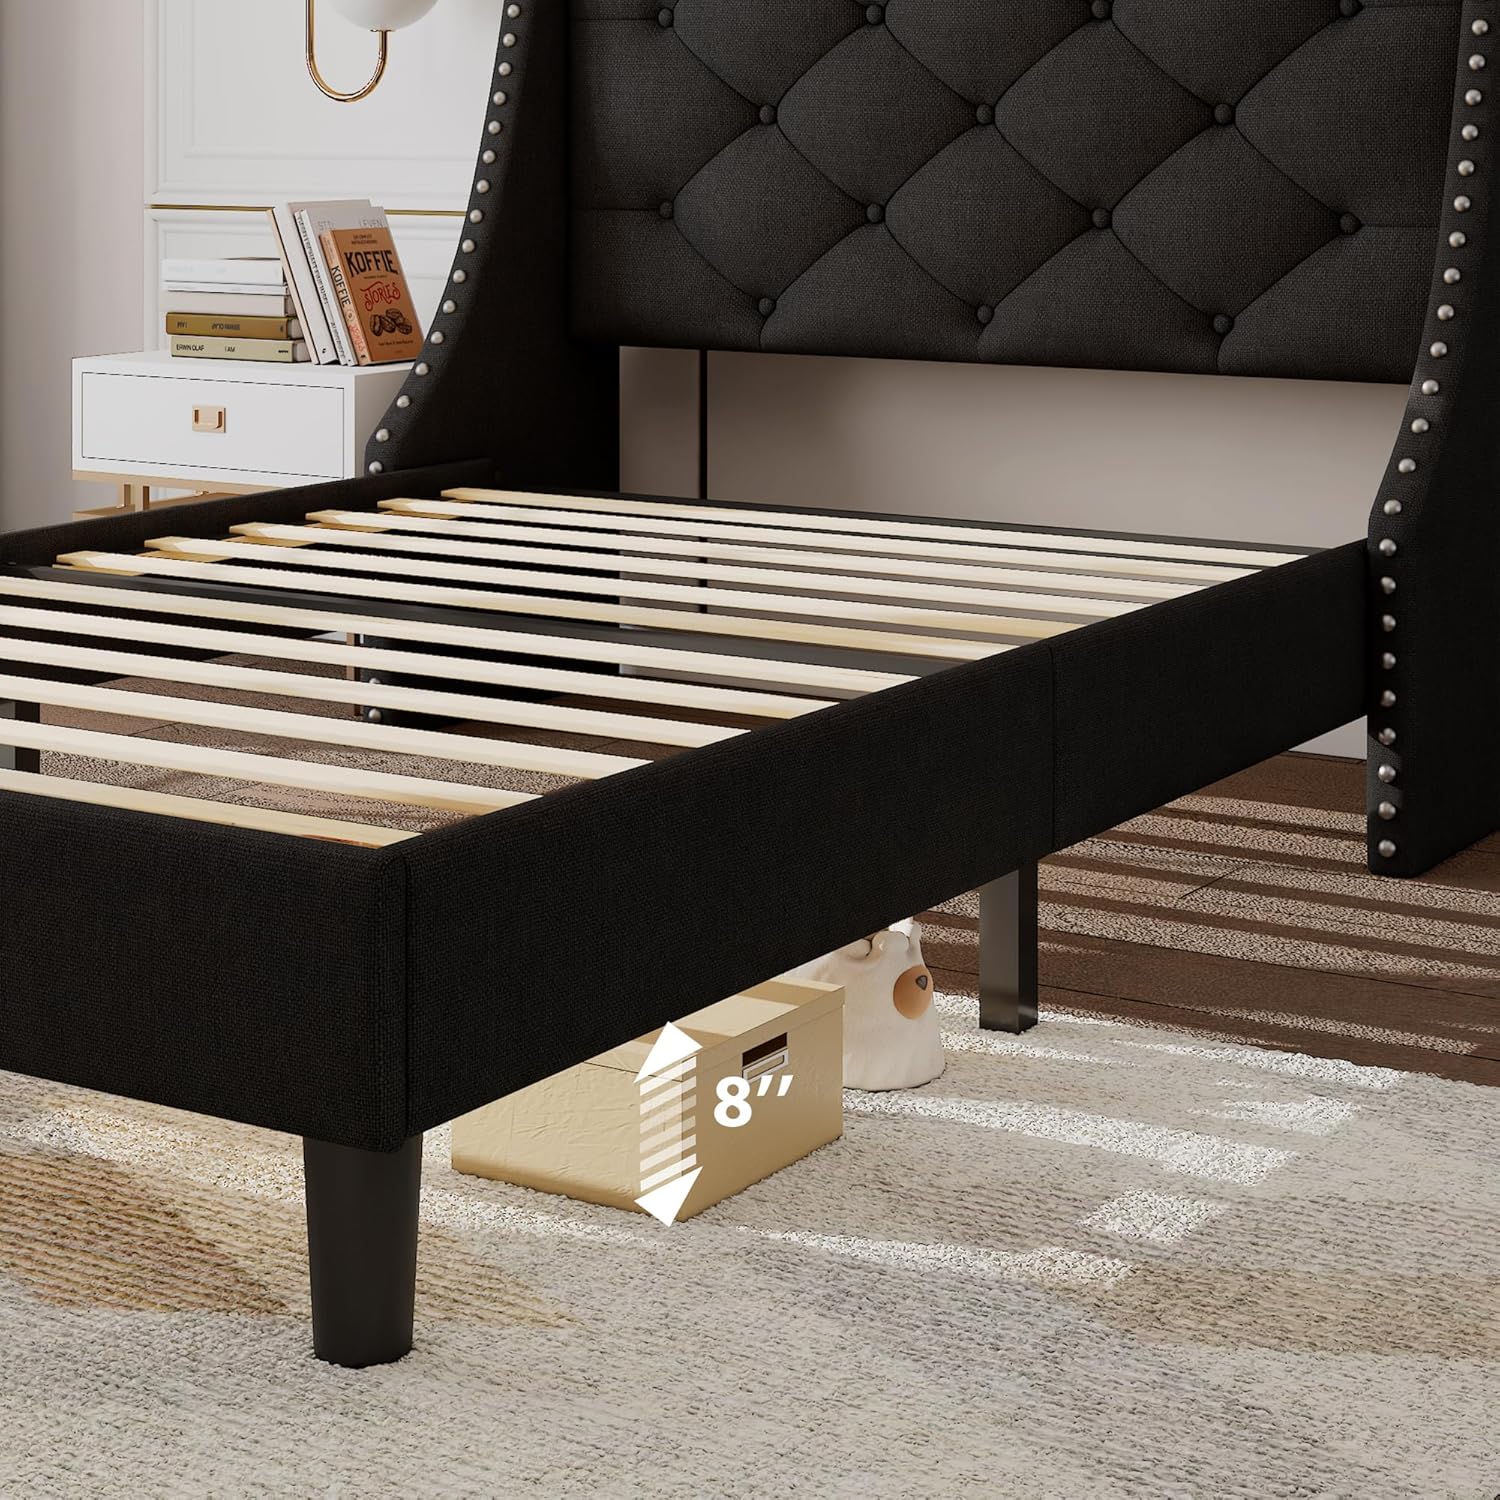
Image: A visual representation of the 8-inch under-bed storage space, highlighting its utility for storing various items.
Maintenance
Cleaning:
- Upholstered Headboard: For general cleaning, gently vacuum the fabric to remove dust and debris. For spills, blot immediately with a clean, dry cloth. For tougher stains, use a mild fabric cleaner following the product's instructions, testing on an inconspicuous area first. Do not saturate the fabric.
- Frame: Wipe down metal and wooden parts with a soft, damp cloth. Avoid harsh chemicals or abrasive cleaners.
General Care:
- Periodically check all bolts and fasteners to ensure they remain tight. Re-tighten if necessary to maintain stability and prevent noise.
- Avoid exposing the bed frame to excessive moisture or direct sunlight, which can damage the fabric and wood.
- Do not drag the bed frame when moving it; lift it to prevent damage to the legs and frame structure.
Troubleshooting
| Problem | Possible Cause | Solution |
|---|---|---|
| Bed frame is squeaking or noisy. | Loose bolts; slats not properly seated; lack of cushioning. | Ensure all assembly bolts are securely tightened. Verify that the wooden slats are firmly pressed onto the Velcro strips and that the EVA strips are correctly positioned between the slats and metal frame. |
| Bed frame feels unstable or wobbly. | Uneven floor; loose connections; incorrect assembly. | Ensure the bed frame is on a level surface. Re-check all bolt connections and tighten them. Review assembly instructions to confirm all parts are correctly installed. |
| Charging station is not working. | Power cord not plugged in; power outlet issue; device issue. | Verify the bed frame's power cord is fully plugged into a live wall outlet. Test the wall outlet with another device. Ensure your device's charging cable is functional. Do not exceed the charging station's power limits. |
| Parts do not align during assembly. | Incorrect orientation of parts; manufacturing defect. | Double-check the part numbers and orientation against the assembly diagrams. Ensure you are not overtightening bolts prematurely. If parts still do not align, contact customer support with details and photos. |
Specifications
- Model: 749D4
- Size: Twin
- Product Dimensions: 79"L x 54"W x 50"H
- Color: Black
- Material: Upholstered fabric (Linen-like), Metal Frame, Wooden Slats
- Weight Capacity: Up to 1000 pounds (453 kg)
- Under-Bed Clearance: 8 inches
- Headboard Features: 16" wide Wingback, Button Tufted design, 4"W Top Storage Ledge
- Charging Station: 2 AC Outlets (110V/12A), 2 USB Ports (5V/2A), 6.6-Feet Power Cord
- Assembly: Required, Easy Assembly (approx. 30 mins)
- Noise Reduction: EVA strips for noise-free use
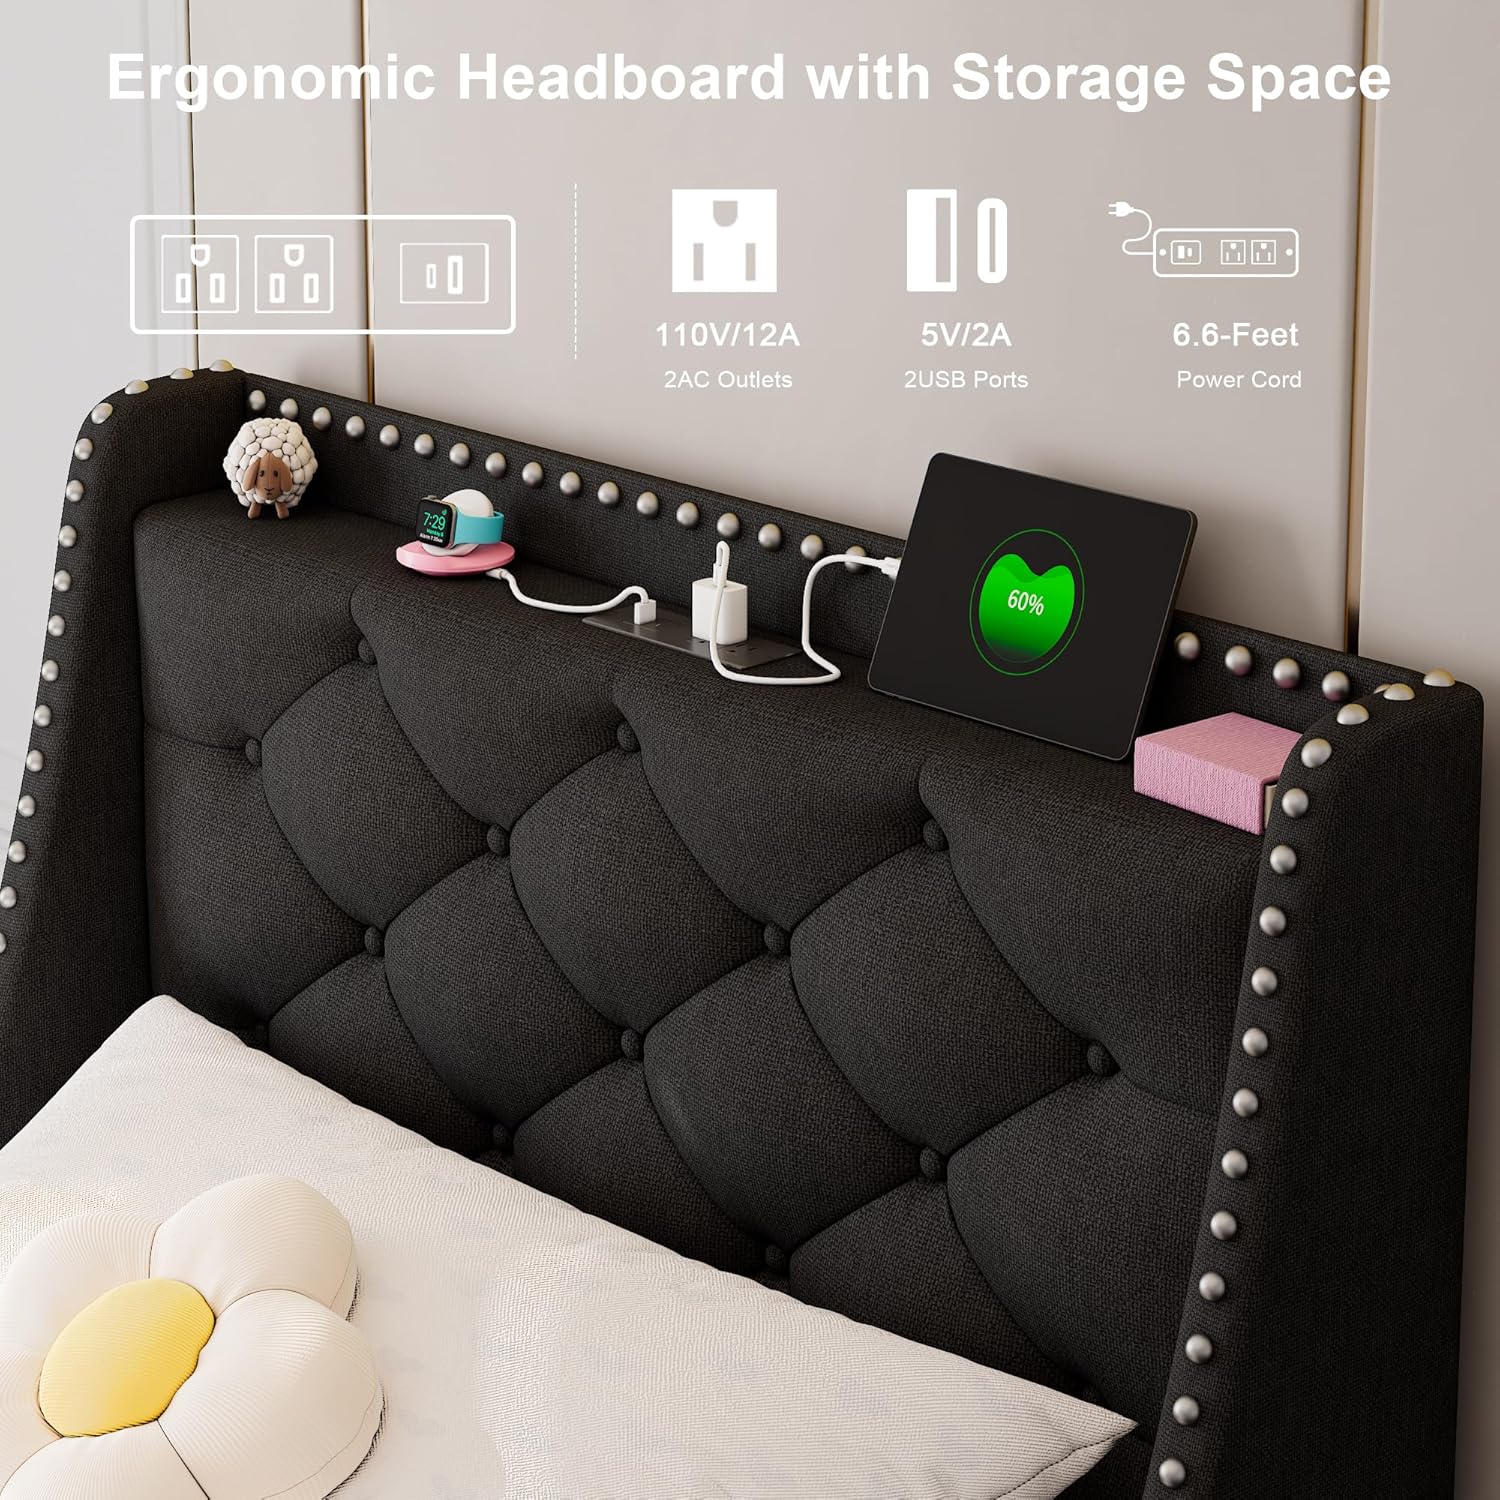
Image: Detailed dimensions of the Feonase Twin Bed Frame, including length, width, height, headboard width, and under-bed clearance.
Warranty & Support
Feonase is committed to providing high-quality products and customer satisfaction. While specific warranty details are not provided in this manual, Feonase offers 24/7 pre-sale and after-sale customer service.
If you encounter any issues with your Feonase Twin Bed Frame, require replacement parts, or have questions regarding assembly or use, please contact Feonase customer support through the retailer's platform or the official Feonase website. Please have your model number (749D4) and purchase information ready when contacting support.

Image: The Feonase brand logo, representing the manufacturer.
Ask a question about this manual
Ask about setup, troubleshooting, compatibility, parts, safety, or missing instructions. Manuals+ will review the question and use this page’s manual context to help answer it.