Gyfimoie 745A
Gyfimoie 6-Drawer Double Dresser with Power Outlet and LED Light
Model: 745A
Important Safety Information
Please read and understand all instructions before assembly and use. Keep this manual for future reference.
- Anti-Tip Device: This dresser includes an anti-tip device. It is crucial to install this device to prevent serious injury from tipping furniture. Secure the dresser to a wall using the provided hardware.
- Electrical Safety: The integrated power outlet and LED lighting system are designed for indoor use only. Do not expose to moisture. Ensure the power cord is not pinched or damaged during assembly or use. Do not overload the outlets.
- Assembly: Assembly requires two adults. Do not use power tools unless specifically instructed, as overtightening screws can damage the furniture.
- Weight Capacity: Do not place excessively heavy items on top of the dresser or inside the drawers. Distribute weight evenly.
- Children Safety: Keep small parts and packaging materials away from children during assembly. Do not allow children to climb on the dresser.
Package Contents
Verify all components are present before beginning assembly. If any parts are missing or damaged, contact customer support.
- Dresser Panels (Top, Bottom, Sides, Back)
- Drawer Panels and Hardware (6 sets)
- Drawer Slides (Ball Bearing)
- Power Outlet Unit with USB Ports
- LED Light Strip and Controller
- Remote Control for LED Lights
- Assembly Hardware (Screws, Dowels, Cam Locks, etc.)
- Anti-Tip Kit
- Instruction Manual
Setup and Assembly
Follow these steps carefully for proper assembly. It is recommended to assemble the dresser on a soft, clean surface to prevent scratches.
Step 1: Prepare the Area and Unpack
Clear a spacious area for assembly. Unpack all components and lay them out, checking against the package contents list. Keep hardware organized.
Step 2: Assemble the Main Frame
Connect the side panels to the bottom panel using the provided dowels and cam locks. Ensure all connections are secure. Attach the back panel to stabilize the frame.

Image: Diagram showing the overall dimensions of the dresser and its components.
Step 3: Install Drawer Slides
Attach the ball bearing drawer slides to the inner sides of the dresser frame and to the drawer boxes according to the instructions. Ensure they are level and aligned for smooth operation.
Video: A demonstration of the dresser's features, including the LED lights and power outlet. This video also shows the smooth operation of the drawers.
Step 4: Assemble Drawers
Assemble each of the six drawers. Attach the front, back, and side panels, then insert the bottom panel. Secure the drawer slides to the assembled drawer boxes.

Image: The dresser with its six drawers partially open, illustrating the available storage capacity.
Step 5: Install Power Outlet and LED Lights
Carefully install the power outlet unit into the designated cutout on the top surface of the dresser. Secure it with screws. Attach the LED light strip to the underside of the top shelf in the open storage compartments. Connect the LED light strip to its controller and then to the power outlet unit. Ensure all electrical connections are secure and cables are neatly managed.

Image: A detailed view of the integrated charging station, highlighting the two AC outlets and two USB ports.
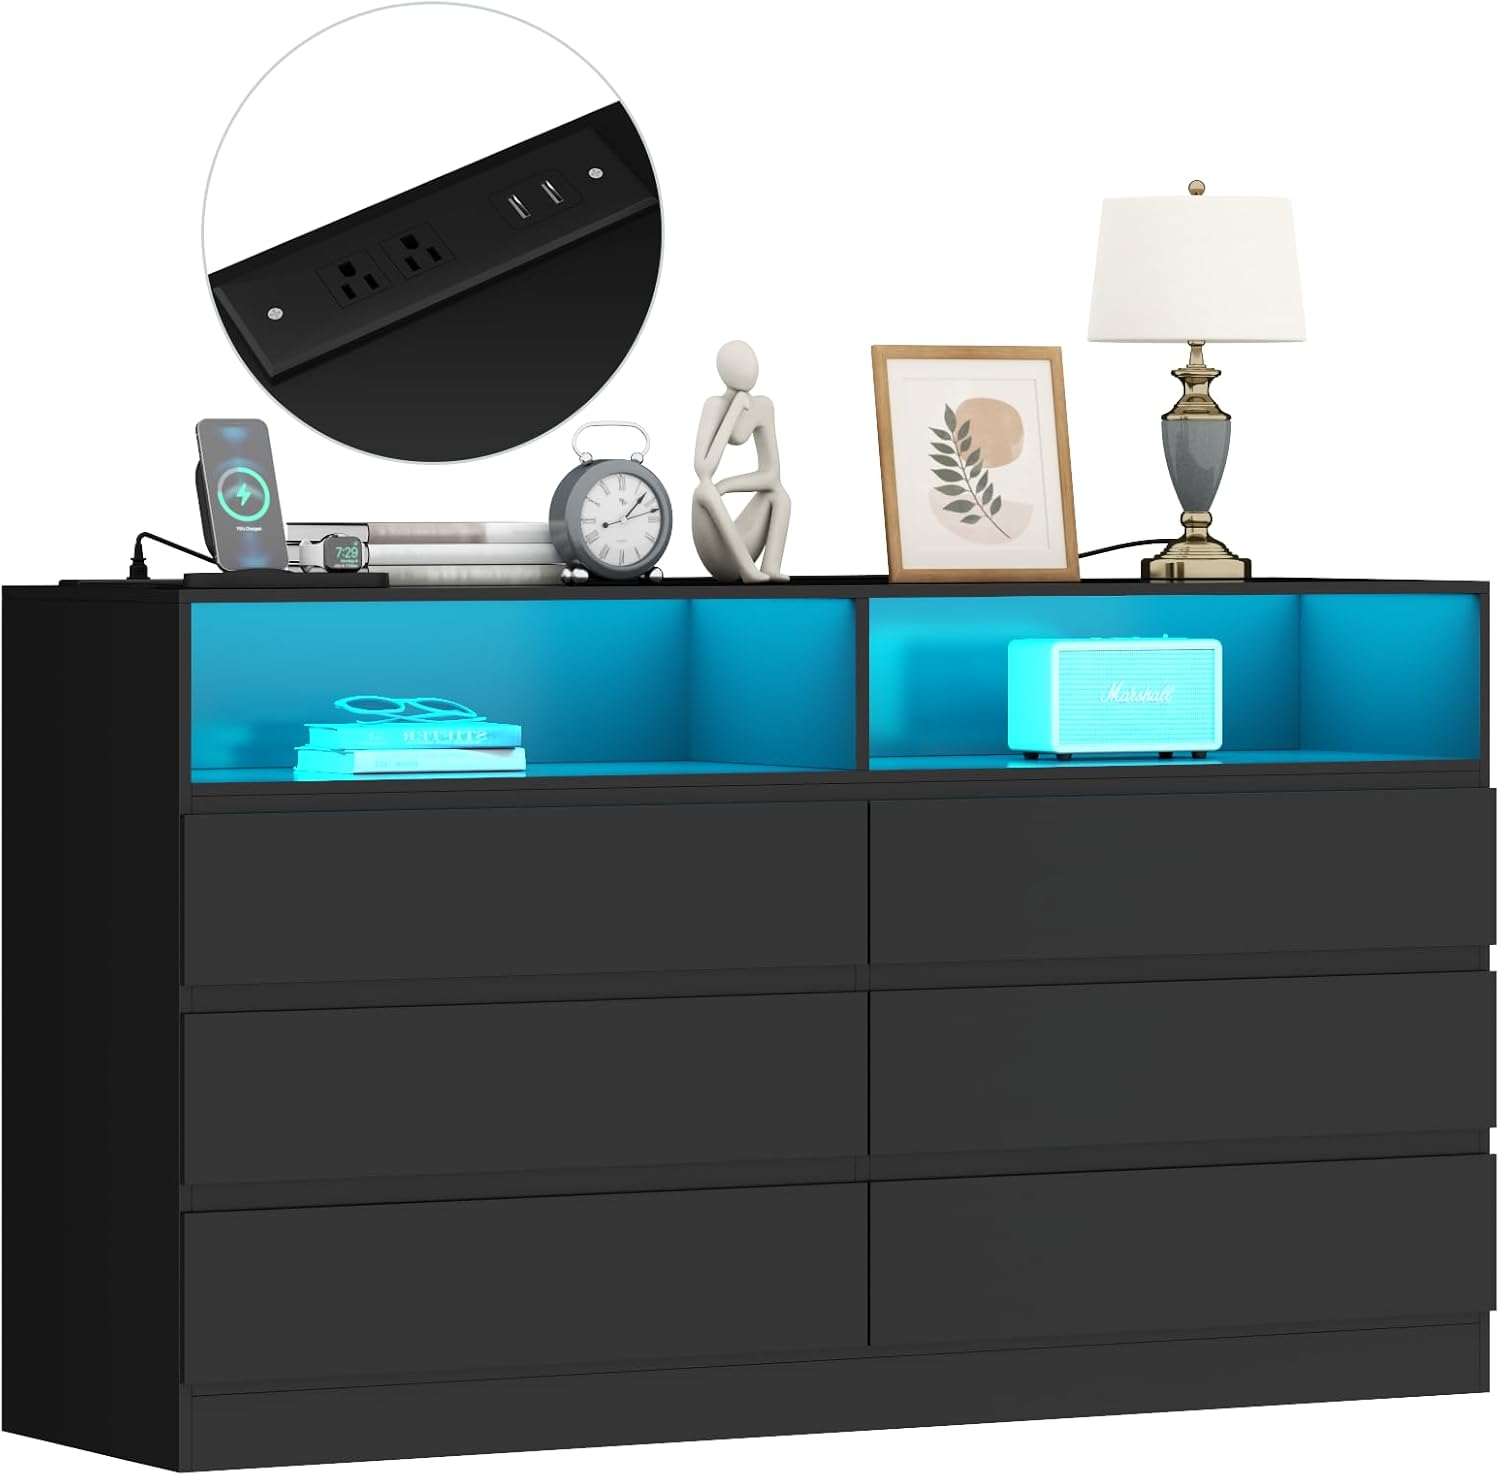
Image: The dresser showcasing its LED lighting in the open compartments and the accessible power outlet on the top surface.
Step 6: Install Anti-Tip Device
Attach the anti-tip bracket to the back of the dresser and to a wall stud using the provided hardware. This step is critical for safety and must not be skipped.
Operating Instructions
Using the Drawers
The drawers are equipped with ball bearing slides for smooth operation. To open, gently pull the drawer front. To close, push the drawer until it is fully seated. Avoid forcing drawers or overloading them to ensure longevity of the slides.
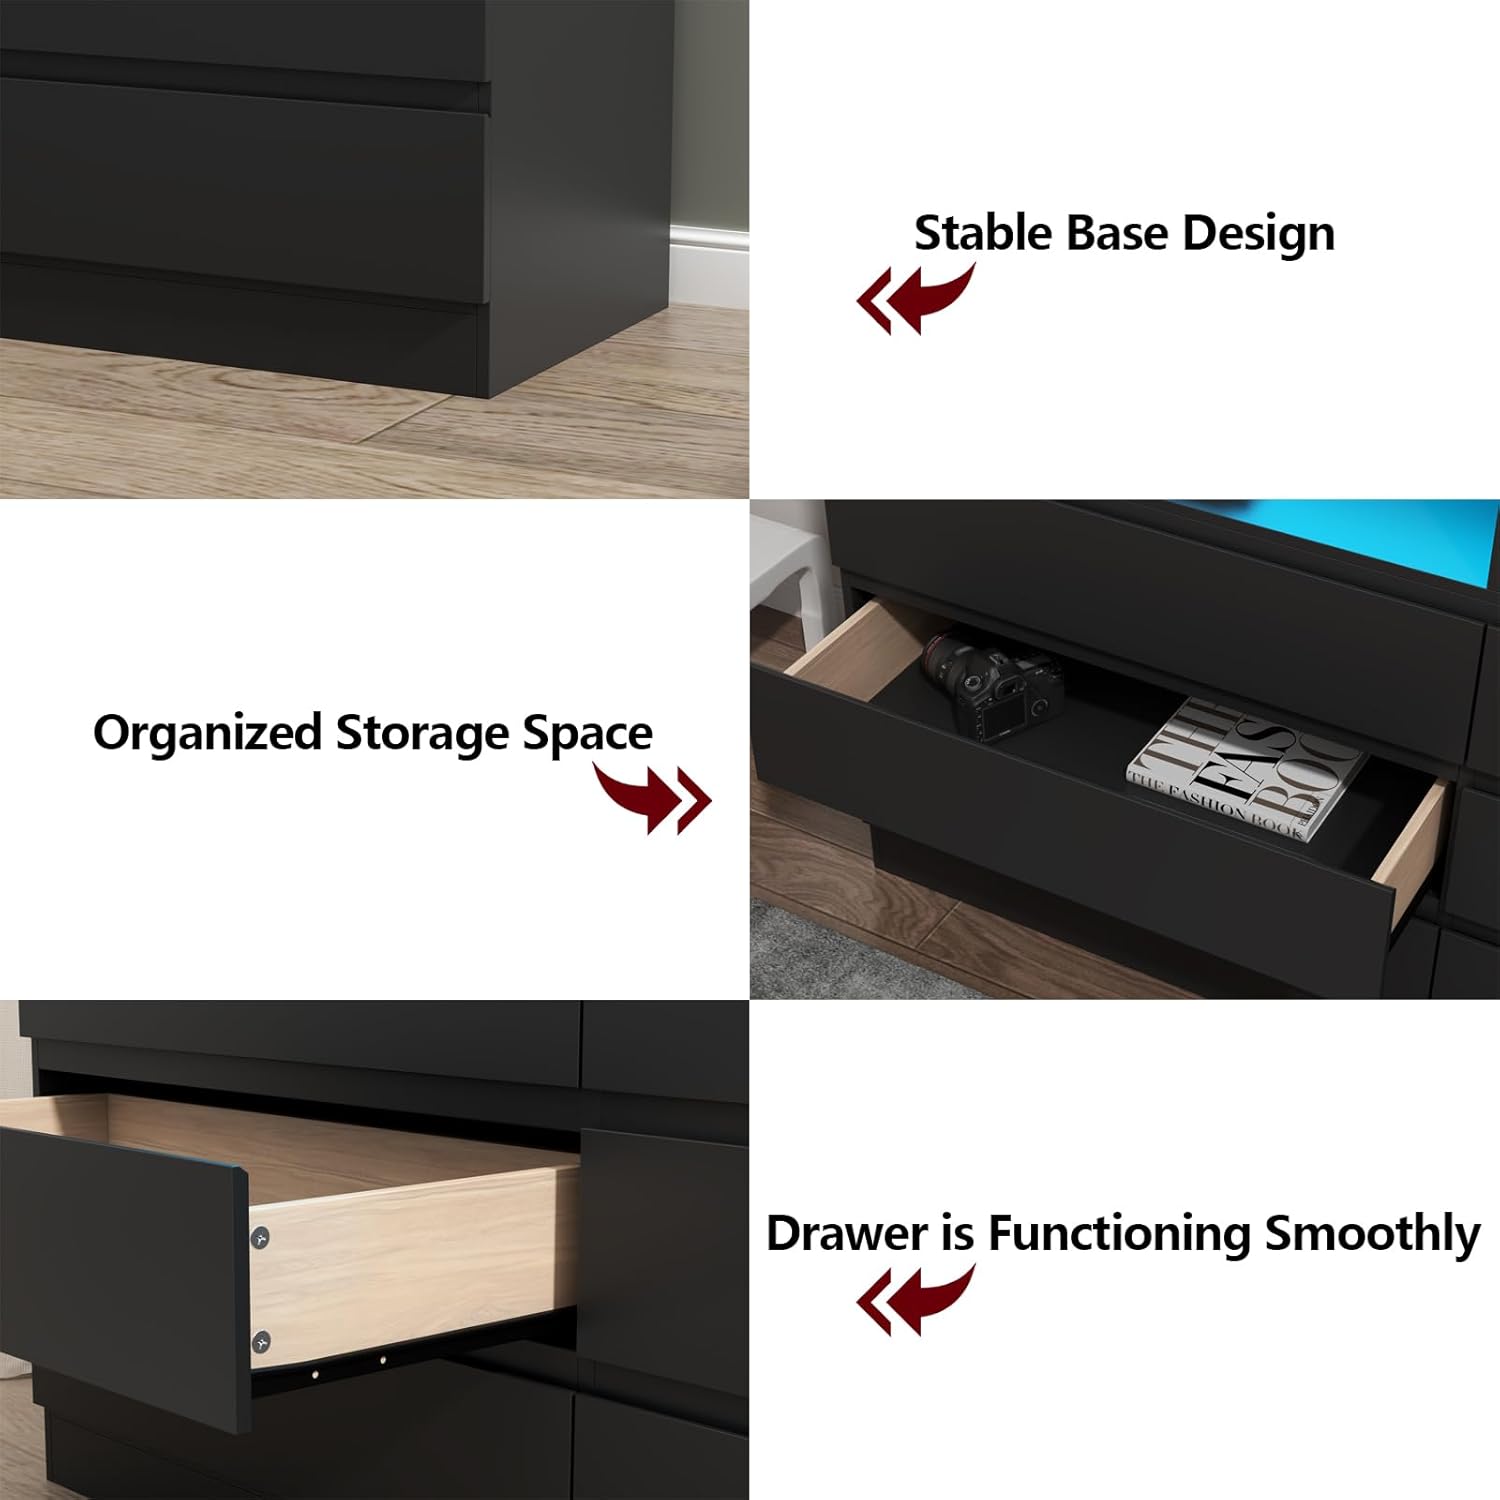
Image: A close-up view demonstrating the smooth functionality of the drawers and the stable base design of the dresser.
Using the Power Outlet and USB Ports
Plug the dresser's main power cord into a standard wall outlet. The two AC outlets and two USB ports on the top surface are now active. Use them to power or charge electronic devices. Ensure devices are compatible with the 125V/12A AC outlets and 5V/2A USB ports.
Operating the LED Lights
The LED lights can be controlled using the included remote control or a compatible smartphone application. Refer to the LED light controller's specific instructions for pairing with the app.
- Remote Control: Use the remote to turn the lights on/off, change colors (16 million options), adjust brightness, and select various dynamic modes (Flashing, Jump, Fade).
- Smartphone App: For advanced control, download the recommended app. The app allows for precise color selection, custom mode creation, and music synchronization.

Image: A smartphone screen displaying the interface of the control app for the LED lights, showing various color and mode options.
Maintenance
- Cleaning: Wipe the dresser surfaces with a dry, soft cloth. Avoid abrasive cleaners or harsh chemicals that may damage the finish.
- Drawer Slides: Periodically check drawer slides for smooth operation. If they become stiff, a small amount of silicone lubricant can be applied.
- Electrical Components: Ensure the power cord and connections for the LED lights and outlets are free from dust and debris. Do not attempt to repair electrical components yourself.
- Hardware: Occasionally check all assembly hardware (screws, cam locks) and tighten if necessary to maintain stability.
Troubleshooting
Drawers are Sticking or Not Closing Properly
- Check if the drawer slides are properly aligned and securely attached to both the drawer box and the dresser frame.
- Ensure the drawer is not overloaded or unevenly weighted.
- Verify that no objects are obstructing the drawer's path.
LED Lights Not Working
- Confirm the dresser's main power cord is securely plugged into a working wall outlet.
- Check that the LED light strip is properly connected to its controller and the power source.
- Ensure the remote control battery is functional and the remote is pointed towards the LED receiver.
- If using the app, verify Bluetooth connection and app settings.
Power Outlets/USB Ports Not Functioning
- Verify the dresser's main power cord is plugged into a live wall outlet.
- Test the wall outlet with another device to ensure it is working.
- Ensure the power outlet unit is correctly installed and connected within the dresser.
- Avoid overloading the outlets, as this may trip a circuit breaker in your home.
Specifications
| Brand | Gyfimoie |
| Model Name | Dresser-745 |
| Item Model Number | 745A |
| Product Dimensions (D x W x H) | 15.75"D x 47.24"W x 31.5"H |
| Number of Drawers | 6 |
| Material | Engineered Wood |
| Finish Type | Painted (Black) |
| Drawer Type | Ball Bearing Slide |
| Item Weight | 96 Pounds |
| Power Outlet | 2 AC Outlets (125V/12A), 2 USB Ports (5V/2A) |
| LED Light Features | Multi-color RGB, Remote & App Control, Adjustable Brightness, Dynamic Modes |
Warranty and Support
For warranty information, missing parts, or technical assistance, please contact Gyfimoie customer support. Refer to your purchase documentation for specific warranty terms and contact details.
You can often find support information on the manufacturer's official website or through the retailer where the product was purchased.