EliteBloom TX-850
EliteBloom Tianxun TX 850 Metal Detector User Manual
Model: TX-850
1. Introduction
This manual provides detailed instructions for the assembly, operation, and maintenance of your EliteBloom Tianxun TX 850 Metal Detector. Please read this manual thoroughly before using the device to ensure safe and effective operation.

Image 1.1: The EliteBloom Tianxun TX 850 Metal Detector, shown with included headphones.
2. Important Safety Information
- Battery Handling: Keep batteries away from heat, sparks, and open flames.
- Water Exposure: Do not use or store the device near water unless specifically designed for submersion (refer to search coil specifications).
- Restricted Areas: Avoid use near airports or other sensitive areas where electromagnetic interference may be prohibited or cause issues.
- Always ensure the device is properly assembled and all connections are secure before operation.
- Do not attempt to modify the detector. Unauthorized modifications can void the warranty and pose safety risks.
3. Package Contents
Upon opening your package, please verify that all the following components are present:
- TX 850 Control Unit with Adjustable Stem
- 11-inch DD Waterproof Search Coil
- Headphones (wired)
- Armrest and Detector Stand
- User Manual (this document)
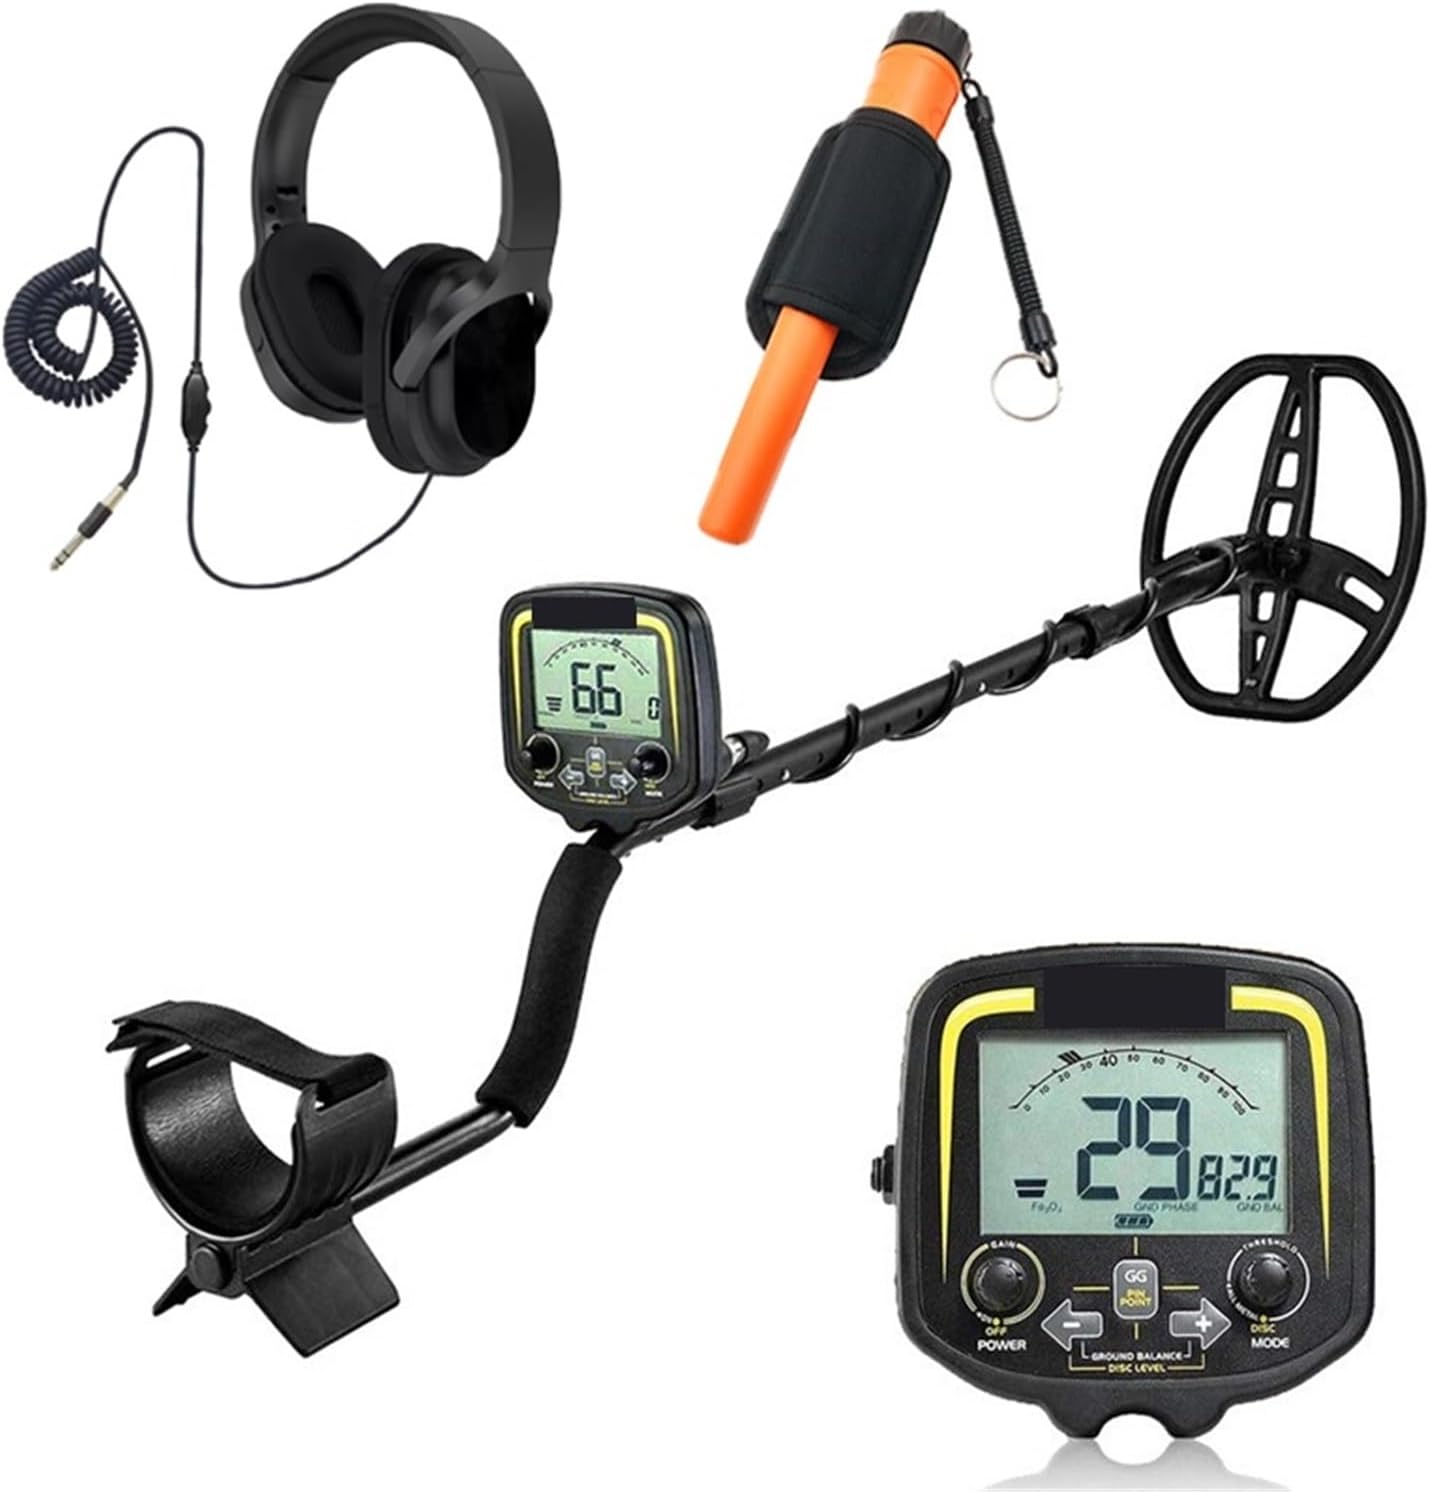
Image 3.1: Overview of the main components included with the metal detector. Note: A pinpointer may be included in some bundles but is not standard.
4. Assembly Instructions
Follow these steps to assemble your metal detector:
- Attach the Search Coil: Secure the 11-inch DD search coil to the lower stem using the provided bolt and washers. Ensure it is firmly attached but can still pivot.
- Connect the Lower and Upper Stems: Insert the lower stem into the upper stem and secure it with the locking mechanism.
- Mount the Control Unit: Slide the control unit onto the upper stem. Adjust its position for comfortable viewing and access to controls.
- Wrap the Cable: Carefully wrap the search coil cable around the stem, ensuring it is not too tight or loose, and plug the connector into the control unit's designated port.
- Install Batteries: Open the battery compartment on the control unit and insert one 9V battery, observing polarity. Close the compartment securely.
- Adjust Armrest and Stem Length: Adjust the armrest for comfort and extend or retract the stem to a suitable length for your height. The stem is adjustable from 42 to 52 inches (107 to 130 cm).

Image 4.1: Dimension description illustrating the adjustable height and search coil size.
5. Controls and LCD Display
The control unit features an LCD display and several buttons for operation:
- LCD Display: Shows possible metal types, target depth, DISC/NOTCH range, SENS (sensitivity) level, and battery status.
- POWER Button: Turns the detector on/off.
- MODE Button: Cycles through the different detection modes.
- GROUND BALANCE / DISC LEVEL Buttons: Used to adjust ground balance and discrimination levels.
- SENS (Sensitivity) Adjustment: Controls the detector's sensitivity to targets.
- VOLUME Control: Adjusts the audio output level.
- Headphone Jack: For connecting the included headphones.

Image 5.1: Detailed view of the control unit and key features, including the Pinpoint Search Mode button.
6. Operating Modes
The TX 850 offers five distinct operating modes to optimize your search:
- All Metal Mode: Detects all types of metal. This mode offers the greatest depth and sensitivity.
- DISC/NOTCH Mode: Allows you to discriminate against unwanted metals (e.g., iron) or notch out specific target IDs. This helps focus on desired targets.
- Memory Mode: Recalls the last used discrimination settings, allowing for quick resumption of a previous search pattern.
- Jewelry Mode: Optimized for finding jewelry by typically ignoring iron and small trash items.
- Pinpointer Mode: Provides accurate detection of the exact location of a buried object, making recovery easier. Press the dedicated Pinpoint button for this function.
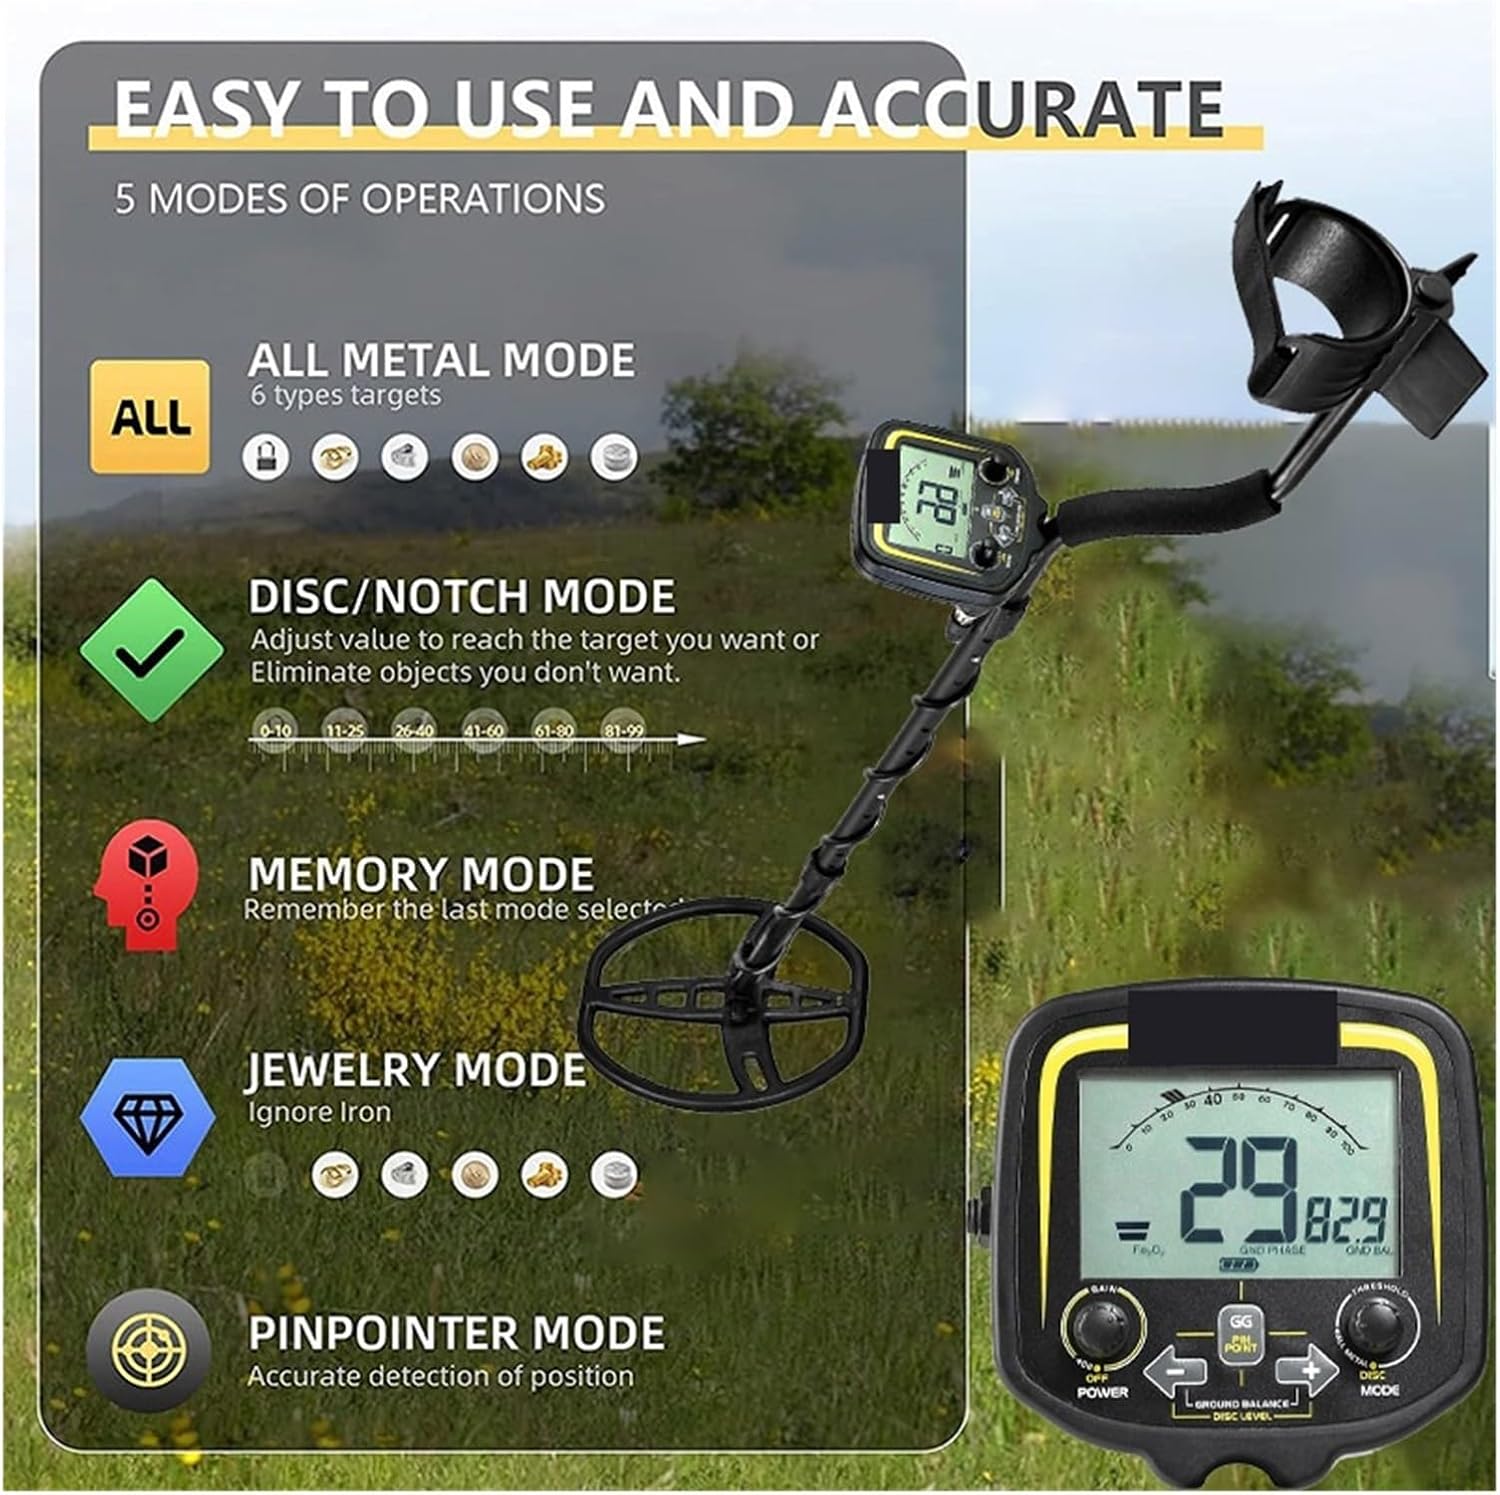
Image 6.1: Visual representation of the five operational modes and their primary functions.
7. Ground Balance
Ground balance is a critical feature that allows the detector to ignore or "see through" naturally occurring minerals in the soil. These minerals can otherwise cause false signals. Proper ground balancing ensures the detector only alerts you to actual metal objects. Refer to the LCD display and use the GROUND BALANCE controls to adjust this setting for optimal performance in different soil conditions.
8. Operation Guidelines
- Power On: Press the POWER button to turn on the detector.
- Select Mode: Use the MODE button to choose your desired detection mode (e.g., All Metal, Jewelry).
- Adjust Sensitivity: Start with a moderate sensitivity level and increase it gradually if no false signals occur. High sensitivity can increase detection depth but may also pick up more ground noise.
- Ground Balance: Perform ground balancing according to the instructions in Section 7 for the specific terrain you are searching.
- Sweep Technique: Hold the search coil parallel to the ground, about 1-2 inches above the surface. Sweep the coil slowly from side to side in overlapping passes.
- Target Identification: Pay attention to the audio tones and the LCD display for target identification. Different metals produce different tones.
- Pinpointing: Once a target is detected, switch to Pinpointer Mode to accurately locate the object before digging.
9. Maintenance
- Cleaning: After each use, wipe down the detector with a damp cloth. Avoid using abrasive cleaners or solvents. The search coil is waterproof and can be rinsed with fresh water.
- Storage: Store the detector in a cool, dry place. Remove the 9V battery if the detector will not be used for an extended period to prevent leakage.
- Cable Care: Inspect the search coil cable regularly for any signs of wear or damage.
10. Troubleshooting
| Problem | Possible Cause | Solution |
|---|---|---|
| No power | Dead or incorrectly installed battery | Replace 9V battery; ensure correct polarity. |
| Constant false signals / Chatter | High sensitivity, improper ground balance, electromagnetic interference | Reduce sensitivity, re-ground balance, move away from power lines or other electronics. |
| Poor detection depth | Low sensitivity, improper ground balance, heavily mineralized soil | Increase sensitivity, re-ground balance, sweep slower. |
| No audio from headphones | Headphones not plugged in, volume too low, faulty headphones | Ensure headphones are fully plugged in, increase volume, test with another pair of headphones if available. |
11. Specifications
- Stretched Length: 42-52 inches (107-130 cm)
- Battery: 1 x 9V (not included)
- Working Voltage: 9V
- Basic Sensitivity: US coin (12-15 inches)
- Detection Depth (Maximum): 1.5 meters (for 50 x 50 x 1.2 cm aluminum plate)
- Search Coil: 11-inch DD, waterproof, interchangeable
- Frequency: 19 KHz, crystal control
- Indication Mode: LCD and sound indicator
- Functions: Headphone jack, volume and sensitivity adjustment, ground balance
- Battery Life: Up to 15 hours
- Operating Temperature: -10°C to +50°C (14°F to 122°F)
- Operating Humidity: 0 to 90% non-condensing
12. Warranty and Support
For warranty information or technical support, please refer to the documentation provided at the time of purchase or contact your seller directly. Keep your purchase receipt as proof of purchase.
Ask a question about this manual
Ask about setup, troubleshooting, compatibility, parts, safety, or missing instructions. Manuals+ will review the question and use this page’s manual context to help answer it.