Introduction
This manual provides detailed instructions for the installation, operation, and maintenance of your Garwarm 39.3-inch bladeless ceiling fan with integrated lighting. Please read this manual thoroughly before installation and use to ensure safe and efficient operation. Keep this manual for future reference.
Safety Information
- Ensure power is disconnected at the circuit breaker before installation or maintenance.
- Installation should be performed by a qualified electrician if you are unsure about electrical wiring.
- Use only E26 bulbs (not included, MAX 60W) with a voltage of 110V.
- Do not attempt to repair or modify the fan yourself. Contact customer support for assistance.
- This product is designed for indoor use only.
Package Contents
- Ceiling Fan Unit with Light Kit
- Remote Control
- Instruction Manual
Specifications
| Brand | Garwarm |
| Model Number | TT-JD2001-4B |
| Product Dimensions | 39.3"L x 7.8"W x 9.8"H (100 x 20 x 20 CM) |
| Ceiling Canopy Dimensions | L15.7in x W7.87in x H 1in (40x20x2cm) |
| Material | Metal, Crystal, PP |
| Color | Long Shape-Black |
| Light Source Type | E26 (bulbs not included) |
| Number of Light Sources | 4 |
| Max Wattage (per bulb) | 60W |
| Voltage | 110V |
| Control Method | Remote Control, App Control |
| Special Features | 6 Wind Speeds, 1/2/4/8H Timing, Reversible Motor, Adjustable Lampheads |
Recommended Bulbs: The fan requires 4 E26 bulbs. Various E26 bulb types are compatible, including Edison style, standard LED, and smart bulbs. (Bulbs not included).

Image: Product dimensions and examples of compatible E26 bulbs.
Setup and Installation
The Garwarm ceiling fan is designed for flush mount installation. Detailed steps are provided in the included instruction manual. For visual guidance, you can scan the QR code found in the manual to access an installation video.
Remote Control Holder Installation
- Select a suitable location for the remote control holder.
- Use a drill to create pilot holes for the mounting screws.
- Secure the remote holder base to the wall.
- Slide the remote control into the installed holder.

Image: Remote control and its wall-mount holder.

Image: Drilling pilot holes for the remote control holder.

Image: Attaching the remote control to its wall-mounted holder.

Image: The remote control securely placed in its holder.
Operating Instructions
Your Garwarm ceiling fan can be controlled via the included remote control or a dedicated smartphone application.
Remote Control Functions
- Power Button: Turns the fan and light on/off.
- Fan Speed: Adjusts between 6 wind speed levels.
- Light On/Off: Controls the light independently.
- Timer Settings: Sets the fan to turn off after 1, 2, 4, or 8 hours.
- Forward/Reverse Rotation: Changes the direction of the fan blades for summer (downward airflow) or winter (upward airflow) modes.
- Natural Wind Mode: Simulates a natural breeze.

Image: Overview of remote control buttons and corresponding app functions.
App Control
The fan can also be controlled using a smartphone application. Refer to the instruction manual for details on downloading and pairing the app with your fan. The app allows for control of fan speeds, light on/off, and timer functions.
Video: Demonstrates how to use the remote and the companion app to control the fan and lights.
Adjustable Lampheads
The four caged lampheads are flexible and can be adjusted 180°/360° to customize the lighting angle, directing light where it is most needed.
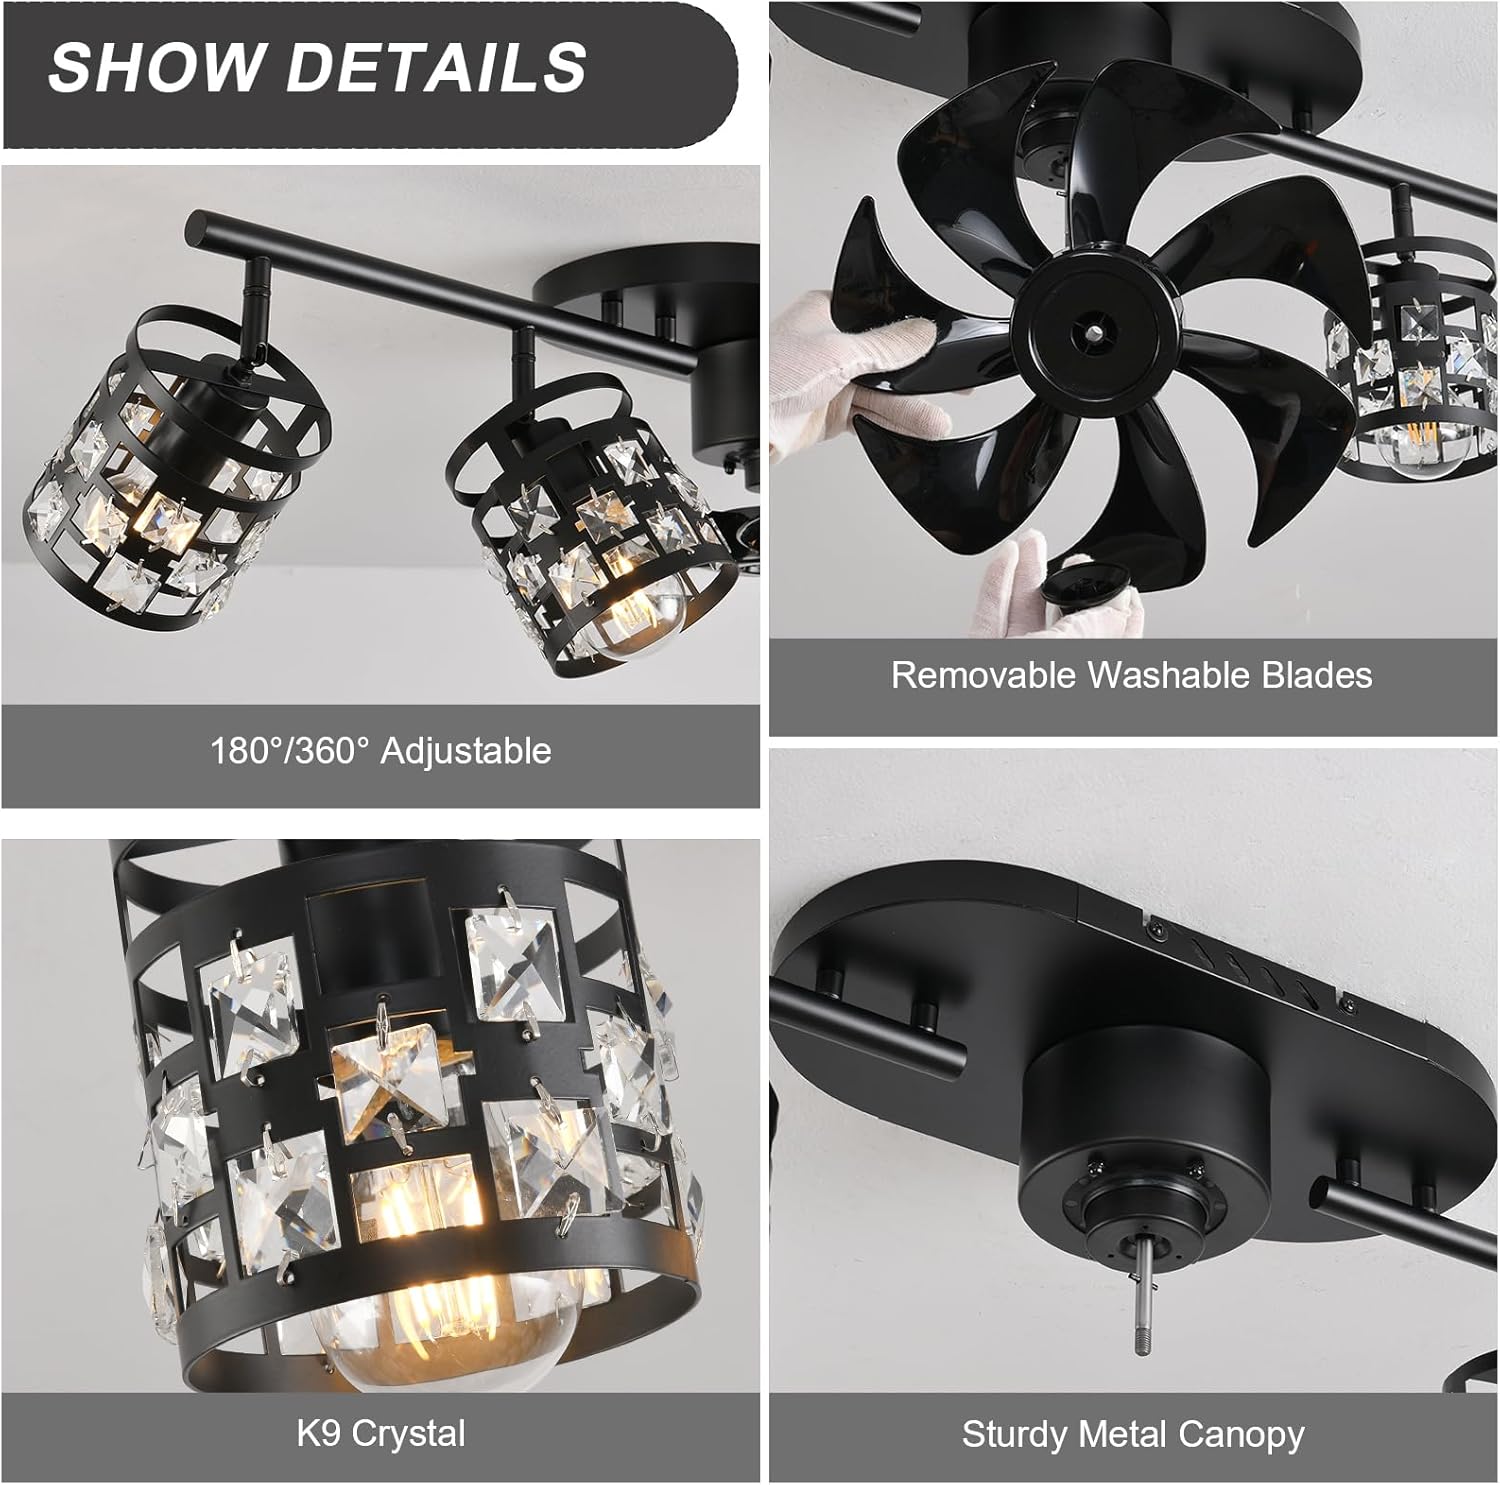
Image: Detailed view of the adjustable lampheads and removable fan blades.
Airflow Circulation (Summer/Winter Mode)
The reversible motor allows for optimal airflow year-round. In summer mode, the fan rotates forward to create a downward breeze, providing a cooling effect. In winter mode, the fan rotates in reverse to circulate warm air upwards, helping to distribute heat more evenly.

Image: Visual representation of summer and winter fan modes for optimal air circulation.
Video: Demonstrates the fan's operation, including light and fan functions, and the reversible motor feature.
Maintenance
Regular cleaning and maintenance will ensure the longevity and optimal performance of your ceiling fan.
- Cleaning: Ensure the fan is turned off and power is disconnected before cleaning. Wipe the fan blades and light fixtures with a soft, damp cloth. Avoid using harsh chemicals or abrasive cleaners.
- Removable Blades: The fan features removable blades for easier cleaning. Gently detach the blades, clean them, and reattach securely.

Image: Demonstrates the cleaning process for the removable fan blades.
Troubleshooting
If you encounter issues with your Garwarm ceiling fan, refer to the following common solutions:
- Fan or Light Not Responding: Check if the power supply is on. Ensure the remote control batteries are not depleted and are inserted correctly. Try re-pairing the remote or app if necessary (refer to the app instructions).
- Unusual Noise: Ensure all screws and connections are tight. Check if the fan blades are securely attached and balanced.
- Fan Not Providing Sufficient Airflow: Verify the fan speed setting. Ensure the fan is in the correct mode (summer/winter) for desired airflow direction.
For persistent issues, please contact Garwarm customer support.
Warranty and Support
Garwarm provides a 2-year after-sales service for this product. We are committed to upholding the highest standards for all our products by testing each for optimal performance. For any inquiries or support needs, please refer to the contact information provided in your purchase documentation or visit the official Garwarm store.