Introduction
This manual provides essential instructions for the safe and efficient operation, setup, and maintenance of your Generic CMAPADJ Automatic Airpot Coffee Maker. Designed for commercial use, this unit delivers consistent coffee quality for high-volume environments such as restaurants and cafes. Please read this manual thoroughly before installation and use.
Important Safety Information
- Always ensure the unit is properly grounded to prevent electrical shock.
- Do not immerse the appliance, cord, or plug in water or other liquids.
- Unplug the coffee maker from the outlet when not in use and before cleaning.
- Do not operate any appliance with a damaged cord or plug, or after the appliance malfunctions or has been damaged in any manner.
- Use only accessories recommended by the manufacturer.
- Keep hands and cords away from hot surfaces.
- This appliance is intended for commercial use only.
Product Components
Familiarize yourself with the main parts of your CMAPADJ Automatic Airpot Coffee Maker.
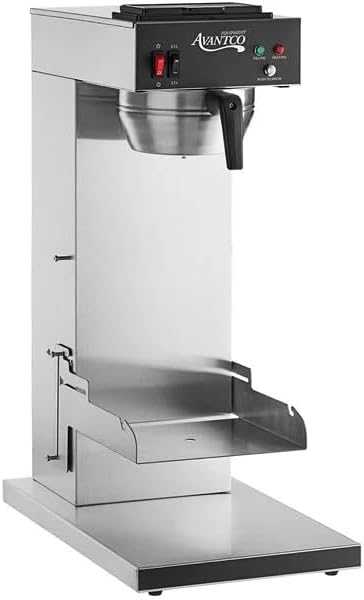
Figure 1: Front View. This image displays the front of the coffee maker, showing the brew basket, control panel with power and heating indicators, and the adjustable shelf in its upper position.

Figure 2: Side View. This image shows the side profile of the coffee maker, highlighting its compact design and the mechanism for the adjustable shelf.
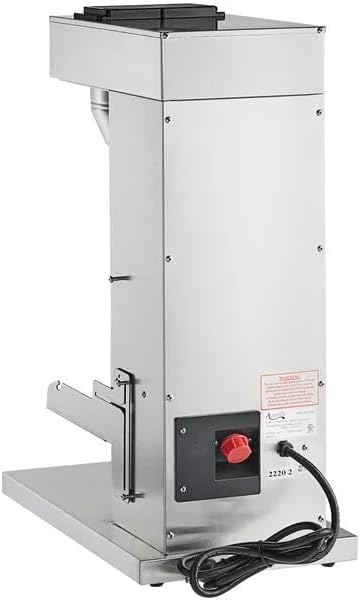
Figure 3: Rear View. This image illustrates the back of the coffee maker, including the power cord connection and the main power switch.

Figure 4: Filter Basket. A detailed view of the stainless steel filter basket, designed to hold coffee grounds during the brewing process.
Setup Instructions
- Unpacking: Carefully remove the coffee maker from its packaging. Inspect for any shipping damage.
- Placement: Place the unit on a stable, level, heat-resistant surface. Ensure adequate clearance around the unit for ventilation.
- Power Connection: Connect the power cord to a grounded 120V, 1450W electrical outlet.
- Initial Cleaning: Before first use, clean the brew basket and airpot (if included) with warm, soapy water. Rinse thoroughly.
- Water Fill: Fill the water reservoir with fresh, cold water. Do not overfill.
- Adjustable Shelf: Adjust the shelf height to accommodate your airpot or serving vessel. The shelf can be moved up or down by loosening the side screws, positioning, and then re-tightening.
Operating Instructions
- Power On: Flip the main power switch to the "ON" position. The "HEATING" indicator light will illuminate.
- Add Coffee Grounds: Place a commercial coffee filter into the brew basket. Add the desired amount of coffee grounds.
- Position Airpot: Place your airpot or serving vessel on the adjustable shelf directly beneath the brew basket.
- Start Brewing: Once the water has reached the optimal brewing temperature (indicated by the "READY" light), press the "BREW" button to start the brewing cycle.
- Brewing Process: Hot water will dispense over the coffee grounds, and brewed coffee will drip into the airpot. The brewing temperature is maintained between 190-200°F for consistent results.
- Completion: Once the brewing cycle is complete, the "BREWING" indicator will turn off. Carefully remove the airpot.
- Repeat: To brew another batch, repeat steps 2-5. Ensure the water reservoir is refilled as needed.
This unit is designed to brew up to 60 (8 oz.) cups per hour, equivalent to approximately 3.8 gallons.
Maintenance and Cleaning
Regular cleaning and maintenance will ensure the longevity and optimal performance of your coffee maker.
- Daily Cleaning:
- Unplug the unit and allow it to cool completely.
- Remove and discard used coffee grounds and filter.
- Wash the brew basket and airpot (if applicable) with warm, soapy water. Rinse thoroughly and dry.
- Wipe down the exterior of the machine with a damp cloth. Do not use abrasive cleaners or scouring pads.
- Descaling (Monthly or as needed):
- Mineral deposits can build up over time, affecting performance.
- Use a commercial descaling solution or a mixture of white vinegar and water (1 part vinegar to 2 parts water).
- Run the descaling solution through a brew cycle without coffee grounds.
- Follow with several cycles of fresh water to rinse thoroughly.
- Adjustable Shelf: Periodically check the tightness of the screws holding the adjustable shelf. Tighten if necessary.
Troubleshooting Guide
| Problem | Possible Cause | Solution |
|---|---|---|
| Coffee maker does not turn on. | No power supply; unit unplugged; circuit breaker tripped. | Ensure unit is plugged in; check power outlet; reset circuit breaker. |
| Coffee is not brewing. | Water reservoir empty; "BREW" button not pressed; unit not heated. | Fill water reservoir; press "BREW" button; wait for "READY" light. |
| Coffee brews too slowly. | Mineral buildup in heating elements; clogged spray head. | Descale the unit; clean the spray head. |
| Coffee tastes weak or bitter. | Incorrect coffee-to-water ratio; water temperature issues; stale coffee. | Adjust coffee grounds amount; ensure unit is fully heated; use fresh coffee. |
Product Specifications
- Model: CMAPADJ
- Brand: Generic
- Power: 120V, 1450W
- Dimensions (D x W x H): 18" x 11" x 27"
- Capacity: 3.8 Gallons (approx. 60 x 8 oz. cups per hour)
- Brewing Temperature: 190-200°F (non-adjustable)
- Construction: Stainless Steel
- Operation Mode: Fully Automatic
- Item Weight: 33 pounds
Warranty and Customer Support
For warranty information, please refer to the documentation provided at the time of purchase or contact the retailer. For technical support or service inquiries, please contact Generic customer service directly. Contact details can typically be found on the product packaging or the manufacturer's official website.


