1. Introduction
This manual provides detailed instructions for the installation, operation, and maintenance of your Uckazy 10.25 Inch Android Auto Radio. This device is designed to enhance your driving experience by integrating modern multimedia features while retaining the original functionalities of your BMW 5 Series F10/F11 (2011-2012) CIC system.

Image 1.1: The Uckazy 10.25 Inch Android Auto Radio with a CarPlay interface displayed.
2. Compatibility
This unit is specifically designed for BMW 5 Series F10/F11 models manufactured between 2011 and 2012, equipped with the CIC system. It is crucial to verify your vehicle's system type before installation to ensure compatibility.
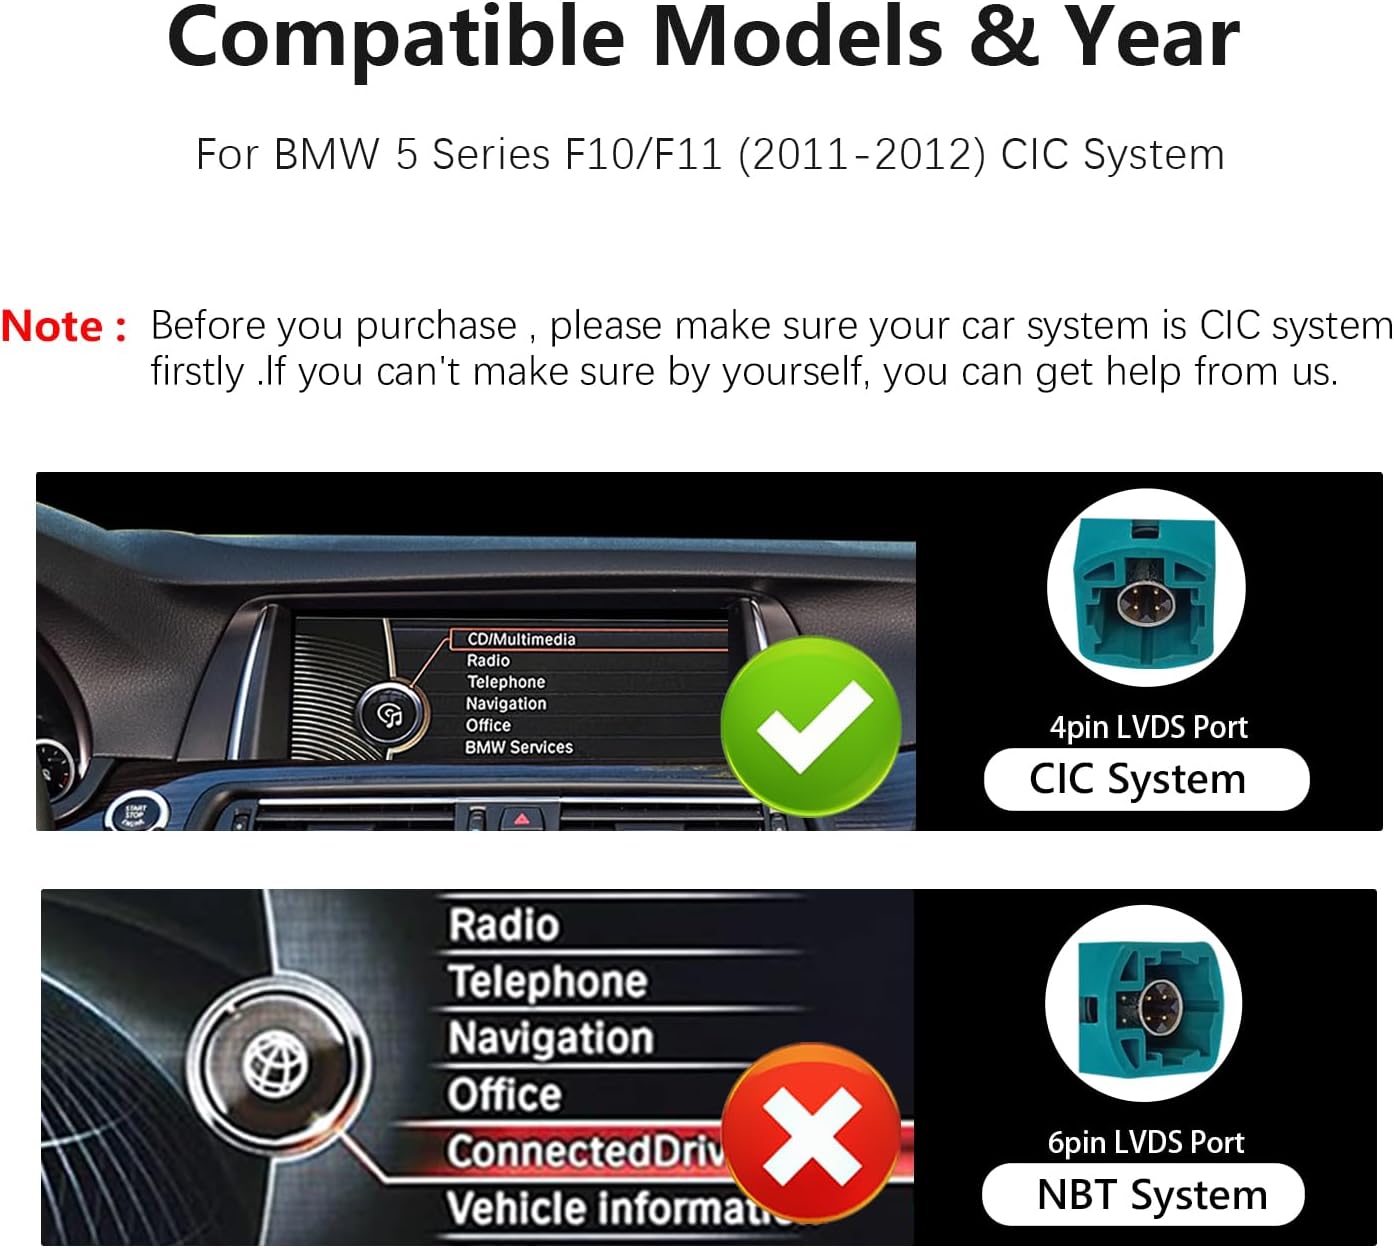
Image 2.1: Visual guide for identifying CIC system compatibility by checking the LVDS port type (4-pin for CIC, 6-pin for NBT).
Note: Please confirm your car's system is CIC (4-pin LVDS port) before proceeding with installation. If you are uncertain, consult a professional or contact customer support.
3. Product Features
- 10.25-inch HD Touch Screen: Features an ultra-narrow 12.3-inch (HD 1920x720) IN-CELL screen with full lamination technology for enhanced clarity and reduced reflection.
- Dual System Integration: Seamlessly switch between the Linux system and your original car system with a single click.
- Wireless Connectivity: Supports wireless and wired Apple CarPlay, wireless and wired Android Auto, wireless Mirrorlink for iOS and Android phones, Bluetooth, and Wi-Fi.
- Retains Original Functions: Preserves original car radio, amplifier function, factory steering wheel controls, original iDrive controller, display of speed, fuel level, oil pressure, safety warnings, and original reverse camera functionality. No software changes are made to the vehicle's control unit.
- Built-in DSP: Equipped with a 16-segment Digital Signal Processor (DSP) for advanced audio tuning and equalization, allowing for customized sound profiles.

Image 3.1: Visual representation of the various features supported by the unit.

Image 3.2: Examples of original car functions that are retained after installation.
4. Setup and Installation
The Uckazy Android Auto Radio is designed for plug-and-play installation. However, professional installation is recommended. Ensure the vehicle's power is off before beginning the installation process.
4.1 Included Components

Image 4.1: The main unit dimensions and a list of included accessories for installation.
4.2 Wiring Connections
Carefully follow the wiring diagrams and instructions below. Pay close attention to connecting the correct interfaces.
- Fiber Optic Cable: If your original system uses a fiber optic cable, you will need to transfer it to the new power harness.
- Power Cable: Connect the provided power cable to the original car's power cable. Ensure a secure connection.
- USB Connection: For optimal performance, use the USB IN 1 port for connecting devices.

Image 4.2: Diagram illustrating the optical fiber connection.

Image 4.3: Diagram illustrating the ISO harness connection.

Image 4.4: Illustration emphasizing the use of USB IN 1 for primary connections.
4.3 Installation Video Guide
Video 4.1: A step-by-step guide demonstrating the installation process, including fiber optic cable and power cable connections.

Image 4.5: A visual comparison of the car's interior before and after the installation of the new display unit.
5. Operating Instructions
5.1 Switching Between Systems
The unit allows for a quick switch between the new Linux system interface and the original BMW car system. This ensures you can access all original vehicle functions as needed.

Image 5.1: Illustration of switching between the original car system and the new display unit's interface.
5.2 Wireless CarPlay and Android Auto
Connect your smartphone wirelessly to access navigation, phone contacts, messages, music, and voice assistants (Siri or Google Voice Assistant).
- For Wired Connection: Connect your iPhone to the device via a high-quality data cable.
- For Wireless Connection: Use your iPhone to search for the device's Bluetooth name (e.g., "CAR-****") and confirm the authorization request on your iPhone.
Video 5.2: Demonstration of connecting a smartphone for wireless CarPlay functionality.

Image 5.2: Examples of the wireless CarPlay and Android Auto interfaces.

Image 5.3: The voice control feature in action, showing prompts for Siri and Google Assistant.
5.3 Day and Night Mode
The unit features automatic light sensitivity, adjusting the display's day and night mode based on your car's original headlights for optimal visibility.

Image 5.4: Illustration of the automatic day and night mode adjustment.
5.4 Audio Settings (DSP)
Utilize the built-in 16-segment DSP to fine-tune your audio experience. Access the equalizer settings to adjust sound quality, speaker positioning, and create custom sound profiles.

Image 5.5: The DSP equalizer interface displayed on the unit's screen.
5.5 Camera and Display Settings
Access the setup menu to configure camera types (original or aftermarket) and adjust screen resolution for optimal display.

Image 5.6: Camera settings menu.

Image 5.7: Screen resolution adjustment options.
6. Specifications
- Product Dimensions: 2.37 x 12.2 x 5.15 inches
- Item Weight: 3.38 pounds
- Item Model Number: F10CIC-LIN
- Connectivity Technology: Bluetooth
- Controller Type: Manual control (touchscreen, original iDrive)
- Special Features: Touchscreen, Voice Control, Maps, Enhanced User Interface
- Compatible Devices: Smartphone
- Total HDMI Ports: 4 (Note: This might refer to internal connections or specific models, verify with product details if external HDMI is expected)
- Connector Type: Stereo Audio
- Audio Output Mode: Stereo, Surround
- Surround Sound Channel Configuration: 2.1
- Video Encoding: H.264, H.265/HEVC
7. Troubleshooting
If you encounter issues with the product, consider the following common solutions:
- Connection Issues: Many problems arise from incorrect wiring or settings. Double-check all cable connections, especially the fiber optic and power cables, ensuring they are securely and correctly plugged into the designated interfaces. Refer to Section 4.2 and Video 4.1.
- System Settings: Verify that all settings, including screen resolution and camera type, are configured correctly within the unit's menu.
- Compatibility: Reconfirm that your vehicle is a BMW 5 Series F10/F11 (2011-2012) with a CIC system. Incompatibility can lead to various functional problems.
- No Sound: Ensure the AUX input is correctly selected on your original car system, as the new unit often routes audio through AUX. Check the 'Auto Switch to AUX' setting in the unit's car settings menu.

Image 7.1: Car settings menu, highlighting the 'Auto Switch to AUX' option.
For persistent issues, provide clear pictures and a detailed description of the problem when contacting support.
8. Warranty and Support
Uckazy specializes in automotive electronic products and offers support for its devices. If you encounter any problems or have questions regarding compatibility or functionality:
- Contact Seller: For product-specific inquiries, technical assistance, or troubleshooting guidance, please contact the seller directly through the platform where the product was purchased.
- Provide Details: When seeking support, describe the issue clearly and provide any relevant pictures or videos to help diagnose the problem efficiently.