1. Introduction
The Reolink P320 is a 5-megapixel Power over Ethernet (PoE) IP security camera designed for both indoor and outdoor surveillance. It features advanced person and vehicle detection, high-definition night vision, and two-way audio communication. This manual provides essential information for the proper installation, operation, and maintenance of your P320 camera.
2. Package Contents
Verify that all items are present in your package:
- P320 PoE Security Camera
- Quick Start Guide
- Mounting and Installation Accessories (screws, wall plugs, mounting template)
- Waterproof Lid for Network Connection
- Power Adapter (for optional power supply, camera primarily uses PoE)
3. Setup
3.1 Physical Installation
Select a suitable location for your camera, ensuring it has a clear field of view and is within range of your network cable. Use the provided mounting template and screws to securely attach the camera to a wall or ceiling. Ensure the camera is positioned to cover the desired surveillance area.

Image: Example of a PoE system setup. This image illustrates how multiple PoE cameras can be integrated into a home security network, connecting to a Network Video Recorder (NVR) for centralized management and recording.
3.2 Network Connection (PoE)
The P320 camera is designed for Power over Ethernet (PoE). Connect one end of an Ethernet cable to the camera's Ethernet port and the other end to a PoE-enabled switch, PoE injector, or a Reolink NVR. This single cable provides both power and data connectivity. Use the waterproof lid for the network connection if installing outdoors to protect against moisture.
3.3 Initial Configuration
Download the Reolink App from your mobile app store or the Reolink Client software for your computer. Follow the on-screen instructions to add your camera to the application. You will typically scan a QR code on the camera or manually enter its UID. Set up a strong password for your camera to ensure security.
4. Operating the Camera
4.1 Live View and Recording
Access the live feed of your camera through the Reolink App or Client software. The camera supports 5MP Super HD resolution, providing clear and detailed visuals. You can initiate manual recordings or configure continuous recording to a local microSD card (up to 256GB, not included) or an NVR.

Image: 5MP Super HD View. This image demonstrates the enhanced visual clarity and detail provided by the 5MP resolution compared to a lower 3MP resolution.
4.2 Night Vision
The P320 camera is equipped with infrared LEDs for high-definition night vision, allowing for clear monitoring in low-light or complete darkness up to 30.5 meters (100 feet). The camera automatically switches between day and night modes based on ambient light conditions.
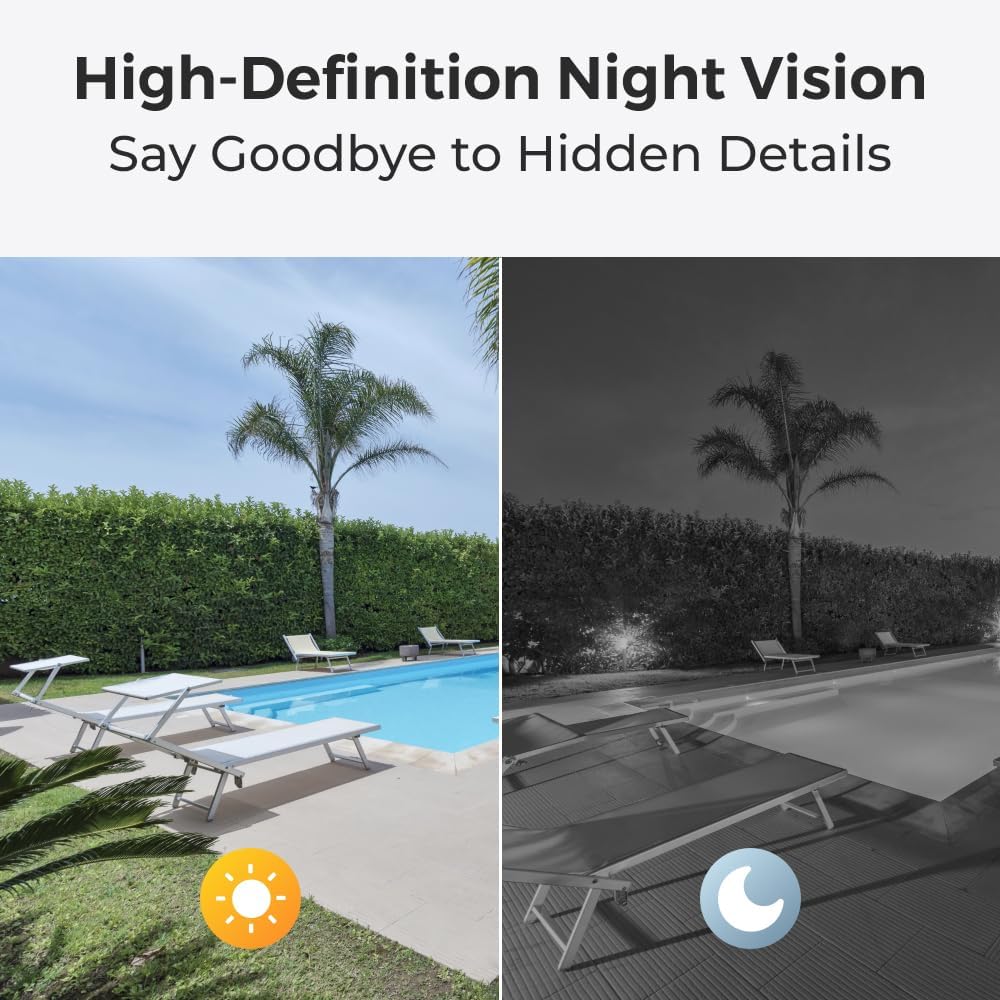
Image: High-Definition Night Vision. This image illustrates the camera's capability to capture clear footage in complete darkness using its infrared night vision feature.
4.3 Person/Vehicle Detection and Motion Detection
Configure motion detection settings within the Reolink App/Client. The camera features intelligent person and vehicle detection, which helps reduce false alarms caused by irrelevant movements like swaying branches. You can define specific motion zones to monitor critical areas and receive alerts only when a person or vehicle is detected.

Image: Person/Vehicle/Motion Detection. This image demonstrates the camera's ability to identify and highlight persons and vehicles within a user-defined surveillance zone, minimizing false alarms.
4.4 Two-Way Audio
The P320 includes a built-in microphone and speaker, enabling two-way audio communication. Through the Reolink App, you can listen to audio from the camera's location and speak through the camera's speaker to communicate with individuals near the camera.

Image: 2-Way Audio. This image illustrates the two-way audio functionality, allowing users to listen and speak through the camera using the mobile application.
5. Maintenance
Regular maintenance ensures optimal performance and longevity of your camera:
- Cleaning: Gently wipe the camera lens with a soft, damp cloth to remove dust or smudges. Avoid abrasive cleaners.
- Firmware Updates: Periodically check for and install firmware updates through the Reolink App or Client software. Updates often include performance improvements and security enhancements.
- Cable Connections: Ensure all cable connections, especially the Ethernet cable, are secure and free from damage.
6. Troubleshooting
If you encounter issues with your Reolink P320 camera, refer to the following common troubleshooting steps:
- No Power/No Image: Ensure the Ethernet cable is securely connected to both the camera and a PoE-enabled device (PoE switch/injector/NVR). Verify that the PoE device is powered on. If using the optional power adapter, ensure it is correctly connected to a power source.
- Network Connection Issues: Check your network cables and router/switch. Ensure the camera's IP address is correctly configured and not conflicting with other devices on your network.
- False Alarms: Adjust the motion detection sensitivity and define specific detection zones within the Reolink App/Client to minimize unwanted alerts from environmental factors.
- Poor Image Quality: Ensure the camera lens is clean. Check your network bandwidth, as insufficient bandwidth can affect streaming quality.
- Audio Issues: Verify that the microphone and speaker settings are enabled in the Reolink App/Client. Ensure there are no obstructions blocking the microphone or speaker.
7. Specifications
| Model | P320 |
| Image Sensor | 5 Megapixel (2K+ Super HD) |
| Video Resolution | 2560x1920 (5MP) |
| Connectivity | Wired (Power over Ethernet - PoE) |
| Night Vision Range | Up to 30.5 meters (100 feet) |
| Special Features | 2-Way Audio, Person/Vehicle Detection, Motion Sensor, Local Recording |
| Storage | MicroSD card slot (up to 256GB, not included) |
| Usage Environment | Indoor/Outdoor (Waterproof) |
| Mounting Type | Wall Mount |
| Dimensions | 14.8 x 7.4 x 7.4 cm |
| Material | Metal |
8. Warranty and Support
Reolink products typically come with a manufacturer's warranty. Please refer to the warranty card included in your package or visit the official Reolink website for specific warranty terms and conditions applicable to your region. For technical support, product inquiries, or further assistance, please visit the official Reolink support page or contact their customer service directly.
Official Reolink Website: reolink.com