1. Introduction
This manual provides comprehensive instructions for the INQMEGA ST-599-6M-20X-10W-4G-US-3 6MP Dual-Lens 20X Optical Zoom 4G Cellular Solar Security Camera. This advanced surveillance system is designed for outdoor use, offering high-resolution video, extensive zoom capabilities, and reliable operation through 4G cellular connectivity and solar power. Please read this manual carefully before installation and operation to ensure proper use and optimal performance.
Key features include a 6MP dual-lens system with 20X optical zoom, 4G LTE cellular connectivity (SIM card included), a 10W solar panel for continuous power, a 20000mAh built-in battery, PIR motion detection, and various night vision modes including color and laser infrared.
2. Package Contents
Verify that all items listed below are present in your package. If any items are missing or damaged, please contact customer support.
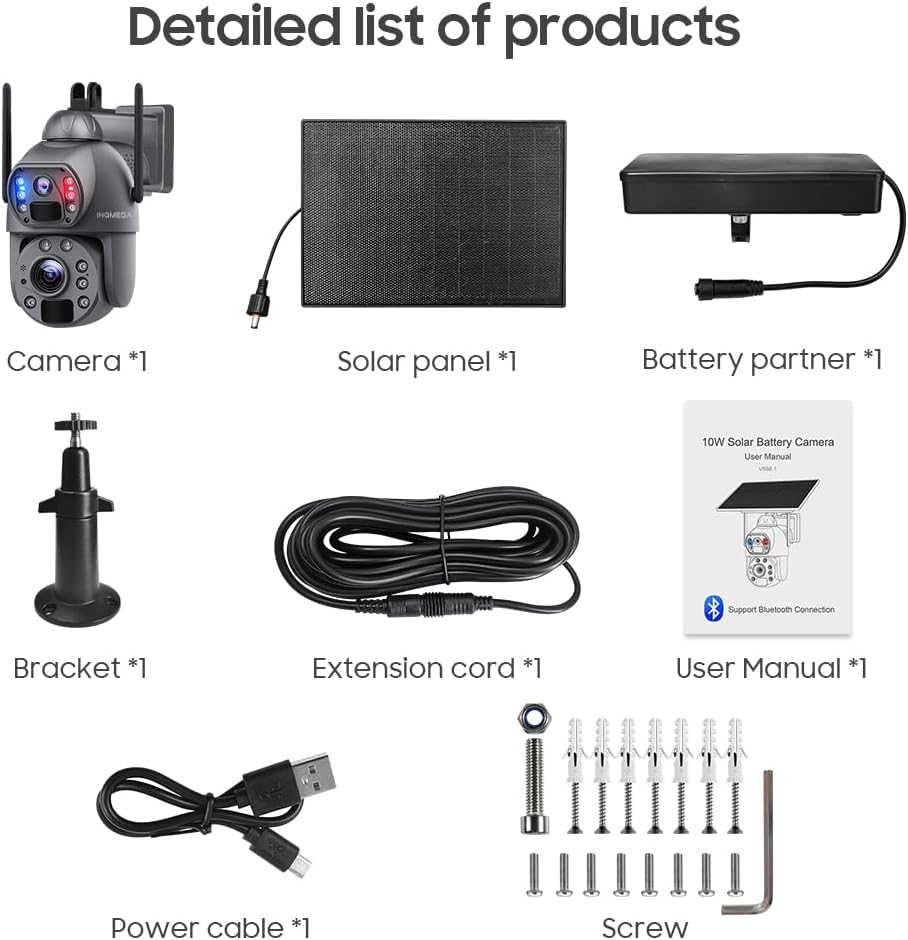
Image 2.1: Detailed list of products included in the package. This image shows the main camera unit, solar panel, battery partner, mounting bracket, extension cord, user manual, power cable, and various screws and anchors for installation.
- 1x INQMEGA Solar Camera Unit
- 1x 10W Solar Panel
- 1x Battery Partner (pre-installed 20000mAh battery)
- 1x Mounting Bracket
- 1x Extension Cord
- 1x User Manual (this document)
- 1x Power Cable (USB)
- 1x 4G LTE SIM Card
- Mounting Screws and Anchors
3. Product Overview
Familiarize yourself with the components and features of your INQMEGA solar security camera.

Image 3.1: Component diagram of the INQMEGA solar camera. Labels include Wide-Angle Lens, Red-Blue Alarm Light, PIR Sensor, Microphone, ZOOM Lens, Photoresistance, LED Indicator, White & IR LEDs, Laser Infrared Lamp, Antenna, and overall dimensions.
3.1 Key Components
- Wide-Angle Lens (2.8mm): Provides a broad field of view for general surveillance.
- ZOOM Lens (4.9+47.04mm): Offers 20X optical zoom for detailed distant viewing.
- Red-Blue Alarm Light: Flashes to deter intruders upon motion detection.
- PIR Sensors: Passive Infrared sensors for accurate human motion detection (Max 12M).
- Microphone & Speaker: Enables two-way audio communication.
- White & IR LEDs: Provide illumination for color night vision and infrared night vision.
- Laser Infrared Lamp: Enhances night vision clarity at longer distances, especially during zoom.
- LED Indicator: Shows camera status (e.g., charging, operating, network status).
- Antenna: For 4G cellular signal reception.
- 10W Solar Panel: Charges the internal battery using sunlight.
4. Setup
4.1 SIM Card and SD Card Installation
- Locate the SIM card slot and SD card slot on the camera unit. These are typically protected by a rubber cover.
- Insert the provided 4G LTE SIM card into the SIM card slot. Ensure it is inserted in the correct orientation.
- (Optional) Insert a Micro SD card (up to 128GB, not included) into the SD card slot for local video storage.
- Securely close the rubber cover to ensure weather resistance.
4.2 Initial Battery Charging and Solar Panel Connection
Before initial use, it is recommended to fully charge the camera's built-in 20000mAh battery using the provided USB power cable.
- Connect the USB power cable to the camera's charging port and a standard USB power adapter (not included).
- Allow the camera to charge until the LED indicator shows a full charge.
- Connect the 10W solar panel to the camera's solar input port. Ensure a secure connection.

Image 4.1: The camera connected to its solar panel, illustrating how solar energy provides continuous power throughout the day and night.
4.3 Mounting the Camera
- Choose a suitable outdoor location with good 4G signal reception and ample direct sunlight for the solar panel.
- Use the provided mounting bracket, screws, and anchors to securely attach the camera to a wall or pole.
- Adjust the camera's angle to cover the desired surveillance area. Ensure the solar panel is positioned to receive maximum sunlight.
4.4 App Installation and Pairing
- Download the UBOX application from your smartphone's app store (iOS or Android).
- Register for a new account or log in if you already have one.
- Follow the in-app instructions to add your new INQMEGA camera. This typically involves scanning a QR code on the camera or manually entering its device ID.
- Ensure your phone's Bluetooth is enabled during the pairing process if prompted.
5. Operating Instructions
5.1 Live View and Playback
Once paired, open the UBOX app to access the live feed from your camera. You can switch between the wide-angle and zoom lenses, and review recorded footage.

Image 5.1: The INQMEGA camera alongside a smartphone displaying the UBOX app interface, showing live dual-lens views and various control icons.
5.2 20X Optical Zoom Functionality
The camera features a unique dual-lens system allowing for 20X optical zoom. In the UBOX app, the dual lenses are displayed as two separate screens, enabling simultaneous wide-angle and zoomed views.

Image 5.2: Visual representation of the 20X optical and digital zoom, showing how the camera can magnify distant objects from 1X to 20X, revealing details like a license plate number.

Image 5.3: A close-up of the camera's laser infrared lamps and a comparison between 1X zoom and 20X optical and digital zoom, highlighting enhanced detail at distance.
5.3 Night Vision Modes
The camera supports multiple night vision modes for clear surveillance in low-light conditions.
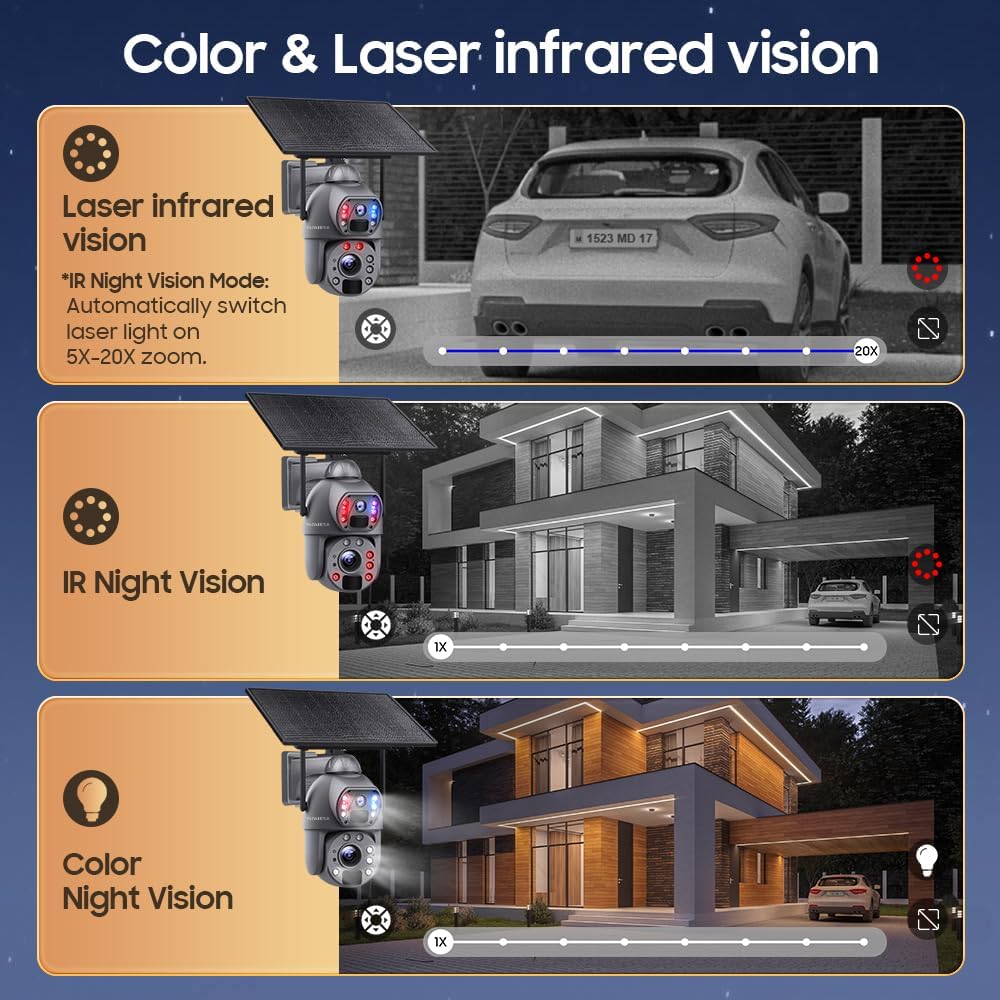
Image 5.4: This image demonstrates the three night vision modes: Laser Infrared Vision (automatically switches on for 5X-20X zoom), standard IR Night Vision (black and white), and Color Night Vision (requires ambient light or camera's white LEDs).
- IR Night Vision: Standard black and white infrared vision, effective up to 50m.
- Color Night Vision: Utilizes white LEDs to provide full-color video in low light.
- Laser Infrared Vision: Automatically activates laser lights for enhanced clarity during 5X-20X zoom in low light.
5.4 PIR Motion Detection and Alerts
The camera's advanced PIR sensors detect human movement up to 12 meters. Upon detection, the camera will:
- Push real-time alarm notifications to your smartphone via the UBOX app.
- Trigger a loud siren and activate the spotlight (Red-Blue Alarm Light) to deter intruders.
- Begin recording the event.
Note: The camera does not support automatic tracking of moving objects.
5.5 Two-Way Audio
The built-in microphone and speaker allow for two-way communication through the UBOX app. You can listen to audio from the camera's location and speak through the camera's speaker.

Image 5.5: An illustration showing the two-way audio functionality, where a user can speak through the camera to a person at the camera's location, such as a delivery person.
5.6 Video Storage
Recorded events can be stored in two ways:
- Micro SD Card: Supports up to 128GB (not included). Recordings are stored locally on the card.
- Cloud Storage: A cloud storage service is available (30 days free trial). Refer to the UBOX app for subscription details.
6. Maintenance
6.1 Cleaning
- Regularly clean the solar panel surface to ensure maximum charging efficiency. Use a soft, damp cloth to wipe away dust and debris.
- Gently clean the camera lenses with a microfiber cloth to maintain clear image quality. Avoid abrasive materials or harsh chemicals.
6.2 Battery Care
- Ensure the solar panel is positioned to receive adequate sunlight daily to keep the battery charged.
- In prolonged periods of low sunlight, the camera can operate for approximately 3 months on a full charge (based on 30 wake-ups per day, 20 seconds each).
- If the battery level becomes critically low, consider manually charging the camera via the USB port.
6.3 Firmware Updates
Periodically check the UBOX app for available firmware updates. Keeping your camera's firmware updated ensures optimal performance, security, and access to new features.
7. Troubleshooting
- Camera not powering on: Ensure the battery is charged. Check the solar panel connection and sunlight exposure. Try charging via USB.
- No 4G signal: Verify the SIM card is correctly inserted and activated. Check the signal strength in the camera's location. Relocate the camera if necessary.
- Motion detection not working: Check PIR sensor settings in the UBOX app. Ensure the sensor is clean and unobstructed. Adjust sensitivity if needed.
- App connection issues: Ensure your smartphone has a stable internet connection. Restart the UBOX app and the camera. Re-pair the camera if necessary.
- Poor image quality: Clean the camera lenses. Check for obstructions. Ensure sufficient lighting for desired night vision mode.
- SD card not recording: Ensure the SD card is correctly inserted and formatted within the UBOX app. Check if the card is full.
8. Specifications
| Feature | Specification |
|---|---|
| Model Name | ST-599-6M-20X-10W-4G-US-3 |
| Video Capture Resolution | 6MP |
| Optical Zoom | 20X |
| Lens 1 (Wide-Angle) | 2.8mm |
| Lens 2 (Zoom) | 4.9mm + 47.04mm |
| Connectivity Technology | 4G LTE Cellular (SIM card included) |
| Power Source | 10W Solar Panel, 20000mAh Built-in Battery |
| PIR Human Detection Range | Max 12M (20ft) |
| Infrared Night Vision Distance | Up to 50m |
| LEDs | 2x Laser Lights, 10x Infrared Lights/White Lights |
| Audio Features | 2-Way Audio (Microphone, Speaker) |
| Storage Options | Amazon Cloud, TF Card (Max 128GB, not included) |
| Standby Time | Approx. 2 months (30 wake-ups/day, 20S each) |
| Item Weight | 5.5 pounds |
9. Warranty and Support
9.1 Product Warranty
The INQMEGA ST-599-6M-20X-10W-4G-US-3 camera comes with a 12-month warranty from the date of purchase. This warranty covers manufacturing defects and malfunctions under normal use. It does not cover damage caused by misuse, accidents, unauthorized modifications, or natural disasters.
9.2 Customer Support
For technical assistance, troubleshooting, or warranty claims, please refer to your purchase documentation for contact information or visit the official INQMEGA website. When contacting support, please have your product model number (ST-599-6M-20X-10W-4G-US-3) and proof of purchase readily available.