Jacgood JAC-KX-627
Jacgood 9.5Qt Dual Basket Air Fryer User Manual
Model: JAC-KX-627
Introduction
Thank you for purchasing the Jacgood 9.5Qt Dual Basket Air Fryer. This appliance is designed to provide a healthier way to cook your favorite foods with little to no oil. Its dual-zone technology allows for simultaneous cooking of different foods at different temperatures and times, offering convenience and versatility in your kitchen. Please read this manual thoroughly before use to ensure safe and optimal operation.
Important Safeguards
When using electrical appliances, basic safety precautions should always be followed, including the following:
- Read all instructions before use.
- Do not touch hot surfaces. Use handles or knobs.
- To protect against electrical shock, do not immerse cord, plugs, or main unit in water or other liquid.
- Close supervision is necessary when any appliance is used by or near children.
- Unplug from outlet when not in use and before cleaning. Allow to cool before putting on or taking off parts.
- Do not operate any appliance with a damaged cord or plug or after the appliance malfunctions or has been damaged in any manner.
- The use of accessory attachments not recommended by the appliance manufacturer may cause injuries.
- Do not use outdoors.
- Do not let cord hang over edge of table or counter, or touch hot surfaces.
- Do not place on or near a hot gas or electric burner, or in a heated oven.
- Extreme caution must be used when moving an appliance containing hot oil or other hot liquids.
- Always attach plug to appliance first, then plug cord into the wall outlet. To disconnect, turn any control to "off", then remove plug from wall outlet.
- Do not use appliance for other than intended use.
- Ensure the appliance is placed on a stable, heat-resistant surface.
- Allow adequate space around the appliance for proper air circulation.
Product Overview

Image: The Jacgood 9.5Qt Dual Basket Air Fryer, showcasing its two independent cooking baskets filled with fried chicken and french fries, ready for cooking.
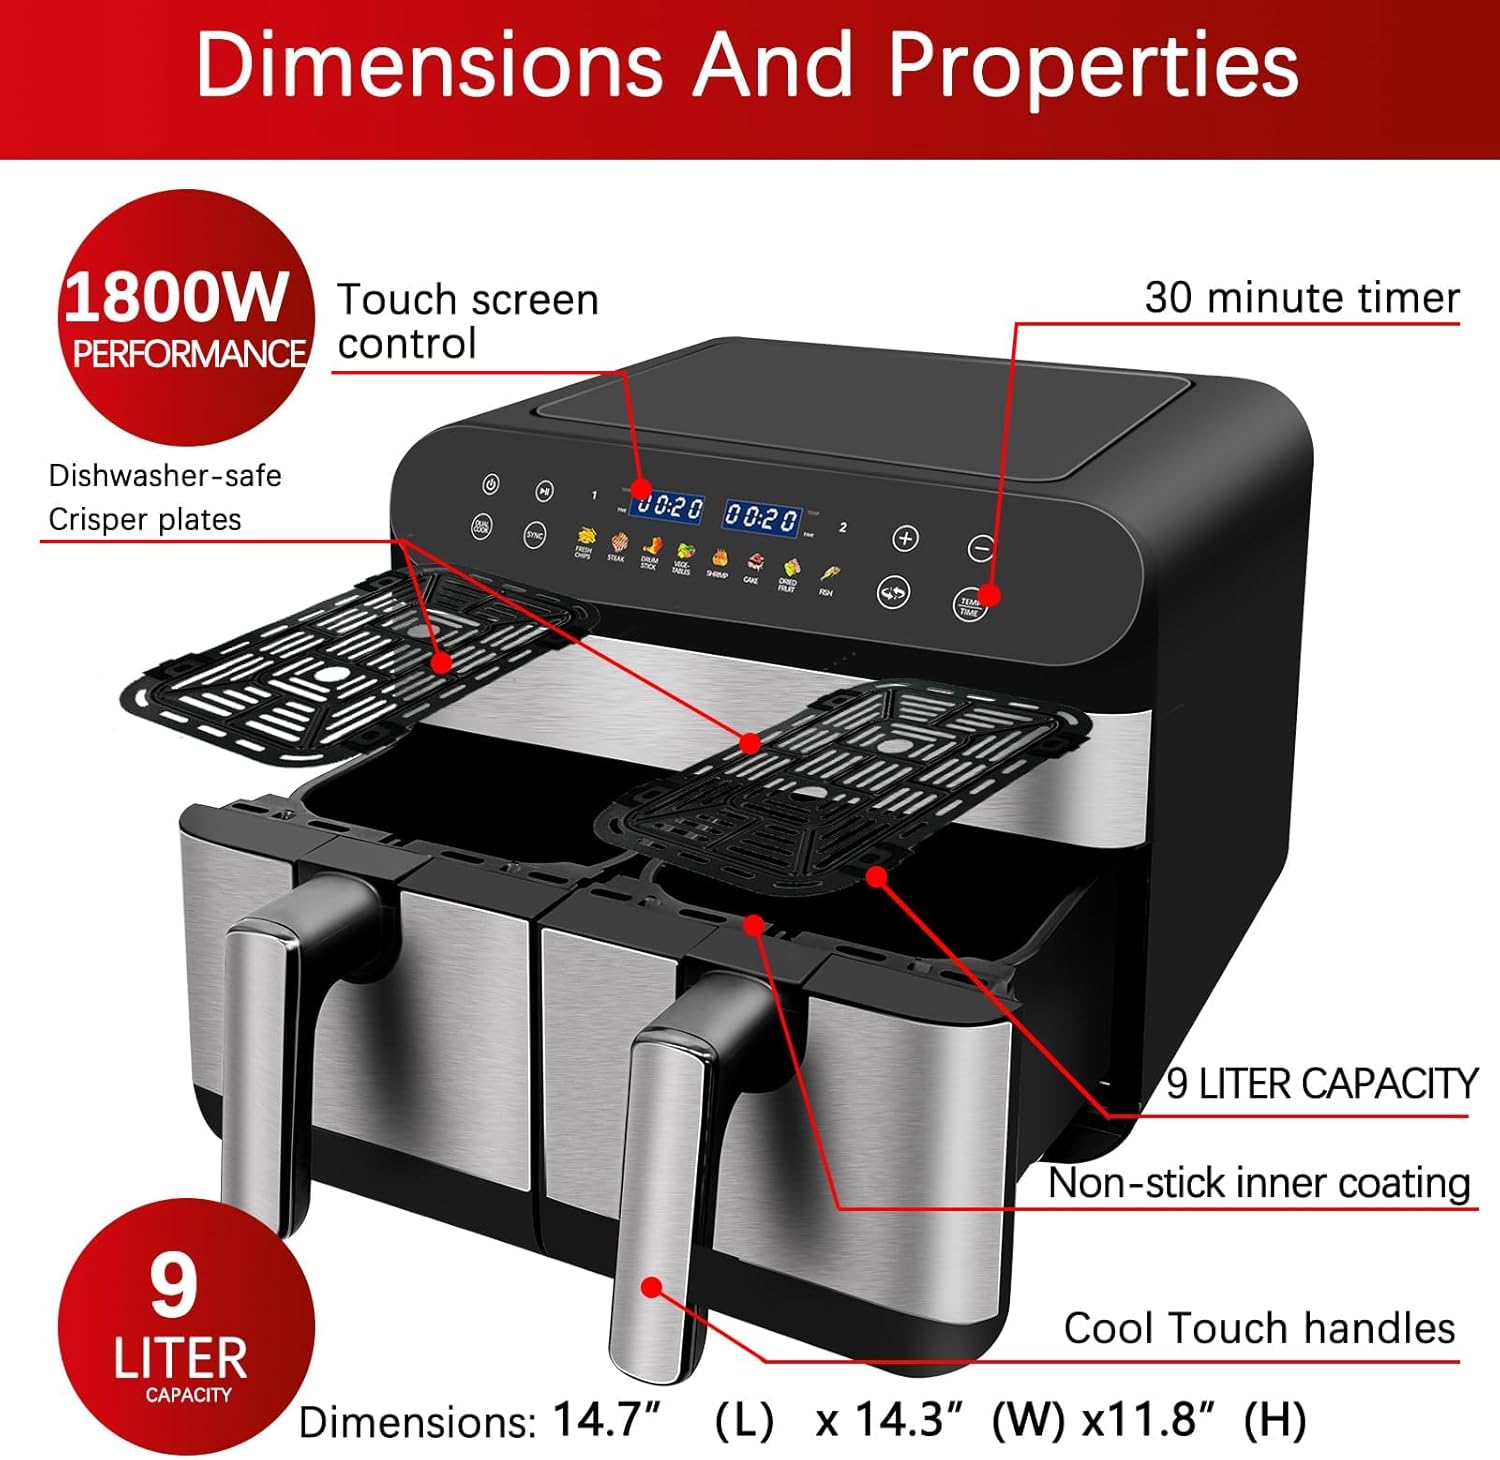
Image: A detailed diagram illustrating the dimensions and key properties of the air fryer, including its 1800W power, touch screen control, 30-minute timer, 9-liter capacity, non-stick inner coating, cool touch handles, and dishwasher-safe crisper plates.
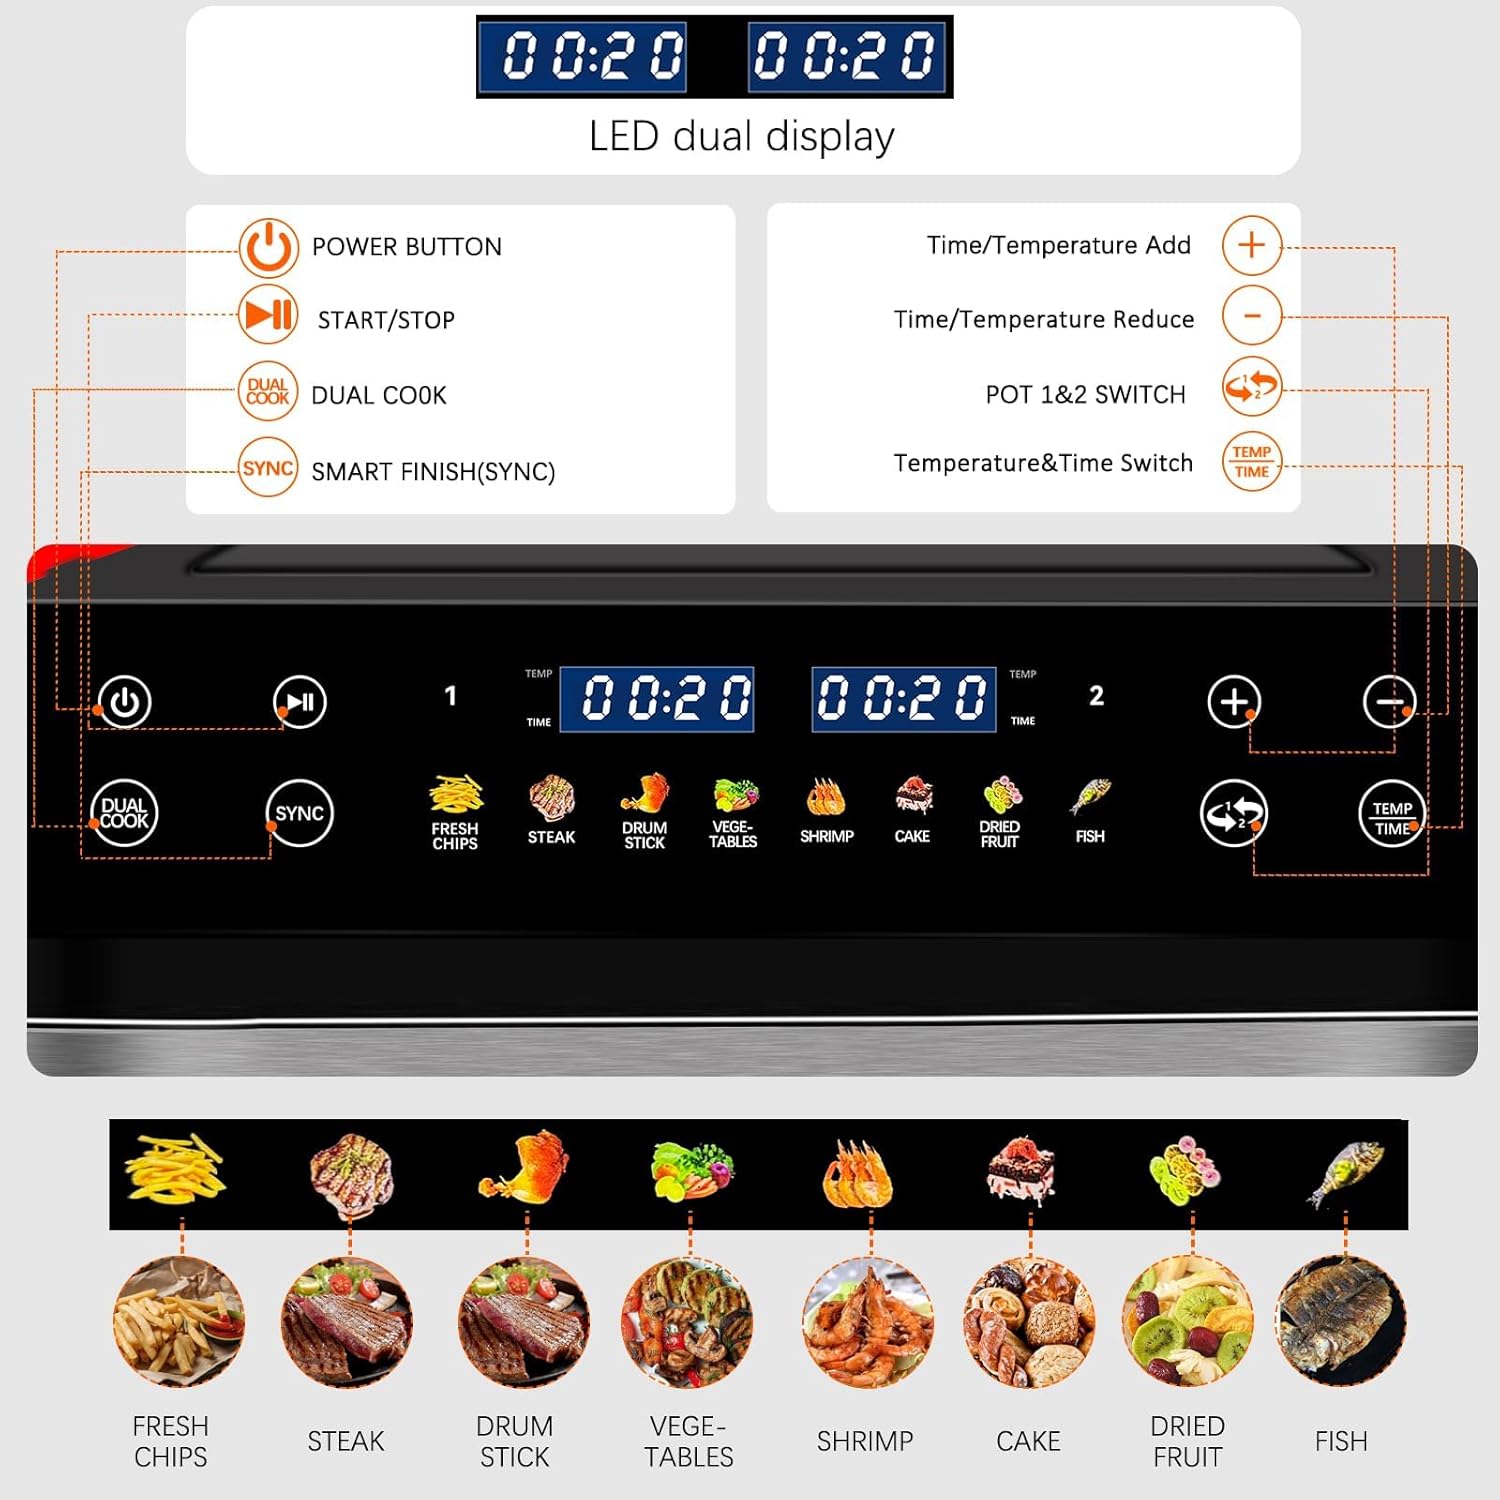
Image: A close-up view of the air fryer's digital control panel, highlighting the LED dual display for time and temperature, power button, start/stop, dual cook, smart finish (sync), time/temperature adjustment buttons, pot 1&2 switch, and temperature & time switch, along with 8 preset cooking icons.
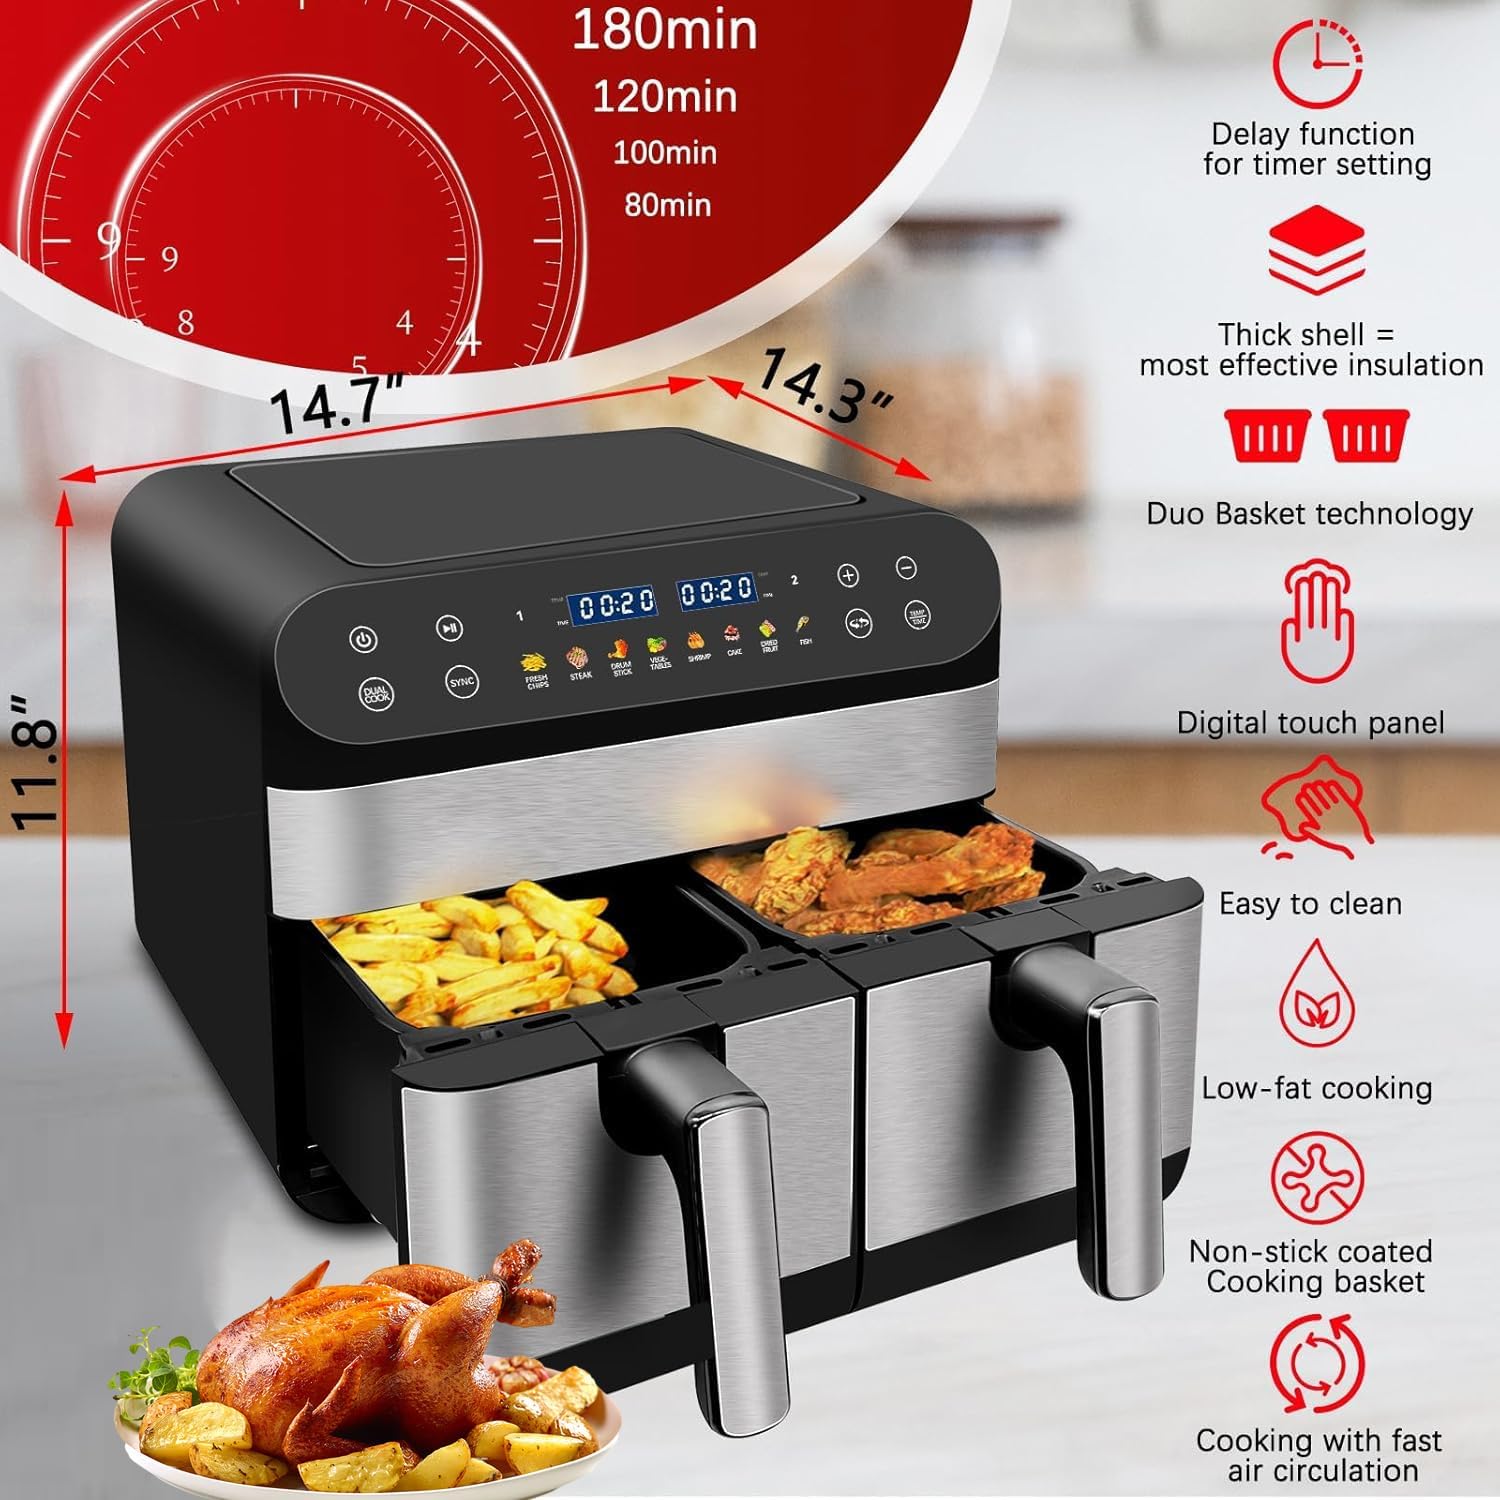
Image: An overview of the air fryer's key features, including its delay function for timer setting, thick shell for insulation, Duo Basket technology, digital touch panel, easy to clean design, low-fat cooking capability, non-stick coated cooking basket, and cooking with fast air circulation. Product dimensions are also shown.
Components:
- Main Unit with Digital Touch Screen
- Dual Cooking Baskets (9.5 Qt total capacity)
- Crisper Plates (removable, non-stick)
- Power Cord
Setup
- Unpacking: Carefully remove the air fryer and all packaging materials. Keep packaging for future storage or disposal.
- Initial Cleaning: Before first use, wash the cooking baskets and crisper plates with hot, soapy water. Rinse thoroughly and dry completely. Wipe the main unit with a damp cloth. Do not immerse the main unit in water.
- Placement: Place the air fryer on a stable, heat-resistant, and level surface. Ensure there is at least 6 inches (15 cm) of clear space around the back and sides of the appliance for proper air circulation. Do not place it directly under cabinets or near flammable materials.
- Power Connection: Plug the power cord into a grounded electrical outlet. Ensure the voltage matches the specifications of your appliance.
- First Use (Burn-in): It is recommended to run the air fryer empty for about 10-15 minutes at 350°F (175°C) before cooking food for the first time. This helps to burn off any manufacturing residues and eliminate initial odors. A slight odor may be present during this process; this is normal.

Image: A diagram illustrating the heat dissipation air outlet at the back of the air fryer, emphasizing the importance of proper ventilation for efficient cooling.
Operating Instructions
Control Panel Overview:
Image: A detailed view of the air fryer's digital control panel, showing the various buttons and their functions, including Power, Start/Stop, Dual Cook, Smart Finish (Sync), Time/Temperature Add/Reduce, Pot 1&2 Switch, and Temp/Time Switch.
- Power Button: Turns the appliance on/off.
- Start/Stop Button: Starts or pauses the cooking cycle.
- Dual Cook Button: Automatically applies the settings of Zone 1 to Zone 2 for cooking the same food or different foods with the same function, temperature, and time.
- Smart Finish (SYNC) Button: Synchronizes cooking times automatically to ensure that both zones are ready at the same time, even if they have different cooking times.
- Time/Temperature Add (+) / Reduce (-) Buttons: Adjusts cooking time or temperature.
- Pot 1 & 2 Switch: Selects which cooking zone (1 or 2) to adjust settings for.
- Temp/Time Switch: Toggles between temperature and time adjustment mode.
Basic Operation:
- Prepare Food: Place ingredients into the cooking basket. Do not overfill.
- Insert Basket: Slide the cooking basket firmly into the main unit.
- Power On: Press the Power button. The digital display will illuminate.
- Select Zone: Use the Pot 1 & 2 Switch to select the desired cooking zone (1 or 2).
- Set Temperature and Time:
- Press the Temp/Time Switch to toggle between temperature and time.
- Use the (+) and (-) buttons to adjust the temperature (e.g., 180°C / 350°F) and cooking time (e.g., 15 minutes).
- Start Cooking: Press the Start/Stop button to begin the cooking process. The timer will start counting down.
- Shaking/Flipping (Optional): For even cooking, some recipes may require shaking or flipping ingredients halfway through the cooking time. The air fryer may beep to remind you. Carefully remove the basket, shake/flip, and reinsert.
- End of Cooking: Once the timer reaches zero, the air fryer will beep, indicating cooking is complete.
- Remove Food: Carefully pull out the basket and empty the cooked food onto a plate. Use heat-resistant tongs.
- Power Off: Press the Power button to turn off the appliance, or it will automatically power off after a period of inactivity.
Using Preset Programs:
The air fryer comes with 8 convenient automatic programs for common foods. Simply select the desired program icon on the touch screen.

Image: A visual representation of the 8 preset cooking modes available on the air fryer, including Fresh Chips, Steak, Drum Stick, Vegetables, Shrimp, Cake, Dried Fruit, and Fish, each with recommended temperature and time ranges.
The 8 preset programs are:
- Fries
- Shrimp
- Cake
- Chicken (Drum Stick)
- Ribs (Steak)
- Steak
- Fish
- Bacon (Dried Fruit)
Note: The actual names on the control panel might vary slightly from the list provided in the product description (e.g., "Drum Stick" for Chicken, "Dried Fruit" for Bacon). Refer to the control panel image for exact icons.

Image: A table-like display showing recommended cooking temperatures and times for various food types, including Fresh Chips (120-200°C, 10-20 min), Steak (105-200°C, 15-36 min), Drum Stick (30-200°C, 1-30 min), Vegetables (75-200°C, 10-20 min), Shrimp (200°C, 10-20 min), Cake (94-180°C, 15-25 min), Dried Fruit (55-90°C, 3-12h), and Fish (75-200°C, 8-15 min).
Dual Zone Cooking Features:
The Jacgood Dual Basket Air Fryer offers advanced features for cooking multiple items simultaneously.

Image: A visual demonstrating the independent cooking drawers, allowing separate time and temperature settings for each zone, enabling cooking of different dishes simultaneously.

Image: A graphic explaining the "SMART" function (Smart Finish) to synchronize cooking times so both dishes finish simultaneously, and the "MATCH" function to apply the same settings to both zones.

Image: A visual demonstrating how to use the "Match Cook" button to instantly set both baskets to the same temperature and cooking time.
- Independent Cooking: Each basket can be set with different temperatures and times. Select the desired basket (1 or 2) using the "Pot 1 & 2 Switch" button, then adjust settings.
- Dual Cook: If you want to cook the same food in both baskets with identical settings, set Zone 1, then press the "Dual Cook" button. The settings from Zone 1 will be copied to Zone 2.
- Smart Finish (SYNC): If you are cooking two different foods with different cooking times but want them to finish simultaneously, set the desired time and temperature for each zone. Then, press the "Smart Finish (SYNC)" button. The air fryer will automatically adjust the start time of the shorter cooking cycle to ensure both finish together.
- Match Cook: For quick setup of identical settings, press the "Match Cook" button (if available, or use Dual Cook). This will apply the current settings of the selected basket to the other basket.
Maintenance and Cleaning
Proper maintenance ensures the longevity and optimal performance of your air fryer.

Image: A visual demonstrating that the non-stick coated baskets and crisper plates are dishwasher safe for easy cleaning, and can also be hand washed.

Image: A graphic highlighting the cool-touch handles for safe movement of baskets and the ease of cleaning the non-stick interior.

Image: A close-up of the crisper plate, explaining its role in improving air circulation and preventing direct contact between food and oil for crispier and healthier results.
- Unplug and Cool Down: Always unplug the air fryer from the power outlet and allow it to cool completely before cleaning.
- Cleaning Baskets and Crisper Plates:
- The non-stick cooking baskets and crisper plates are dishwasher safe.
- Alternatively, wash them with hot water, dish soap, and a non-abrasive sponge.
- For stubborn food residue, soak the baskets in hot, soapy water for about 10-15 minutes before cleaning.
- Ensure they are completely dry before reinserting into the main unit.
- Cleaning the Main Unit:
- Wipe the exterior of the air fryer with a damp cloth. Do not use abrasive cleaners or scouring pads.
- Never immerse the main unit in water or any other liquid.
- Clean the heating element inside the air fryer with a cleaning brush to remove any food particles.
- Storage: Ensure the appliance is clean and dry before storing. Store it in a cool, dry place.
Troubleshooting
| Problem | Possible Cause | Solution |
|---|---|---|
| Air fryer does not turn on. | Not plugged in; Power outlet malfunction; Appliance malfunction. | Ensure the power cord is securely plugged into a working outlet. Check the circuit breaker. Contact customer support if the issue persists. |
| Food is not cooked evenly. | Basket is overfilled; Food not shaken/flipped; Incorrect temperature/time. | Do not overfill the basket. Shake or flip ingredients halfway through cooking. Adjust temperature and time as needed. |
| White smoke coming from the appliance. | Grease residue from previous use; Fatty ingredients. | Clean the basket and crisper plate thoroughly after each use. For fatty foods, place a piece of aluminum foil at the bottom of the basket to catch excess oil. |
| Appliance smells during first use. | Manufacturing residues burning off. | This is normal for first use. Run the air fryer empty for 10-15 minutes at 350°F (175°C) to burn off residues. Ensure good ventilation. |
| Baskets do not slide in properly. | Basket not aligned correctly; Obstruction. | Ensure the basket is aligned with the grooves and pushed in firmly until it clicks into place. Check for any food debris or obstructions. |
Specifications
| Model Name | JACGOOD DUAL AIR FRYER |
| Model Number | JAC-KX-627 |
| Brand | Jacgood |
| Capacity | 9.5 Quarts (Dual Basket) |
| Power Output | 1800 Watts |
| Voltage | 180 Volts |
| Control Method | Touch Screen Digital Control |
| Dimensions (D x W x H) | 14.3"D x 14.7"W x 11.8"H |
| Item Weight | 20.3 pounds |
| Material | Aluminum, Plastic (Outer), Stainless Steel (Inner) |
| Special Features | Dual Zone, Temperature Control, Programmable, Non-stick Coating |
| Air Frying Technology | Hot Air Technology |
| Dishwasher Safe Parts | Cooking Baskets and Crisper Plates only (Main unit is NOT dishwasher safe) |
Warranty and Support
For warranty information and customer support, please refer to the product packaging or contact Jacgood customer service directly. Keep your purchase receipt as proof of purchase for any warranty claims.
Typically, manufacturers offer a limited warranty against defects in materials and workmanship for a specified period from the date of purchase. Please visit the official Jacgood website or contact their support team for the most up-to-date warranty terms and conditions.
Customer Support Contact: Please refer to the contact information provided with your product or on the manufacturer's official website.
Related Documents - JAC-KX-627
 |
Panasonic Cordless Phone Frequently Asked Questions (FAQ) A comprehensive collection of frequently asked questions and answers regarding Panasonic cordless telephones, covering setup, troubleshooting, features, model comparisons, and maintenance. |
 |
Panasonic Cordless Telephone Operating Instructions Operating instructions for Panasonic Cordless Telephones and Digital Answering Machines, covering models like KX-TGD510, KX-TGD530 series. Includes setup, features, troubleshooting, and specifications. |
 |
Panasonic Digital Cordless Answering System Service Manual - KX-TGE Series Comprehensive service manual for Panasonic Digital Cordless Answering Systems, including models like KX-TGE240, KX-TGE260, KX-TGE270, and KX-TGEA20. Covers technical specifications, circuit diagrams, troubleshooting, and parts lists for these Bluetooth-enabled phones. |
 |
Дополнение к руководству по установке систем Panasonic KX-TD: KX-TD144, KX-TD146, KX-TD142, KX-TD7500 Данное дополнение к руководству по установке содержит информацию о беспроводной системе и процедурах установки для цифровых гибридных суперсистем Panasonic KX-TD816 и KX-TD1232, включая блоки интерфейса KX-TD144, KX-TD146, KX-TD142 и KX-TD7500. |
 |
Panasonic KX-TG3711BX/KX-TG3712BX/KX-TG3719BX/KX-TG3711SX/KX-TG3712SX/KX-TG3811BX/KX-TG3811JX/KX-TG3811SX/KX-TG3721BX/KX-TG3722BX/KX-TG3721SX/KX-TG3722SX/KX-TG3821BX/KX-TG3821JX/KX-TG3822JX/KX-TG3821SX Operating Instructions Comprehensive operating instructions for Panasonic 2.4 GHz Digital Cordless Phones and Answering Systems, including models KX-TG3711, KX-TG3712, KX-TG3719, KX-TG3721, KX-TG3722, KX-TG3811, KX-TG3821, and KX-TG3822 series. Covers setup, features, safety information, and specifications. |
 |
Panasonic Cordless Telephone Operating Instructions Official operating instructions manual for Panasonic cordless telephone systems, including models with digital answering machines. Covers setup, operation, answering system, caller ID, and troubleshooting for models like the KX-TGD510 and KX-TGD530 series. |
Ask a question about this manual
Ask about setup, troubleshooting, compatibility, parts, safety, or missing instructions. Manuals+ will review the question and use this page’s manual context to help answer it.