ANJIELO SMART 94201-94402
ANJIELO SMART Wired Video Intercom System User Manual
Model: 94201-94402
Introduction
This manual provides detailed instructions for the installation, operation, and maintenance of your ANJIELO SMART Wired Video Intercom System. Please read this manual thoroughly before installation and use to ensure proper functionality and safety. This system is designed for home and villa applications, offering hands-free communication, a waterproof outdoor doorbell, and one-key unlock features.
Key features include:
- 4-wire cable system supporting one door camera and one indoor monitor.
- Two unlock buttons on the monitor for separate lock control.
- 16 selectable ringtones with adjustable volume.
- IP65 waterproof and dustproof outdoor camera with infrared night vision.
- Easy setup and operation.
Package Contents
Verify that all items are present in the package:
- 1 x Indoor Monitor
- 1 x Outdoor Doorbell Unit
- Mounting Screws and Anchors
- Connection Cables (4-wire)
- User Manual (this document)

Image: The ANJIELO SMART Wired Video Intercom System, showing both the indoor monitor and the outdoor doorbell unit.
Setup and Installation
1. Safety Precautions
- Ensure power is disconnected before any wiring or installation.
- Consult a qualified electrician if you are unsure about any wiring procedures.
- Do not expose the indoor monitor to moisture or extreme temperatures.
2. Mounting the Outdoor Doorbell Unit
The outdoor doorbell unit is IP65 waterproof and designed for outdoor use. Choose a mounting location near your entrance, approximately 1.5 meters (5 feet) from the ground, ensuring clear visibility of visitors.
- Mark the drilling points using the mounting bracket as a template.
- Drill holes and insert wall anchors if necessary.
- Secure the mounting bracket to the wall.
- Connect the 4-wire cable to the doorbell unit (refer to wiring diagram).
- Attach the doorbell unit to the mounting bracket.

Image: The outdoor doorbell unit, highlighting its compact design and dimensions (120mm height, 40mm width, 25mm depth).
3. Mounting the Indoor Monitor
Select a convenient indoor location for the monitor, such as a hallway or living room, where it is easily accessible.
- Mark the drilling points for the monitor's mounting bracket.
- Drill holes and insert wall anchors.
- Secure the mounting bracket to the wall.
- Connect the 4-wire cable from the doorbell unit to the indoor monitor (refer to wiring diagram).
- Connect the power supply to the indoor monitor.
- Attach the indoor monitor to its mounting bracket.

Image: The indoor monitor unit, displaying its dimensions (170mm height, 120mm width, 20mm depth).
4. Wiring Diagram (General)
The system uses a 4-wire connection between the indoor monitor and the outdoor doorbell. For electronic locks, an additional DC 12V power supply is required and connects to either the doorbell or the monitor, depending on the lock type (fail-safe or fail-secure).
Note: Locks are not included and must be purchased separately. Consult the specific wiring instructions provided with your electronic lock for detailed connection information.
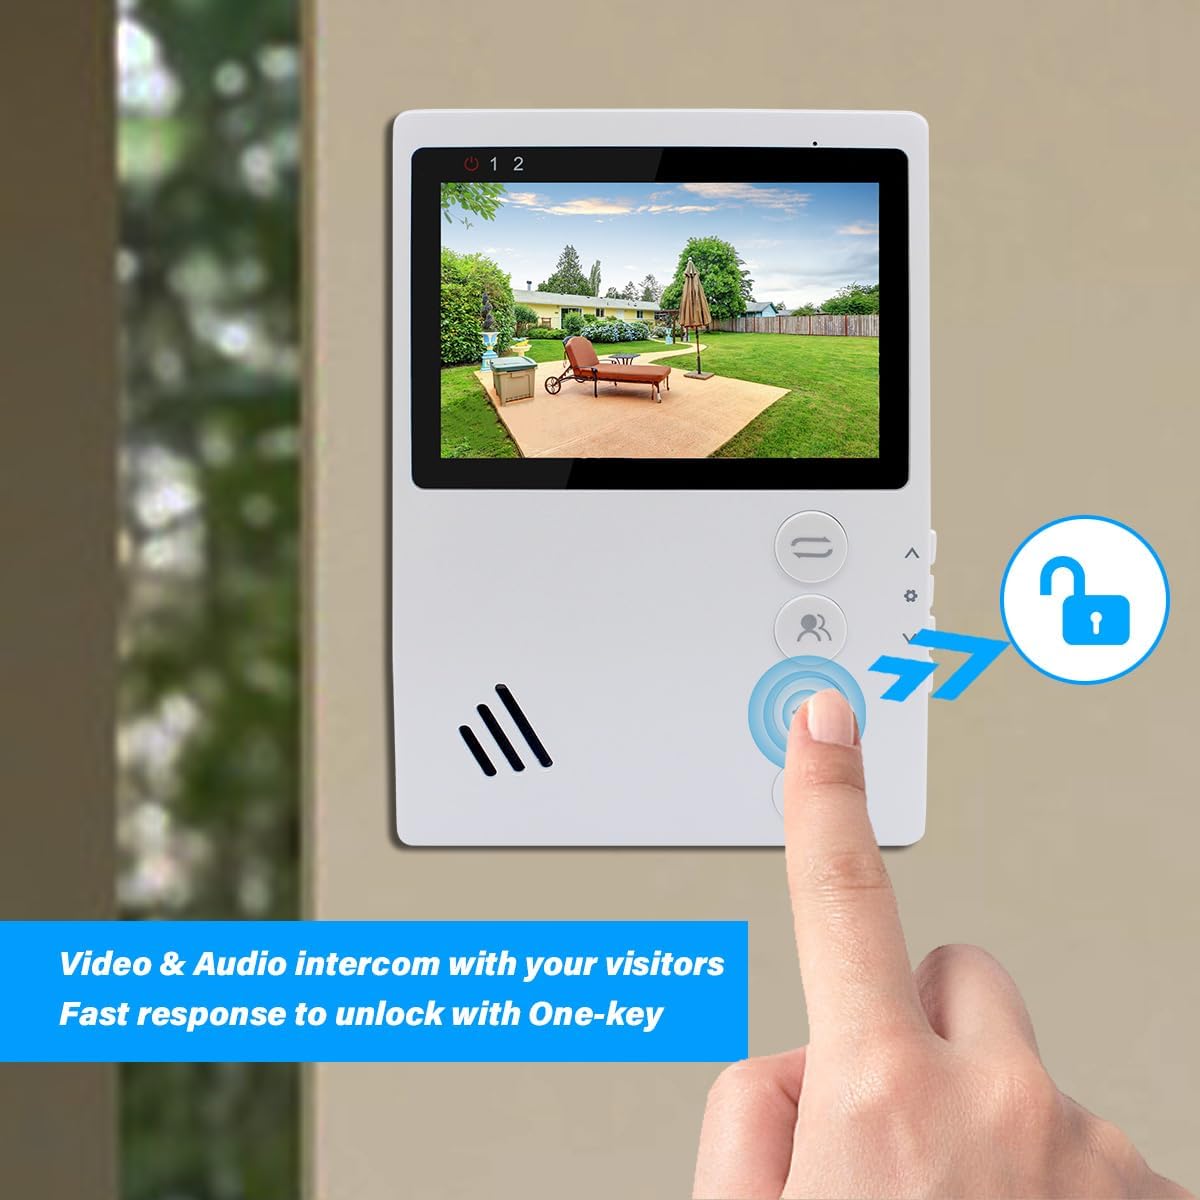
Image: A diagram illustrating the 4-wire connection between the indoor monitor and the outdoor doorbell, and connections for an electronic lock.
Operation
1. Basic Functions
- Answering a Call: When a visitor presses the doorbell, the indoor monitor will ring and display the visitor's image. Press the "Answer/Hang up" button to initiate two-way audio communication.
- Monitoring: Press the "Monitor" button on the indoor unit to view the outdoor camera feed at any time.
- Unlocking the Door: During a call or while monitoring, press the "Door Unlock" button to open the connected electronic lock. The monitor has two unlock buttons for controlling two separate locks if configured.
- Hands-free Communication: The system supports hands-free two-way audio communication.

Image: The indoor monitor displaying a visitor and an arrow pointing to the "Door Unlock" button, indicating the one-key unlock feature.

Image: A visual representation of two-way audio communication between a visitor at the doorbell and a person inside using the monitor.
2. Monitor Button Functions

Image: The indoor monitor with labels indicating the functions of its main buttons: Transfer, Monitor, Door Unlock, and Answer/Hang up/Return.
- Transfer Button: Used for transferring calls (if multiple indoor monitors are installed).
- Monitor Button: Activates the outdoor camera view.
- Door Unlock Button: Activates the electronic lock connected to the system.
- Answer/Hang up/Return Button: Answers incoming calls, ends current calls, or navigates back in menus.
3. Menu Navigation and Settings

Image: The indoor monitor with labels indicating the functions of its side buttons: Increase/Up, Menu Setting/Confirm, Reduce/Down, and Gate Unlock.
- Increase / Up: Navigates up in menus or increases values.
- Menu Setting / Confirm: Enters the menu, confirms selections.
- Reduce / Down: Navigates down in menus or decreases values.
- Gate Unlock: An additional unlock button, potentially for a secondary gate or lock.
To adjust settings such as ringtone and volume:
- Press the "Menu Setting / Confirm" button to enter the main menu.
- Use the "Increase / Up" and "Reduce / Down" buttons to navigate through options.
- Select the desired setting (e.g., "Ringtone" or "Volume") and press "Menu Setting / Confirm" to enter.
- Adjust the value using the "Increase / Up" and "Reduce / Down" buttons.
- Press "Menu Setting / Confirm" to save changes and "Answer/Hang up/Return" to exit the menu.
Maintenance
- Cleaning: Use a soft, dry cloth to clean the indoor monitor and outdoor doorbell unit. Do not use abrasive cleaners or solvents.
- Outdoor Unit: Periodically check the outdoor unit for any obstructions to the camera lens or microphone/speaker. Ensure the weatherproof cover is securely in place.
- Wiring: Regularly inspect all wiring connections for any signs of wear or damage. Ensure connections remain secure.
- Software Updates: Check the manufacturer's website for any available firmware updates for improved performance or new features.
Troubleshooting
| Problem | Possible Cause | Solution |
|---|---|---|
| No image on indoor monitor. |
|
|
| No audio during intercom. |
|
|
| Door lock not activating. |
|
|
| Doorbell not ringing. |
|
|
Specifications
| Feature | Detail |
|---|---|
| Model Number | 94201-94402 |
| Connectivity Technology | Wired (4-wire system) |
| Indoor/Outdoor Usage | Indoor monitor, Outdoor doorbell |
| Power Source | Corded Electric (Indoor monitor powers outdoor unit) |
| Outdoor Doorbell Waterproof Rating | IP65 |
| Outdoor Doorbell Resolution | 1000TVL |
| Camera Lens Angle | 90° |
| Night Vision | Infrared night vision |
| Operation Temperature | -30°C to +60°C (-22°F to +140°F) |
| Special Feature | 2-Way Audio, One-Key Unlock |
| Included Components | 1X Indoor Monitor, 1X Outdoor Doorbell |
| Product Dimensions (Indoor Monitor) | 170mm (H) x 120mm (W) x 20mm (D) |
| Product Dimensions (Outdoor Doorbell) | 120mm (H) x 40mm (W) x 25mm (D) |
| Wattage | 10 watts |
Support and Contact Information
For technical assistance, troubleshooting beyond this manual, or warranty inquiries, please contact ANJIELO SMART customer support.
- Manufacturer: ANJIELOSAMRT
- Brand: ANJIELO SMART
- Online Support: Visit the ANJIELO SMART Store on Amazon for product information and potential contact options.
Please have your model number (94201-94402) and purchase details ready when contacting support.
Related Documents - 94201-94402
 |
Anjielo Smart 4-Wire Villa Video Intercom System Indoor Monitor User Manual Comprehensive user manual for the Anjielo Smart 4-Wire Villa Video Intercom System, covering installation, operation, wiring, and specifications for the indoor monitor. Learn how to set up and use your video intercom. |
 |
Anjielo Smart 4-Wire Villa Video Intercom System User Manual Comprehensive user manual for the Anjielo Smart 4-Wire Villa Video Intercom System, covering installation, wiring diagrams, menu operations, and technical specifications. |
 |
Anjielo SMART 2-Wire Digital Video Doorbell Intercom System User Manual User manual for the Anjielo SMART 2-Wire Digital Video Doorbell Intercom System, detailing features, installation, wiring, monitor interface, settings, and smartphone app integration for secure home access and communication. |
 |
Anjielosmart 4-Wire Video Door Phone: User Manual and Installation Guide Comprehensive guide for the Anjielosmart 4-Wire Video Door Phone, covering installation, setup, features, packing list, and app integration with Tuya Smart for smart home security. |
 |
anjielosmart HD Wireless Video Door Phone User Manual User manual for the anjielosmart HD Wireless Video Door Phone system, detailing product features, safety warnings, installation guide, setup instructions, network configuration with Tuya Smart app, device pairing, packing list, product parameters, and troubleshooting tips. |
 |
Anjielo Smart 2-Wire Digital Video Intercom Kit User Manual | Installation & Features User manual for the Anjielo Smart 2-Wire Digital Video Intercom Kit (Model KW06). Covers features of the monitor and intercom panel, connectivity, app integration with Tuya Smart/Smart Life, kit contents, wiring diagrams, installation steps, monitor interface, settings, and smartphone app usage for home security and communication. |
Ask a question about this manual
Ask about setup, troubleshooting, compatibility, parts, safety, or missing instructions. Manuals+ will review the question and use this page’s manual context to help answer it.