1. Important Safety Instructions
Please read all instructions carefully before using this appliance. Failure to follow these instructions may result in electric shock, fire, or serious injury.
- Electrical Safety: Ensure the power outlet matches the heater's voltage (110V for US Plug model). Do not overload circuits. Do not use with damaged cords or plugs.
- Placement: Do not place the heater directly below a power outlet. Maintain a safe distance from flammable materials such as furniture, curtains, bedding, paper, clothes, and other combustibles.
- Water and Moisture: This heater is designed for use in various environments, including humid areas like bathrooms. However, ensure it is not directly exposed to water spray or submerged. Always ensure hands are dry when operating.
- Children and Pets: Keep children and pets away from the heater. Do not leave the heater unattended when in use.
- Ventilation: Do not block air inlets or outlets. Ensure proper airflow around the heater.
- Overheat Protection: The heater is equipped with an automatic overheat protection device. If the heater overheats, it will automatically shut off. Unplug the heater and allow it to cool down before restarting.
- Maintenance: Unplug the heater before cleaning or performing any maintenance.
2. Package Contents
Carefully unpack the box and ensure all items are present and in good condition. If any items are missing or damaged, please contact customer support.
- 1 x Smart Wall Heater Unit
- 1 x User Manual
- 1 x Remote Controller (Battery type: CR2025x1, not included)
- 4 x Screws
- 4 x Expansion Studs
- 2 x Brackets
- 2 x Poles (for towel rack functionality)

Image: All components included in the package, showing the heater unit, remote control, power cord, mounting brackets, screws, expansion studs, and two metal poles.
3. Setup and Installation
The Haofy Smart Wall Heater can be installed as a wall-mounted unit or used as a mobile, desktop placement heater.
3.1 Wall-Mounted Installation
This design saves floor space and optimizes room layout. Follow these steps for wall mounting:
- Choose Location: Select a suitable wall location, ensuring it is not directly below a power outlet and maintains safe distances from flammable materials.
- Mark Drilling Points: Use the provided brackets to mark the drilling points on the wall. Ensure the marks are level.
- Drill Holes: Drill holes at the marked points. Insert the expansion studs into the drilled holes.
- Attach Brackets: Secure the brackets to the wall using the provided screws.
- Mount Heater: Carefully place the heater unit onto the installed brackets. Ensure it is securely seated.
- Install Poles (Optional): If desired, attach the two metal poles to the brackets for use as a towel rack.

Image: The Haofy Smart Wall Heater shown mounted on a wall in a bedroom setting, demonstrating its space-saving design.
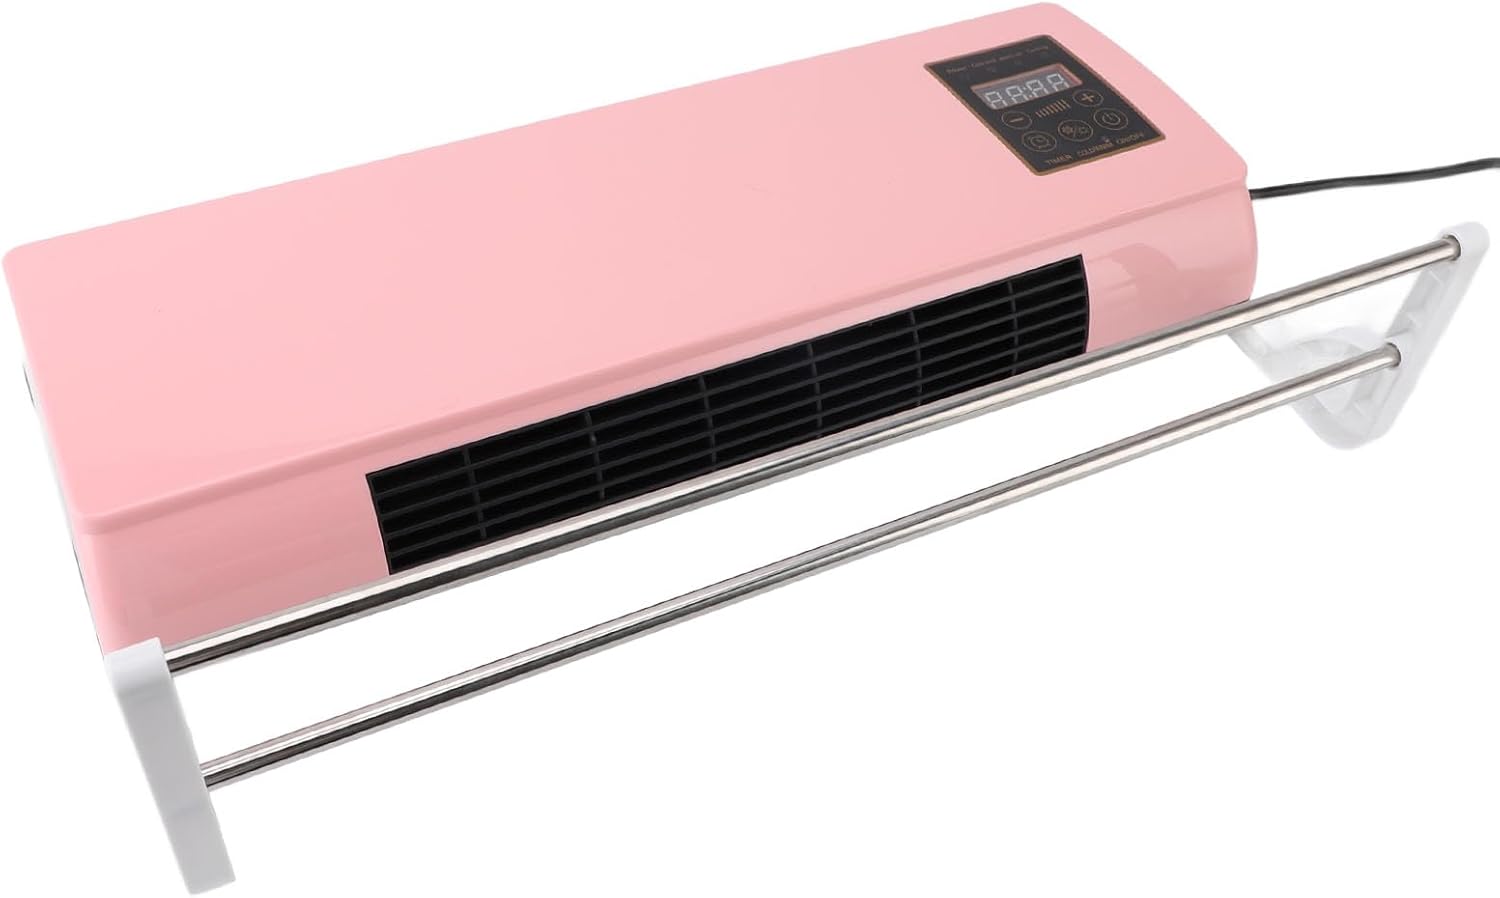
Image: An angled view of the Haofy Smart Wall Heater, wall-mounted, with the optional towel bars installed below the heating unit.
3.2 Desktop Placement (Mobile Use)
For localized warming, the heater can be placed on a stable, flat surface. Ensure the surface is heat-resistant and that the heater is not near any edges where it could fall.

Image: The Haofy Smart Wall Heater displayed on a flat surface, illustrating its mobile design for desktop placement.
4. Operating Instructions
The Haofy Smart Wall Heater features an intuitive control panel and a remote controller for convenient operation.
4.1 Control Panel Overview

Image: A detailed view of the heater's control panel, showing the digital display and various function buttons.
- Digital Display: Shows current temperature, timer settings, or fan speed.
- Power Button (On/Off): Turns the heater on or off.
- Temperature Adjustment (+/-): Increases or decreases the desired temperature.
- Mode Button: Switches between heating and cooling (fan-only) modes.
- Fan Speed Button: Adjusts the fan speed (e.g., low, medium, high).
- Timer Button: Activates and sets the timer function (1-6 hours).
4.2 Basic Operation
- Power On: Plug the heater into a suitable 110V power outlet. Press the Power button on the control panel or remote.
- Set Temperature: Use the '+' and '-' buttons to set your desired temperature. The heater will automatically work to reach and maintain this temperature.
- Select Mode: Press the Mode button to switch between heating and fan-only (cooling) functions.
- Adjust Fan Speed: Press the Fan Speed button to cycle through available fan speeds.
- Set Timer: Press the Timer button repeatedly to set the desired operating duration (1-6 hours). The heater will automatically turn off after the set time.
- Power Off: Press the Power button again to turn off the heater.

Image: The Haofy Smart Wall Heater in operation, showing warm air being emitted from the unit, indicating its heating function.
5. Maintenance
Regular maintenance ensures optimal performance and extends the lifespan of your heater. Always unplug the heater from the power outlet before cleaning.
- Cleaning the Exterior: Wipe the exterior surfaces with a soft, damp cloth. Do not use abrasive cleaners or solvents. Ensure no water enters the internal components.
- Cleaning Air Vents: Use a vacuum cleaner with a brush attachment to gently remove dust and debris from the air intake and exhaust vents. Do not insert any objects into the vents.
- Storage: If storing the heater for an extended period, unplug it, clean it thoroughly, and store it in a cool, dry place, preferably in its original packaging.
6. Troubleshooting
If you encounter issues with your Haofy Smart Wall Heater, please refer to the following common problems and solutions:
| Problem | Possible Cause | Solution |
|---|---|---|
| Heater does not turn on. | Not plugged in; power outlet malfunction; power button not pressed; overheat protection activated. | Ensure the heater is securely plugged into a working 110V outlet. Press the power button. If recently overheated, unplug and allow to cool for 30 minutes before restarting. |
| No heat, only fan operates. | Heater is in fan-only (cooling) mode; ambient temperature is higher than set temperature. | Press the Mode button to switch to heating mode. Increase the set temperature above the current room temperature. |
| Heater turns off unexpectedly. | Overheat protection activated; timer function engaged. | Unplug the heater and allow it to cool down for at least 30 minutes. Check if the timer was set. Ensure air vents are not blocked. |
| Remote control not working. | Battery depleted; obstruction between remote and heater; remote not aimed correctly. | Replace the CR2025 battery in the remote control. Ensure there are no obstructions. Aim the remote directly at the heater's sensor. |
If the problem persists after trying these solutions, please contact customer support.
7. Specifications
- Model Number: Haofyk95qyx8rvp-11
- ASIN: B0D83R98TC
- Material: PTC, ABS
- Power Input: US Plug 110V
- Timing Function: 1-6 Hours
- Placement Options: Desktop Placement, Wall Hanging
- Item Weight: Approximately 5.26 pounds (2.388 kg)
- Package Dimensions: 23.62 x 9.45 x 6.69 inches
- Manufacturer: Haofy

Image: A diagram explaining the PTC (Positive Temperature Coefficient) heating technology used in the heater, highlighting its fast heating, high temperature resistance, and oxidation resistance properties.
8. Warranty and Support
For warranty information and customer support, please refer to the documentation included with your product or visit the official Haofy website. Keep your purchase receipt as proof of purchase.
Haofy Official Store: Visit Haofy Store on Amazon