CCLIFE 3179A
CCLIFE Drywall Panel Lifter Instruction Manual
Model: 3179A
Introduction
This manual provides detailed instructions for the safe and efficient assembly, operation, and maintenance of your CCLIFE Drywall Panel Lifter. This robust tool is designed to assist with the installation of drywall, gypsum boards, OSB panels, chipboards, and wooden panels on ceilings and walls, significantly reducing physical strain during construction and renovation projects.
Please read this manual thoroughly before initial use to ensure proper handling and to prevent injury or damage to the equipment.
Safety Information
Always adhere to the following safety guidelines:
- Ensure the work area is clear of obstructions and well-lit.
- Always wear appropriate personal protective equipment (PPE), including safety glasses, gloves, and sturdy footwear.
- Verify that all components are securely fastened before each use.
- Do not exceed the maximum load capacity of 68 kg (150 lbs).
- Operate the lifter on a stable, level surface.
- Engage the wheel brakes when the lifter is in a stationary position or under load.
- Keep hands and clothing clear of moving parts, especially the winch and cables.
- Do not modify the equipment. Use only original replacement parts.
- Keep children and unauthorized personnel away from the operating area.
- Lower panels slowly and with control.
Components Overview
Familiarize yourself with the main parts of your drywall panel lifter:

Figure 1: Main components of the CCLIFE Drywall Panel Lifter.
Key Parts:
- Main Frame: The central vertical support structure.
- Loading Arms: Extendable arms that support the panel.
- Winch System: Hand crank and cable mechanism for raising and lowering the arms.
- Base with Wheels: Stable tripod base with three swivel wheels, each equipped with a locking brake.
- Tilting Mechanism: Allows the loading arms to be angled for wall or sloped ceiling installations.
- Locking Pins/Levers: For securing height and angle adjustments.

Figure 2: Detailed view of the winch, stable tripod, rotating stand, strong locking force mechanism, and swivel wheels with brakes.
Setup and Assembly
The product is delivered in two separate packages. Follow these steps for assembly:
- Unpack Components: Carefully remove all parts from the packaging. Verify all components are present and undamaged according to the packing list.
- Assemble the Base: Attach the three support legs to the central base column. Ensure they are securely fastened with the provided bolts and nuts.
- Install Swivel Wheels: Insert the swivel wheels into the designated slots on the end of each support leg. Ensure the locking brakes are functional.
- Attach Main Frame: Connect the main vertical frame to the assembled base. Secure it firmly.
- Mount Loading Arms: Attach the two extendable loading arms to the top assembly of the main frame. Ensure they can extend and retract smoothly.
- Install Winch System: Mount the hand crank and cable mechanism to the main frame as indicated in the diagram. Ensure the cable is properly routed and tensioned.
- Initial Check: Before first use, manually operate the winch to raise and lower the arms to ensure smooth operation. Check all connections for tightness.
Operating Instructions
1. Adjusting Height and Width:
The lifter offers adjustable height from 140 cm to 350 cm and a working width of 128 cm to 295 cm.

Figure 3: Product dimensions and adjustable ranges.
- Height Adjustment: Use the hand crank to raise or lower the loading arms to the desired height. Ensure the locking mechanism engages securely once the height is set.
- Width Adjustment: Extend or retract the loading arms to match the width of the panel you are lifting. Secure the arms in place using their respective locking pins or levers.
2. Adjusting Angle (Tilting and Rotation):
The lifter allows for angle adjustment and 360-degree rotation for versatile panel installation.
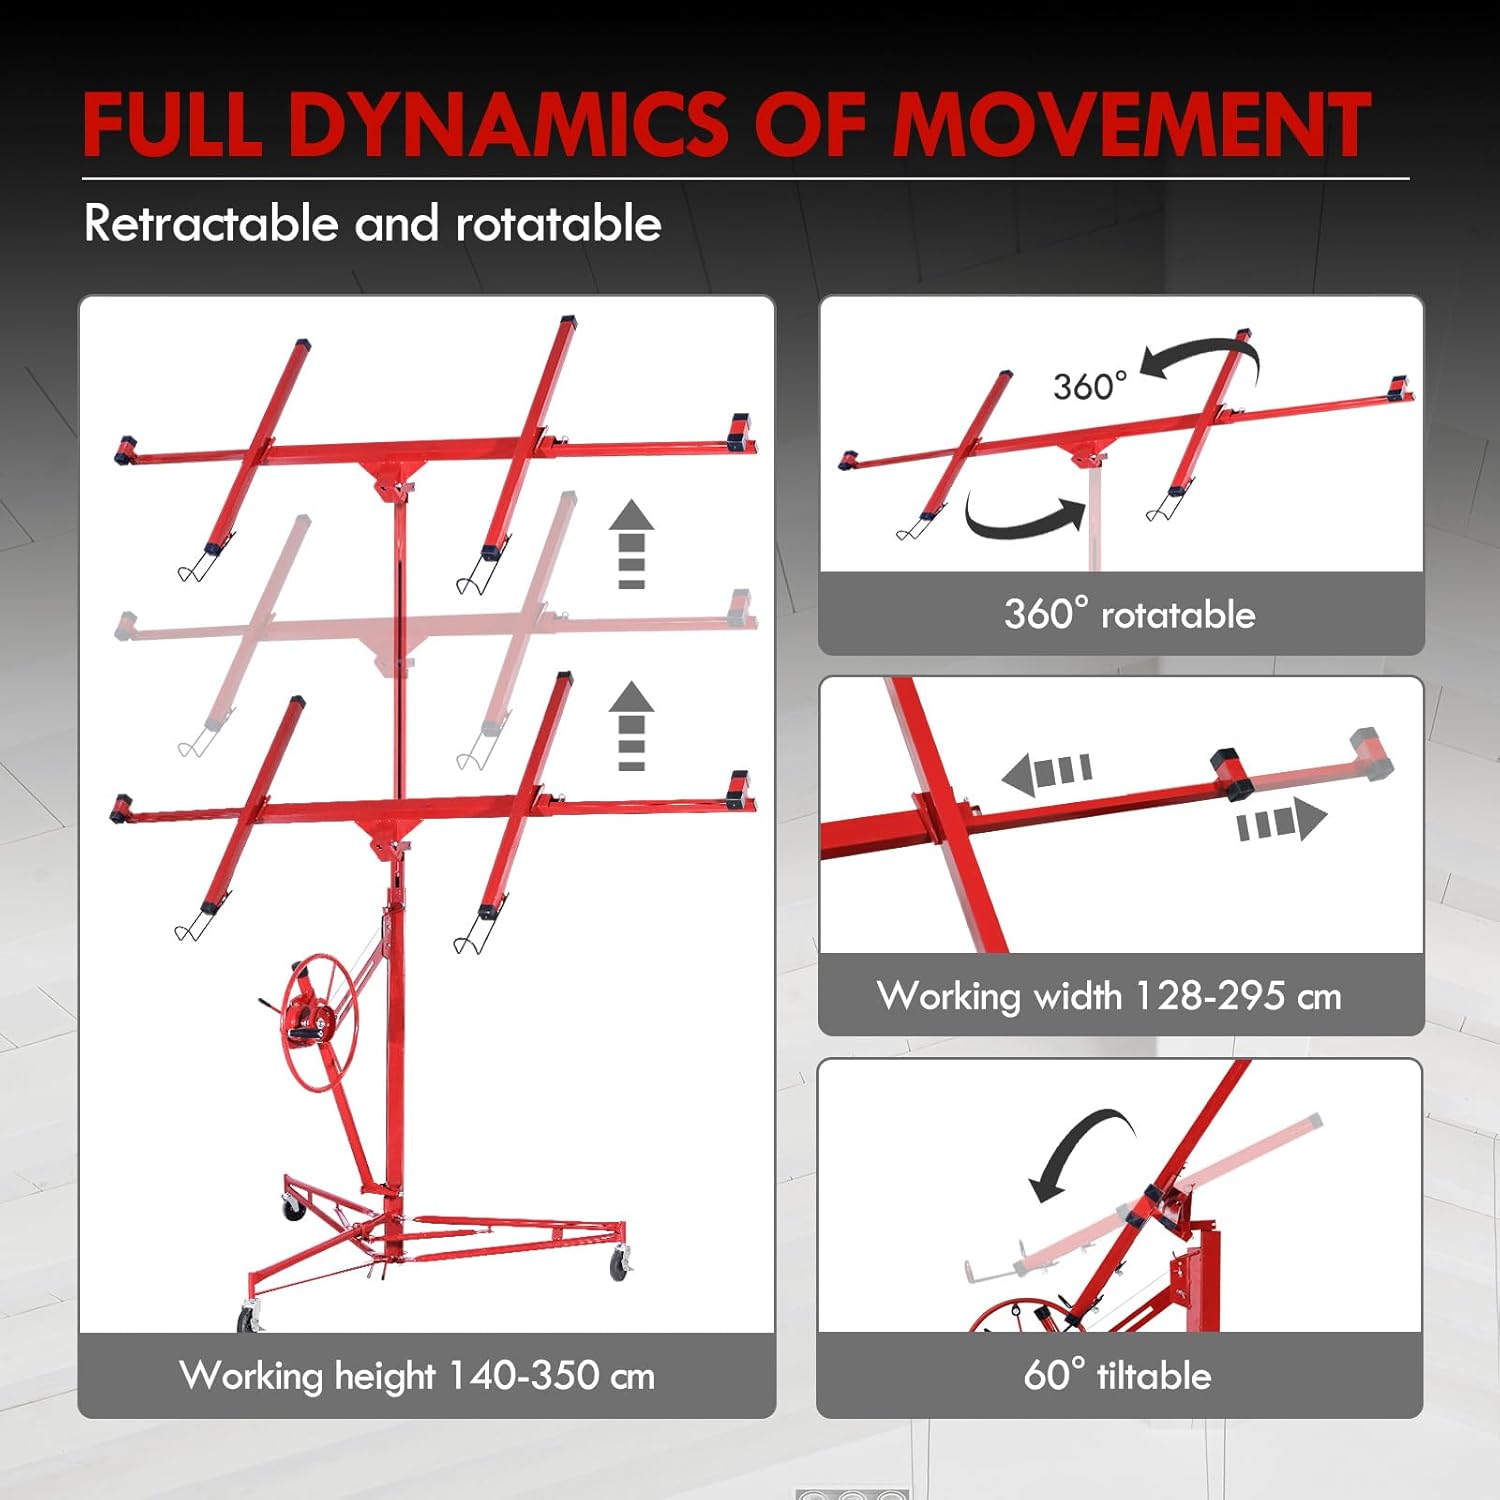
Figure 4: Movement capabilities including height adjustment, rotation, and tilting.
- Tilting: Release the tilting lock and adjust the angle of the loading arms up to 60 degrees to accommodate sloped ceilings or wall installations. Re-engage the lock firmly.
- Rotation: The entire loading platform can rotate 360 degrees. This allows for precise positioning of the panel without repositioning the entire lifter.
3. Loading and Securing Panels:
The lifter has a maximum load capacity of 68 kg.

Figure 5: The lifter's capacity to handle panels up to 68 kg.
- Positioning: Roll the lifter to the desired location. Engage the brakes on all three wheels to prevent movement.
- Loading: Carefully place the drywall or panel onto the loading arms. Ensure the panel is centered and stable.
- Securing: Use any integrated panel stops or clamps (if applicable) to prevent the panel from sliding during lifting.
4. Lifting and Installation:
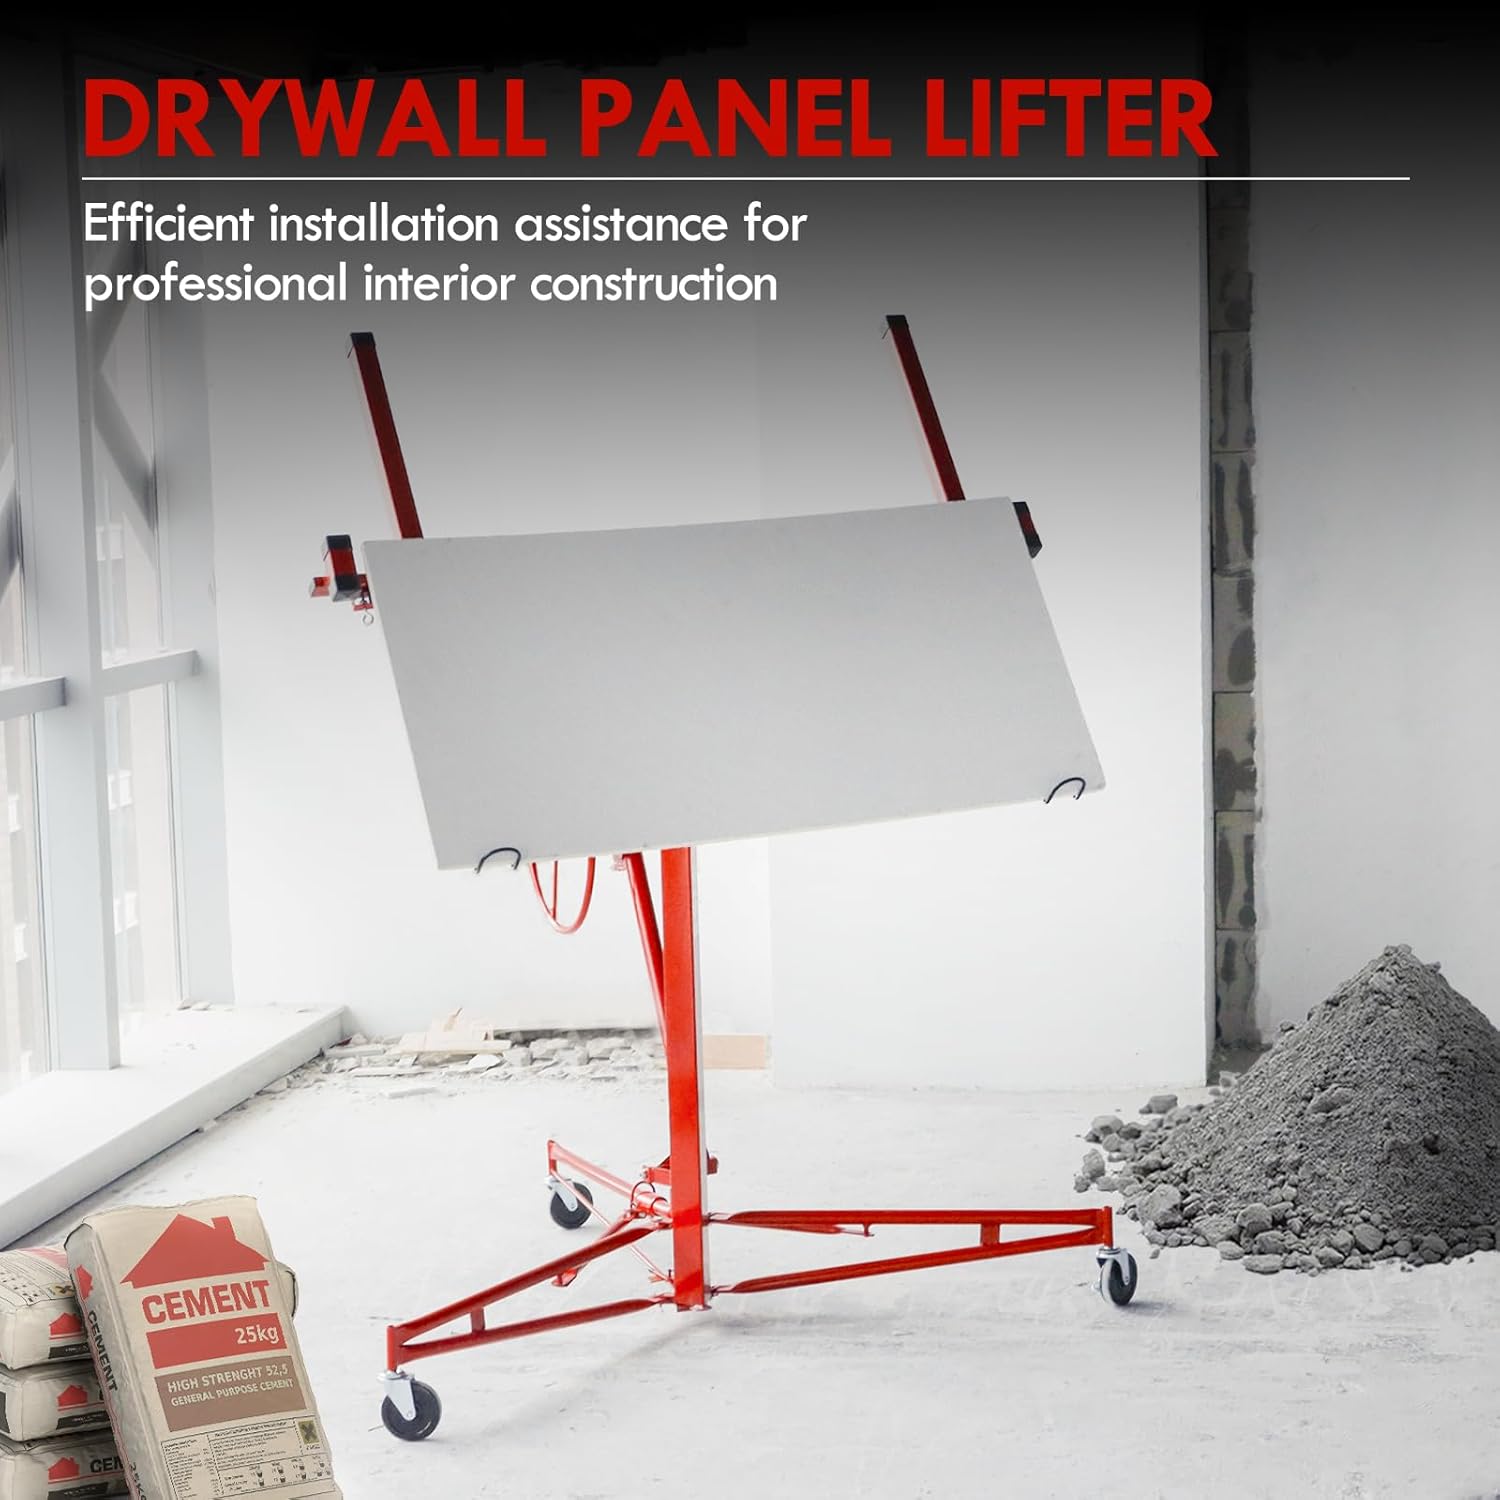
Figure 6: Lifter supporting a panel for installation.
- Lifting: Slowly turn the hand crank to raise the panel to the desired height for installation. Maintain control and observe the panel's stability.
- Positioning: Once at height, use the rotation and tilting features to precisely align the panel with the ceiling or wall.
- Installation: Secure the panel in place using appropriate fasteners.
- Lowering: After the panel is secured, slowly lower the loading arms by reversing the hand crank.
- Removal: Once the arms are fully lowered, carefully remove the lifter from the work area.

Figure 7: The lifter facilitates high-altitude work.
Maintenance
- Regular Cleaning: Wipe down the lifter after each use to remove dust and debris.
- Lubrication: Periodically lubricate moving parts, such as the winch mechanism, cables, and wheel axles, with a suitable lubricant to ensure smooth operation and prevent rust.
- Cable Inspection: Regularly inspect the lifting cable for any signs of fraying, kinks, or wear. Replace the cable immediately if damage is observed.
- Fastener Check: Routinely check all bolts, nuts, and locking pins for tightness. Tighten any loose fasteners.
- Wheel Condition: Inspect the wheels and brakes for wear or damage. Ensure the brakes engage effectively.
- Storage: Store the lifter in a dry, clean environment when not in use. The lifter can be folded for compact storage.
Troubleshooting
| Problem | Possible Cause | Solution |
|---|---|---|
| Difficulty raising/lowering arms | Lack of lubrication; cable tangled/damaged; excessive load. | Apply lubricant to moving parts; inspect and untangle/replace cable; reduce load. |
| Lifter unstable during operation | Brakes not engaged; uneven surface; overloaded. | Engage all wheel brakes; move to a level surface; ensure load is within capacity. |
| Arms not locking at desired height/angle | Locking pins/levers not fully engaged; worn locking mechanism. | Ensure pins/levers are fully engaged; inspect and replace worn parts. |
| Wheels not rolling smoothly | Debris in wheels; lack of lubrication; damaged wheels. | Clean wheels; lubricate axles; replace damaged wheels. |
Specifications
| Feature | Detail |
|---|---|
| Model Number | 3179A |
| Brand | CCLIFE |
| Adjustable Height | 140 cm - 350 cm (4.6 ft - 11.5 ft) |
| Extendable Load Arms Width | Up to 295 cm (9.7 ft) |
| Maximum Load Capacity | 68 kg (150 lbs) |
| Tilting Angle | Up to 60 degrees |
| Rotation | 360 degrees |
| Wheels | 3 swivel wheels with locking brakes |
| Product Dimensions (folded) | 98 x 45 x 17 cm (38.6 x 17.7 x 6.7 inches) |
| Item Weight | 19 kg (41.9 lbs) |
Warranty and Support
For warranty information, please refer to the terms and conditions provided at the point of purchase or contact your retailer. This product is designed for durability and performance.
For technical support, spare parts, or any inquiries regarding your CCLIFE Drywall Panel Lifter, please contact CCLIFE customer service through their official website or the contact information provided with your purchase. Please have your model number (3179A) ready when contacting support.
Ask a question about this manual
Ask about setup, troubleshooting, compatibility, parts, safety, or missing instructions. Manuals+ will review the question and use this page’s manual context to help answer it.