Introduction
This manual provides instructions for the installation, operation, and maintenance of your TCNEWCL HDMI USB 3.0 KVM Switch. This device allows you to control two computers using a single set of peripherals (monitor, keyboard, mouse, etc.).
The KVM switch supports high-resolution video output up to 8K@60Hz or 4K@120Hz, and features USB 3.0 ports for high-speed data transmission. It is compatible with various operating systems including Windows, Linux, Mac OS, and Chrome OS.
Package Contents
Verify that all items listed below are included in your package:
- 1 x TCNEWCL HDMI USB 3.0 KVM Switch
- 2 x HDMI 2.1 Cables
- 2 x USB 3.0 Cables
- 1 x Desktop Controller (Wired Remote)
- 1 x USB Power Cable (Note: External power supply not always required, but can be used for stability)

Image: TCNEWCL KVM Switch with all included accessories, including two HDMI cables, two USB cables, and a desktop controller.
Product Diagram and Features
Familiarize yourself with the ports and indicators on your KVM switch.

Image: Top and rear view of the KVM switch, showing HDMI In, USB In, HDMI Out, USB Out ports, DC 5V power input, and the switch button.
Key Features:
- HDMI 2.1 Support: Supports resolutions up to 8K (7680x4320) @ 60Hz and 4K (3840x2160) @ 120Hz. Backward compatible with 2K and 1080P @ 144Hz.
- HDR and 3D Support: Enhances visual experience with High Dynamic Range and 3D effects.
- Advanced Audio: Supports Dolby Atmos, DTS X, Dolby TrueHD, DTS-HD Master Audio.
- USB 3.0 Ports: Provides high-speed data transmission up to 5Gbps, 10 times faster than USB 2.0. Backward compatible with USB 2.0, 1.1, and 1.0.
- Plug & Play: No drivers required for installation.
- LED Indicators: Green LED for PC1 active, Blue LED for PC2 active.
- Easy Switching: Switch between connected PCs using the button on the device or the wired desktop controller.
Setup Instructions
Follow these steps to connect your KVM switch:
- Connect Monitor: Connect your monitor to the "HDMI OUT" port on the KVM switch using an HDMI cable.
- Connect Peripherals: Connect your keyboard, mouse, and other USB devices (e.g., U disk, printer) to the "USB OUT 1", "USB OUT 2", and "USB OUT 3" ports on the KVM switch.
- Connect PC1:
- Connect an HDMI cable from PC1's HDMI output to the "HDMI IN (PC1-GREEN)" port on the KVM switch.
- Connect a USB 3.0 cable from PC1's USB 3.0 port to the "USB IN (PC1-GREEN)" port on the KVM switch.
- Connect PC2:
- Connect an HDMI cable from PC2's HDMI output to the "HDMI IN (PC2-BLUE)" port on the KVM switch.
- Connect a USB 3.0 cable from PC2's USB 3.0 port to the "USB IN (PC2-BLUE)" port on the KVM switch.
- Connect Desktop Controller (Optional): Plug the wired desktop controller into the dedicated "KEY" port on the KVM switch.
- Power Connection (If needed): If you experience instability or issues with high-power USB devices, connect the provided USB power cable to the "DC 5V" port on the KVM switch and to a 5V USB power source (e.g., a USB wall adapter or a computer's USB port).
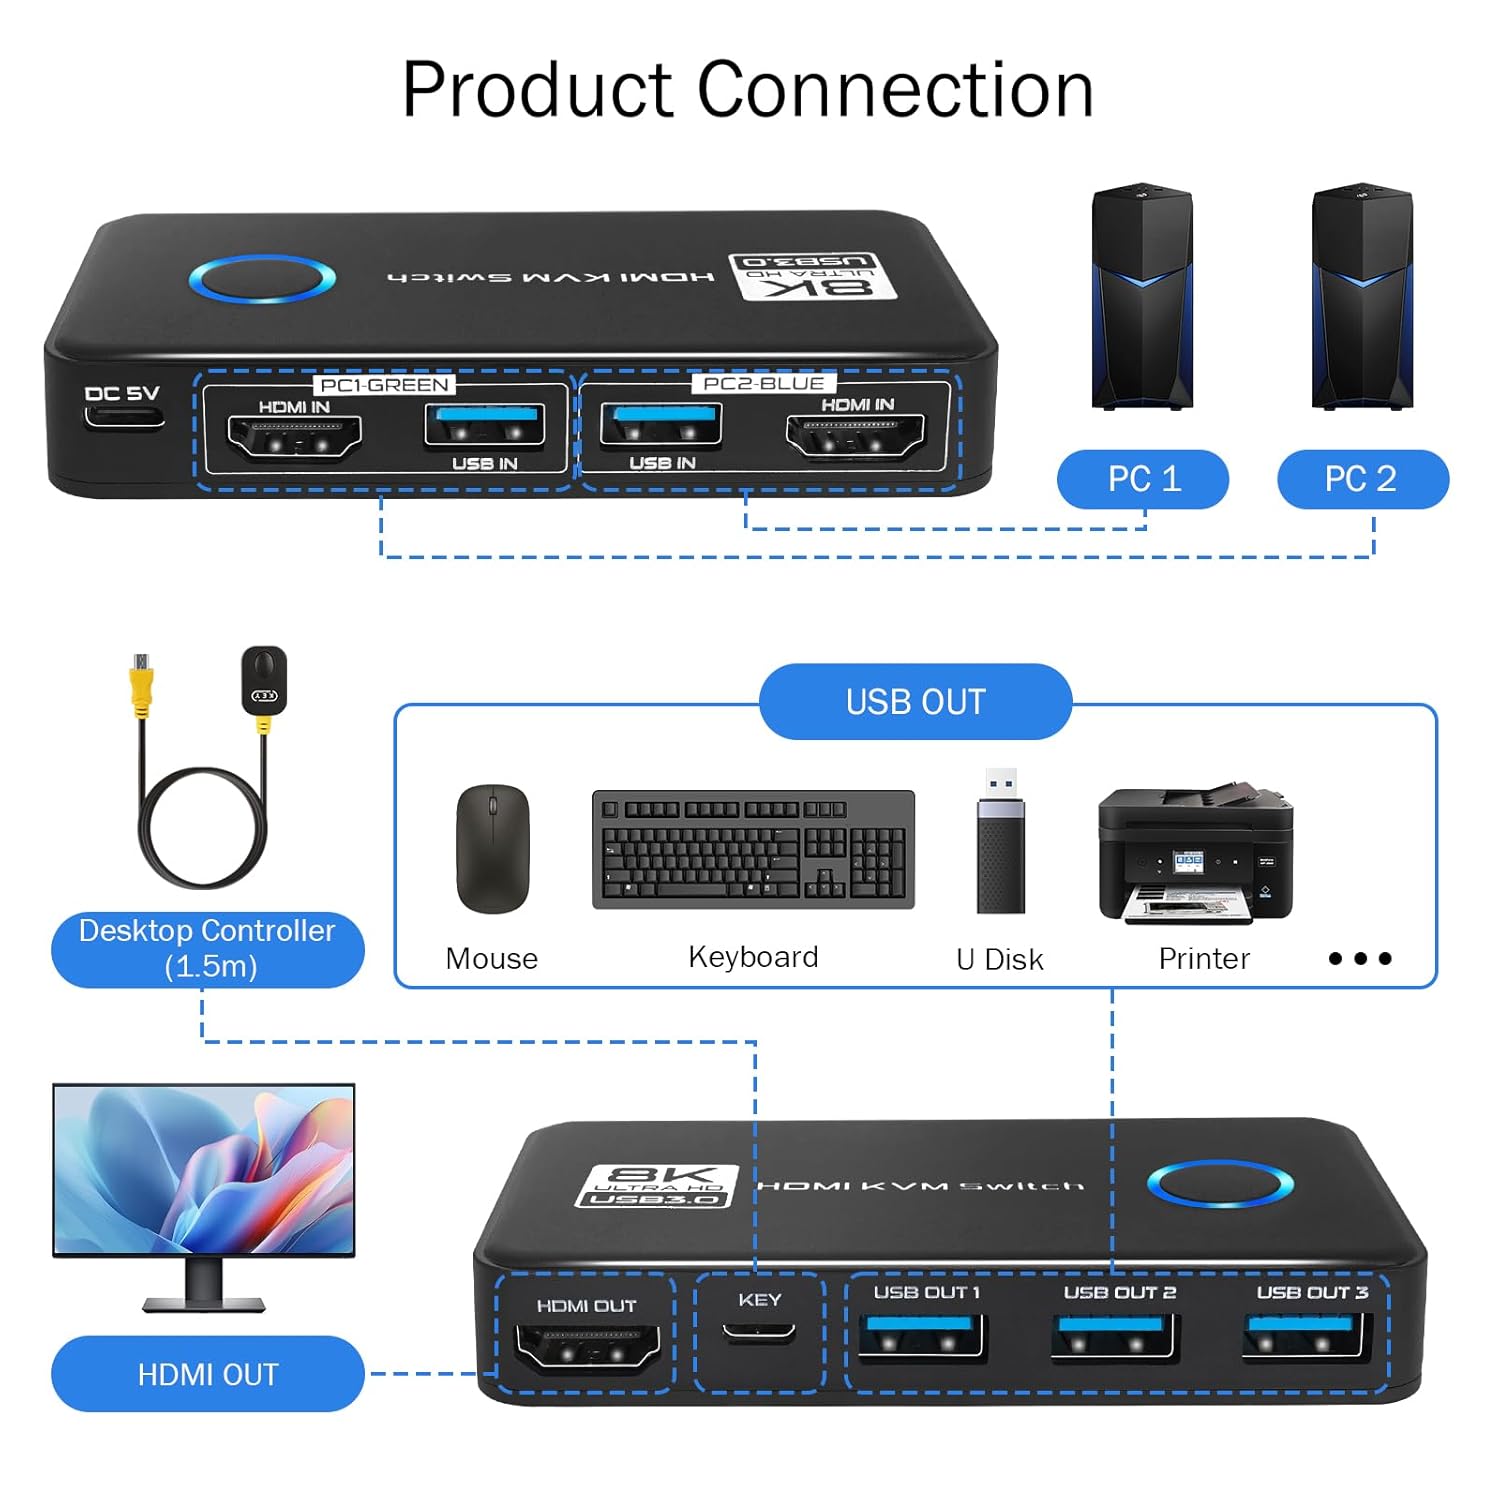
Image: A detailed diagram illustrating the connection process for two PCs, one monitor, and various USB peripherals to the KVM switch.
Important Note for 8K Resolution: For stable operation at 8K resolution, it is recommended to use HDMI 2.1 cables shorter than 3 meters (approximately 9.8 feet).
Operating Instructions
The KVM switch is designed for simple operation.
Switching Between PCs:
You can switch between PC1 and PC2 using one of two methods:
- Device Button: Press the "KEY" button located on the top of the KVM switch.
- Desktop Controller: Press the button on the wired desktop controller.
When PC1 is active, the LED indicator will glow green. When PC2 is active, the LED indicator will glow blue.

Image: Illustration of the KVM switch's LED indicators for active PC (green for PC1, blue for PC2) and the two methods for switching: the button on the unit and the external desktop controller.
Troubleshooting
If you encounter issues, refer to the following common problems and solutions:
| Problem | Possible Cause / Solution |
|---|---|
| No display on monitor after switching. |
|
| Keyboard or mouse not responding. |
|
| Display resolution or refresh rate is lower than expected. |
|
| Switching takes a long time (5+ seconds). |
|
Specifications
| Feature | Detail |
|---|---|
| Model Number | KS609-T |
| Manufacturer | TCNEWCL |
| Product Dimensions (L x W x H) | 5.1 x 1.5 x 10.3 cm (2.0 x 0.6 x 4.1 inches) |
| Weight | 570 grams (1.26 lbs) |
| Color | Black |
| Material | Acrylonitrile Butadiene Styrene (ABS) |
| HDMI Version | HDMI 2.1 |
| Max Resolution | 8K@60Hz, 4K@120Hz |
| Backward Compatibility | 2K, 1080P@144Hz |
| Video Features | HDR, 3D, HDCP2.3 |
| Audio Support | Dolby Atmos, DTS X, Dolby TrueHD, DTS-HD Master Audio |
| USB Ports | USB 3.0 (5Gbps), backward compatible with USB 2.0/1.1/1.0 |
| Operating Voltage | 5 Volts |
| Current Rating | 1 A |
| Certifications | CE, RoHS, WEEE |
| Operating Mode | ON-ON |

Image: Visual representation of the KVM switch's support for HDMI 2.1, enabling resolutions up to 8K@60Hz and 4K@120Hz.
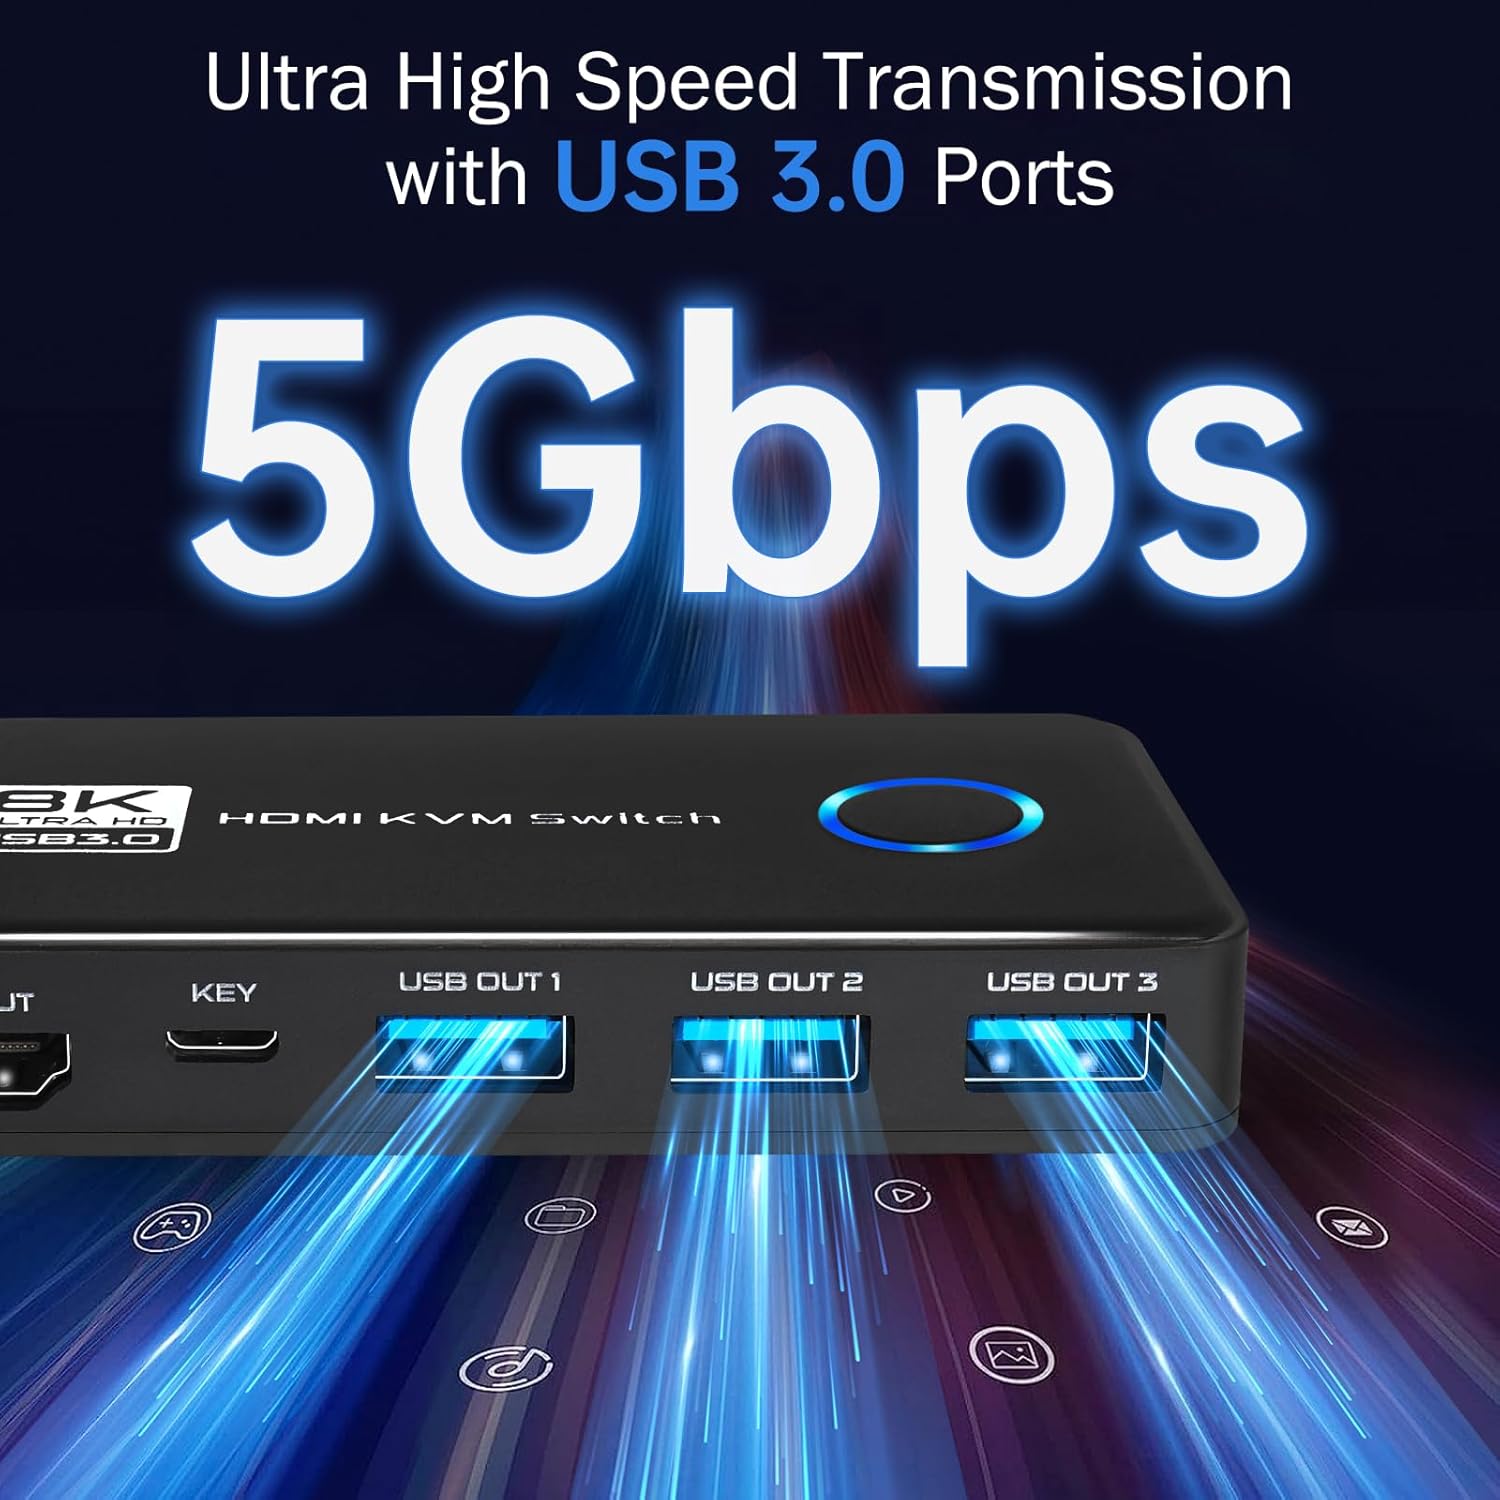
Image: A close-up view highlighting the USB 3.0 ports on the KVM switch, emphasizing their 5Gbps ultra-high-speed data transmission capability.

Image: A visual comparison demonstrating the improved image quality, color, and contrast when HDR (High Dynamic Range) is enabled, supported by the KVM switch.
Maintenance
To ensure the longevity and optimal performance of your KVM switch, follow these maintenance guidelines:
- Cleaning: Use a soft, dry cloth to clean the exterior of the device. Do not use liquid cleaners or aerosols.
- Ventilation: Ensure the device is placed in a well-ventilated area to prevent overheating. Do not block any ventilation openings.
- Cable Management: Keep cables organized and avoid sharp bends or excessive tension, which can damage cables or ports.
- Storage: When not in use for extended periods, store the KVM switch in a cool, dry place away from direct sunlight and extreme temperatures.
- Power: Always use the recommended 5V power supply if external power is required.
Warranty and Support
Information regarding warranty coverage and customer support for the TCNEWCL KVM Switch is typically provided with your purchase documentation or available on the manufacturer's official website. Please refer to those resources for details on:
- Warranty period and terms.
- Contact information for technical support.
- Return and replacement policies.
For further assistance, please contact TCNEWCL customer service.