WENMENGDE WMD-PND-903D
User Manual
WENMENGDE 10.26 inch Portable Car Stereo with 4K DVR & AHD Rear Cam (Model: WMD-PND-903D)
1. Introduction
This manual provides comprehensive instructions for the installation, operation, and maintenance of your WENMENGDE 10.26 inch Portable Car Stereo. This device integrates a high-resolution IPS touch screen with advanced features such as wireless Apple CarPlay and Android Auto, a 4K front DVR dash camera, and an AHD rear camera, enhancing your driving experience with navigation, entertainment, and safety functionalities.

Figure 1.1: Overview of the WENMENGDE Portable Car Stereo system, including the main unit, suction cup mount, rear camera, cigarette lighter power adapter, and USB-C cable.
2. Package Contents
Please verify that all items listed below are included in your package:
- 1x Head Unit (10.26 inch Portable Car Stereo)
- 1x Bracket (Suction Cup Mount)
- 1x Cigarette Lighter Power Adapter
- 1x Camera Adapter
- 1x AUX Transfer Cable
- 1x 4-LED Backup Camera (AHD Rear Cam)
- 1x User Manual

Figure 2.1: Visual representation of the components included in the product package, showing the main unit, cables, cameras, and mounting accessories.
3. Setup
Follow these steps to set up your portable car stereo:
- Mounting the Head Unit: Attach the suction cup mount to a clean, smooth surface on your dashboard or windshield. Ensure the mount is secure and does not obstruct your view or interfere with driving controls. The unit should be positioned to allow the integrated front 4K dash camera a clear view of the road ahead.
- Power Connection: Connect the cigarette lighter power adapter to the head unit's USB Type-C port and plug the adapter into your vehicle's 12V power outlet.
- Rear Camera Installation (Optional):
- Mount the AHD rear camera at the rear of your vehicle, ensuring a clear view.
- Route the camera cable to the head unit and connect it to the designated camera input port. Professional installation may be required for optimal routing and connection of the rear camera.
- Audio Output Connection: Choose one of the following methods for audio output:
- Bluetooth Audio Output: For the most stable and high-quality stereo sound, connect the head unit to your car's original Bluetooth system. This allows audio from CarPlay/Android Auto to play through your car's speakers.
- AUX Connection: Use the provided AUX transfer cable to connect the head unit's AUX output to your car's AUX input.
- FM Transmitter: Tune the head unit's FM transmitter to an unused FM frequency, then tune your car's radio to the same frequency. Refer to Section 4.3 for detailed FM transmission setup.
- Built-in Speaker: The unit has a built-in speaker for basic audio output.
- SD Card Insertion: Insert a compatible Micro SD card into the designated slot on the head unit for DVR recording storage. Ensure the card is inserted correctly and fully seated.

Figure 3.1: Detailed view of the interface ports on the head unit, including SD card slot, camera input, AUX output, and Type-C power input.
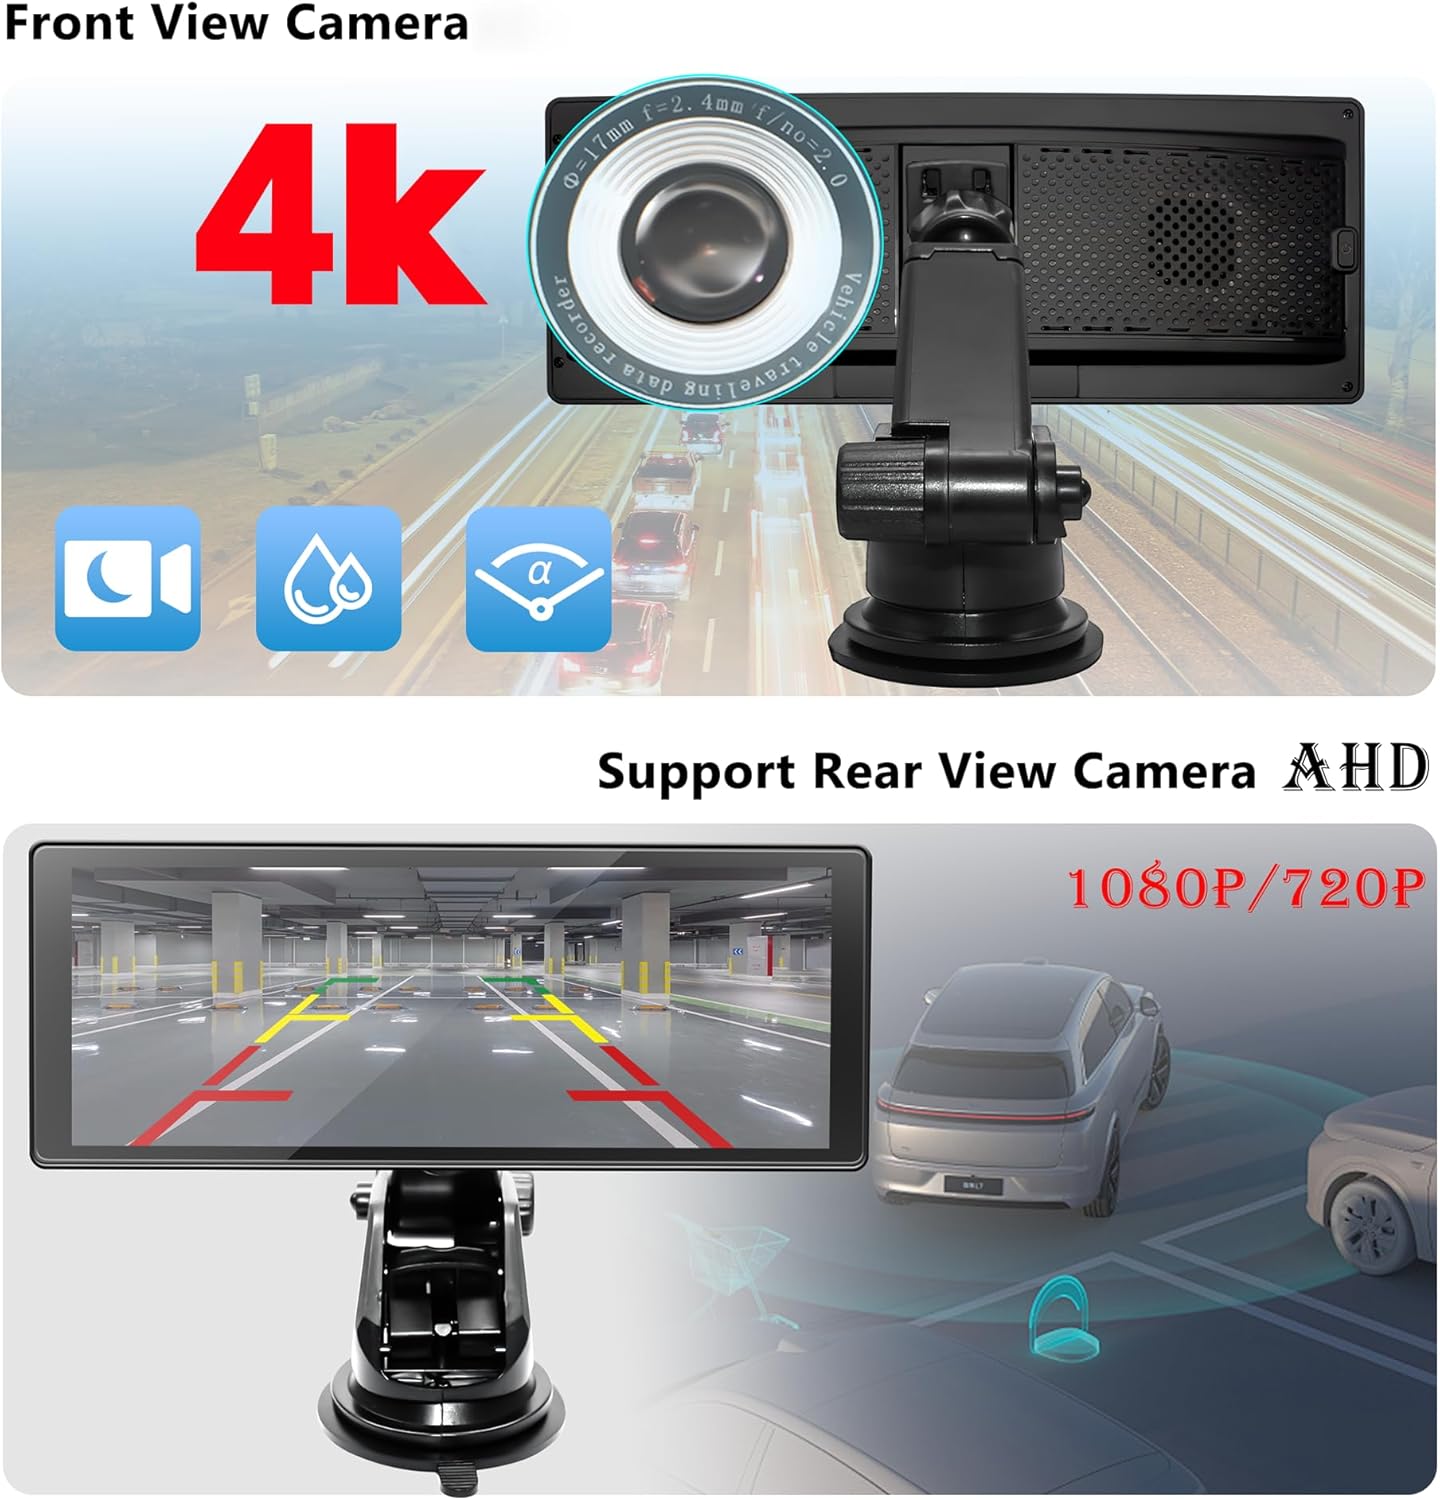
Figure 3.2: Illustration of the integrated 4K front dash camera and the supported AHD rear view camera, highlighting their respective views.
4. Operating Instructions
This section details the primary functions and operations of your device.
4.1 Wireless Apple CarPlay & Android Auto
The device supports wireless connection to Apple CarPlay and Android Auto. Once powered on, the unit will attempt to automatically connect to the last paired smartphone.
- Initial Connection: On your smartphone, enable Bluetooth and search for the device's Bluetooth name. Pair your phone with the car stereo.
- Accessing Features: Once connected, you can access map navigation, phone contacts, music, and other compatible applications directly from the 10.26-inch IPS touch screen.
- Hands-Free Calling: Utilize the built-in Bluetooth for hands-free calling, enhancing safety while driving.

Figure 4.1: Display showing the Apple CarPlay and Android Auto interfaces, demonstrating wireless connectivity and available applications.
4.2 DVR Dash Camera Recording
The unit features a 4K front dash camera and supports a 720P AHD rear camera for dual-screen loop recording.
- Automatic Recording: Recording begins automatically when the device is powered on.
- Loop Recording: Older footage is overwritten by new recordings when the SD card is full.
- Emergency Lock: In case of sudden impact or collision, the G-sensor will automatically lock the current video segment to prevent it from being overwritten.
- Video Playback: You can watch video replays directly on the device screen or download the dedicated app to view footage on your smartphone via Wi-Fi.
4.3 FM Transmission
To transmit audio to your car's original radio via FM:
- Access the FM Transmission settings on the head unit.
- Select an unused FM frequency (e.g., 108.0 MHz).
- Tune your car's FM radio to the exact same frequency.
- Audio from the portable car stereo will now play through your car's speakers.
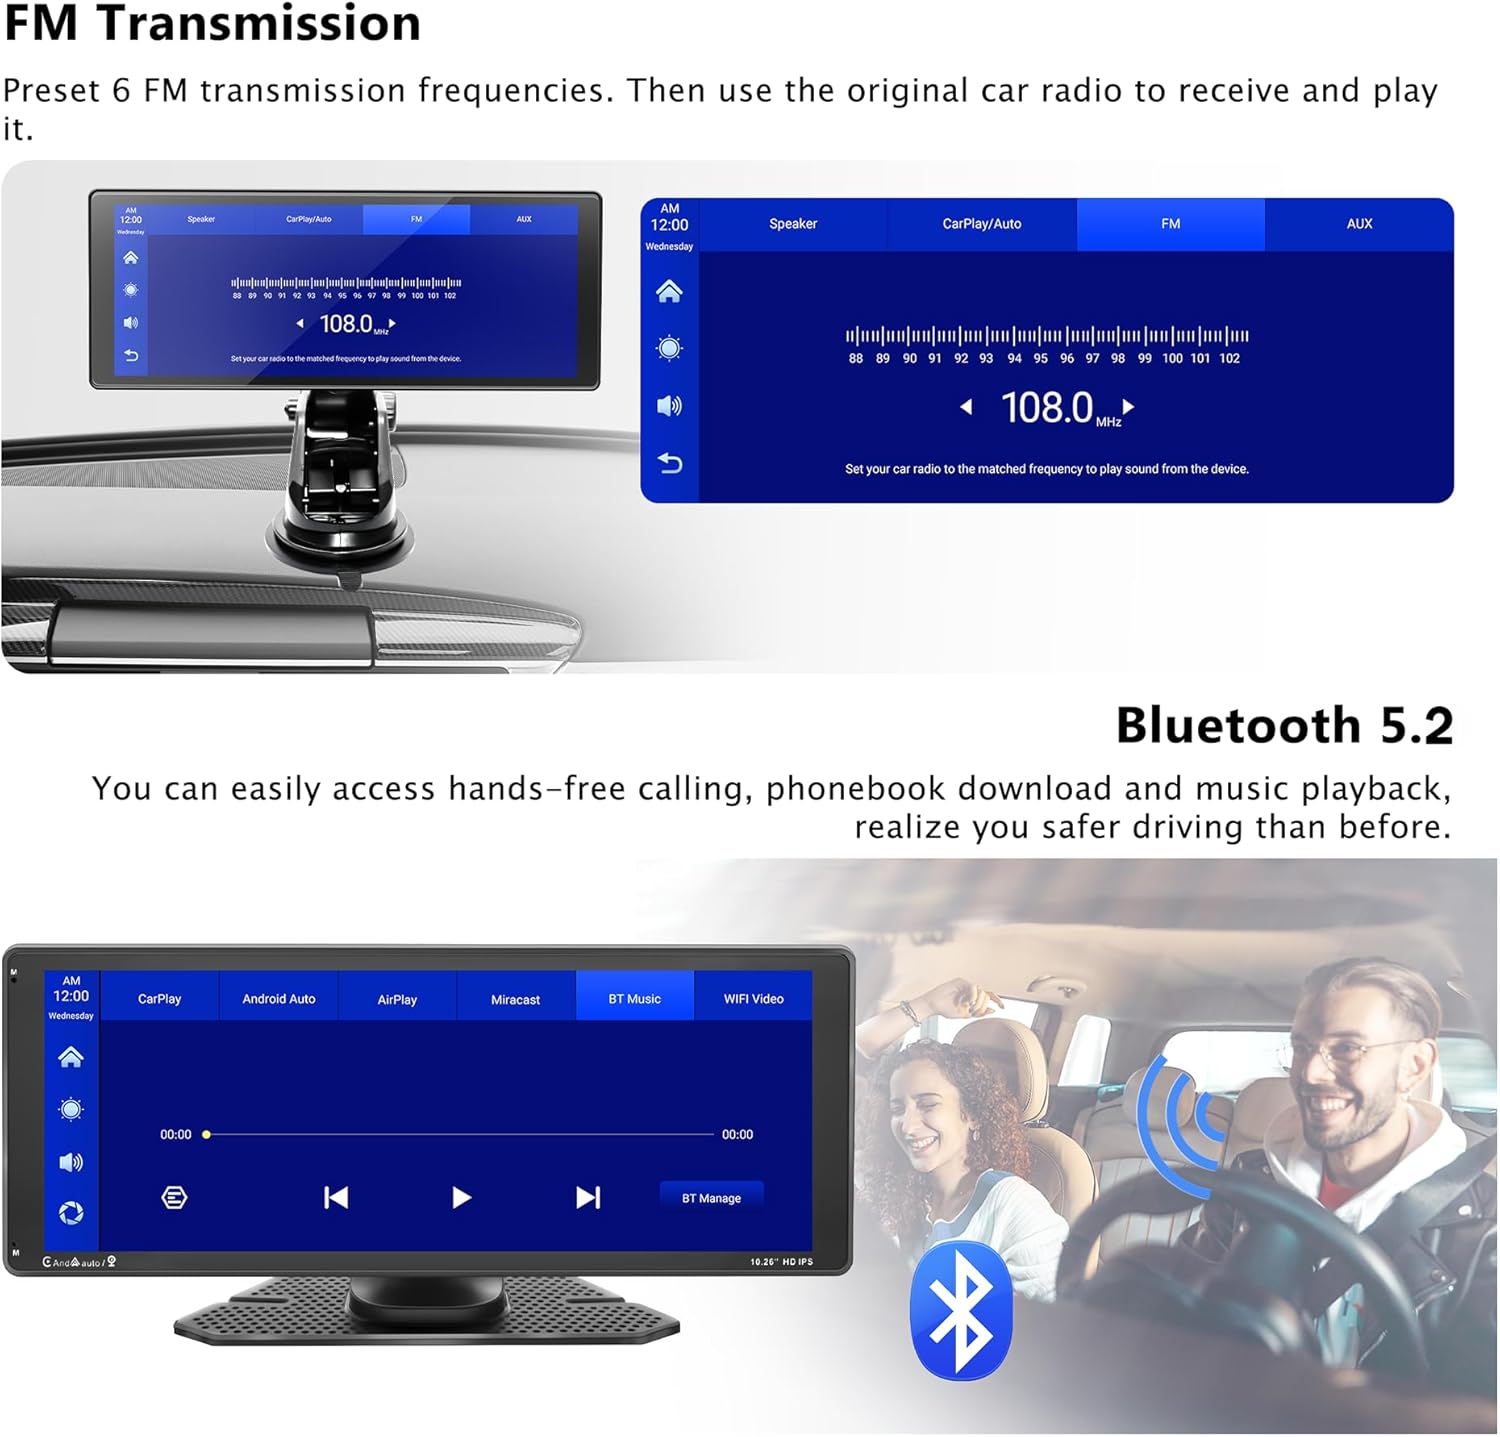
Figure 4.2: Screenshot of the FM Transmission interface, showing frequency selection and Bluetooth 5.2 connectivity options.
4.4 Wi-Fi Video & Screen Mirroring (Miracast)
Download the companion app to connect your phone to the device via Wi-Fi. This allows you to view camera images and recordings directly on your phone. The device also supports Miracast for wireless phone screen mirroring.

Figure 4.3: Display showing the Wi-Fi video connection help screen with a QR code for app download, and an illustration of screen mirroring.
4.5 Touch Screen Operation
The 10.26-inch IPS full-touch screen offers high sensitivity and clear display. Navigate the interface by tapping, swiping, and pinching as you would on a smartphone.

Figure 4.4: Visual representation of the 2.5D capacitive touch screen, highlighting its resolution and size, and demonstrating touch gestures.
5. Maintenance
Proper maintenance ensures the longevity and optimal performance of your device.
- Cleaning the Screen: Use a soft, lint-free cloth to gently wipe the screen. For stubborn smudges, slightly dampen the cloth with water or a screen-safe cleaner. Avoid abrasive materials or harsh chemicals.
- Cleaning the Cameras: Keep the front and rear camera lenses clean from dust and dirt to ensure clear recordings. Use a soft cloth or lens cleaning pen.
- Cable Management: Ensure all cables are neatly routed and secured to prevent damage or interference with driving.
- Temperature: Avoid exposing the device to extreme temperatures (very hot or very cold) for extended periods, as this can affect performance and lifespan.
- Storage: If storing the device for a long period, disconnect it from power and store it in a cool, dry place.
6. Troubleshooting
If you encounter issues with your device, refer to the following common problems and solutions:
| Problem | Possible Cause | Solution |
|---|---|---|
| Device does not power on. | No power, loose connection, faulty power adapter. | Check if the cigarette lighter adapter is fully inserted and receiving power. Ensure the USB-C cable is securely connected to the head unit. Test the power outlet with another device. |
| Cannot connect to Apple CarPlay/Android Auto wirelessly. | Bluetooth not enabled, incorrect pairing, software glitch. | Ensure Bluetooth is enabled on both the device and your smartphone. Forget the device on your phone's Bluetooth settings and re-pair. Restart both the car stereo and your phone. |
| Dash cam not recording or footage is missing. | SD card full, faulty SD card, incorrect SD card insertion. | Check if the SD card is properly inserted. Format the SD card (this will erase all data). Try a different, compatible SD card. Ensure loop recording is enabled in settings. |
| Poor audio quality via FM Transmission. | Interference, incorrect frequency. | Try a different FM frequency that is clear and unused in your area. Ensure your car's radio is tuned precisely to the same frequency as the device. |
| Touch screen is unresponsive or inaccurate. | Temporary software issue, screen protector interference. | Restart the device. Ensure the screen is clean and free of debris. If a screen protector is installed, ensure it is applied correctly and not causing issues. |
| Mount is unstable or wobbly. | Improper suction, surface not clean, mount mechanism loose. | Clean the mounting surface thoroughly before attaching the suction cup. Ensure the suction cup lever is fully engaged. Tighten any adjustable knobs on the mount. |
7. Specifications
| Feature | Detail |
|---|---|
| Brand | WENMENGDE |
| Model Number | WMD-PND-903D |
| Screen Size | 10.26 inches |
| Display Type | IPS Full-Touch Screen |
| Front Camera Resolution | 4K DVR |
| Rear Camera Resolution | 720P AHD |
| Connectivity Technology | Bluetooth, Auxiliary, USB, Wi-Fi |
| Wireless Features | Apple CarPlay, Android Auto, Miracast |
| Audio Output Modes | Bluetooth, AUX, FM Transmitter, Built-in Speaker |
| Storage | Micro SD Card Slot (for DVR recording) |
| Power Input | USB Type-C (via Cigarette Lighter Adapter) |
| Item Weight | 2.35 pounds |
| Package Dimensions | 10.94 x 5.16 x 4.84 inches |
| Country of Origin | China |

Figure 7.1: Rear view of the main unit, illustrating the integrated front camera and the textured surface.
8. Warranty and Support
WENMENGDE is committed to providing high-quality products and customer satisfaction. If you have any questions, concerns, or require technical assistance with your product, please do not hesitate to contact our professional technical support team.
Our team is dedicated to replying to inquiries within 24 hours to ensure you receive prompt and effective assistance.
Please refer to the contact information provided on the product packaging or the official WENMENGDE website for the most up-to-date support channels.
Ask a question about this manual
Ask about setup, troubleshooting, compatibility, parts, safety, or missing instructions. Manuals+ will review the question and use this page’s manual context to help answer it.