1. Introduction
This manual provides essential information for the safe and efficient operation of your EQBVZZRD 16A 3.5KW Portable Electric Vehicle (EV) Charger with a SAE J1772 Type 1 connector. This portable charging station is designed for convenient charging of compatible electric vehicles, offering adjustable current settings and robust protection features.
Please read this manual thoroughly before using the product and retain it for future reference.
2. Safety Information
To ensure safe operation, observe the following precautions:
- Do not use the charger if it appears damaged or if the cable is frayed.
- Ensure the power outlet is properly grounded and rated for the charger's specifications.
- Keep the charger and its connections dry. The unit has an IP66 rating for water resistance, but direct exposure to heavy rain or submersion should be avoided.
- Do not attempt to open or repair the charger. Contact qualified personnel for service.
- The charger is equipped with multiple protection features including leakage protection, over-voltage/low-voltage protection, over-load protection, lightning protection, and over-heat protection. If any protection is triggered, the charger will stop operation.
- Always disconnect the charger from the power source before cleaning or maintenance.
3. Product Overview
The EQBVZZRD Portable EV Charger consists of a power plug, a control box, and a charging cable with a SAE J1772 Type 1 connector.

Image 1: EQBVZZRD Portable EV Charger (SAE J1772 Type 1)
3.1. Main Components
- Power Plug: Standard Schuko Plug (EU) for connecting to a wall outlet.
- Control Box: Houses the intelligent control system, LED display, and control buttons.
- Charging Cable: 5-meter cable connecting the control box to the vehicle.
- SAE J1772 Type 1 Connector: The vehicle-side plug for charging compatible electric vehicles.

Image 2: Overview of various EV charger connector types. This manual specifically covers the Type 1 (SAE J1772) variant.
3.2. Control Box Features
The control box integrates several functions for safe and adjustable charging:
- Power Indicator Light: Indicates the operational status.
- Current Adjustment Button: Allows selection of charging current (8A/10A/13A/16A).
- Timer Function: Enables setting a delay for charging (0-6 hours).
- Integrated Protections: Leakage, over-voltage, low-voltage, over-load, lightning, and over-heat protection.
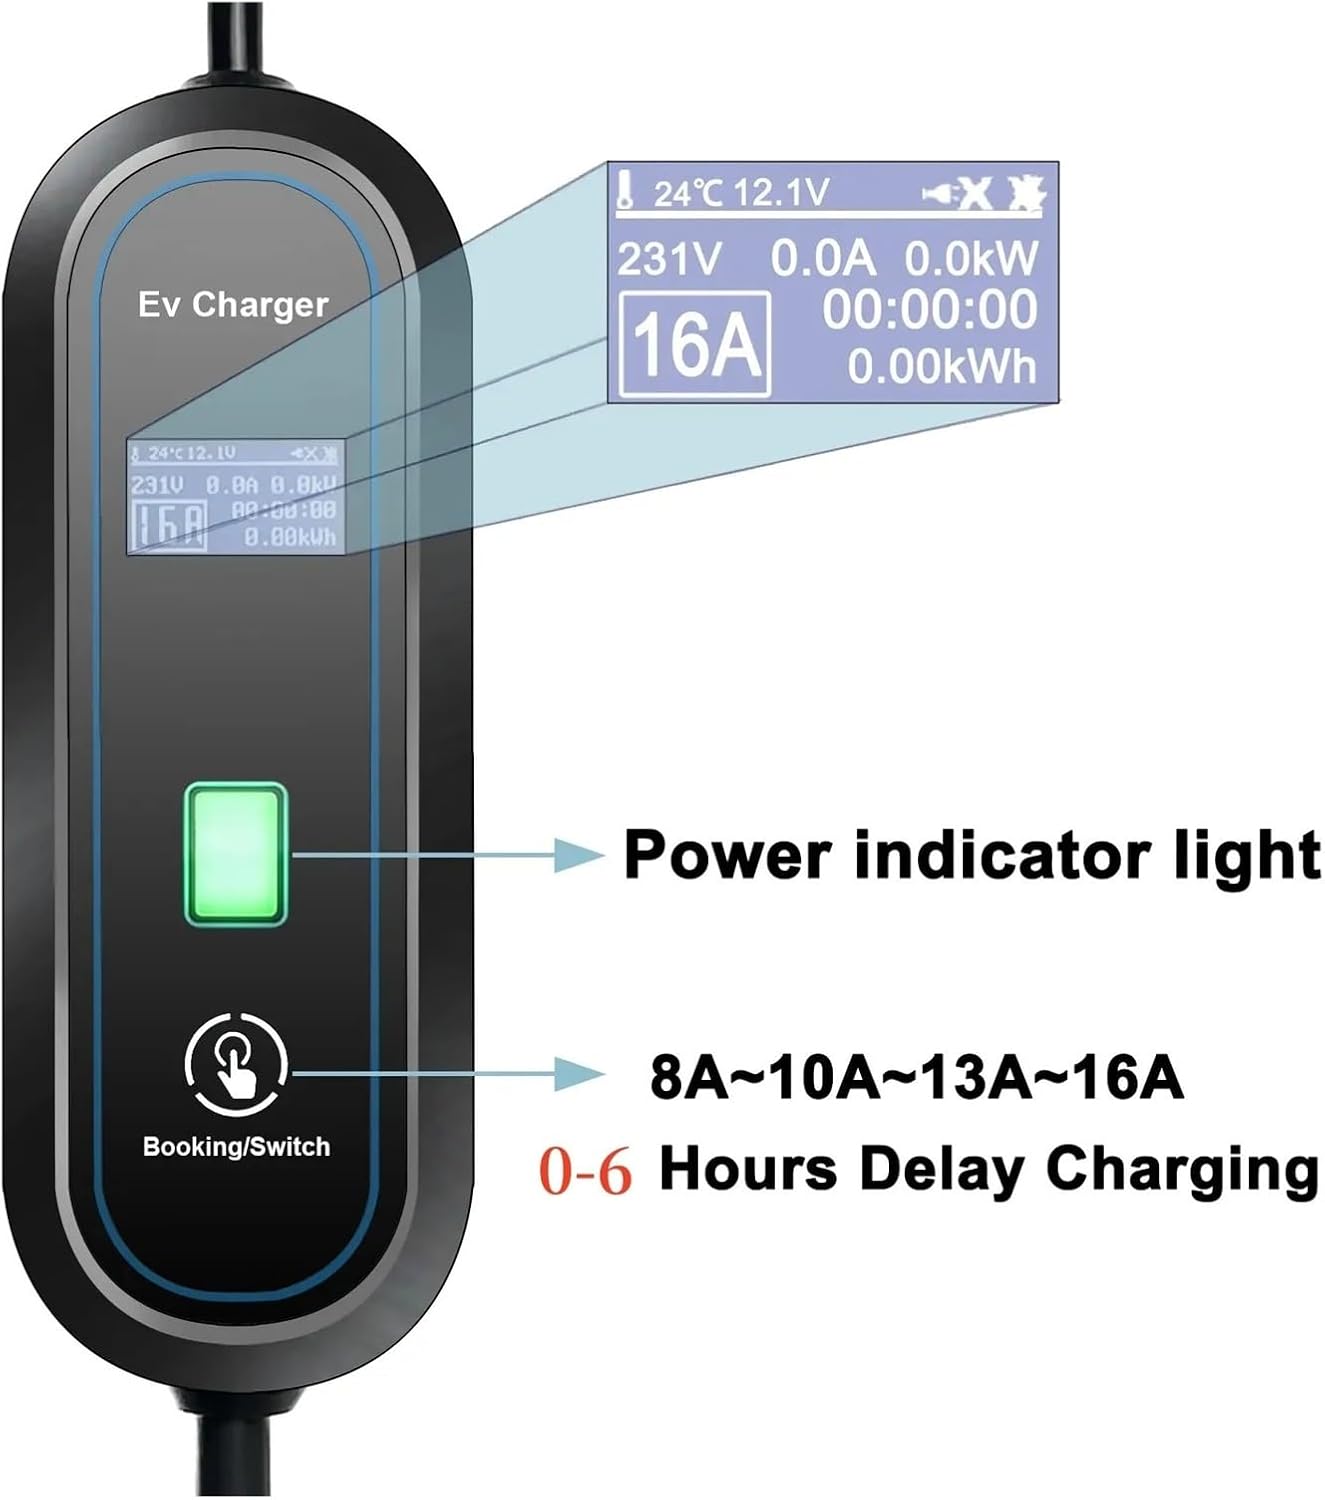
Image 3: Control Box Interface with Power Indicator, Current Adjustment, and Delay Charging Function.
3.3. LED Display Information
The LED display on the control box provides real-time charging status and parameters:
- Charging Temperature: Current operating temperature.
- Charging Status: Indicates if charging is active, paused, or complete.
- Set Current: The selected charging current (e.g., 16A).
- Energy Charged (KW/h): Total energy delivered during the current session.
- Charged Time: Duration of the current charging session.
- Charging Voltage: Real-time voltage.
- Charging Current: Real-time current.
- Charging Power: Real-time power output.

Image 4: Detailed LED Display showing various charging parameters.
4. Setup
Follow these steps to set up your portable EV charger:
- Inspect the Charger: Before each use, visually inspect the charger, cable, and connectors for any signs of damage, wear, or foreign objects. Do not use if damaged.
- Connect to Power Outlet: Insert the Schuko power plug firmly into a compatible, properly grounded 220V AC wall outlet. The control box display should illuminate.
- Connect to Electric Vehicle: Open the charging port cover on your electric vehicle. Insert the SAE J1772 Type 1 charging connector into the vehicle's charging inlet until it clicks into place.
- Verify Connection: Ensure both connections are secure. The control box display will show the current status, indicating it's ready for charging.
5. Operating Instructions
5.1. Starting a Charge
Once the charger is connected to both the power outlet and the vehicle, charging typically begins automatically or after a brief self-check. The LED display will show real-time charging data.
5.2. Adjusting Charging Current
You can adjust the charging current to suit your needs or the capacity of your electrical circuit. The available settings are 8A, 10A, 13A, and 16A.
- While the charger is connected and active, press the 'Booking/Switch' button on the control box.
- Each press will cycle through the available current settings (8A → 10A → 13A → 16A → 8A...).
- The selected current will be displayed on the LED screen. The charger will automatically adjust to the new setting.
5.3. Setting Delay Charging (Timer Function)
The charger features a timer function for delayed charging, allowing you to schedule charging up to 6 hours in advance.
- With the charger connected to the power outlet and vehicle, press and hold the 'Booking/Switch' button for approximately 3 seconds.
- The display will show a timer icon and allow you to set the delay in hours (0-6 hours).
- Press the 'Booking/Switch' button repeatedly to increase the delay time.
- Once the desired delay is set, release the button. The charger will begin charging after the set delay period has elapsed.
5.4. Stopping a Charge
To stop charging:
- Disconnect the SAE J1772 Type 1 connector from your vehicle's charging port.
- Then, disconnect the power plug from the wall outlet.
6. Maintenance
Proper maintenance ensures the longevity and safe operation of your charger.
- Cleaning: Disconnect the charger from all power sources. Use a soft, dry cloth to wipe the control box and cables. Do not use abrasive cleaners or solvents.
- Storage: When not in use, store the charger in a dry, cool place, away from direct sunlight and extreme temperatures. Coil the cable neatly to prevent kinks or damage.
- Inspection: Regularly inspect the cable, plugs, and control box for any signs of physical damage, corrosion, or discoloration.
7. Troubleshooting
If you encounter issues with your charger, refer to the following common troubleshooting steps:
- Charger Not Starting:
- Ensure both the power plug and the vehicle connector are securely inserted.
- Check the wall outlet for power by testing with another appliance.
- Verify that the vehicle's charging port is active and ready to receive a charge.
- Error Message on Display:
- The charger's protection features (over-voltage, over-current, over-heat, etc.) may have been triggered. Disconnect the charger, wait a few minutes, and reconnect.
- If the error persists, consult the manufacturer for support.
- Charging Interrupted:
- This could be due to a power fluctuation, vehicle-side issue, or a safety protection activation. Check connections and restart the charging process.
For persistent issues or technical support, please contact EQBVZZRD customer service.
8. Specifications
The following table details the technical specifications for the EQBVZZRD 16A 3.5KW Portable EV Charger (SAE J1772 Type 1):
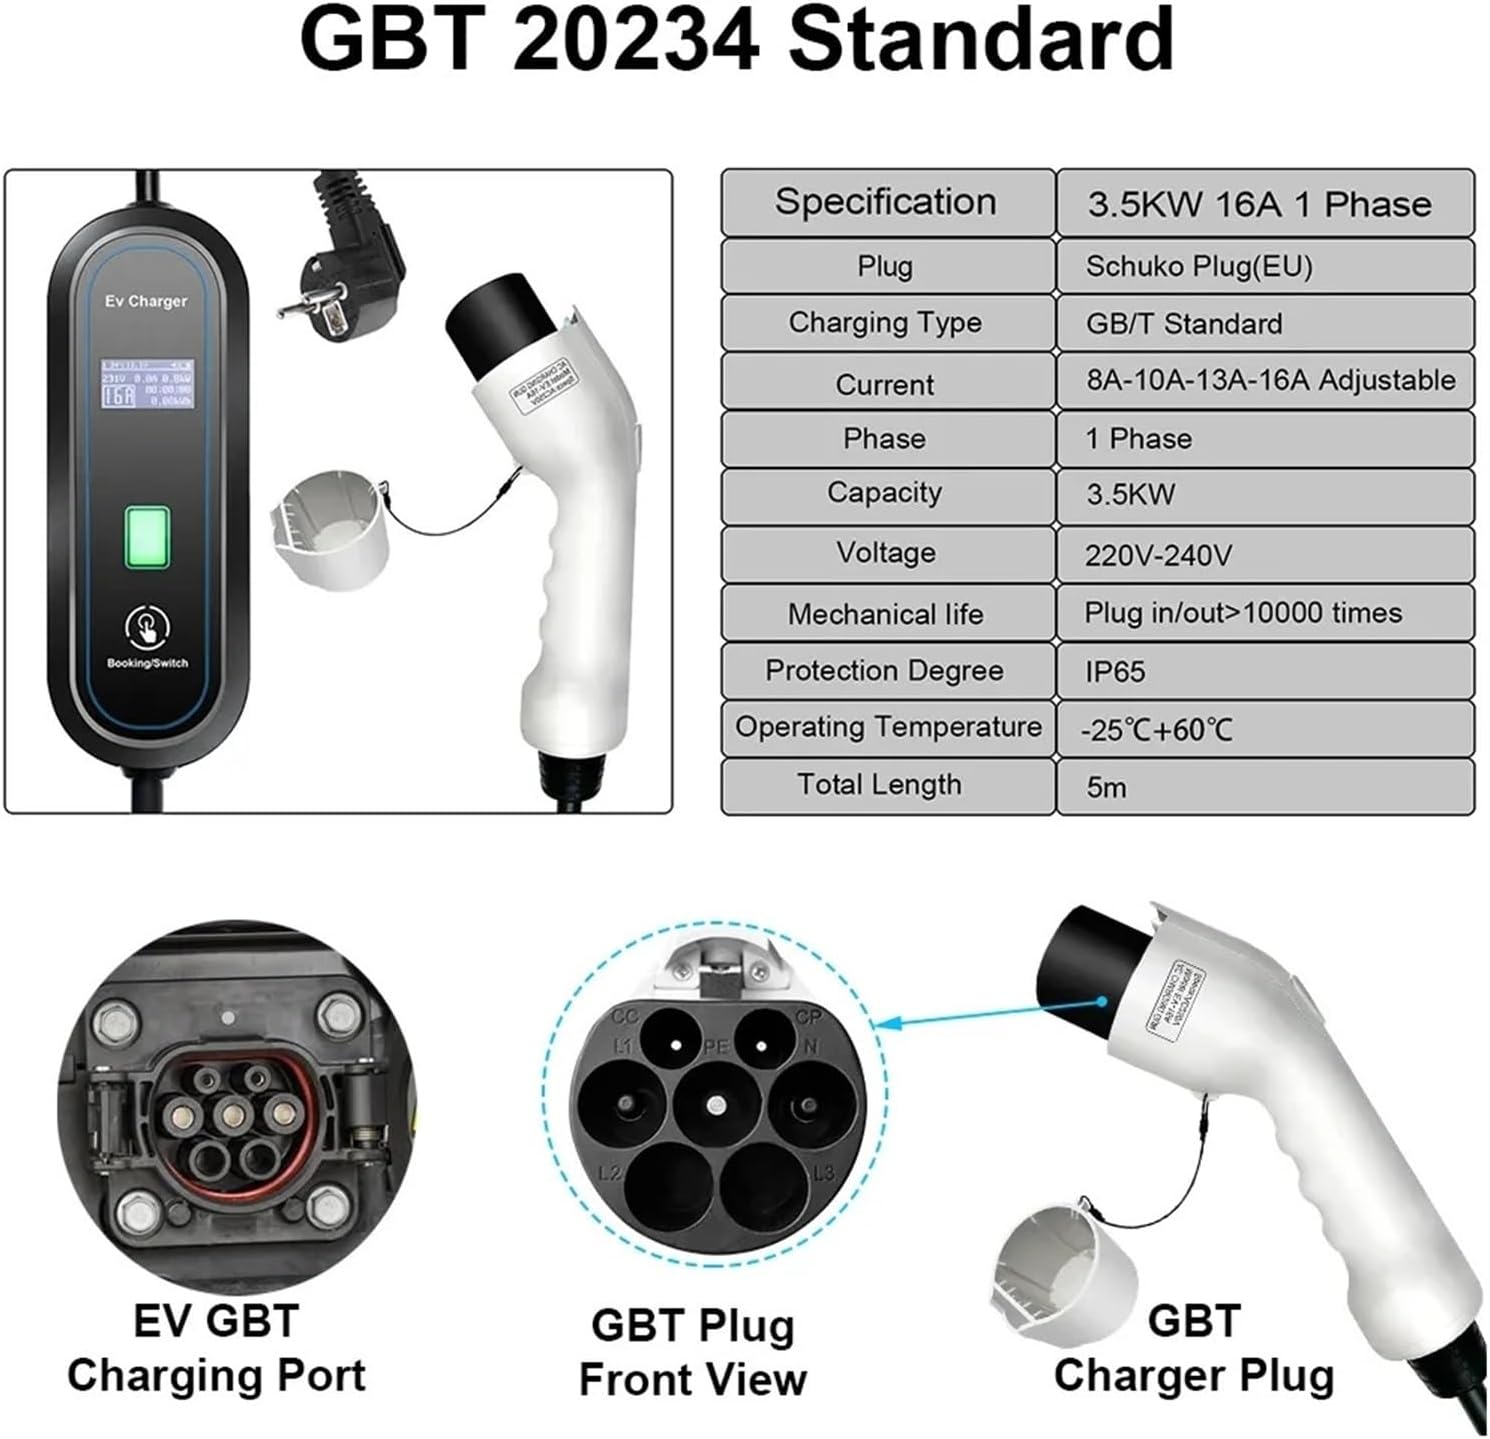
Image 5: SAE J1772 Type 1 Connector and Specifications.
| Feature | Specification |
|---|---|
| Model | EQBVZZRD (16A 3.5kw Type1) |
| Phases | Single phase |
| Output Power | 3.5kW |
| Input Power | 220±20%V AC |
| Charging Current | 8A/10A/13A/16A (Adjustable) |
| Power Pins | 3 pcs (L1, N, PE) |
| Signal Pins | 2 pcs (CP, PD) |
| Signal Current | 2A |
| Signal Voltage | 30V AC |
| IP Rating | IP66 |
| Operating Temperature | -25°C to +55°C |
| Cable Length | 5 meters |
| Item Weight | 4.85 pounds (approx. 2.2 kg) |
| Mechanical Life | Plug in/out > 10000 times |
9. Warranty and Support
For warranty information, technical assistance, or customer support, please contact EQBVZZRD directly through their official channels or the retailer from whom the product was purchased. Please have your product model number (EQBVZZRD) and purchase details available when contacting support.