Pabulum SU3
Pabulum 4000A Car Jump Starter with Air Compressor User Manual
Model: SU3
Introduction
Thank you for choosing the Pabulum 4000A Car Jump Starter with Air Compressor. This versatile device is designed to provide reliable jump-starting for 12V vehicles, efficient tire inflation up to 150 PSI, and portable power for electronic devices. Please read this manual thoroughly before use to ensure safe and optimal operation.
Important Safety Information
Always observe the following safety precautions to prevent injury or damage to the device and vehicle:
- Read all instructions before using the product.
- Do not operate the unit if it is damaged.
- Keep out of reach of children.
- Ensure proper polarity connection when jump-starting (Red to positive, Black to negative).
- Do not touch metal parts of the air pump immediately after inflation; allow to cool.
- Avoid short-circuiting the jumper clamps.
- Do not expose the unit to rain or extreme temperatures outside its operating range (-4°F to 158°F).
- Use only the provided smart jumper cables.

Image: The device features 10 advanced safety protections including over-charge, over-load, over-current, high-temp, low-temp, over-voltage, short-circuit, spark-proof, reverse-polarity, and reverse-charge.
Package Contents
Verify that all items are present in your package:
- Pabulum 4000A Car Jump Starter x1
- Smart Jumper Cables x1
- Carry Case x1
- Pump Tube x1
- Air Nozzles x4 (various types)
- User Manual x1

Image: All components included in the package, neatly arranged.
Product Overview
The Pabulum SU3 is a multi-functional device combining a powerful jump starter, an air compressor, and a portable power bank. It features a digital display for pressure monitoring and battery status, along with an integrated LED flashlight.

Image: Detailed view of the device's control panel and digital display.
Setup and Initial Charging
Before first use, fully charge the jump starter. Connect the provided USB-C cable to the device and a suitable USB power adapter (not included). The display will indicate charging status. A full charge is recommended for optimal performance.
Charging Time: Varies depending on the power adapter. Typically, it takes several hours for a full charge.
Operating Instructions
1. Jump Starting a Vehicle
- Ensure sufficient charge: The jump starter should be at least 50% charged.
- Connect Jumper Cables: Insert the smart jumper cable plug into the jump starter's port.
- Attach Clamps to Battery: Connect the RED (+) clamp to the vehicle's positive battery terminal. Connect the BLACK (-) clamp to the vehicle's negative battery terminal.
- Check Indicator: The smart cable's LED indicator should turn GREEN, signifying a correct connection. If it's red or flashing, check connections and battery voltage.
- Start Vehicle: Once the LED is green, start your vehicle's engine.
- Remove Clamps: After the vehicle starts, immediately remove the jumper clamps from the car battery, then disconnect the smart cable from the jump starter.

Image: Step-by-step guide for safely jump-starting a vehicle.
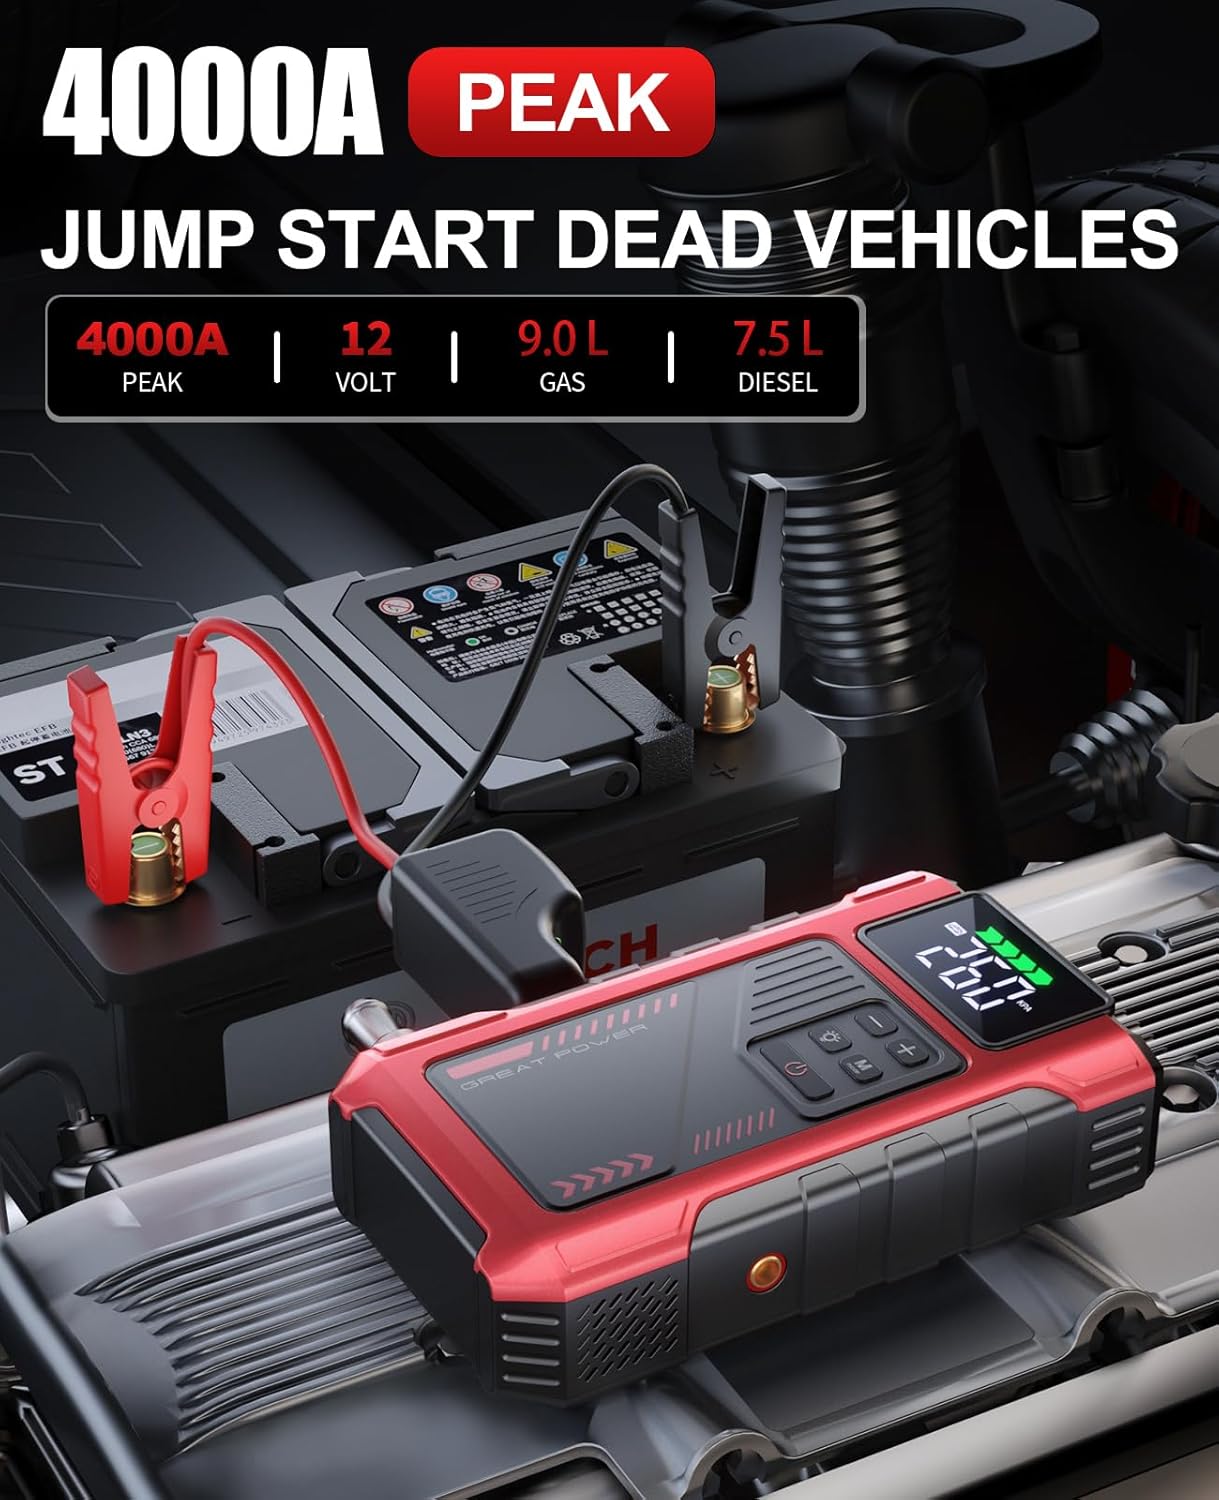
Image: The jump starter connected to a car battery, ready for operation.
2. Using the Air Compressor (Tire Inflator)
- Attach Pump Tube: Screw the pump tube securely into the air outlet port on the jump starter.
- Select Nozzle: Choose the appropriate air nozzle for your item (car tire, bicycle, ball, etc.) and attach it to the pump tube.
- Set Desired Pressure: Turn on the device. Use the '+' and '-' buttons to set the target pressure (PSI, KPA, or BAR). The 'M' button cycles through units.
- Start Inflation: Press the power button to begin inflation. The compressor will automatically stop when the preset pressure is reached.
- Disconnect: Unscrew the pump tube and remove the nozzle. Be cautious as metal parts may be hot after use.

Image: The device actively inflating a car tire, highlighting its multi-purpose inflation capabilities.

Image: The digital display showing various pressure units and battery charge levels.

Image: Recommended pressure ranges for different items.
3. Using as a Portable Power Bank
The device can charge phones, tablets, and other USB-powered electronic devices. Simply connect your device's charging cable to the USB output port on the jump starter.

Image: The device charging a smartphone, demonstrating its power bank functionality.
4. Using the LED Flashlight
Press the flashlight button to cycle through different light modes: constant on, strobe, and SOS. This feature is useful for roadside emergencies or working in low-light conditions.

Image: The jump starter's LED flashlight in use during an emergency.
Maintenance
- Recharge Regularly: To prolong battery life, recharge the unit every 3-6 months, even if not used.
- Storage: Store the device in a cool, dry place, away from direct sunlight and extreme temperatures.
- Cleaning: Wipe the unit with a soft, damp cloth. Do not use harsh chemicals or abrasive cleaners.
- Check Cables: Periodically inspect jumper cables and air hose for any signs of wear or damage.
Troubleshooting
| Problem | Possible Cause | Solution |
|---|---|---|
| Vehicle does not start after jump-starting. | Low charge on jump starter; incorrect connection; severely damaged car battery. | Ensure jump starter is fully charged. Recheck cable connections. If car battery is severely damaged, it may need replacement. |
| Smart cable LED is red or flashing. | Incorrect polarity; short circuit; low voltage. | Verify positive (+) and negative (-) connections. Ensure clamps are not touching each other. Recharge jump starter. |
| Air compressor not inflating. | Hose not securely attached; incorrect pressure setting; unit overheated. | Ensure pump tube is tightly screwed. Check pressure setting. Allow unit to cool down if used continuously. |
| Device not charging. | Faulty USB cable or adapter; charging port issue. | Try a different USB cable and power adapter. Contact customer support if issue persists. |
Specifications
- Model: SU3
- Peak Output Current: 4000 Amps
- Air Compressor Pressure: Up to 150 PSI
- Engine Compatibility: Up to 9.0L Gas / 7.5L Diesel (12V vehicles)
- Battery Type: Lithium Ion
- Product Dimensions: 1.81"D x 4.17"W x 7.24"H
- Item Weight: 1.45 Pounds
- Operating Temperature: -4°F to 158°F
Warranty and Support
Pabulum provides 1-Year Technical Support for this product. For any questions, concerns, or technical assistance, please contact our customer support team. We are committed to providing quality solutions and lifetime customer support.
- Technical Support: 1 Year
- Quality Problem Solutions: 24 Months
- Customer Support: 24 Hours, 7x24
- Return Guarantee: 30-day Unconditional Return

Image: Summary of Pabulum's customer support and warranty offerings.
Ask a question about this manual
Ask about setup, troubleshooting, compatibility, parts, safety, or missing instructions. Manuals+ will review the question and use this page’s manual context to help answer it.